element14 Community
element14 Community
    Register Log In
  • Site
  • Search
  • Log In Register
  • About Us
  • Community Hub
    Community Hub
    • What's New on element14
    • Feedback and Support
    • Benefits of Membership
    • Personal Blogs
    • Members Area
    • Achievement Levels
  • Learn
    Learn
    • Ask an Expert
    • eBooks
    • element14 presents
    • Learning Center
    • Tech Spotlight
    • STEM Academy
    • Webinars, Training and Events
    • Learning Groups
  • Technologies
    Technologies
    • 3D Printing
    • FPGA
    • Industrial Automation
    • Internet of Things
    • Power & Energy
    • Sensors
    • Technology Groups
  • Challenges & Projects
    Challenges & Projects
    • Design Challenges
    • element14 presents Projects
    • Project14
    • Arduino Projects
    • Raspberry Pi Projects
    • Project Groups
  • Products
    Products
    • Arduino
    • Avnet Boards Community
    • Dev Tools
    • Manufacturers
    • Multicomp Pro
    • Product Groups
    • Raspberry Pi
    • RoadTests & Reviews
  • Store
    Store
    • Visit Your Store
    • Choose another store...
      • Europe
      •  Austria (German)
      •  Belgium (Dutch, French)
      •  Bulgaria (Bulgarian)
      •  Czech Republic (Czech)
      •  Denmark (Danish)
      •  Estonia (Estonian)
      •  Finland (Finnish)
      •  France (French)
      •  Germany (German)
      •  Hungary (Hungarian)
      •  Ireland
      •  Israel
      •  Italy (Italian)
      •  Latvia (Latvian)
      •  
      •  Lithuania (Lithuanian)
      •  Netherlands (Dutch)
      •  Norway (Norwegian)
      •  Poland (Polish)
      •  Portugal (Portuguese)
      •  Romania (Romanian)
      •  Russia (Russian)
      •  Slovakia (Slovak)
      •  Slovenia (Slovenian)
      •  Spain (Spanish)
      •  Sweden (Swedish)
      •  Switzerland(German, French)
      •  Turkey (Turkish)
      •  United Kingdom
      • Asia Pacific
      •  Australia
      •  China
      •  Hong Kong
      •  India
      •  Korea (Korean)
      •  Malaysia
      •  New Zealand
      •  Philippines
      •  Singapore
      •  Taiwan
      •  Thailand (Thai)
      • Americas
      •  Brazil (Portuguese)
      •  Canada
      •  Mexico (Spanish)
      •  United States
      Can't find the country/region you're looking for? Visit our export site or find a local distributor.
  • Translate
  • Profile
  • Settings
Wearable Tech
  • Challenges & Projects
  • Project14
  • Wearable Tech
  • More
  • Cancel
Wearable Tech
Blog UV Exposure Badge
  • Blog
  • Forum
  • Documents
  • Events
  • Polls
  • Files
  • Members
  • Mentions
  • Sub-Groups
  • Tags
  • More
  • Cancel
  • New
Join Wearable Tech to participate - click to join for free!
  • Share
  • More
  • Cancel
Group Actions
  • Group RSS
  • More
  • Cancel
Engagement
  • Author Author: Workshopshed
  • Date Created: 14 Jan 2019 12:00 AM Date Created
  • Views 2108 views
  • Likes 20 likes
  • Comments 6 comments
  • pocketbeaglebone
  • wearabletechch
Related
Recommended

UV Exposure Badge

Workshopshed
Workshopshed
14 Jan 2019
image

Wearable Tech

Enter Your Electronics & Design Project for a chance to win a $100 Shopping Cart!

Back to The Project14 homepage image

Project14 Home
Monthly Themes
Monthly Theme Poll


James Young on twitter mentioned that a UV monitor was something he'd find really useful as he has sensitive skin.

image

So my thought was to use the PocketBeagle to log the UV exposure using a https://www.element14.com/community/view-product.jspa?fsku=2373588&nsku=NULL&COM=noscriptML8511 chip. It could indicate a warning or send a message to a phone when the levels are too high for too long.

imageimage

The ML8511 produces an output voltage proportional to the UV level, so I needed to use one of the PocketBeagle's ADC pins to record the level. The PocketBeagle has 6 pins that take 0-1.8v and 2 that can take upto 3v, so I needed to use one of the later pins. The chip also has an "enable" pin which needs to be set high before a reading is taken.
image


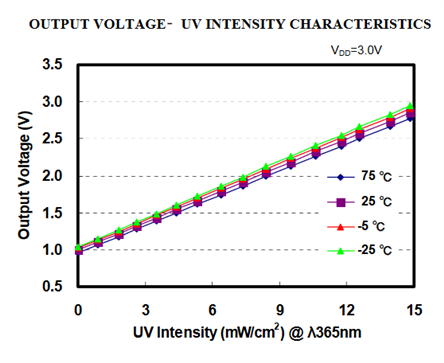
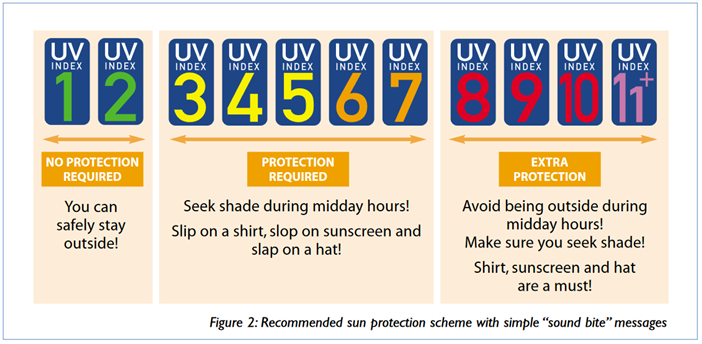
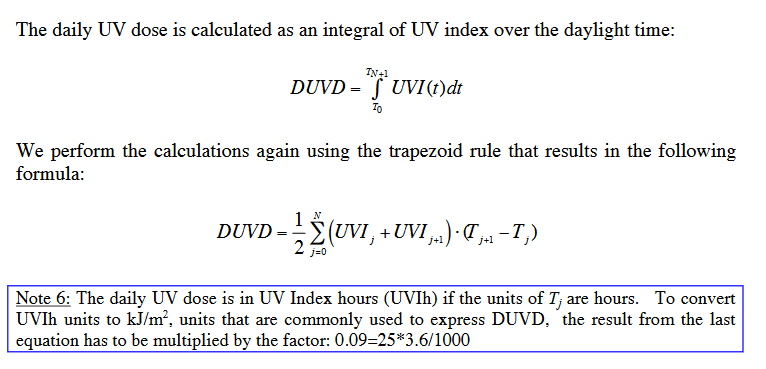
The World Health Organisation have defined a simple index which we can use the determine some colour coded outputs. I was also thinking that the duration of exposure would be significant and the WHO have a second value called the daily UV dose which is calculated as the integral of the UVI over the day.
imageimage

Input

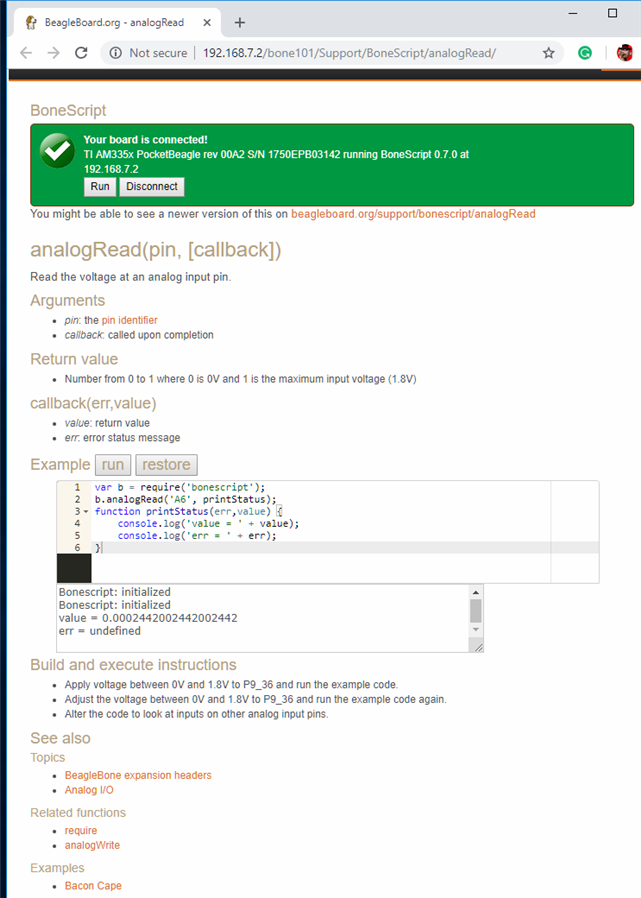
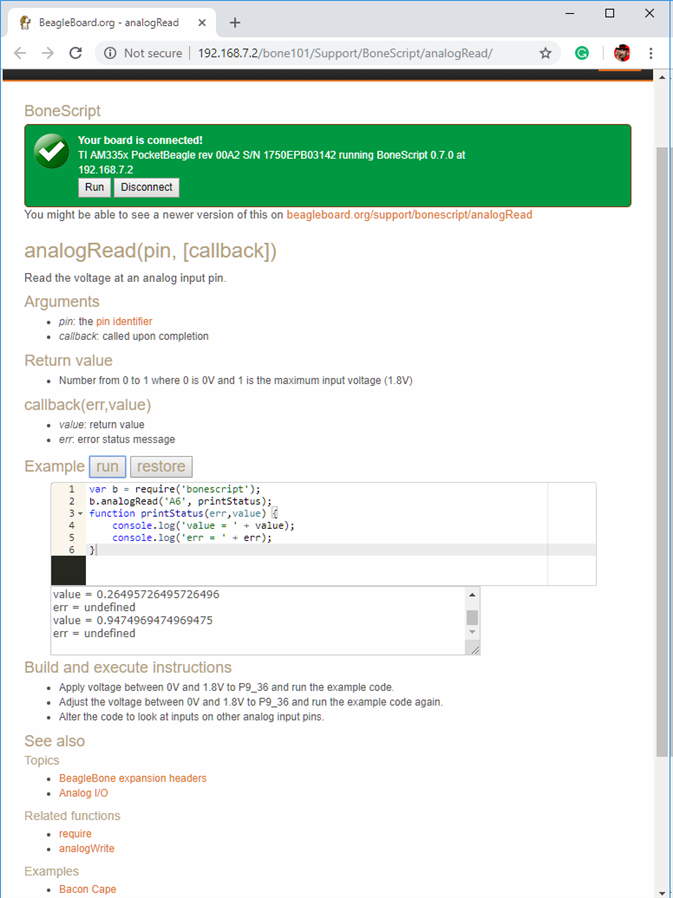
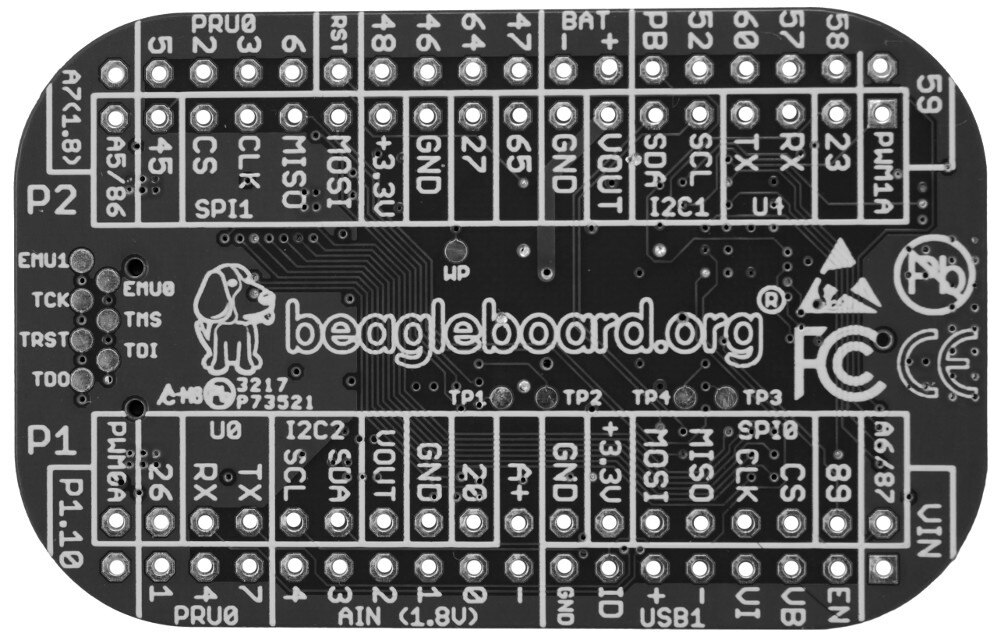
The ADC inputs on the BeagleBones is typically 0 to 1.8v. However the Pocket Beagle Bone has some pins that can cope with 3.3v. One of these is A6. So I attached a potentiometer between 0v and 3.3v and fed it into the A6 pin. So although the documentation does not explicitly mention it, it would appear that the output 0 -> 1 represents voltages 0 -> 3.3v.


{gallery} Analogue In

image

Testing: Wiring up a potentiometer to check the A6 input

image

Test 1: Floating

image

Test 2: 1v

image

Test 3: 3,3v

Output

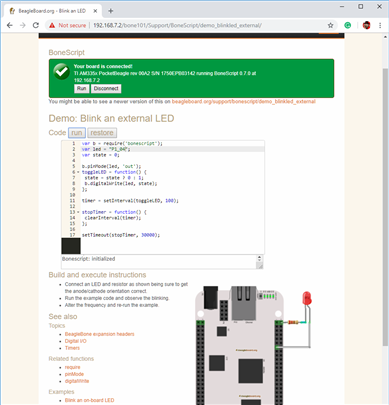
To test the output I wired up an RGB LED as below, and checked it using the blink LED demo to confirm the pin I was using for the enable for the ML8511. This turned out to be P1_04.

imageimage

The System Reference manual for the Pocket Beagle mentions that it supports "4 Pulse Width Modulation outputs accessible with 2 enabled by default"


I checked with the config-pin command to confirm that the pin P2_3 that I wanted to use was enabled for PWM and it appears to be ok.

https://zeekhuge.me/post/a_handfull_of_commands_and_scripts_to_get_started_with_beagleboneblack/


debian@beaglebone:~$ config-pin -l P2_3
default gpio gpio_pu gpio_pd gpio_input pwm


I wired up PWM1A, PWM0A and GPIO23 to the LED and checked that it could dim these using analogWrite

image

var b = require('bonescript');
var f = 0.1;

rampLED = function() {
 f=f + 0.1;
 if (f>1) { f=0.1; }
 b.analogWrite('P2_1', f, 2000.0);
 b.analogWrite('P1_36', f, 2000.0);
 b.analogWrite('P2_3', f, 2000.0); 
};

timer = setInterval(rampLED, 100);

stopTimer = function() {
 clearInterval(timer);
};

setTimeout(stopTimer, 30000);


https://github.com/beagleboard/pocketbeagle/wiki/Peripherals


Simple demo

When I combined my code together I found that the analogRead was quite slow to return so I adjusted my code to only check every 10s to avoid reading the value faster than the API could handle.


To test the levels I used the potentiometer and the following simple code:


var b = require('bonescript');
console.log('Starting UVMonitor');


function writeLED(err,value) {
    var col = [0,0,0];

     if (value < 0.3) { 
         col = [0,1,0];
     }
     else if (value < 0.8) {
         col = [1,1,0];
     }
     else if (value >= 0.8) {
         col = [1,0,0];
     }
     
     b.analogWrite('P2_1', col[0], 2000.0);
     b.analogWrite('P1_36', col[1], 2000.0);
     b.analogWrite('P2_3', col[2], 2000.0); 


     b.digitalWrite('P1_4', b.LOW);
}


function checkSensor() {
     b.pinMode('P1_4', b.OUTPUT);
     b.digitalWrite('P1_4', b.HIGH);
     setTimeout(checkInput, 500)
}


function checkInput() {
 b.analogRead('A6',writeLED );
}


timer = setInterval(checkSensor, 1000);


Using the cloud9 IDE saved the file into the cloud9/autoruns directory so it would start on bootup.


You don't have permission to edit metadata of this video.
Edit media
x
image
Upload Preview
image

  • Sign in to reply

Top Comments

  • DAB
    DAB over 6 years ago +5
    Nice project. As someone who gets second degree sunburn in about 20 minutes, I may have to duplicate your design and code for my own use. DAB
  • Workshopshed
    Workshopshed over 6 years ago +2
    It's interesting watching that back how much delay there in the analogWrite. The red LED goes off and there's a noticable delay before the green goes back on even though it's just the next line of code…
  • Jan Cumps
    Jan Cumps over 6 years ago +2
    Andy, how did you calculate the integral? A math library? Python?
  • DAB
    DAB over 6 years ago

    Nice project.


    As someone who gets second degree sunburn in about 20 minutes, I may have to duplicate your design and code for my own use.


    DAB

    • Cancel
    • Vote Up +5 Vote Down
    • Sign in to reply
    • More
    • Cancel
  • Workshopshed
    Workshopshed over 6 years ago

    Hey Gene, I have been thinking about how to shrink this down and run it from a tiny battery. So the main "feature" to add would be power management. Obviously calibration is important too.

    • Cancel
    • Vote Up +2 Vote Down
    • Sign in to reply
    • More
    • Cancel
  • Workshopshed
    Workshopshed over 6 years ago in reply to Jan Cumps

    I didn't. Due to time constraints I made it a simple level detector.

    It should be possible to use an array to store all the values and sum them up periodically. But I'm wondering if a rolling average would be a close enough approximation?

    • Cancel
    • Vote Up +2 Vote Down
    • Sign in to reply
    • More
    • Cancel
  • genebren
    genebren over 6 years ago

    Nice project!  I like the idea behind monitoring for UV exposure.  It will be interesting to see how you polish this up into a full feature device.


    Gene

    • Cancel
    • Vote Up +1 Vote Down
    • Sign in to reply
    • More
    • Cancel
  • Jan Cumps
    Jan Cumps over 6 years ago

    Andy, how did you calculate the integral? A math library? Python?

    • Cancel
    • Vote Up +2 Vote Down
    • Sign in to reply
    • More
    • Cancel
>
element14 Community

element14 is the first online community specifically for engineers. Connect with your peers and get expert answers to your questions.

  • Members
  • Learn
  • Technologies
  • Challenges & Projects
  • Products
  • Store
  • About Us
  • Feedback & Support
  • FAQs
  • Terms of Use
  • Privacy Policy
  • Legal and Copyright Notices
  • Sitemap
  • Cookies

An Avnet Company © 2025 Premier Farnell Limited. All Rights Reserved.

Premier Farnell Ltd, registered in England and Wales (no 00876412), registered office: Farnell House, Forge Lane, Leeds LS12 2NE.

ICP 备案号 10220084.

Follow element14

  • X
  • Facebook
  • linkedin
  • YouTube