


Abstract
The proposed project has an array of submodules and sub-projects as explained in the first post. Till now I have made a basic RPi Robot and gone into the basics of adding a python GUI to control it. I have also started working with OpenCV on the Raspberry pi and worked with live images. I have also produced a DIY quadcopter and added it to the mix. In this update I talk about some 3D printing and how I printed a LCD bracket.
So you have a 3D printer
Congratulation! If you are reading this, either you already have a 3D printer or intend to get one in the future. In either case, you have taken the first step towards prototyping freedom. Before you fire up the printer, you need to understand what you want to print. A lot of people (including my wife) have taken to experiments with downloading models from the internet and then printing them. And this is the best way to get started because someone has done the handwork of designing the thing for you and all you need to do is press a button and viola!
Ofcourse there are scenarios where you have a specific requirement like a broken knob or part of a simple machine or like in my case, the need for something to hold the LCD in place. And at that point you know what you need so you would think you need to just make exactly what you want in a CAD tool and press print, right? Well chances are it might not work out the way you had hoped because believe it or not when you are making things for 3D printing, there are still a few things to keep in mind for the output to be successful. Let us go through the steps I took to create something I needed.
Step One: Decide what you want
Before I even start the computer, I need to analyse what I need. This means dimensions and a rough drawing and hence usually, I start with a piece of paper and pencil to make a rough sketch of what I need.
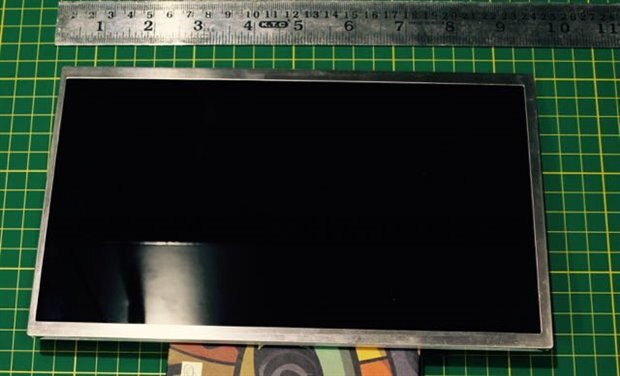
Here my requirement was that I have a 10.1” LCD which needs a sort of ‘stand’ which is a bit flexible. Hence I started on a paper to try and make possible solutions. The image below is my first rough sketch of three designs I though would be useful.
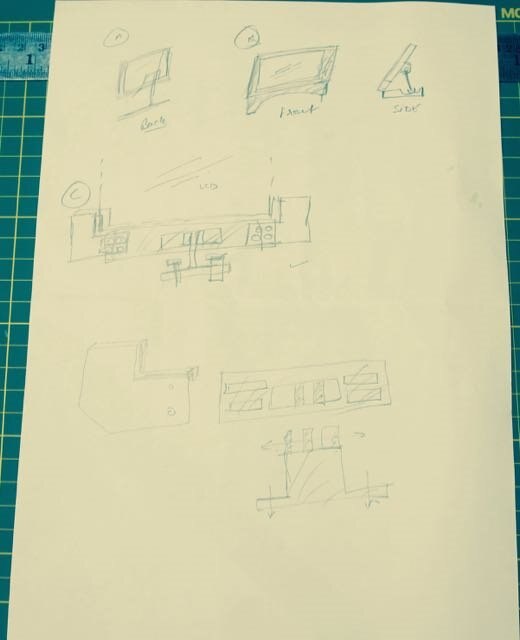
I chose design C because it was a solution which is flexible and can be used for other display sizes as well. Additionally, it uses the least amount of material and hence it was the obvious choice.
Step Two: The dimensions
After I have a drawing in hand, I need to add dimensions to the lines. The dimensions of the LCD are measured and then the drawing is finalised. It takes some time but the drawing is complete. In my case I need dimensions of the slots as well as the thickness. The cel robot has a 20 Micron thickness resolution and a 0.8mm thickness nozzle and a 0.3mm hence I will chose dimensions in multiple of these so that prints are precise.
Step Three: The 3D modelling software tool
In order to make the 3D models, we need a software program that can do the heavy lifting. There are a bunch of options and here is my take on them.
Beginner at 3D modelling?
Google/Timble Sketchup is what you are looking for.
Its an easy to use tool and with google warehouse with LOTS of models of everything to everything. If you use CadSoft Eagle, then you may get the skeckup plugin which allows you to create a 3D model of your PCB for FREE!
BUT... beware that you can create 3D models that MAY NOT get printed in sketchup. Why? Because it allows you to create objects with zero thickness like rectagles and circles which cannot be synthesized by a 3D printer.
Don't Like Sketchup?
Autocad 123D is the next best bet and allows you to create all the boxes you want. I have used this the least but its a good place to start with Autodesk.
Master of Mechanical Design and want precision?
RS Design Spark Mechanical
This is one powerful tool to create enclosure and multi part things. Its free and has a lot of great tutorials on YouTube and it is the choice of people who want precise control on their design.
You can save your files locally and share them online. BUT if you are a newbie, it will take some time to get used to and I recommend watching some videos BEFORE getting started or even downloading this tool. Its pro grade with very few features missing and it highly recommended for 3D print modelling.
Like coding/scripting instead of that mouse?
OpenSCAD is a completely scripted way of 3D modelling and many find it to be more comfortable. The true power of this tool is if you can exploit it's parametric approach and use paramters to dynamically modify and customize models on demand.
Warning. If you do not like writing code... don't get into this one!
Want to make complex Organic Shapes?
Blender is the standard for making 3D shapes like faces and other non-mechanical stuff. There are tutorials on how to convert a photograph into a 3D model and yes its complicated and no its not for a newbie. Blender will make you sweat and it will make you dizzy and it will make you hurt but it will produce the most amazing stuff anyone has seen(for free).
Want a balance of the mecha and orga?
Autodesk Fusion 360 is what you should look at. Its big and powerful and works like Autodesk 123D and DS Mechanical and takes some time to get used to. BUT once you get the hang of it, you will be making stuff like crazy. Want to add a little 3D flower to your Raspberry Pi Case? Sure you can do that! There is a tutorial on how to make a mouse using Fusion 360 and its quite simple. Hinges and joints and all are there and then you can render the models to your heart's content.
BUT its cloud based. Which means there is no 'Save as file' option. You can export it as an archive which is equivalent but you will need an internet connection every now and then just to start the app which can make you hate this app.
Personally, I use Fusion 360 most of the time but say hello to Design Spark Mechanical and sketchup every now and then. I use EagleCad to create 3D models of PCBs and their enclosures which are simple enough.
There are commercial software as well but I am not going into those.
Step Four: Making things
We have the drawing on paper and it should be pretty straightforward when converting into the 3D models. However not everything that can be designed can be printed. There are a couple of things that you need to keep in mind when you design for print, you need to consider the following.
1. A 3D Printer cannot print in air and so you need to design edges that have supports. Most of the time this can be done by the software like mesh maker from autodesk but its always better to have a design that can be printed the way you designed it
2. Don’t design small posts and columns unless your 3D printer can support it. A lot of the time we design thin details like line and posts which cannot be fabricated.
3. Know the limits. Every 3D printer has a print volume which tell you how big your 3D print can be. If your final object is larger, you need to either split it into pieces or design it with joints.
4. Material thickness considerations. Try and design wall thickness in multiples of nozzle size so that its comes out just right.
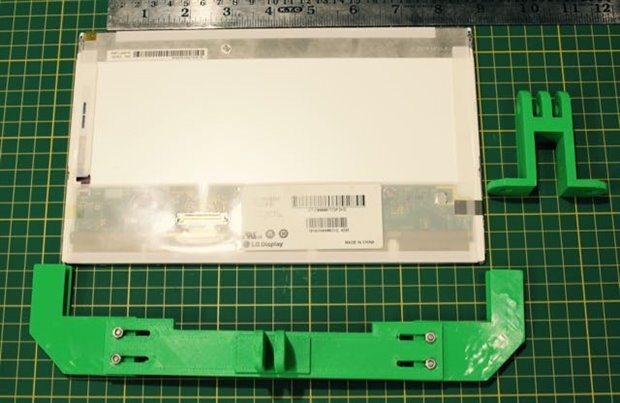
With these considerations, I designed the frame using google ketchup.
Step Five: Press Print
The second last step is to send the files to the 3D printer. The results may vary depending on the 3D printer.
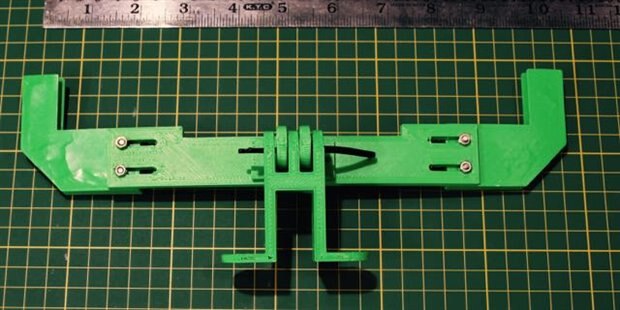
Step six: Putting things together
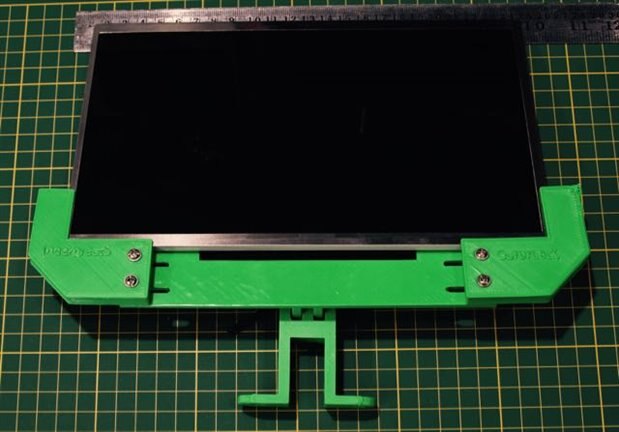
The final step is to see if you did everything right or not. In my case the assembled print is shown in the image below.
Conclusion
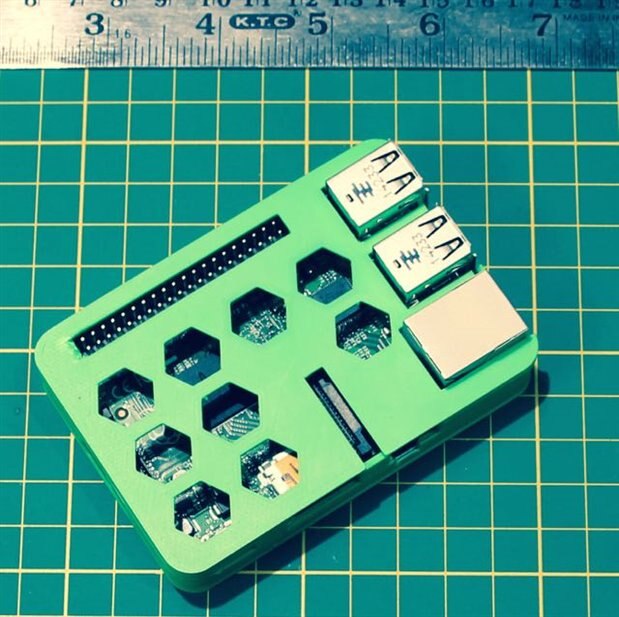
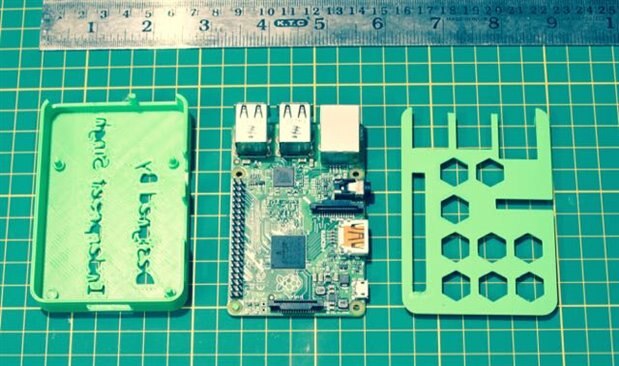
I got things to work and as you can see its a good fit. I hope I have helps you make a better print and if so then gimme a shout out. I also made a Raspberry Pi case and I am attaching the pictures at the end.
See you next time,
Cheers,
IP
Top Comments