element14 Community
element14 Community
    Register Log In
  • Site
  • Search
  • Log In Register
  • About Us
  • Community Hub
    Community Hub
    • What's New on element14
    • Feedback and Support
    • Benefits of Membership
    • Personal Blogs
    • Members Area
    • Achievement Levels
  • Learn
    Learn
    • Ask an Expert
    • eBooks
    • element14 presents
    • Learning Center
    • Tech Spotlight
    • STEM Academy
    • Webinars, Training and Events
    • Learning Groups
  • Technologies
    Technologies
    • 3D Printing
    • FPGA
    • Industrial Automation
    • Internet of Things
    • Power & Energy
    • Sensors
    • Technology Groups
  • Challenges & Projects
    Challenges & Projects
    • Design Challenges
    • element14 presents Projects
    • Project14
    • Arduino Projects
    • Raspberry Pi Projects
    • Project Groups
  • Products
    Products
    • Arduino
    • Avnet Boards Community
    • Dev Tools
    • Manufacturers
    • Multicomp Pro
    • Product Groups
    • Raspberry Pi
    • RoadTests & Reviews
  • Store
    Store
    • Visit Your Store
    • Choose another store...
      • Europe
      •  Austria (German)
      •  Belgium (Dutch, French)
      •  Bulgaria (Bulgarian)
      •  Czech Republic (Czech)
      •  Denmark (Danish)
      •  Estonia (Estonian)
      •  Finland (Finnish)
      •  France (French)
      •  Germany (German)
      •  Hungary (Hungarian)
      •  Ireland
      •  Israel
      •  Italy (Italian)
      •  Latvia (Latvian)
      •  
      •  Lithuania (Lithuanian)
      •  Netherlands (Dutch)
      •  Norway (Norwegian)
      •  Poland (Polish)
      •  Portugal (Portuguese)
      •  Romania (Romanian)
      •  Russia (Russian)
      •  Slovakia (Slovak)
      •  Slovenia (Slovenian)
      •  Spain (Spanish)
      •  Sweden (Swedish)
      •  Switzerland(German, French)
      •  Turkey (Turkish)
      •  United Kingdom
      • Asia Pacific
      •  Australia
      •  China
      •  Hong Kong
      •  India
      •  Korea (Korean)
      •  Malaysia
      •  New Zealand
      •  Philippines
      •  Singapore
      •  Taiwan
      •  Thailand (Thai)
      • Americas
      •  Brazil (Portuguese)
      •  Canada
      •  Mexico (Spanish)
      •  United States
      Can't find the country/region you're looking for? Visit our export site or find a local distributor.
  • Translate
  • Profile
  • Settings
CodeBug
  • Learn
  • Learning Center
  • STEM Academy
  • CodeBug
  • More
  • Cancel
CodeBug
Blog 10 CodeBug Projects in 10 Days: Pushing Buttons
  • Blog
  • Forum
  • Documents
  • Events
  • Polls
  • Files
  • Members
  • Mentions
  • Sub-Groups
  • Tags
  • More
  • Cancel
  • New
Join CodeBug to participate - click to join for free!
  • Share
  • More
  • Cancel
Group Actions
  • Group RSS
  • More
  • Cancel
Engagement
  • Author Author: element14Dave
  • Date Created: 1 Oct 2015 3:28 PM Date Created
  • Views 2863 views
  • Likes 20 likes
  • Comments 9 comments
  • codebug
  • codebug_beginner
Related
Recommended

10 CodeBug Projects in 10 Days: Pushing Buttons

element14Dave
element14Dave
1 Oct 2015
imageIntroducing CodeBug!

image  What is CodeBug

image  10 CodeBug Projects in 10 Days

image  Are You a STEM Educator?


Getting Started:

image

We start the project by visiting the CodeBug website http://www.codebug.co.uk and creating an

account. It only takes a few minutes. While logged in, clock on Create to start a new project. Don't forget to save your work!


The interface for CodeBug contains an area to the right of the screen with is the primary programming interface. There are a series of menus that are used to store the blocks with can be dragged from the menus into the coding area. Good blocks are made to connect together, and that is what we intend to do!


Now that you have familiarized yourself with the interface, let's get started on an beginner project Thomas Macpherson-Pope pulled together from CodeBug.org.uk


What you need:

CodeBug

Micro USB Cable

CR2032 Battery

Crocodile  Clips

Buttons

Computer


The Project


CodeBug’s legs can also detect electrical currents. In this mode they are called Inputs.

image

Before we get into how to use a button with CodeBug, we should first talk a little bit about what a button is.

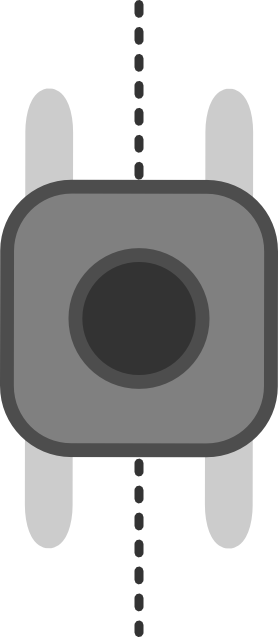
Buttons work by controlling whether two contacts are connected or not. When the button is pushed the two sides are connected and electricity can flow. In the off state (not-pressed) no electricity will flow. The button diagram to the right shows how the two CodeBug's button legs are connected. The two legs on the left are always connected together, and the two legs on the right are always connected together. While you press the button, the left side and the right side are connected.


Now that we have a basic understanding of how a button works, let's get to work on how to use one on the CodeBug!

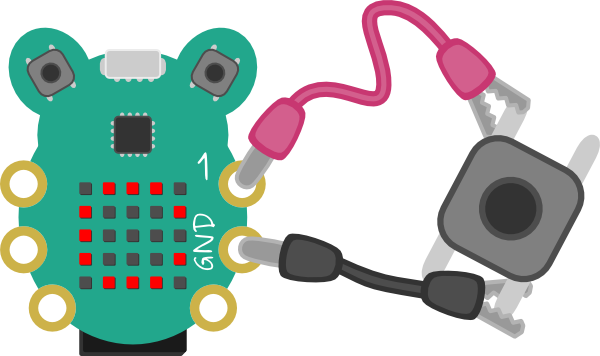
Connect a black croc-clip to the ground leg (GND) on CodeBug and attach the other end of the croc-clip to a leg on the button. Now connect another croc-clip to Leg 1 of CodeBug and the other end to the opposite leg on the button (diagonally across from the Leg you have already connected to).

image

Now that the button is hooked up to the bug, let's set up the program.

To set the Legs of the CodeBug we will need to first configure the Emulator. To do this we will need to open the emulator configuration via the settings cog on the emulator. Tick the Show Leg Controls box. Click on the Configure Emulator button to complete the settings change. The emulator will now show the status of the CodeBug's legs with blue arrows. The arrow pointing into the legs denotes that it's set as an Input; away from the legs is an Output. When the background of the leg is red, the leg is at Power, when the leg is black, it is Ground.

image


Now that the Emulator has been configured, we can begin programming the legs. To do this we will need to click on the Cog of the Start block. From the popup we can drag the Leg Input/Output block into the Start block on the right. Because we want the Leg to sense a button, we will need to tell CodeBug to use Leg 1 as an Input. .


We want CodeBug to run different code depending on whether a button is pressed. In order to do this we will need an If block and a block that checks to see if the Leg is connected to Ground via the button.  We will start by dragging in an If Else block and placing it in an empty space on the workstation. From the Input/Output menu we will drag a Leg Grounded block.


We will need different code to run when the button is pressed. If it is pressed we should get a Set Pixel block to turn the LED display on, and a Set Pixel block to turn it off. To do this we we need to take two Set Pixel blocks from the 5X5 Display menu. Next we will snap them both inside the If Else block, one under If and the other under Else. We will set the Else section to 0. We will want this code to repeat so we will need to add a Repeat While True loop and snap it into the Start block. Finally we will drag in the code into the Repeat While True loop.


image


Now it's time to see if it works via the Emulator...


You don't have permission to edit metadata of this video.
Edit media
x
image
Upload Preview
image


With the program working we can now send that over to the CodeBug.


With the code working, click on Download; it's just under the emulator controls. When the code downloads, plug a USB to micro USB cable into your computer. While holding Button A of your CodeBug also insert the micro USB into the CodeBug. The top left LED in the matrix on the CodeBug will flash. Your computer should also recognize the CodeBug as a USB drive on your computer. Copy the downloaded code from the CodeBug website to the USB drive and run the program by pressing Button B. If your CodeBug is on battery power, you can now disconnect the USB cable.


REMIX THIS PROJECT


BONUS!

CodeBug’s legs are also touch sensitive, so we don’t have to use switches -- we can just use our hands!

  • Leave the program on CodeBug from the above project and make sure CodeBug is powered on.
  • Disconnect the button from the croc-clips, but we're going to leave the croc-clips connected to CodeBug’s Legs (1 and GND).
  • Hold the metal end of one croc-clip in one hand and touch the end of the other croc-clip with the other hand.
  • While touching the clip, CodeBug senses it and runs the blocks of code we told it to.


image

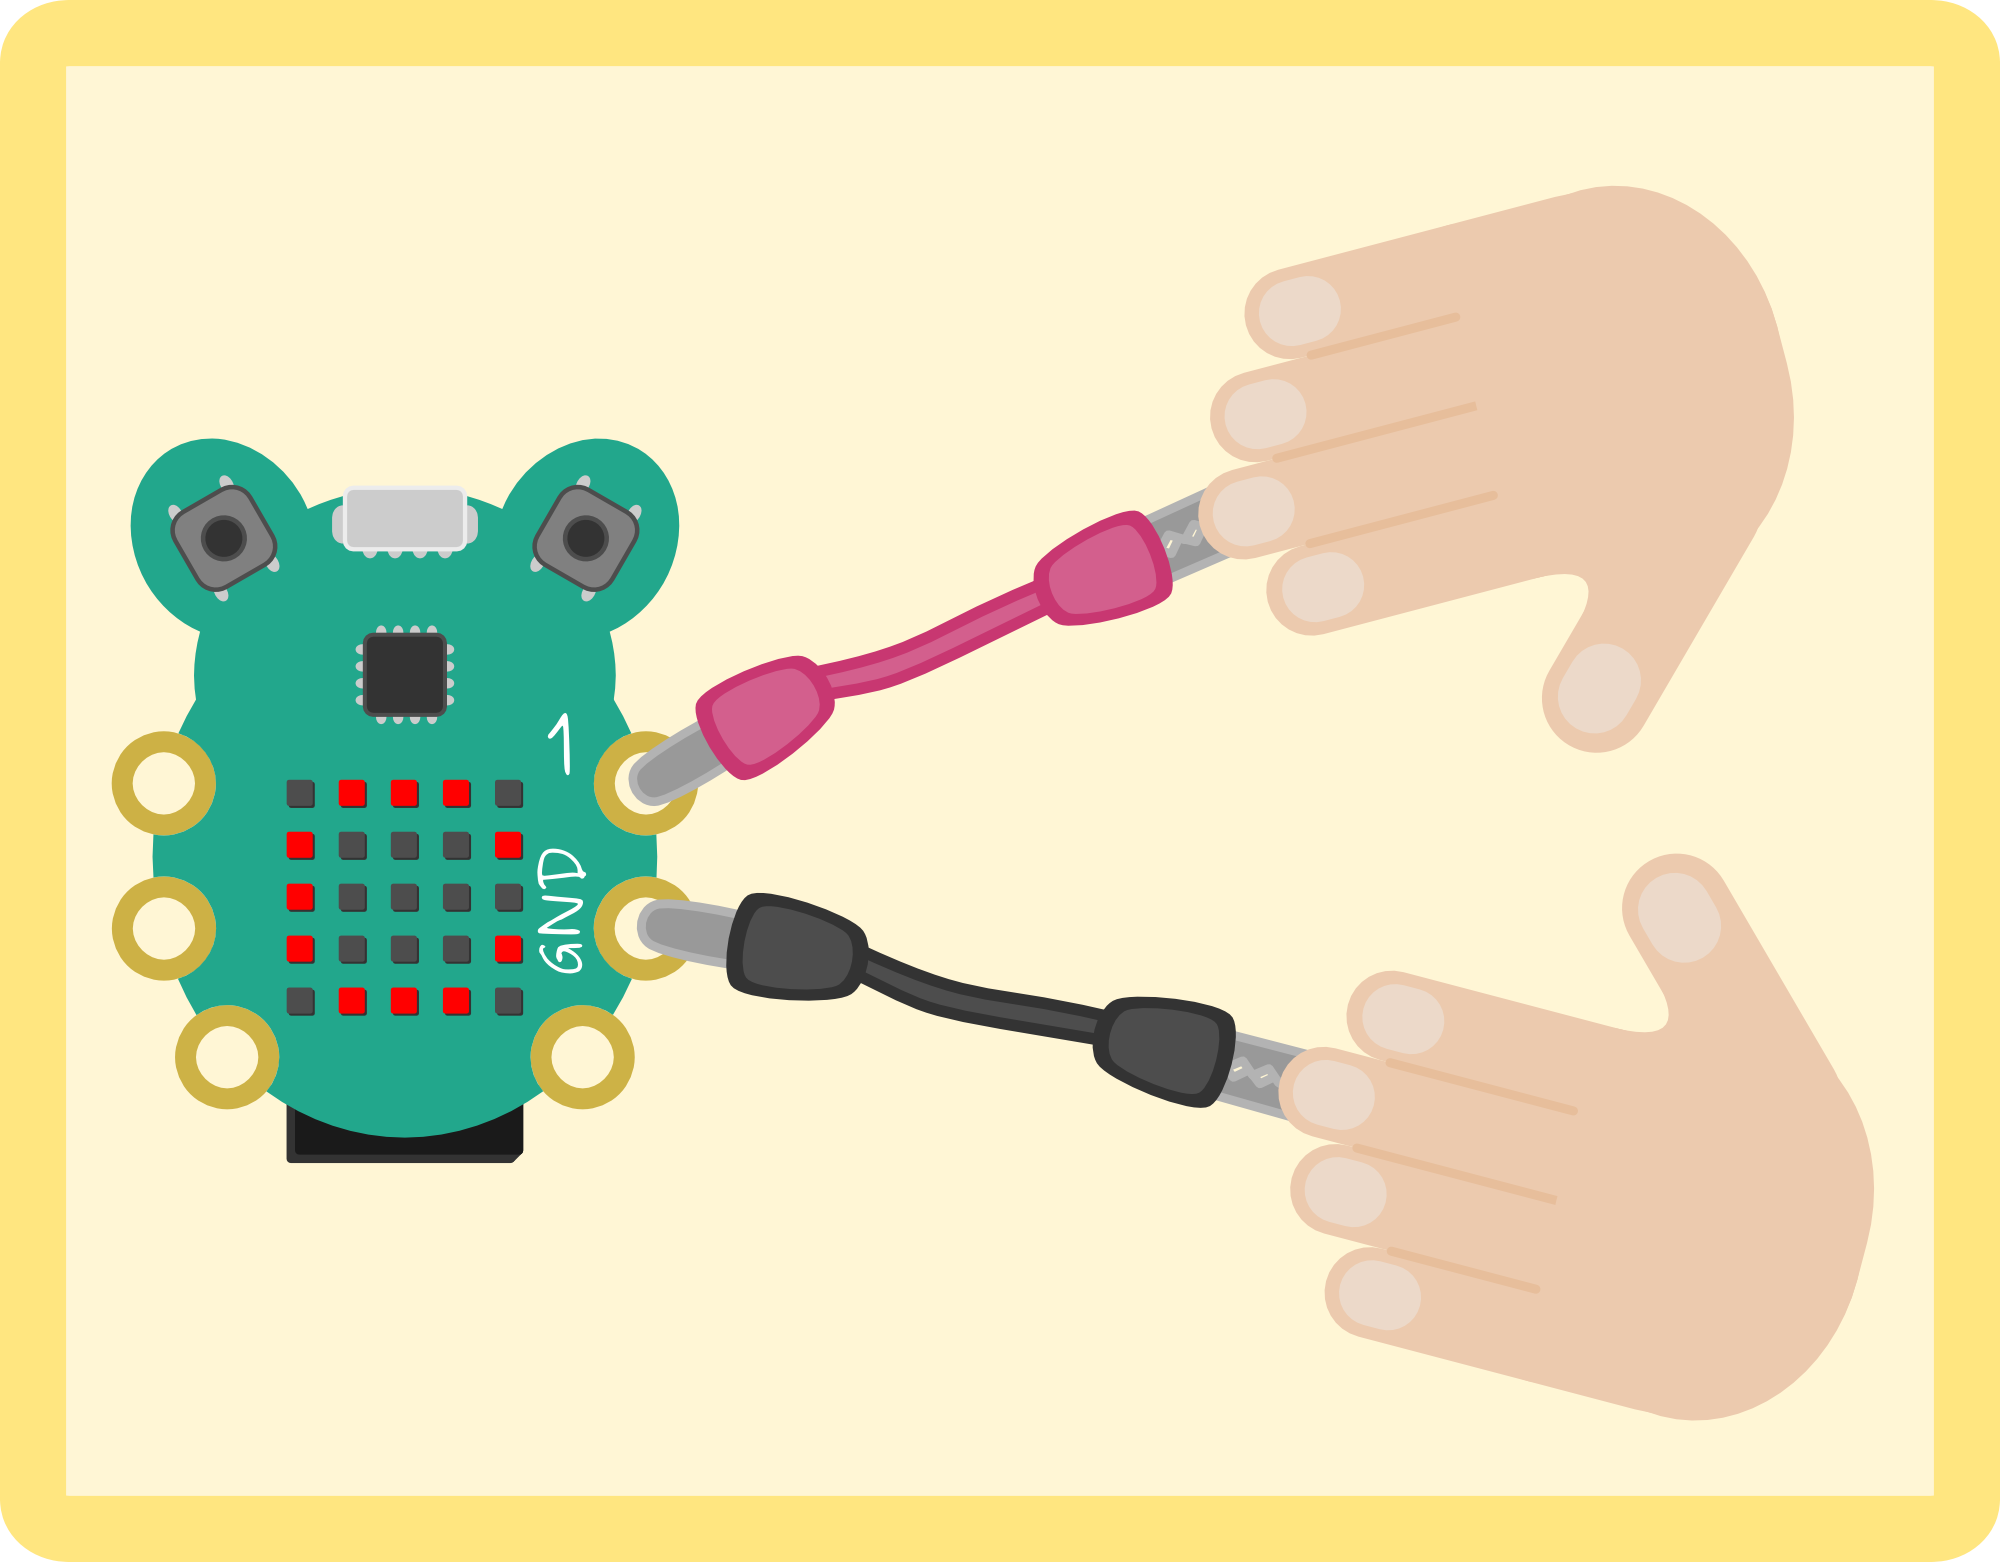
This works because everything containing a lot of water will conduct a small amount of electricity. This is not enough electricity to power something like an LED, but it is enough for CodeBug’s legs to sense contact. Since the human body is about 70% water WE conduct this small amount of electricity too!

Try holding a friend’s hand and get them to touch the other croc-clip.

image

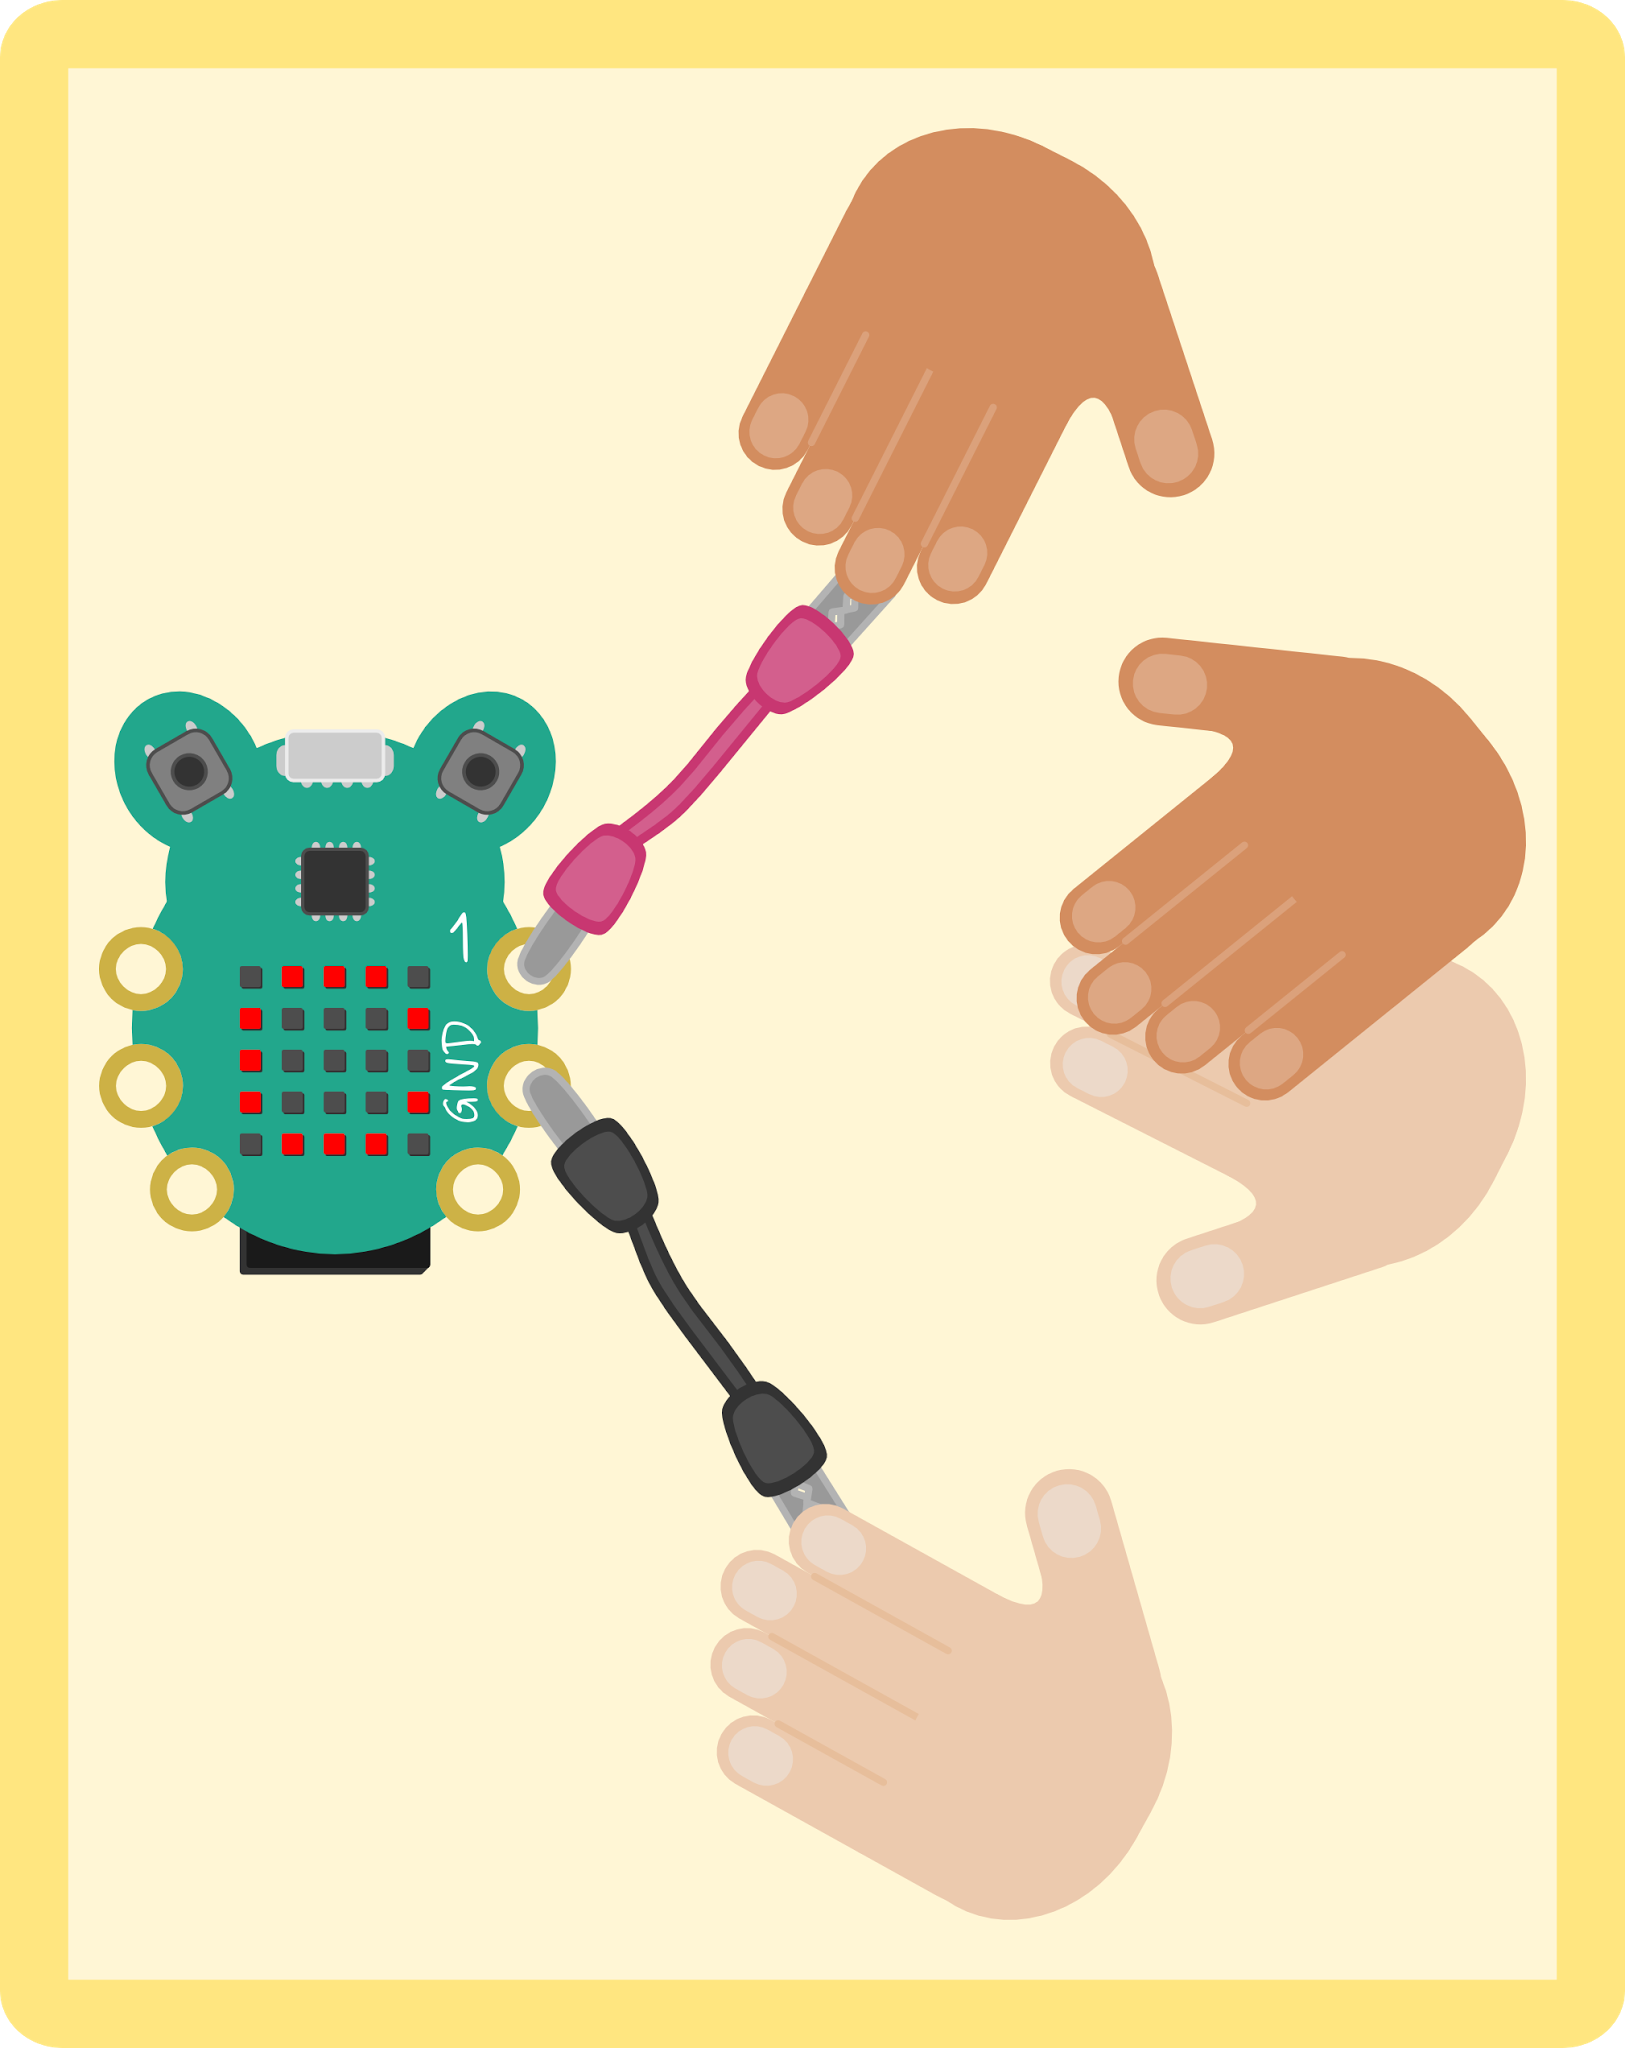
Gather some more friends and see how many how people can be in the chain before CodeBug can’t sense the electricity anymore. Each extra person adds some resistance to the electricity in the chain. Each person in the chain adds more resistance which makes it harder for the electricity to flow.


See more CodeBug projects and learn how you can get one of your own by visiting: 10 CodeBug Projects in 10


  • Sign in to reply

Top Comments

  • gadget.iom
    gadget.iom over 9 years ago in reply to Former Member +3
    Doug Jefferies wrote: The Codebug site doesn't seem to like Internet Explorer, it's worth trying other browsers if you have problems while using IE. It might have something to do with the CodeBug…
  • Former Member
    Former Member over 9 years ago in reply to gadget.iom +2
    That's a good one.
  • gadget.iom
    gadget.iom over 9 years ago +1
    These look like fun projects. Can't wait for my CodeBug to arrive!
  • spraus
    spraus over 7 years ago

    Im looking forward to doing this project with my daughter and her GirlScouts group!

    Thanks for such a great idea!

    • Cancel
    • Vote Up +1 Vote Down
    • Sign in to reply
    • More
    • Cancel
  • volly
    volly over 9 years ago in reply to gadget.iom

    You mean IE=Infinite Errors???

    • Cancel
    • Vote Up 0 Vote Down
    • Sign in to reply
    • More
    • Cancel
  • Former Member
    Former Member over 9 years ago in reply to gadget.iom

    image


    That's a good one.

    • Cancel
    • Vote Up +2 Vote Down
    • Sign in to reply
    • More
    • Cancel
  • gadget.iom
    gadget.iom over 9 years ago in reply to Former Member

    Doug Jefferies wrote:


    The Codebug site doesn't seem to like Internet Explorer, it's worth trying other browsers if you have problems while using IE.

    It might have something to do with the CodeBug website using HTML5.

    image

    • Cancel
    • Vote Up +3 Vote Down
    • Sign in to reply
    • More
    • Cancel
  • mcb1
    mcb1 over 9 years ago

    If the codebug is tethered to your computer, you'll probably find it doesn't require you to touch the earth pin.


    On battery you will need to.

    • Cancel
    • Vote Up 0 Vote Down
    • Sign in to reply
    • More
    • Cancel
>
element14 Community

element14 is the first online community specifically for engineers. Connect with your peers and get expert answers to your questions.

  • Members
  • Learn
  • Technologies
  • Challenges & Projects
  • Products
  • Store
  • About Us
  • Feedback & Support
  • FAQs
  • Terms of Use
  • Privacy Policy
  • Legal and Copyright Notices
  • Sitemap
  • Cookies

An Avnet Company © 2025 Premier Farnell Limited. All Rights Reserved.

Premier Farnell Ltd, registered in England and Wales (no 00876412), registered office: Farnell House, Forge Lane, Leeds LS12 2NE.

ICP 备案号 10220084.

Follow element14

  • X
  • Facebook
  • linkedin
  • YouTube