element14 Community
element14 Community
    Register Log In
  • Site
  • Search
  • Log In Register
  • Members
    Members
    • Benefits of Membership
    • Achievement Levels
    • Members Area
    • Personal Blogs
    • Feedback and Support
    • What's New on element14
  • Learn
    Learn
    • Learning Center
    • eBooks
    • STEM Academy
    • Webinars, Training and Events
    • Learning Groups
  • Technologies
    Technologies
    • 3D Printing
    • Experts & Guidance
    • FPGA
    • Industrial Automation
    • Internet of Things
    • Power & Energy
    • Sensors
    • Technology Groups
  • Challenges & Projects
    Challenges & Projects
    • Design Challenges
    • element14 presents
    • Project14
    • Arduino Projects
    • Raspberry Pi Projects
    • Project Groups
  • Products
    Products
    • Arduino
    • Dev Tools
    • Manufacturers
    • Raspberry Pi
    • RoadTests & Reviews
    • Avnet Boards Community
    • Product Groups
  • Store
    Store
    • Visit Your Store
    • 'Choose another store...'
      • Europe
      •  Austria (German)
      •  Belgium (Dutch, French)
      •  Bulgaria (Bulgarian)
      •  Czech Republic (Czech)
      •  Denmark (Danish)
      •  Estonia (Estonian)
      •  Finland (Finnish)
      •  France (French)
      •  Germany (German)
      •  Hungary (Hungarian)
      •  Ireland
      •  Israel
      •  Italy (Italian)
      •  Latvia (Latvian)
      •  
      •  Lithuania (Lithuanian)
      •  Netherlands (Dutch)
      •  Norway (Norwegian)
      •  Poland (Polish)
      •  Portugal (Portuguese)
      •  Romania (Romanian)
      •  Russia (Russian)
      •  Slovakia (Slovak)
      •  Slovenia (Slovenian)
      •  Spain (Spanish)
      •  Sweden (Swedish)
      •  Switzerland(German, French)
      •  Turkey (Turkish)
      •  United Kingdom
      • Asia Pacific
      •  Australia
      •  China
      •  Hong Kong
      •  India
      •  Korea (Korean)
      •  Malaysia
      •  New Zealand
      •  Philippines
      •  Singapore
      •  Taiwan
      •  Thailand (Thai)
      • Americas
      •  Brazil (Portuguese)
      •  Canada
      •  Mexico (Spanish)
      •  United States
      Can't find the country/region you're looking for? Visit our export site or find a local distributor.
  • Translate
  • Profile
microbit
  • Learn
  • Learning Center
  • STEM Academy
  • microbit
  • More
  • Cancel
microbit
micro:bit Blog 10 BBC micro:bit Projects in 10 Days: Day Eight - Security Alarm
  • Blog
  • Forum
  • Documents
  • Events
  • Polls
  • Files
  • Members
  • Mentions
  • Sub-Groups
  • Tags
  • More
  • Cancel
  • New
microbit requires membership for participation - click to join
Blog Post Actions
  • Subscribe by email
  • More
  • Cancel
  • Share
  • Subscribe by email
  • More
  • Cancel
Group Actions
  • Group RSS
  • More
  • Cancel
Engagement
  • Author Author: jlucas
  • Date Created: 3 Jun 2016 11:45 AM Date Created
  • Views 2160 views
  • Likes 20 likes
  • Comments 4 comments
  • intermediate micro:bit projects
  • micro:bit
  • bbc micro:bit
  • microbit
  • intermediate_microbit_projects
  • bbc microbit
  • ten bbc micro:bit projects
  • bbc_micro:bit
  • 10projects10days
Related
Recommended

10 BBC micro:bit Projects in 10 Days: Day Eight - Security Alarm

jlucas
jlucas
3 Jun 2016

About this project


This project demonstrates how the BBC micro:bit's functions can be enhanced with external devices, in this case a 3V buzzer that can be programmed to act as a security alarm.


What you'll need


1 x BBC micro:bit

1 x 3V buzzer

1 x Micro USB

1 x Computer or tablet

2 x AAA Batteries & Battery Holder

2 x Crocodile Clips


Project walkthrough


  • Go to the BBC micro:bit website, click 'create code' and begin a new Microsoft Block Editor project.


  • Start by dragging in a 'forever' loop from the basic commands menu.


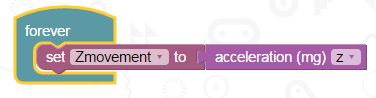
  • To create a variable for tracking movement, drag in a 'set [item] to' tile and rename the variable to 'Zmovement' or similar. From the Input commands menu, attach a tile that reads 'acceleration (mg) [x]' and set it to 'acceleration (mg) [z]'.


image


  • Now, drag in and attach an 'if/do' tile, to tell the device to react to changes in the Z value of the accelerometer.


  • For 'if', connect an 'or' tile from the Logic commands menu, to tell the device to react under one of two circumstances.


  • Using two [0] < [0]' tiles and your Zmovement variable, create a line of code that reads 'if [Zmovement] < [-1,100] or [Zmovement] > [-900]'


  • This tells your device to react if it is moved along the Z axis. If the device is stationary and facing LED-upwards from a flat surface, this means it should now react if anybody attempts to pick it up from above.


  • For 'do', attach a 'show string' tile from the basic commands menu, and enter an appropriate warning, such as 'Hands off my micro:bit!'


image


  • Now, create two duplicates of your 'set [Zmovement] to accelleration (mg) [z]' string, and create two new variables for detecting movement along the X and Y axis'. Place these in your Forever loop, above the 'if/do' string, like so:


image


  • Create two duplicates your 'if/do' string, and set these to Xmovement and Ymovement respectively. Set the numerical parameters to < [-100] and > [100], and recreate your 'show string' warning message under 'do' for each.


  • This means your device will now trigger the warning message if it is picked up, or if it is moved along the X and Y axis' on the accelerometer. Your full block of code should look something like this:

image


  • Finally, we need to add the buzzer element. We'll be attaching the 3V buzzer to one of the BBC micro:bit's pins - for the purposes of this walkthrough, let's use pin 0.


  • Go to the Pins command menu and find the tile that reads 'digital write (0,1) [1] to pin [P0]'.


  • This tile tells the pin to either switch the pin on, or off. When the digital write is set to 0, the pin is switched off. When it is set to 1, the pin is switched on at 3V.


  • Set the digital write to [1], and keep the pin set to [P0].


  • We don't want the buzzer to go off constantly when activated, so now set a pause of 3000ms (3 seconds) underneath.


  • Now, add a second 'digital write...' tile, and this time set it to 0, meaning the pin will switch off three seconds after activating.


image


  • Create two identical duplicates of this set of tiles, and place one within each of your three 'if/do' tiles.


  • Your final block of code should look like this:


image

  • Click compile to download your code, and transfer it to your BBC micro:bit device.


  • Attach one end of your first crocodile clip to the GND pad at the edge of the BBC micro:bit, and the other end to the black wire on your buzzer.


  • Attach one end of your second crocodile clip to the '0' pad on the BBC micro:bit, and the other end to the red wire on your buzzer.


  • Now either run your code or pick up your BBC micro:bit to test the functionality of your new security alarm!


Once your students have mastered this project, what else can they learn how to do with the pin functionality? Experiment with attaching different devices, or by using the BBC micro:bit's other pins to program a wider range of responses to external stimuli. Let us know what you and your pupils come up with in the comments section below...

  • Sign in to reply

Top Comments

  • jlucas
    jlucas over 7 years ago in reply to buteman +3
    Hi Norman. Thanks for your question. I've managed to get some answers that I hope will allay your concerns. What sort of buzzer can this be? We recommend using a piezoelectric buzzer such as the one linked…
  • buteman
    buteman over 7 years ago +2
    What sort of buzzer can this be? Is the micro:bit capable of supplying the needed current? Is it protected from reverse voltage spikes? We need answers to these questions before thousands of them are destroyed…
  • jpnbino
    jpnbino over 5 years ago in reply to buteman +1
    adding to John's answer, remember to use a resistor in parallel with the piezoelectric buzzer. Please check at document's page 7/7 recommended operating circuit example: https://www.mouser.com/ds/2/400…
  • NigelB
    NigelB over 5 years ago in reply to jlucas

    In fact it is 7mA for 12V operation, so it should be smaller on 5V or 3V3 - see http://www.kingstate.com.tw/index.php/en/products-piezo-buzzer/products-piezo-indicator/products-wire/item/137  .


    A nice usage fir the micro:bit - again it could be developed to either play a tune, or to do something interesting with the display as well as beep... including displaying the acceleration readings, or axis that caused the trip, perhaps. So room to play with it in further ways

    • Cancel
    • Vote Up +1 Vote Down
    • Sign in to reply
    • More
    • Cancel
  • jpnbino
    jpnbino over 5 years ago in reply to buteman

    adding to John's answer,


    remember to use a resistor in parallel with the piezoelectric buzzer.


    Please check at document's page 7/7 recommended operating circuit example:  https://www.mouser.com/ds/2/400/ef532_ps-13444.pdf

    • Cancel
    • Vote Up +1 Vote Down
    • Sign in to reply
    • More
    • Cancel
  • jlucas
    jlucas over 7 years ago in reply to buteman

    Hi Norman.


    Thanks for your question. I've managed to get some answers that I hope will allay your concerns.


    What sort of buzzer can this be?

    We recommend using a piezoelectric buzzer such as the one linked to in the article. Avoid using electromechanical buzzer types.


    Is the micro:bit capable of supplying the needed current?

    Yes. In high-output mode , the nRF51822 can supply up to 15mA. The buzzer requires 7mA.


    Is it protected from reverse voltage spikes?

    If you're using a piezo style buzzer, reverse voltage spikes are generally not going to be a problem. If it is a concern, simply add a general-purpose diode in parallel with the buzzer, with the anode connected to ground.


    Hope this helps. Please let me know if you have any other questions.

    • Cancel
    • Vote Up +3 Vote Down
    • Sign in to reply
    • More
    • Cancel
  • buteman
    buteman over 7 years ago

    What sort of buzzer can this be?

    Is the micro:bit capable of supplying the needed current?

    Is it protected from reverse voltage spikes?

    We need answers to these questions before thousands of them are destroyed.

    • Cancel
    • Vote Up +2 Vote Down
    • Sign in to reply
    • More
    • Cancel
element14 Community

element14 is the first online community specifically for engineers. Connect with your peers and get expert answers to your questions.

  • Members
  • Learn
  • Technologies
  • Challenges & Projects
  • Products
  • Store
  • About Us
  • Feedback & Support
  • FAQs
  • Terms of Use
  • Privacy Policy
  • Legal and Copyright Notices
  • Sitemap
  • Cookies

An Avnet Company © 2023 Premier Farnell Limited. All Rights Reserved.

Premier Farnell Ltd, registered in England and Wales (no 00876412), registered office: Farnell House, Forge Lane, Leeds LS12 2NE.

ICP 备案号 10220084.

Follow element14

  • X
  • Facebook
  • linkedin
  • YouTube