element14 Community
element14 Community
    Register Log In
  • Site
  • Search
  • Log In Register
  • Members
    Members
    • Benefits of Membership
    • Achievement Levels
    • Members Area
    • Personal Blogs
    • Feedback and Support
    • What's New on element14
  • Learn
    Learn
    • Learning Center
    • eBooks
    • STEM Academy
    • Webinars, Training and Events
    • Learning Groups
  • Technologies
    Technologies
    • 3D Printing
    • FPGA
    • Industrial Automation
    • Internet of Things
    • Power & Energy
    • Sensors
    • Technology Groups
  • Challenges & Projects
    Challenges & Projects
    • Design Challenges
    • element14 presents
    • Project14
    • Arduino Projects
    • Raspberry Pi Projects
    • Project Groups
  • Products
    Products
    • Arduino
    • Dev Tools
    • Manufacturers
    • Raspberry Pi
    • RoadTests & Reviews
    • Avnet Boards Community
    • Product Groups
  • Store
    Store
    • Visit Your Store
    • Choose Another Store
      • Europe
      •  Austria (German)
      •  Belgium (Dutch, French)
      •  Bulgaria (Bulgarian)
      •  Czech Republic (Czech)
      •  Denmark (Danish)
      •  Estonia (Estonian)
      •  Finland (Finnish)
      •  France (French)
      •  Germany (German)
      •  Hungary (Hungarian)
      •  Ireland
      •  Israel
      •  Italy (Italian)
      •  Latvia (Latvian)
      •  
      •  Lithuania (Lithuanian)
      •  Netherlands (Dutch)
      •  Norway (Norwegian)
      •  Poland (Polish)
      •  Portugal (Portuguese)
      •  Romania (Romanian)
      •  Russia (Russian)
      •  Slovakia (Slovak)
      •  Slovenia (Slovenian)
      •  Spain (Spanish)
      •  Sweden (Swedish)
      •  Switzerland(German, French)
      •  Turkey (Turkish)
      •  United Kingdom
      • Asia Pacific
      •  Australia
      •  China
      •  Hong Kong
      •  India
      •  Korea (Korean)
      •  Malaysia
      •  New Zealand
      •  Philippines
      •  Singapore
      •  Taiwan
      •  Thailand (Thai)
      • Americas
      •  Brazil (Portuguese)
      •  Canada
      •  Mexico (Spanish)
      •  United States
      Can't find the country/region you're looking for? Visit our export site or find a local distributor.
  • Translate
  • Profile
microbit
  • Learn
  • Learning Center
  • STEM Academy
  • microbit
  • More
  • Cancel
microbit
Blog 10 BBC micro:bit Projects in 10 Days: Day Five - Falling Sprite Game
  • Blog
  • Forum
  • Documents
  • Events
  • Members
  • Mentions
  • Sub-Groups
  • Tags
  • More
  • Cancel
  • New
microbit requires membership for participation - click to join
Blog Post Actions
  • Subscribe by email
  • More
  • Cancel
  • Share
  • Subscribe by email
  • More
  • Cancel
Group Actions
  • Group RSS
  • More
  • Cancel
Engagement
  • Author Author: jlucas
  • Date Created: 3 Jun 2016 11:41 AM Date Created
  • Views 2890 views
  • Likes 20 likes
  • Comments 15 comments
  • intermediate micro:bit projects
  • micro:bit
  • bbc micro:bit
  • microbit
  • intermediate_microbit_projects
  • bbc microbit
  • ten bbc micro:bit projects
  • bbc_micro:bit
  • 10projects10days
Related
Recommended

10 BBC micro:bit Projects in 10 Days: Day Five - Falling Sprite Game

jlucas
jlucas
3 Jun 2016

About this project


This project guides pupils through the creation of a simple game played out on the BBC micro:bit's LED array. Players can earn points by using the A and B buttons to avoid falling hazards, similar to classic arcade games like Space Invaders.


What you'll need


1 x BBC micro:bit

1 x Micro USB

1 x Computer or tablet

2 x AAA Batteries & Battery Holder


Project walkthrough


  • Go to the BBC micro:bit website, click 'create code' and begin a new Microsoft Block Editor project.


  • First we need to program the basic metrics of the game, including your playable character, the score and what happens when the game ends.


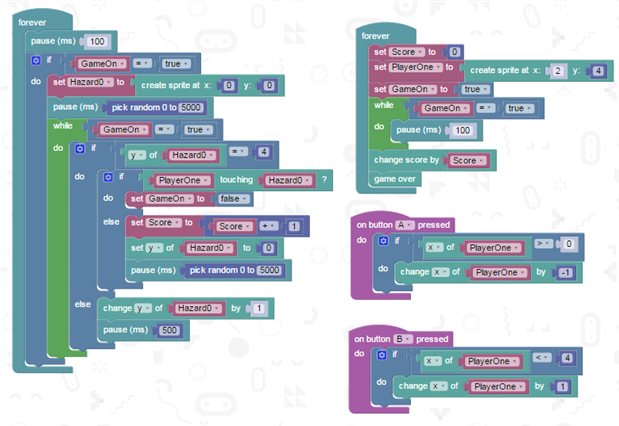
  • Using the command tiles from the Basic, Variables, Logic and Game menus, create the following block of code.


image


  • This tell the device to create a playable 'sprite' at the X2, Y4 co-ordinate on the LED array. It also sets up the base score of zero and tells it to reset that score when the game over function is triggered.


  • The next step is to set up the controls for your character. Using Input, Logic and Game commands, create the following block of code, separate from the first.


image

  • This block of code tells your device that when the A button is pressed, to move the sprite by one position to the left, unless they have reached the edge of the screen, in which case nothing will happen.


  • Now you need to tell the device to move your sprite one position to the right whenever the B button is pressed. To save time, simply duplicate your Button A coding block and make the following changes in the appropriate dialog boxes.

image


  • Next, it's time to create some hazards! Create another block of code containing the following commands. You'll also need to create a new variable to reference the hazards where indicated. For the purposes of this demo, I've called it Hazard0 - the 0 references the column this hazard will fall from.


image


  • This block of code essentially tells the device to send a sprite down column X0 on the LED array at random intervals every 0-5 seconds. If the sprite makes contact with your sprite, the game will end. If the sprite reaches the bottom of the column and you successfully avoid it, it will disappear and your score will be increased by one point.


  • Now you need to create the same block of code to create sprites for columns X1 to X4. Fortunately, rather than building all of these from scratch, it's much easier to simply duplicate the block of code above, create a new variable for each (Hazard1, Hazard2, etc.) and alter the dialog boxes where required to ensure they each fall down a different column.


image

  • You should now have eight distinct blocks of code in your coding editor - one for the basic metrics, two for the A and B button commands, and five controlling the falling hazards.


image

image

image


  • Congratulations, you've just coded your first game! Hit 'Run' to test the game out on the emulator, before compiling your script and transferring it to your BBC micro:bit device.


Once your pupils have got to grips with this project, challenge them to play around with the new commands they've learned to alter the game. Can they figure out how to speed up the falling sprites, alter the scoring system or change the game so that players score points for catching the falling sprites rather than avoiding them? Let us know how they got on in the comments section below...

  • Sign in to reply

Top Comments

  • dillonb07
    dillonb07 over 3 years ago +3
    This is code that works. The instructions didn't for me.
  • clem57
    clem57 over 3 years ago in reply to dillonb07 +3
    Welcome to Element 14 dillonb07 ! Thanks for providing good working code... I hope you enjoy the rest of the site. Many people that are helpful are here.
  • jkutzsch
    jkutzsch over 6 years ago +2
    The more I see these little projects the more I want to try one of these little guys out! Thank you for sharing john.lucas@dsdistribution.com
  • clem57
    clem57 over 3 years ago in reply to dillonb07

    Welcome to Element 14 dillonb07 ! Thanks for providing good working code... I hope you enjoy the rest of the site. Many people that are helpful are here.

    • Cancel
    • Vote Up +3 Vote Down
    • Sign in to reply
    • More
    • Cancel
  • dillonb07
    dillonb07 over 3 years ago

    image

    This is code that works.

    The instructions didn't for me.

    • Cancel
    • Vote Up +3 Vote Down
    • Sign in to reply
    • More
    • Cancel
  • dubbie
    dubbie over 4 years ago

    This looks complicated. Still I wrote my first computer game on a main frame in Basic using punch cards. It didn't work. This looks much easier.


    Dubbie

    • Cancel
    • Vote Up +1 Vote Down
    • Sign in to reply
    • More
    • Cancel
  • tonydbeck
    tonydbeck over 4 years ago in reply to balearicdynamics

    I agree that this is pretty complex with block images - it doesn't take long for blocks to get quite busy - especially when there are a number of nested levels!


    I will have to see if I can get my 7 year daughter to follow it!  image It is amazing how well kids these days get on with tech!  I guess from a kids point of view -  even though complex, they would probably follow a graphical programming method better than purely code.  I will have to test that theory out!


    Cheers

    --------------------------

    Tony

    • Cancel
    • Vote Up +1 Vote Down
    • Sign in to reply
    • More
    • Cancel
  • anuag_ashim
    anuag_ashim over 4 years ago

    plus and play software

    • Cancel
    • Vote Up 0 Vote Down
    • Sign in to reply
    • More
    • Cancel
>
element14 Community

element14 is the first online community specifically for engineers. Connect with your peers and get expert answers to your questions.

  • Members
  • Learn
  • Technologies
  • Challenges & Projects
  • Products
  • Store
  • About Us
  • Feedback & Support
  • FAQs
  • Terms of Use
  • Privacy Policy
  • Legal and Copyright Notices
  • Sitemap
  • Cookies

An Avnet Company © 2023 Premier Farnell Limited. All Rights Reserved.

Premier Farnell Ltd, registered in England and Wales (no 00876412), registered office: Farnell House, Forge Lane, Leeds LS12 2NE.

ICP 备案号 10220084.

Follow element14

  • Facebook
  • Twitter
  • linkedin
  • YouTube