element14 Community
element14 Community
    Register Log In
  • Site
  • Search
  • Log In Register
  • Community Hub
    Community Hub
    • What's New on element14
    • Feedback and Support
    • Benefits of Membership
    • Personal Blogs
    • Members Area
    • Achievement Levels
  • Learn
    Learn
    • Ask an Expert
    • eBooks
    • element14 presents
    • Learning Center
    • Tech Spotlight
    • STEM Academy
    • Webinars, Training and Events
    • Learning Groups
  • Technologies
    Technologies
    • 3D Printing
    • FPGA
    • Industrial Automation
    • Internet of Things
    • Power & Energy
    • Sensors
    • Technology Groups
  • Challenges & Projects
    Challenges & Projects
    • Design Challenges
    • element14 presents Projects
    • Project14
    • Arduino Projects
    • Raspberry Pi Projects
    • Project Groups
  • Products
    Products
    • Arduino
    • Avnet & Tria Boards Community
    • Dev Tools
    • Manufacturers
    • Multicomp Pro
    • Product Groups
    • Raspberry Pi
    • RoadTests & Reviews
  • About Us
  • Store
    Store
    • Visit Your Store
    • Choose another store...
      • Europe
      •  Austria (German)
      •  Belgium (Dutch, French)
      •  Bulgaria (Bulgarian)
      •  Czech Republic (Czech)
      •  Denmark (Danish)
      •  Estonia (Estonian)
      •  Finland (Finnish)
      •  France (French)
      •  Germany (German)
      •  Hungary (Hungarian)
      •  Ireland
      •  Israel
      •  Italy (Italian)
      •  Latvia (Latvian)
      •  
      •  Lithuania (Lithuanian)
      •  Netherlands (Dutch)
      •  Norway (Norwegian)
      •  Poland (Polish)
      •  Portugal (Portuguese)
      •  Romania (Romanian)
      •  Russia (Russian)
      •  Slovakia (Slovak)
      •  Slovenia (Slovenian)
      •  Spain (Spanish)
      •  Sweden (Swedish)
      •  Switzerland(German, French)
      •  Turkey (Turkish)
      •  United Kingdom
      • Asia Pacific
      •  Australia
      •  China
      •  Hong Kong
      •  India
      •  Korea (Korean)
      •  Malaysia
      •  New Zealand
      •  Philippines
      •  Singapore
      •  Taiwan
      •  Thailand (Thai)
      • Americas
      •  Brazil (Portuguese)
      •  Canada
      •  Mexico (Spanish)
      •  United States
      Can't find the country/region you're looking for? Visit our export site or find a local distributor.
  • Translate
  • Profile
  • Settings
microbit
  • Learn
  • Learning Center
  • STEM Academy
  • microbit
  • More
  • Cancel
microbit
micro:bit Blog BBC Micro:Fit Pt. 2
  • Blog
  • Forum
  • Documents
  • Events
  • Polls
  • Files
  • Members
  • Mentions
  • Sub-Groups
  • Tags
  • More
  • Cancel
  • New
Join microbit to participate - click to join for free!
  • Share
  • More
  • Cancel
Group Actions
  • Group RSS
  • More
  • Cancel
Engagement
  • Author Author: RParkerE
  • Date Created: 10 Dec 2016 8:12 PM Date Created
  • Views 649 views
  • Likes 7 likes
  • Comments 0 comments
  • activity_monitor
  • micro:bit
  • bbc micro:bit
  • activity_tracker
  • wearabletech
  • microbit
  • bbc_microbit
  • fitness
  • bbc microbit
  • big ideas
  • activity
  • fitness bands
Related
Recommended

BBC Micro:Fit Pt. 2

RParkerE
RParkerE
10 Dec 2016

Hello All,


I want to apologize for the long lapse between Pt. 1 and Pt. 2, finals have been a handful. But anyways to the content we go!


Unfortunately it does not look like the Micro:Fit will have a watch/clock component, as I can not find any module for the Micro:Bit to act as one. But I was able to make a fancy little bracelet for the Micro:Fit to be worn.


If you go to this link you will see the tutorial I followed to make my Micro:Fit wearable!


I first got an old shirt, you can use any old clothing, in the tutorial they used jeans, or you could also just buy some fabric from a local store. You want to measure out how wide the Micro:Fit is and cut one strip wide enough to support the board (~ 5cm), and long enough to completely envelope your wrist (~ 22-26cm). Add a strip of heavy duty double sided tape to this fabric and place both the board and the batter pack on the tape. Next you will want to cut two pieces of fabric to cover the rest of the double sided tape and fabric on either side of the board (you will want to cover the batter pack with one of the two strips as well). Now once you have completed all of this, you will add Velcro on either end of the bracelet in order for it to allow to attach onto your wrist. See the images of the final product below!


If you missed Pt. 1 you can find it here. It will show you how to program a steps counter, a compass, and a thermometer into your Micro:Fit for a basic activity tracker!


image

A much prettier version of a wearable Micro:Bit from the tutorial on the BBC micro:bit page.

image

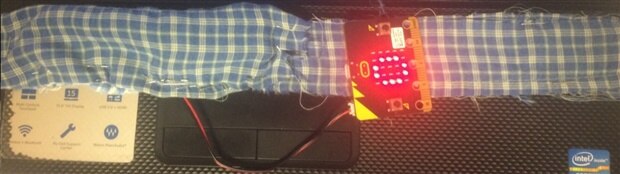
My version of my wearable Micro:Fit displaying how inactive I was during the entire process.

  • Sign in to reply
element14 Community

element14 is the first online community specifically for engineers. Connect with your peers and get expert answers to your questions.

  • Members
  • Learn
  • Technologies
  • Challenges & Projects
  • Products
  • Store
  • About Us
  • Feedback & Support
  • FAQs
  • Terms of Use
  • Privacy Policy
  • Legal and Copyright Notices
  • Sitemap
  • Cookies

An Avnet Company © 2025 Premier Farnell Limited. All Rights Reserved.

Premier Farnell Ltd, registered in England and Wales (no 00876412), registered office: Farnell House, Forge Lane, Leeds LS12 2NE.

ICP 备案号 10220084.

Follow element14

  • X
  • Facebook
  • linkedin
  • YouTube