element14 Community
element14 Community
    Register Log In
  • Site
  • Search
  • Log In Register
  • Community Hub
    Community Hub
    • What's New on element14
    • Feedback and Support
    • Benefits of Membership
    • Personal Blogs
    • Members Area
    • Achievement Levels
  • Learn
    Learn
    • Ask an Expert
    • eBooks
    • element14 presents
    • Learning Center
    • Tech Spotlight
    • STEM Academy
    • Webinars, Training and Events
    • Learning Groups
  • Technologies
    Technologies
    • 3D Printing
    • FPGA
    • Industrial Automation
    • Internet of Things
    • Power & Energy
    • Sensors
    • Technology Groups
  • Challenges & Projects
    Challenges & Projects
    • Design Challenges
    • element14 presents Projects
    • Project14
    • Arduino Projects
    • Raspberry Pi Projects
    • Project Groups
  • Products
    Products
    • Arduino
    • Avnet Boards Community
    • Dev Tools
    • Manufacturers
    • Multicomp Pro
    • Product Groups
    • Raspberry Pi
    • RoadTests & Reviews
  • Store
    Store
    • Visit Your Store
    • Choose another store...
      • Europe
      •  Austria (German)
      •  Belgium (Dutch, French)
      •  Bulgaria (Bulgarian)
      •  Czech Republic (Czech)
      •  Denmark (Danish)
      •  Estonia (Estonian)
      •  Finland (Finnish)
      •  France (French)
      •  Germany (German)
      •  Hungary (Hungarian)
      •  Ireland
      •  Israel
      •  Italy (Italian)
      •  Latvia (Latvian)
      •  
      •  Lithuania (Lithuanian)
      •  Netherlands (Dutch)
      •  Norway (Norwegian)
      •  Poland (Polish)
      •  Portugal (Portuguese)
      •  Romania (Romanian)
      •  Russia (Russian)
      •  Slovakia (Slovak)
      •  Slovenia (Slovenian)
      •  Spain (Spanish)
      •  Sweden (Swedish)
      •  Switzerland(German, French)
      •  Turkey (Turkish)
      •  United Kingdom
      • Asia Pacific
      •  Australia
      •  China
      •  Hong Kong
      •  India
      •  Korea (Korean)
      •  Malaysia
      •  New Zealand
      •  Philippines
      •  Singapore
      •  Taiwan
      •  Thailand (Thai)
      • Americas
      •  Brazil (Portuguese)
      •  Canada
      •  Mexico (Spanish)
      •  United States
      Can't find the country/region you're looking for? Visit our export site or find a local distributor.
  • Translate
  • Profile
  • Settings
microbit
  • Learn
  • Learning Center
  • STEM Academy
  • microbit
  • More
  • Cancel
microbit
micro:bit Blog Image Sender Project
  • Blog
  • Forum
  • Documents
  • Events
  • Polls
  • Files
  • Members
  • Mentions
  • Sub-Groups
  • Tags
  • More
  • Cancel
  • New
Join microbit to participate - click to join for free!
  • Share
  • More
  • Cancel
Group Actions
  • Group RSS
  • More
  • Cancel
Engagement
  • Author Author: rancell
  • Date Created: 30 May 2019 9:16 AM Date Created
  • Views 888 views
  • Likes 5 likes
  • Comments 0 comments
  • micro:bit
  • stem projects
Related
Recommended

Image Sender Project

rancell
rancell
30 May 2019

About this project


If you've done the Heart Monitor Project you would have seen how one micro:bit can send a radio message to another and get it to show an image. In that project the receiving micro:bit showed a heart image when it received messages. But what if we wanted the sending micro:bit to choose which image to show? This project will show you how to send an image using radio messages. The transmitting micro:bit sends the image when the A button is pressed and any receiving micro:bit shows that image.


There are 25 LEDs on the front of a micro:bit in a 5 × 5 grid. Each LED can get controlled using an X and Y co-ordinate. The X co-ordinate goes from left to right starting from zero, and the Y co-ordinate from top to bottom starting from zero:

image

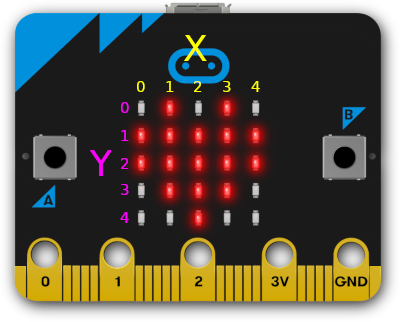
Each LED can be represented with the numbers 1 (on) or 0 (off). In the above heart image the first row (where Y is 0) has LEDs that are off, on, off, on, and off. That can be represented as 01010. The second row (Y is 1) has all the LEDs on. That can be represented by 11111. Using these numbers all 25 LEDs can be described.


Try doing your own image. Draw a 5 × 5 grid on paper, fill out the squares you want lit and convert this to five numbers using ones and zeros. With a partner read out the numbers you calculated. They should be able to draw your image on a 5 × 5 grid without seeing the image.


Now you have a method to send an image using numbers. This can be programmed into two micro:bits.


What you'll need


2 x BBC micro:bit (or more if you have them)

1 x Micro USB cable

1 x Computer or tablet

4 x AAA Batteries & 2 x Battery Holder (optional)


Project walk through


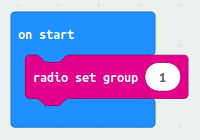
  • Start by choosing a radio group. If you are near other people working with micro:bits make sure to pick a number that no-one else is using!

image

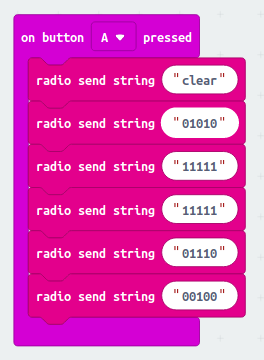
  • When button A is pressed the image data is sent using the radio. First a clear message is sent to tell the receiving micro:bit that a new image is being sent. Then a message is sent for each row containing the numbers calculated for the chosen image.

image

  • When each message (image row) is received we need to work out which X and Y co-ordinate each number represents (make two variables for these). The ones and zeros in the mesage represent the X co-ordinates from 0 to 4. The Y co-ordinate is the same for each row. A loop block is used to go through the X values (for block in the Loop section). The LED in that location is turned on or off by checking if the number in the received string is a one or a zero (the char from block is in the Text section under Advanced).

image

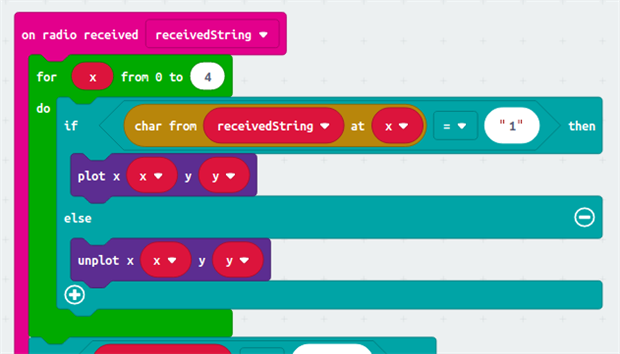
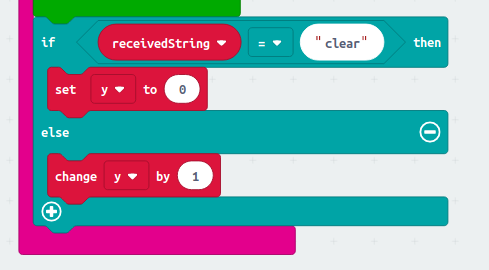
  • After each row the Y co-ordinate gets increased by one. If we got the special "clear" message then we start again at the first row (zero).

image


Download this program to two micro:bits and see if you can send the image from one to the other!


Next steps

  • Can you send a different image? Perhaps a face?
  • Can you make the sending micro:bit choose different images to send? Use the A button to choose which image and the B button to send it.
  • Is there a way to send the whole image in one radio message? Radio messages can only be 19 characters long so you'll have to change the way the image is sent.
  • Sign in to reply
element14 Community

element14 is the first online community specifically for engineers. Connect with your peers and get expert answers to your questions.

  • Members
  • Learn
  • Technologies
  • Challenges & Projects
  • Products
  • Store
  • About Us
  • Feedback & Support
  • FAQs
  • Terms of Use
  • Privacy Policy
  • Legal and Copyright Notices
  • Sitemap
  • Cookies

An Avnet Company © 2025 Premier Farnell Limited. All Rights Reserved.

Premier Farnell Ltd, registered in England and Wales (no 00876412), registered office: Farnell House, Forge Lane, Leeds LS12 2NE.

ICP 备案号 10220084.

Follow element14

  • X
  • Facebook
  • linkedin
  • YouTube