element14 Community
element14 Community
    Register Log In
  • Site
  • Search
  • Log In Register
  • About Us
  • Community Hub
    Community Hub
    • What's New on element14
    • Feedback and Support
    • Benefits of Membership
    • Personal Blogs
    • Members Area
    • Achievement Levels
  • Learn
    Learn
    • Ask an Expert
    • eBooks
    • element14 presents
    • Learning Center
    • Tech Spotlight
    • STEM Academy
    • Webinars, Training and Events
    • Learning Groups
  • Technologies
    Technologies
    • 3D Printing
    • FPGA
    • Industrial Automation
    • Internet of Things
    • Power & Energy
    • Sensors
    • Technology Groups
  • Challenges & Projects
    Challenges & Projects
    • Design Challenges
    • element14 presents Projects
    • Project14
    • Arduino Projects
    • Raspberry Pi Projects
    • Project Groups
  • Products
    Products
    • Arduino
    • Avnet Boards Community
    • Dev Tools
    • Manufacturers
    • Multicomp Pro
    • Product Groups
    • Raspberry Pi
    • RoadTests & Reviews
  • Store
    Store
    • Visit Your Store
    • Choose another store...
      • Europe
      •  Austria (German)
      •  Belgium (Dutch, French)
      •  Bulgaria (Bulgarian)
      •  Czech Republic (Czech)
      •  Denmark (Danish)
      •  Estonia (Estonian)
      •  Finland (Finnish)
      •  France (French)
      •  Germany (German)
      •  Hungary (Hungarian)
      •  Ireland
      •  Israel
      •  Italy (Italian)
      •  Latvia (Latvian)
      •  
      •  Lithuania (Lithuanian)
      •  Netherlands (Dutch)
      •  Norway (Norwegian)
      •  Poland (Polish)
      •  Portugal (Portuguese)
      •  Romania (Romanian)
      •  Russia (Russian)
      •  Slovakia (Slovak)
      •  Slovenia (Slovenian)
      •  Spain (Spanish)
      •  Sweden (Swedish)
      •  Switzerland(German, French)
      •  Turkey (Turkish)
      •  United Kingdom
      • Asia Pacific
      •  Australia
      •  China
      •  Hong Kong
      •  India
      •  Korea (Korean)
      •  Malaysia
      •  New Zealand
      •  Philippines
      •  Singapore
      •  Taiwan
      •  Thailand (Thai)
      • Americas
      •  Brazil (Portuguese)
      •  Canada
      •  Mexico (Spanish)
      •  United States
      Can't find the country/region you're looking for? Visit our export site or find a local distributor.
  • Translate
  • Profile
  • Settings
microbit
  • Learn
  • Learning Center
  • STEM Academy
  • microbit
  • More
  • Cancel
microbit
micro:bit Blog [PROJECT]  Develop a micro:bit watch
  • Blog
  • Forum
  • Documents
  • Events
  • Polls
  • Files
  • Members
  • Mentions
  • Sub-Groups
  • Tags
  • More
  • Cancel
  • New
Join microbit to participate - click to join for free!
  • Share
  • More
  • Cancel
Group Actions
  • Group RSS
  • More
  • Cancel
Engagement
  • Author Author: andyforeverest
  • Date Created: 2 Nov 2018 12:29 PM Date Created
  • Views 2712 views
  • Likes 4 likes
  • Comments 3 comments
  • intermediate micro:bit projects
  • micro:bit education giveaway
  • micro:bit project
  • microbit projects
  • intermediate_microbit_projects
  • the great micro:bit challenge
Related
Recommended

[PROJECT]  Develop a micro:bit watch

andyforeverest
andyforeverest
2 Nov 2018

We are going to start a project: develop a digital watch. This is actually going to be a multi-session project that we can expand as much as we like (depending on the level of attending students).


We will start with the easiest solution. Once that is working, we will ask ourselves if there are any features our watch is missing and how we can implement them. Then we will start the process all over again.


This approach makes the project adaptable to different levels of knowledge: the younger kids can do only the initial part and still have a working project, while the older ones can go deeper and learn more in the process.


1. Display the hour and minutes when a button is pressed


image


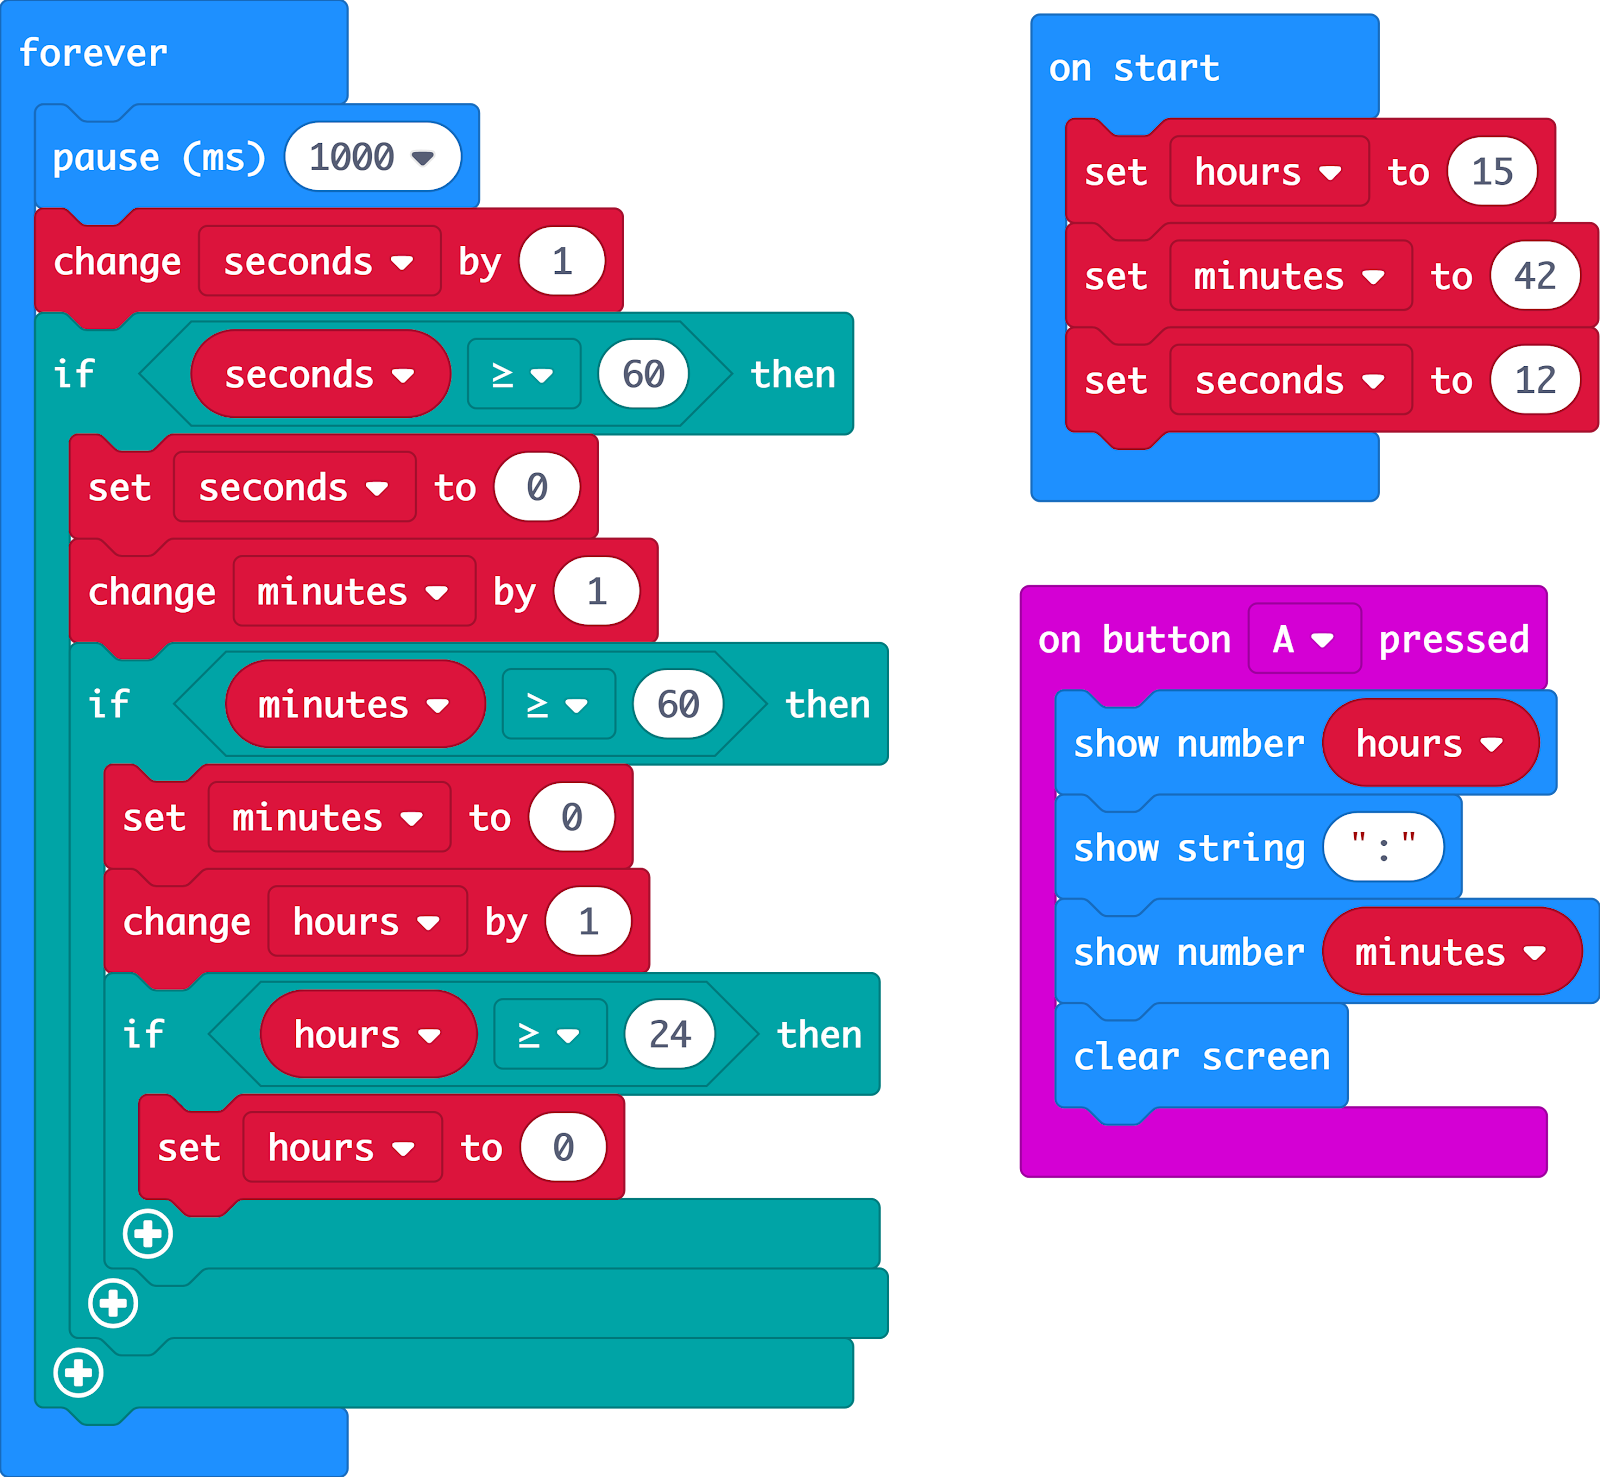
Pretty simple! The Forever loop keeps updating the time every second and pressing button_A displays the hour and minute.


What can be improved?

  • add a “0” in front of single digit minutes (ex: instead of “14:2”  display “14:02”)
  • time setting is difficult: one has to change the values of variables “hours”, “minutes” and “seconds”, then download the .hex file once again and copy on the micro:bit;
  • reading the time takes several seconds and that is not very practical!


2. Add a “0” in front of single digit minutes


image

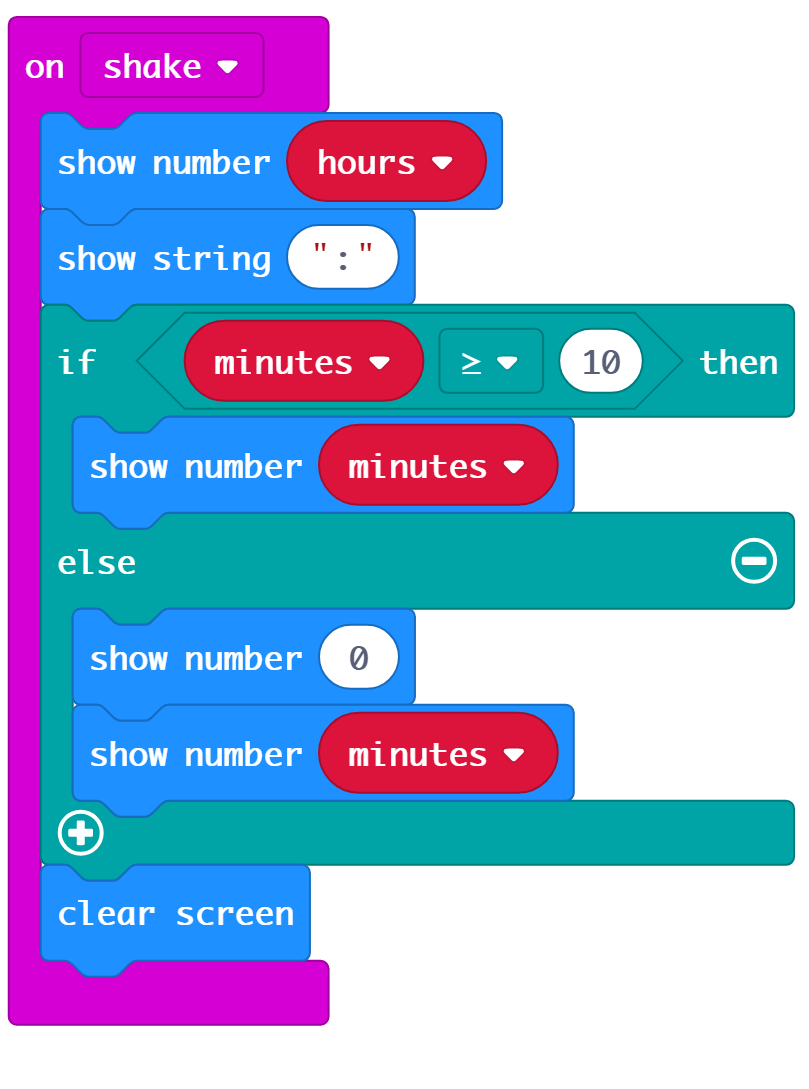
This is the only place where the program changes from the original version.


3. Use buttons to set the time


We are going to change the program so that setting of time will be done using the buttons: button_A to change the hour and button_B to change the minute. Then use “on shake” event to display the time.


image


Note that for each press of the buttons we need to make sure that the hour and minute are in range; otherwise we could go over the limit and the the program would not see this anomaly until the program in the forever loop would check (every minute for minutes and every hour for hours).


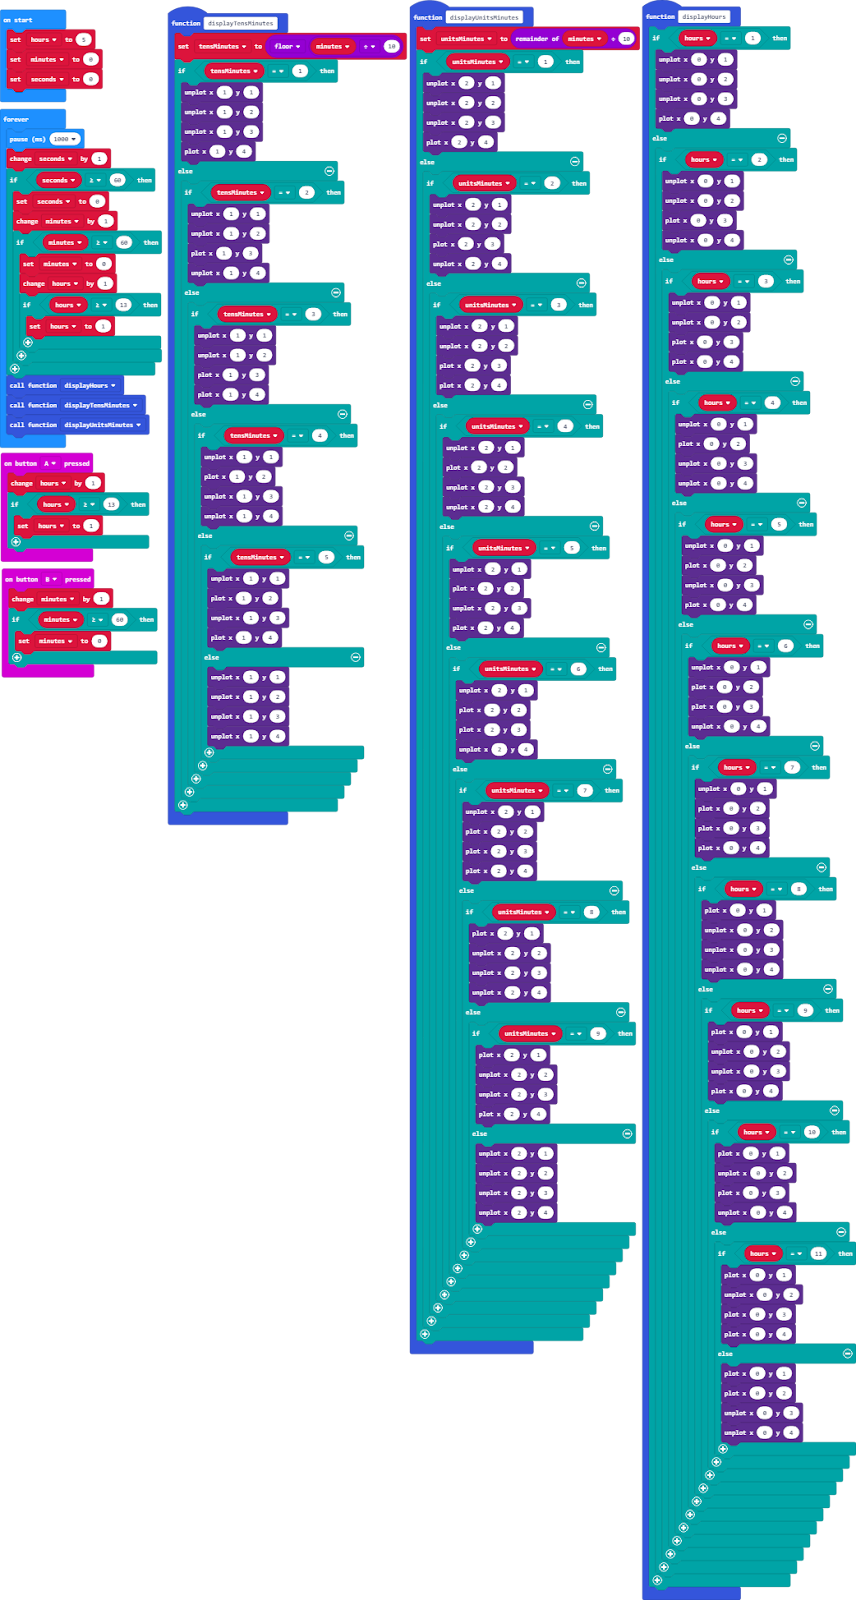
4. Change the display format


In order to display the time in such a manner that the whole time is visible at once (without waiting for the characters to scroll). In order to achieve such a goal, a different system for displaying the time should be considered. For example: https://blog.tokyoflash.com/2012/07/30/binary-led-watch-minimal-sleek-and-geeky/


Binary system


Numbers can be represented with “0” and “1” as such:


0 - 0000, 1 - 0001, 2 - 0010, 3 - 0011 etc (see more at https://www.mathsisfun.com/binary-number-system.html)


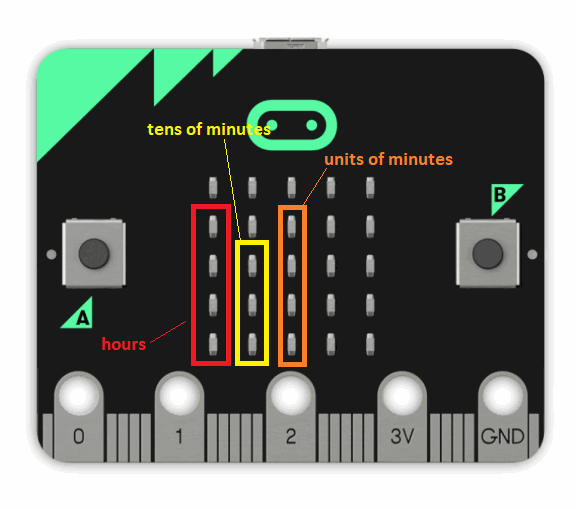
So, in order to display the hour, we would use the first column of LEDs, starting from the bottom LED (that being the least significant bit) going up. We would use four LEDs, thus being able to display all hours from 1 to 12.


For minutes we would use next two columns: the second and the third column on the display. On the second column we would display tens of minutes and on the third - units of minutes. The largest value for minutes is 59 so for the tens of minutes we use only 3 LEDs and for the units we use only 4 LEDs.


image


image


Now, the display works well. We can see the time at once (no scrolling delay). However, the program is long and hard to maintain. Can we make it shorter?


In order to answer this question we need to understand how a decimal number get converted into its binary representation.


How is a decimal number transformed into binary? By dividing the number to 2 and using the remainders as bits.


For example: 19 is 10011.


Step 1: 19 / 2 = 9 remainder is 1

Step 2: 9 / 2 = 4 remainder is 1

Step 3: 4 / 2 = 2 remainder is 0

Step 4: 2 / 2 = 1 remainder is 0

Step 5: 1 / 2 = 0 remainder is 1


So, the first remainder is the last bit (also called LSB - least significant bit). The second remainder is the next to last bit and so forth. We keep dividing until the quotient is 0. The first bit (also called MSB - most significant bit) is remainder of the last division.


It is implemented in the program below:


image


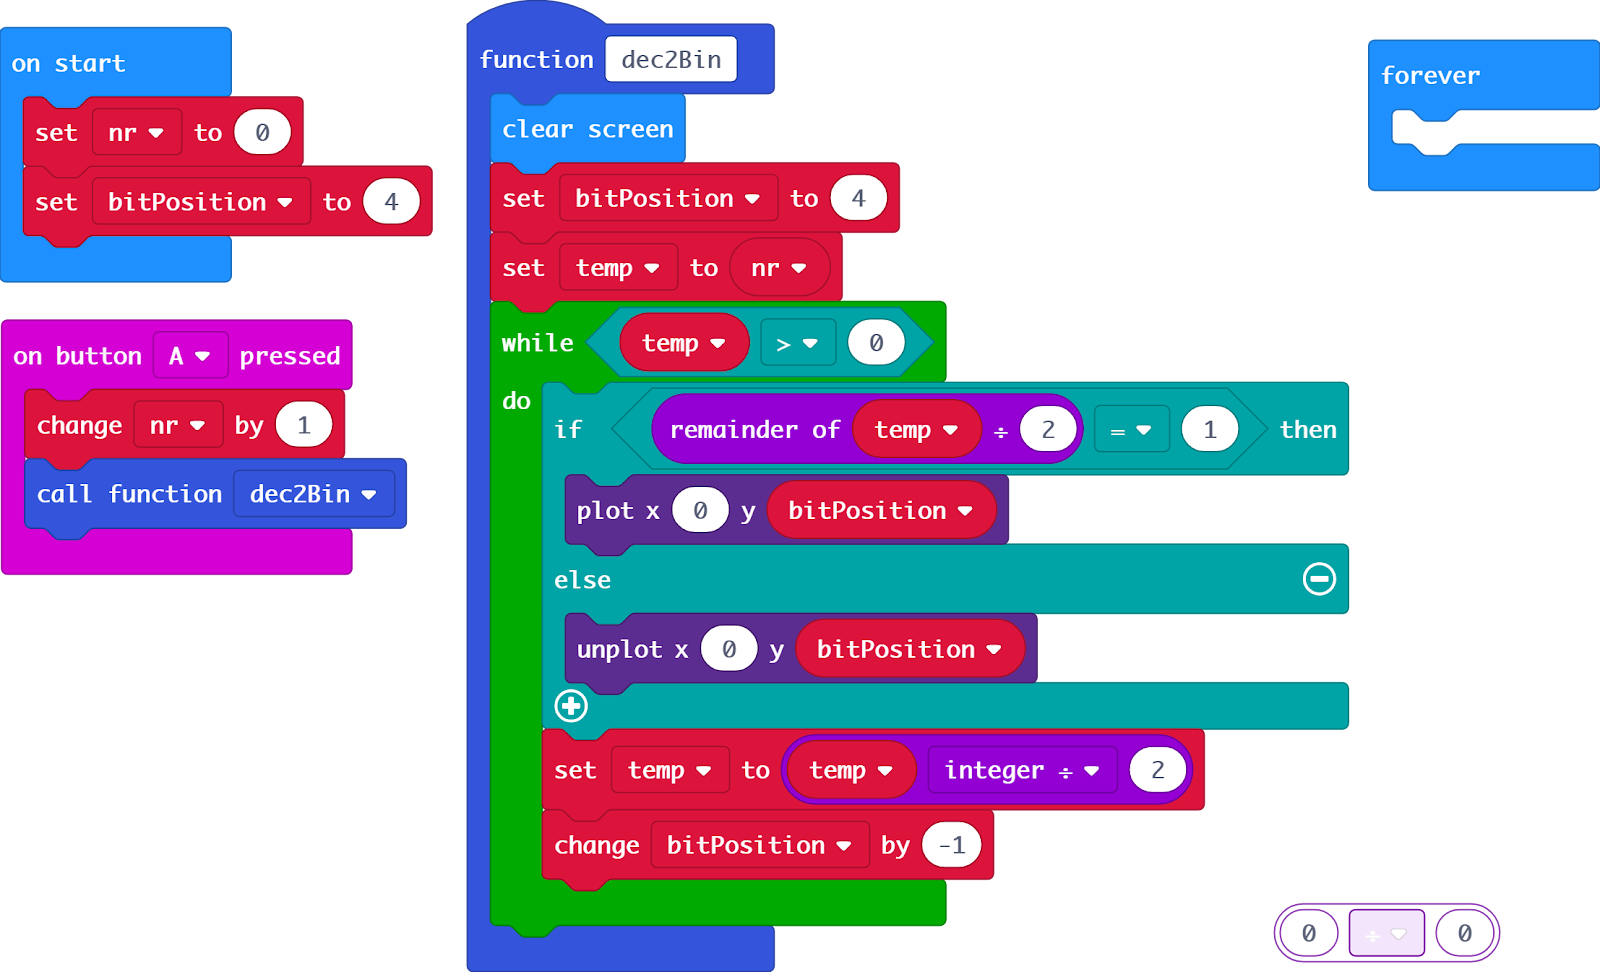
How do we implement this in the watch project?


image


Are there more steps to take in order to improve our watch?


I think so. Some possible options:


  1. We could display seconds on the last two columns of LEDs.
  2. We could add an alarm.
  3. We could add date (month and day of month) on the last two last columns of LEDs. If we do this, then we have to develop a system of setting the date using the buttons. So, we could use button A to set the mode (for example: hour setting mode, minute setting mode, month setting mode, day setting mode, alarm hour setting mode, alarm minute setting mode, normal mode). Then we could use button B to increase the value dictated by the current mode set at the previous mode.
  • Sign in to reply
Parents
  • Lesternixon
    Lesternixon over 2 years ago

    This method makes the project flexible to different knowledge levels: younger children can complete just the first section and still have a functioning project, while older children can dig deeper and learn more as a result.

    • Cancel
    • Vote Up 0 Vote Down
    • Sign in to reply
    • More
    • Cancel
Comment
  • Lesternixon
    Lesternixon over 2 years ago

    This method makes the project flexible to different knowledge levels: younger children can complete just the first section and still have a functioning project, while older children can dig deeper and learn more as a result.

    • Cancel
    • Vote Up 0 Vote Down
    • Sign in to reply
    • More
    • Cancel
Children
No Data
element14 Community

element14 is the first online community specifically for engineers. Connect with your peers and get expert answers to your questions.

  • Members
  • Learn
  • Technologies
  • Challenges & Projects
  • Products
  • Store
  • About Us
  • Feedback & Support
  • FAQs
  • Terms of Use
  • Privacy Policy
  • Legal and Copyright Notices
  • Sitemap
  • Cookies

An Avnet Company © 2025 Premier Farnell Limited. All Rights Reserved.

Premier Farnell Ltd, registered in England and Wales (no 00876412), registered office: Farnell House, Forge Lane, Leeds LS12 2NE.

ICP 备案号 10220084.

Follow element14

  • X
  • Facebook
  • linkedin
  • YouTube