element14 Community
element14 Community
    Register Log In
  • Site
  • Search
  • Log In Register
  • About Us
  • Community Hub
    Community Hub
    • What's New on element14
    • Feedback and Support
    • Benefits of Membership
    • Personal Blogs
    • Members Area
    • Achievement Levels
  • Learn
    Learn
    • Ask an Expert
    • eBooks
    • element14 presents
    • Learning Center
    • Tech Spotlight
    • STEM Academy
    • Webinars, Training and Events
    • Learning Groups
  • Technologies
    Technologies
    • 3D Printing
    • FPGA
    • Industrial Automation
    • Internet of Things
    • Power & Energy
    • Sensors
    • Technology Groups
  • Challenges & Projects
    Challenges & Projects
    • Design Challenges
    • element14 presents Projects
    • Project14
    • Arduino Projects
    • Raspberry Pi Projects
    • Project Groups
  • Products
    Products
    • Arduino
    • Avnet Boards Community
    • Dev Tools
    • Manufacturers
    • Multicomp Pro
    • Product Groups
    • Raspberry Pi
    • RoadTests & Reviews
  • Store
    Store
    • Visit Your Store
    • Choose another store...
      • Europe
      •  Austria (German)
      •  Belgium (Dutch, French)
      •  Bulgaria (Bulgarian)
      •  Czech Republic (Czech)
      •  Denmark (Danish)
      •  Estonia (Estonian)
      •  Finland (Finnish)
      •  France (French)
      •  Germany (German)
      •  Hungary (Hungarian)
      •  Ireland
      •  Israel
      •  Italy (Italian)
      •  Latvia (Latvian)
      •  
      •  Lithuania (Lithuanian)
      •  Netherlands (Dutch)
      •  Norway (Norwegian)
      •  Poland (Polish)
      •  Portugal (Portuguese)
      •  Romania (Romanian)
      •  Russia (Russian)
      •  Slovakia (Slovak)
      •  Slovenia (Slovenian)
      •  Spain (Spanish)
      •  Sweden (Swedish)
      •  Switzerland(German, French)
      •  Turkey (Turkish)
      •  United Kingdom
      • Asia Pacific
      •  Australia
      •  China
      •  Hong Kong
      •  India
      •  Korea (Korean)
      •  Malaysia
      •  New Zealand
      •  Philippines
      •  Singapore
      •  Taiwan
      •  Thailand (Thai)
      • Americas
      •  Brazil (Portuguese)
      •  Canada
      •  Mexico (Spanish)
      •  United States
      Can't find the country/region you're looking for? Visit our export site or find a local distributor.
  • Translate
  • Profile
  • Settings
micro:bit tutorial videos
  • Learn
  • Learning Center
  • STEM Academy
  • microbit
  • micro:bit tutorial videos
  • More
  • Cancel
micro:bit tutorial videos
Blog Animate NeoPixels in Make Code for micro:bit * 05 *
  • Blog
  • Forum
  • Documents
  • Events
  • Polls
  • Files
  • Members
  • Mentions
  • Sub-Groups
  • Tags
  • More
  • Cancel
  • New
Join micro:bit tutorial videos to participate - click to join for free!
  • Share
  • More
  • Cancel
Group Actions
  • Group RSS
  • More
  • Cancel
Engagement
  • Author Author: TechnoChic
  • Date Created: 19 Apr 2024 11:37 PM Date Created
  • Views 2655 views
  • Likes 6 likes
  • Comments 6 comments
Related
Recommended

Animate NeoPixels in Make Code for micro:bit * 05 *

TechnoChic
TechnoChic
19 Apr 2024
Animate NeoPixels in Make Code for micro:bit * 05 *

Welcome back! Natasha here. :)  

This is the fifth of 10 blog posts featuring each video in my series on animating LEDs with micro:bit and Make Code. If you've just stumbled upon this post, start from the beginning here.

image image

In the last video, I showed you how to turn the LEDs on and change them to show different colors. Then, I showed you how to change the duration of each color and, as a bonus, how to make an animated rainbow animation. 

Building upon this, in this video I'll show you how to address the individual NeoPixel pixels to program LED animations that appear to be moving across the strip.

NeoPixel Strip Connected to micro:bit

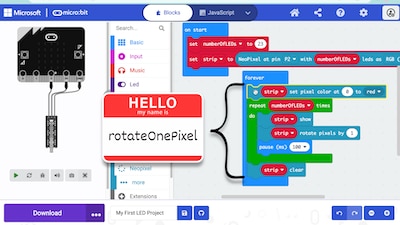
First, I'll show you how to refer to each pixel's address and use the "set pixel color" block to program each pixel's color individually. The video goes into this in more detail, but the one thing to remember is that you have to call "show!"

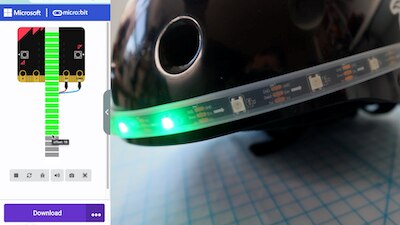
There are two ways to animate the pixels once you draw them: shift, and rotate. I'll go over the difference between the "shift pixels" and "rotate pixels" blocks and show an example of each. Then, I'll experiment with adding pixels to the animation and changing its direction. 

image image

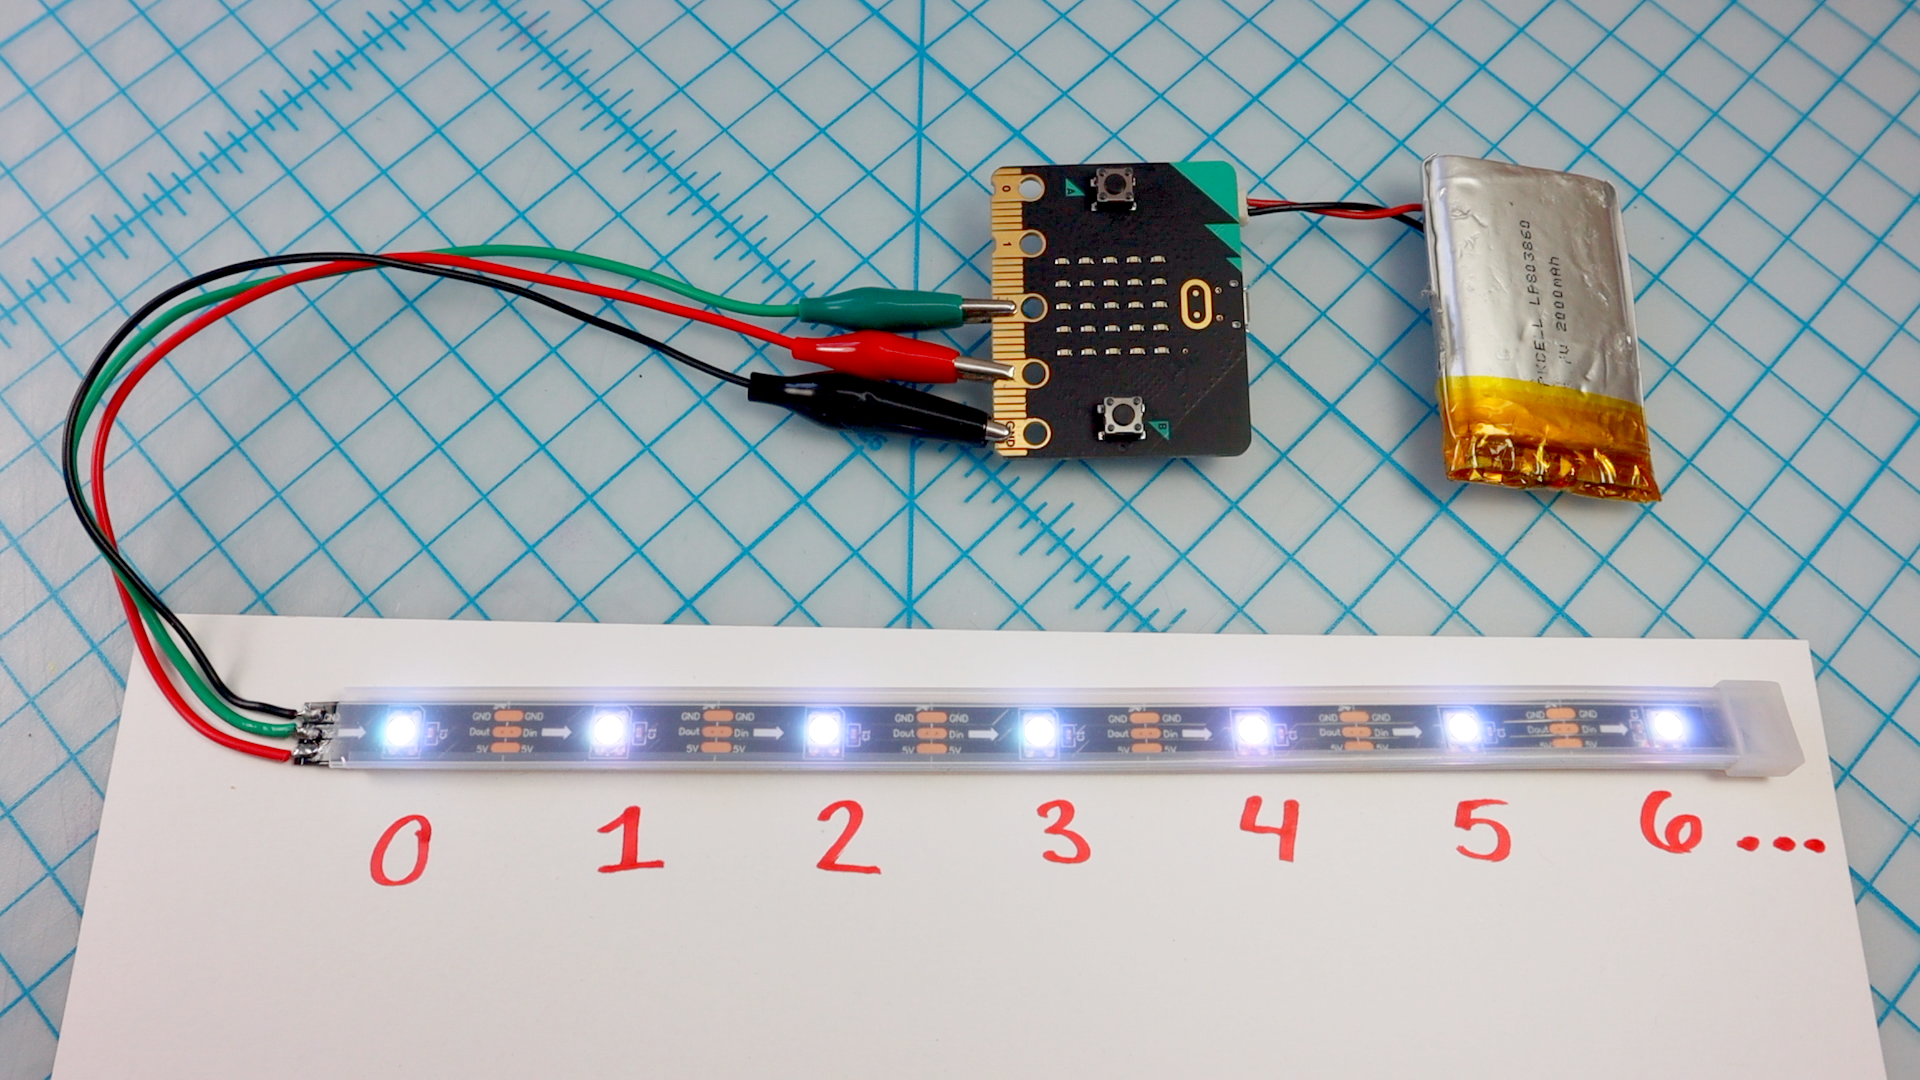
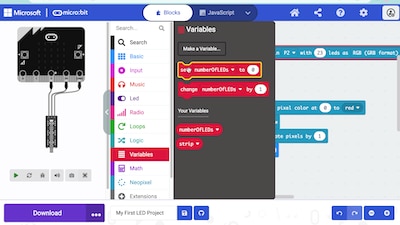
Since the number of LEDs on the strip is an important piece of information to keep track of when designing pixel animations, I'll go over how to store that information in a variable. This helps with remembering the number and lets us reuse this value throughout the code. 

Reorganization time!

The next step is structuring the code to set-up and animate the pixels in the forever loop. I add a repeat loop inside the forever loop to repeat the rotation of pixels and go through a few examples of why and how that works. 

image image

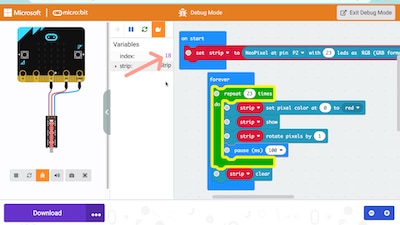
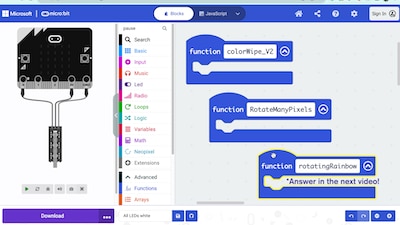
Then, to organize and reuse the code, I create a function. Functions are a way of giving sequences of code a name so that they can be reused. So, instead of repeating a bunch of blocks, I can just call the function instead. After setting it up, I add parameters to alter the speed and color of the pixel animation inside the function each time it's called!

image image

Next it's your turn! I show you how to duplicate a function and tweak it to create a new animation - like changing the "rotate one pixel" function into a "color wipe" across the NeoPixels. Your challenge is to duplicate the function and make it do whatever you want!

What will you create?

image image

Watch the full video now:

You don't have permission to edit metadata of this video.
Edit media
x
image
Upload Preview
image

How did it go?

What animations did you make? Do you have an idea but don't know how to start? 

Comment below or join the Discord channel to share your questions and ideas. 

See you there! Slight smile

  • Sign in to reply
  • TechnoChic
    TechnoChic over 1 year ago in reply to DAB

    Thanks! Slight smile

    • Cancel
    • Vote Up 0 Vote Down
    • Sign in to reply
    • More
    • Cancel
  • DAB
    DAB over 1 year ago

    Very good explanation of the software and introduction into more complex programming.

    • Cancel
    • Vote Up 0 Vote Down
    • Sign in to reply
    • More
    • Cancel
  • TechnoChic
    TechnoChic over 1 year ago in reply to beacon_dave

    Yes! Dan Shiffman's channel is a great place to start looking for inspiration and a 'cookbook' of effects -  translate the idea from Processing to Blocks. Advanced users will probably want to use Arduino, but for those of you looking to create animations with Make Code code blocks and want to go further, I did some of this reverse-engineering in my Xmas tree post: https://youtu.be/vJ72wu_Hbvw?si=0YAxhpEsmbksRSEz 

    The code is here: https://makecode.microbit.org/83462-70654-65119-58168

    • Cancel
    • Vote Up 0 Vote Down
    • Sign in to reply
    • More
    • Cancel
  • beacon_dave
    beacon_dave over 1 year ago in reply to TechnoChic

    A lot of it though comes down to array manipulation.

    You create an array the same length as your NeoPixel strip and your main program loop sends the contents of the array out to the NeoPixel strip.

    The creativity comes with how you manipulate the contents of that array each time you go around the loop.

    For example, if you want a comet tail effect, you turn on the first element of the array to max, then the next time around the loop you decrease all values in the array by a sizable amount, then turn on the next index of the array to max. The result is a full brightness LED at index 1 followed by a dimmed LED at index 0. Repeat this over and over and you see a full brightness LED moving along followed by LEDs decreasing in brightness (comet's tail) then finally LEDs that are turned off as they have been dimmed to zero. Once you reach the last element of the array, you either reverse the direction stepping through the array or loop around to the start. By varying the amount you decrement by each time, you get a longer or shorter tail.

    For me, the tricky bit is coming up with the creative stuff to do with the manipulation of the array in order to get nice visual effects. That's where a 'cookbook' of effects would be useful to get some more ideas to play around with.

    After that I think I might be looking at some of Daniel Shiffman's 'The Nature of Code' type algorithms to add the likes of gravity and acceleration and easing in and out to the party.

    For a stationary bicycle wheel you could perhaps have fireworks launching from the bottom of the wheel up the rim and then exploding when they reach the top then falling back down the rim under gravity.

    You could perhaps have a Newton's cradle type effect with balls dropping from the top of the wheel feeding a Newton's cradle type animation at the bottom of the wheel.

    For a moving bicycle then perhaps deceleration under braking could trigger comet tail type effects and a colour shift to orange and red. The harder the braking the more exaggerated the tails and colour shift.

    • Cancel
    • Vote Up 0 Vote Down
    • Sign in to reply
    • More
    • Cancel
  • TechnoChic
    TechnoChic over 1 year ago in reply to beacon_dave

    Thanks!

    Most NeoPixel references are written for Arduino or Circuit Playground, but the best animations rely on libraries like FastLED or built-in presets. This is great, but there is a huge jump between "tweaking the presets" and coding an animation based on your original design idea. (When I taught my high school students they would decide that the default was what they were going for instead of trying to design their animation themselves, haha.)

    I designed this tutorial to show the thought process behind building the animation from scratch. There is a ton to be built upon this and if I can find the funding to keep going, I will. Slight smile

    • Cancel
    • Vote Up 0 Vote Down
    • Sign in to reply
    • More
    • Cancel
>
element14 Community

element14 is the first online community specifically for engineers. Connect with your peers and get expert answers to your questions.

  • Members
  • Learn
  • Technologies
  • Challenges & Projects
  • Products
  • Store
  • About Us
  • Feedback & Support
  • FAQs
  • Terms of Use
  • Privacy Policy
  • Legal and Copyright Notices
  • Sitemap
  • Cookies

An Avnet Company © 2025 Premier Farnell Limited. All Rights Reserved.

Premier Farnell Ltd, registered in England and Wales (no 00876412), registered office: Farnell House, Forge Lane, Leeds LS12 2NE.

ICP 备案号 10220084.

Follow element14

  • X
  • Facebook
  • linkedin
  • YouTube