element14 Community
element14 Community
    Register Log In
  • Site
  • Search
  • Log In Register
  • Community Hub
    Community Hub
    • What's New on element14
    • Feedback and Support
    • Benefits of Membership
    • Personal Blogs
    • Members Area
    • Achievement Levels
  • Learn
    Learn
    • Ask an Expert
    • eBooks
    • element14 presents
    • Learning Center
    • Tech Spotlight
    • STEM Academy
    • Webinars, Training and Events
    • Learning Groups
  • Technologies
    Technologies
    • 3D Printing
    • FPGA
    • Industrial Automation
    • Internet of Things
    • Power & Energy
    • Sensors
    • Technology Groups
  • Challenges & Projects
    Challenges & Projects
    • Design Challenges
    • element14 presents Projects
    • Project14
    • Arduino Projects
    • Raspberry Pi Projects
    • Project Groups
  • Products
    Products
    • Arduino
    • Avnet & Tria Boards Community
    • Dev Tools
    • Manufacturers
    • Multicomp Pro
    • Product Groups
    • Raspberry Pi
    • RoadTests & Reviews
  • About Us
  • Store
    Store
    • Visit Your Store
    • Choose another store...
      • Europe
      •  Austria (German)
      •  Belgium (Dutch, French)
      •  Bulgaria (Bulgarian)
      •  Czech Republic (Czech)
      •  Denmark (Danish)
      •  Estonia (Estonian)
      •  Finland (Finnish)
      •  France (French)
      •  Germany (German)
      •  Hungary (Hungarian)
      •  Ireland
      •  Israel
      •  Italy (Italian)
      •  Latvia (Latvian)
      •  
      •  Lithuania (Lithuanian)
      •  Netherlands (Dutch)
      •  Norway (Norwegian)
      •  Poland (Polish)
      •  Portugal (Portuguese)
      •  Romania (Romanian)
      •  Russia (Russian)
      •  Slovakia (Slovak)
      •  Slovenia (Slovenian)
      •  Spain (Spanish)
      •  Sweden (Swedish)
      •  Switzerland(German, French)
      •  Turkey (Turkish)
      •  United Kingdom
      • Asia Pacific
      •  Australia
      •  China
      •  Hong Kong
      •  India
      • Japan
      •  Korea (Korean)
      •  Malaysia
      •  New Zealand
      •  Philippines
      •  Singapore
      •  Taiwan
      •  Thailand (Thai)
      • Vietnam
      • Americas
      •  Brazil (Portuguese)
      •  Canada
      •  Mexico (Spanish)
      •  United States
      Can't find the country/region you're looking for? Visit our export site or find a local distributor.
  • Translate
  • Profile
  • Settings
Community Hub
Community Hub
Member Blogs How not to repair a Playstation 4 - The Risks of Second Hand Electronics
  • Blog
  • Forum
  • Documents
  • Quiz
  • Events
  • Leaderboard
  • Polls
  • Files
  • Members
  • Mentions
  • Sub-Groups
  • Tags
  • More
  • Cancel
  • New
Join Community Hub to participate - click to join for free!
  • Share
  • More
  • Cancel
Group Actions
  • Group RSS
  • More
  • Cancel
Engagement
  • Author Author: cstanton
  • Date Created: 1 Jul 2019 1:06 PM Date Created
  • Views 1051 views
  • Likes 13 likes
  • Comments 10 comments
  • micro soldering
  • playstation 4 repair
  • playstation 4
Related
Recommended

How not to repair a Playstation 4 - The Risks of Second Hand Electronics

cstanton
cstanton
1 Jul 2019

I have enough game consoles in the house, they're not all current generation. I have a Wii, Wii-U, XBox 360, Nintendo (3)DS, GBA, Gameboy, SteamLink to my gaming PC, and access to a Playstation 3. A friend of mine offered me a copy of Destiny since I've been playing Destiny 2 on the PC and I haven't finished the first.


The problem? It's a console exclusive, so I thought to myself "What if I managed to get a Playstation 4? I can play Destiny 1 free online with it and... maybe if it's a bit damaged, I can fix it!"


So most 'damaged' Playstation 4s go for about £60-90, claiming that it's an easy fix for the HDMI port, apparently these get very loose and rip up the pads on the PCB and just need a re-soldering job. Sounds easy enough, or perhaps the processor needs to sit under a heat gun for a bit of reflow.


So I gave myself a budget, can I get hold of and fix a Playstation 4 for £50 max? I thought I was in with a winner when I found one on gumtree for £25 saying it 'doesn't display but it obviously powers up'.


Yeah, yeah... sooooo I really should have checked it physically before handing over the money, when I got the Playstation 4 home, the torx screws had been mangled. so I opened it up. Oh boy.


Oh, boy.


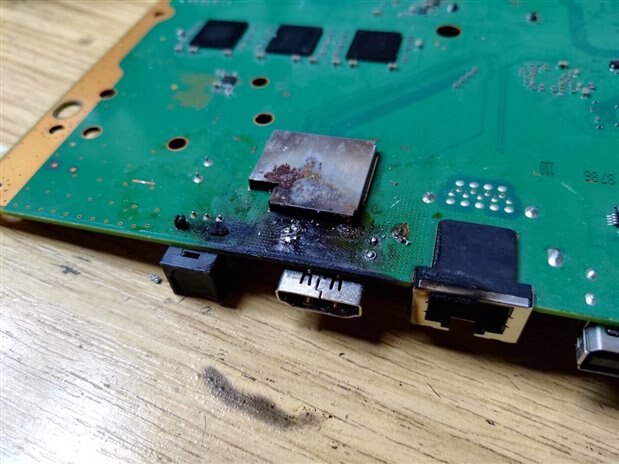
I really wish I had taken a photo' of it when I first got to the motherboard, instead, you can bare witness to the clean up after I removed the huge blob of solder that was across the HDMI pins, and the massacre of the board left behind:


imageimage


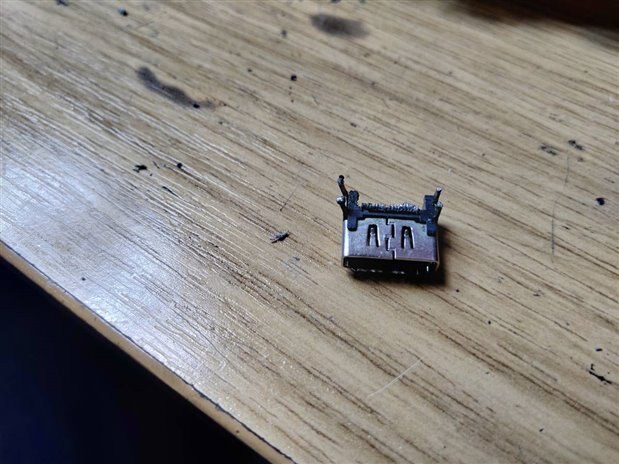
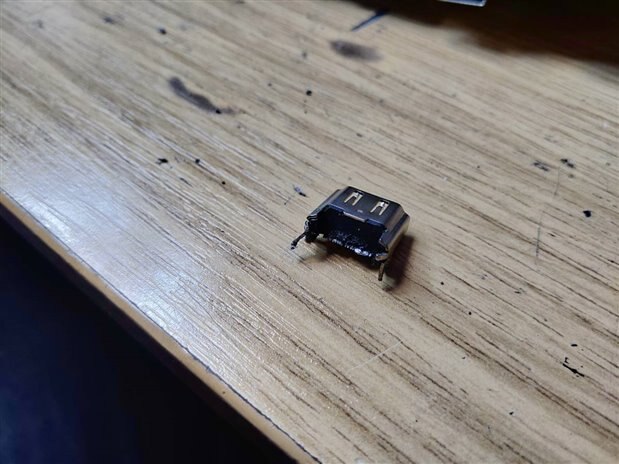
Pretty charred for a HDMI port.. so about the rest of it..


imageimage


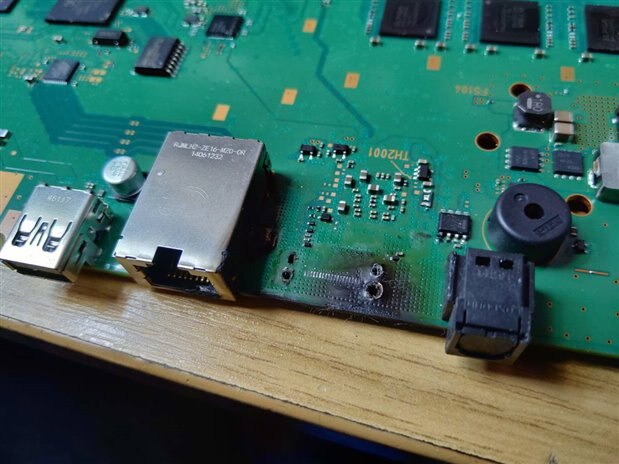
I thought maybe they've used some kind of butane / blow torch on this, but it looks like they've drilled through the PCB to get the HDMI port out and then wondered why it's not working.


Still, under advisement, and a bit of clean up, I thought maybe it hadn't been entirely trashed, the vias seem OK and the traces are still there.


image


I've managed to re-solder the HDMI port on, and now at least any screen I plug in recognises that it's got a HDMI cable plugged in, still though, doesn't work. I'm wondering if this HDMI port is actually connected up properly because it's orientation seems different to the original, may have to double check that later.


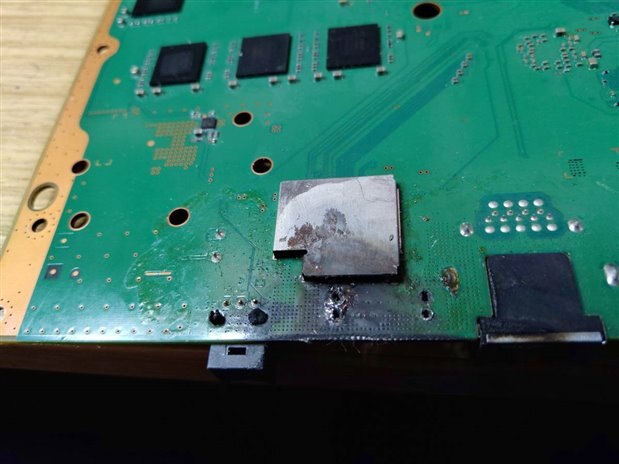
So the other part that can fail is apparently the IC under the shielding... time for some proper reflow work and a bit of kapton tape.


image


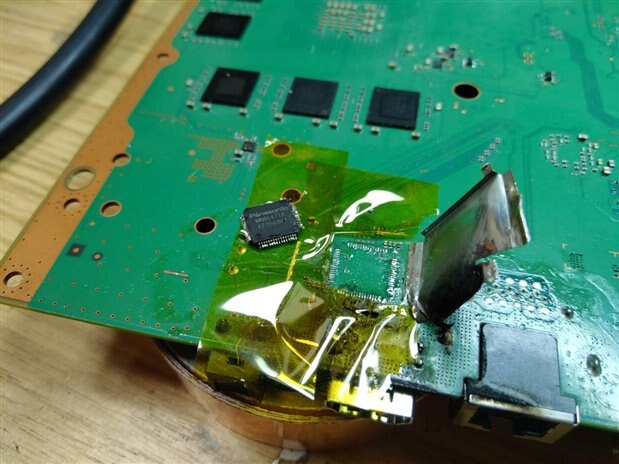
This was a pain to remove, I had to go up to 500degC on the station to get this melted. I managed to replace it successfully, still, no go on the visuals. I'm wondering if the filters were also damaged, as those had started to pull the trace from the board a bit.


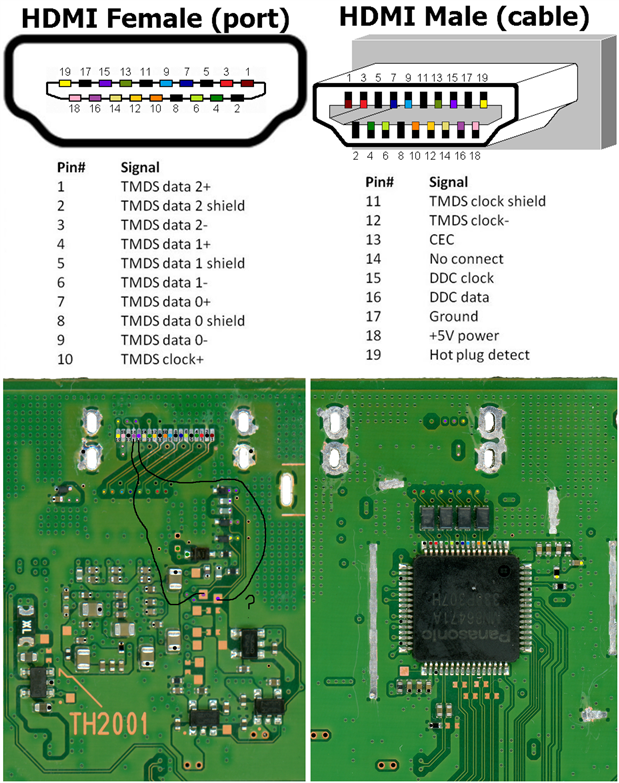
I've at least learned a lot from soldering at this pitch, which I hadn't done before, and the Playstation 4 does indeed boot up fully, it's just getting the visuals out of the system. At this point I'm just below my budget for fixing it, and I managed to find this graphic online:


image


Micro soldering isn't something I've tried before either, but at this point, I've literally got nothing to lose from this mess, haha!


What's been your most difficult repair?

  • Sign in to reply

Top Comments

  • shabaz
    shabaz over 6 years ago +6
    There's so many deceptive things on sale, it's disappointing : ( I've received a couple of items from ebay in the past, that the owner must have known were faulty, and yet sold as "untested" : ( I cannot…
  • dougw
    dougw over 6 years ago +4
    A brave attempt at repair. Looking at the original repair mess, I don't think I have ever seen such a nasty butcher job performed in hopes of repair. It looks like it came out of a war zone where nothing…
  • cstanton
    cstanton over 6 years ago in reply to dougw +3
    Oooh taking apart a hard drive, that is risky - did you manage to have a dust free environment to do it in?
  • dougw
    dougw over 6 years ago in reply to cstanton +3
    This was done in my basement which is definitely not a clean room. I do have air cleaners to minimize my allergies, but this wasn't allergy season, so they were not running. I did wear gloves though -…
  • johnclord
    johnclord over 6 years ago +3
    I didn't have to do any reflow work (and pray I never have to!), but I have a Foscam F18910W camera that I had mounted under the roof overhang in front of our garage, that had been "not right" after I…
  • cstanton
    cstanton over 6 years ago in reply to dougw +2
    This reminds me of a 1tB Seagate drive I have which failed on me, upon further inspection, the microcontroller chip on it exploded (it has a hole in the middle of it where it went 'pop'. I may now actually…
  • Jan Cumps
    Jan Cumps over 6 years ago +1
    I also use 500° for rework on this kind of components on lead-free boards In combination with pre-heating and a ridiculous amount of flux.
  • cstanton
    cstanton over 6 years ago in reply to shabaz +1
    Huh, I always wondered what inside an ecu looked like, thanks for sharing.
  • Jan Cumps
    Jan Cumps over 6 years ago in reply to johnclord

    Instead of wiring, you can use a WiFi repeater to bridge the long distance.

    They are more expensive than a network wire but easier to place. You only need a free wall outlet.

    • Cancel
    • Vote Up 0 Vote Down
    • Sign in to reply
    • More
    • Cancel
  • johnclord
    johnclord over 6 years ago

    I didn't have to do any reflow work (and pray I never have to!), but I have a Foscam F18910W camera that I had mounted under the roof overhang in front of our garage, that had been "not right" after I accidentally hit it with a  high pressure water spray while washing gnats and cobwebs off the exterior garage light nearby.  The unit still seemed to power up OK and turn back and forth as usual while booting, and all the LED's in back still came on as usual, but the cabled and WiFi internet on it were NOT working.  After watching the video of some guy working on a very similar model Foscam, (here: https://www.youtube.com/watch?v=ibXkmefqx6E  ) I figured I couldn't break mine any worse than its already incommunicative state.  So, watching as he discovered all 4 screws, I opened mine up to view the damage.  I didn't think to make a photo of mine, but the only part that looked messed up in mine was the main PCB with the SMD's on it.  The water had gotten in there and washed dust and debris across the leads on the SMDs and I figure made shorts across most of them.  So first, I used the canned air duster to blow loose what I could.  Then I used cotton swabs with alcohol to try and gently scrub them.  Then I decided that was just too tedious, so I took a clean terry wash cloth wetted with alcohol (plain old rubbing alcohol) and swabbed the entire filthy side of the PCB where the SMDs were mounted.  When it looked like I'd gotten all the debris off the connections, I used the canned air again to dry it all out, put it together, and was pleasantly surprised to watch it show up (wired) on my network as "Anonymous" because I'd also used the reset button while booting it to reset it to factory defaults.  After using the wired connection to program it with our timezone and give it the Wi-Fi SSID and password, and also changing its own administrator username and password, I disconnected the Ethernet wire and rebooted it and watched it connect successfully to my Wi-Fi network.   Saved myself the $79 I'd paid for it many years ago and only used a couple tablespoons of rubbing alcohol and some canned air duster.  This guy's youtube video (link already given above) is him working on his own Foscam camera which appears to have the same circuit board as my own camera.  I just snagged the relevant screenshot image

    from his video. The SMD contacts are incredibly close together.  I think a human hair would be hard to fit between them.  I felt incredibly lucky to have gotten them all clean enough to work with my crude and impatient repair, but it worked.

    Now that I have all three of my Foscam cameras working again, I need to run wiring for the two that are still using Wi-Fi.  There's just too much distance and signal obstruction and the wi-fi communication is too slow, so those two keep dropping offline.  The wired one stays on OK, but it was the one I'd hit with the water spray.  The other two are just annoyingly unreliable on Wi-Fi.  Probably because I have them mounted outside the house and when we got new siding, the installers put up 1/4" thick foam board insulation panels that had silvered aluminum foil covering them.  I think I live inside a Faraday cage now.  I had to use an outdoor antenna on the rooftop to get decent, free, over the air TV signals.

    There's always something left to fix, isn't there?

    • Cancel
    • Vote Up +3 Vote Down
    • Sign in to reply
    • More
    • Cancel
  • shabaz
    shabaz over 6 years ago in reply to cstanton

    The older ones were fun to work with, a friend used to make money from Ford Sierra Cosworth owners : ) by pulling out the old-school dual-in-line packages (EPROMS : ) and replacing them with blank ones from Maplin, programmed for higher performance. Using Motorola/Freescale 6805 CPU I recall (not 100% sure).


    This is the one in my car.. fortunately no potting over this one.. but hard to service if the left-most MOSFET fails : ) it would need the 100+ pin connector removing, or breaking off a plastic bit of the connector!

    image

    • Cancel
    • Vote Up 0 Vote Down
    • Sign in to reply
    • More
    • Cancel
  • cstanton
    cstanton over 6 years ago in reply to shabaz

    Huh, I always wondered what inside an ecu looked like, thanks for sharing.

    • Cancel
    • Vote Up +1 Vote Down
    • Sign in to reply
    • More
    • Cancel
  • Jan Cumps
    Jan Cumps over 6 years ago

    I also use 500° for rework on this kind of components on lead-free boards In combination with pre-heating and a ridiculous amount of flux.

    • Cancel
    • Vote Up +1 Vote Down
    • Sign in to reply
    • More
    • Cancel
>
element14 Community

element14 is the first online community specifically for engineers. Connect with your peers and get expert answers to your questions.

  • Members
  • Learn
  • Technologies
  • Challenges & Projects
  • Products
  • Store
  • About Us
  • Feedback & Support
  • FAQs
  • Terms of Use
  • Privacy Policy
  • Legal and Copyright Notices
  • Sitemap
  • Cookies

An Avnet Company © 2025 Premier Farnell Limited. All Rights Reserved.

Premier Farnell Ltd, registered in England and Wales (no 00876412), registered office: Farnell House, Forge Lane, Leeds LS12 2NE.

ICP 备案号 10220084.

Follow element14

  • X
  • Facebook
  • linkedin
  • YouTube