This is a continuation of my previous post Seeeduino XIAO Expansion board . I'm going to use the RTC and microSD card to datalog time stamped temperature and humidity data from the DHT11 sensor to a file.
I'm going to use the RTC (PCF8563) and OLED (Adafruit_SSD1306) libraries from my previous post and add the standard Arduino SD library for the microSD card interface. The SD library will pick up the default SD SPI (MOSI,MISO,CLK) pins from the Xiao variant.h file so we only need to specify the pin that we are using for the SD CS pin.
From the Expansion board schematic we find that the SD CS is pin D2.


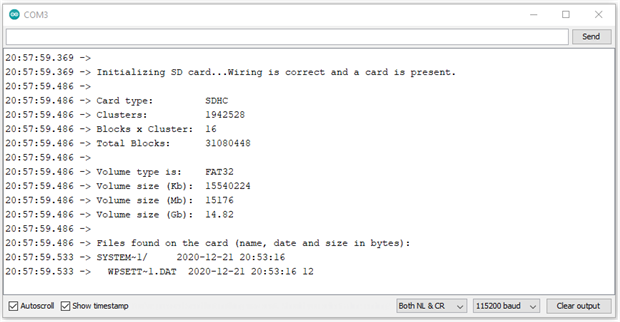
As a quick check of the interface, I ran the SD Cardinfo example. I am using a SanDisk 16GB FAT32 formatted SDHC card.
Xiao_SD_CardInfo.ino
/*
  SD card test

  This example shows how use the utility libraries on which the'
  SD library is based in order to get info about your SD card.
  Very useful for testing a card when you're not sure whether its working or not.

  The circuit:
    SD card attached to SPI bus as follows: (SPI hardware default for Xiao)
 ** MOSI - pin 11
 ** MISO - pin 10
 ** CLK - pin 9
 ** CS - depends on your SD card shield or module.
  Pin 2 used here for the Xiao Expansion board

  created  28 Mar 2011
  by Limor Fried
  modified 9 Apr 2012
  by Tom Igoe
  modified for Xiao Expansion board 21 Dec 2020
  by Ralph Yamamoto
*/
// include the SD library:
#include <SPI.h>
#include <SD.h>

// set up variables using the SD utility library functions:
Sd2Card card;
SdVolume volume;
SdFile root;

// change this to match your SD shield or module;
// Xiao Expansion SD: pin D2
const int chipSelect = 2;

void setup() {
  // Open serial communications and wait for port to open:
  Serial.begin(9600);
  while (!Serial) {
    ; // wait for serial port to connect. Needed for native USB port only
  }

  Serial.print("\nInitializing SD card...");

  // we'll use the initialization code from the utility libraries
  // since we're just testing if the card is working!
  if (!card.init(SPI_HALF_SPEED, chipSelect)) {
    Serial.println("initialization failed. Things to check:");
    Serial.println("* is a card inserted?");
    Serial.println("* is your wiring correct?");
    Serial.println("* did you change the chipSelect pin to match your shield or module?");
    while (1);
  } else {
    Serial.println("Wiring is correct and a card is present.");
  }

  // print the type of card
  Serial.println();
  Serial.print("Card type:         ");
  switch (card.type()) {
    case SD_CARD_TYPE_SD1:
      Serial.println("SD1");
      break;
    case SD_CARD_TYPE_SD2:
      Serial.println("SD2");
      break;
    case SD_CARD_TYPE_SDHC:
      Serial.println("SDHC");
      break;
    default:
      Serial.println("Unknown");
  }

  // Now we will try to open the 'volume'/'partition' - it should be FAT16 or FAT32
  if (!volume.init(card)) {
    Serial.println("Could not find FAT16/FAT32 partition.\nMake sure you've formatted the card");
    while (1);
  }

  Serial.print("Clusters:          ");
  Serial.println(volume.clusterCount());
  Serial.print("Blocks x Cluster:  ");
  Serial.println(volume.blocksPerCluster());

  Serial.print("Total Blocks:      ");
  Serial.println(volume.blocksPerCluster() * volume.clusterCount());
  Serial.println();

  // print the type and size of the first FAT-type volume
  uint32_t volumesize;
  Serial.print("Volume type is:    FAT");
  Serial.println(volume.fatType(), DEC);

  volumesize = volume.blocksPerCluster();    // clusters are collections of blocks
  volumesize *= volume.clusterCount();       // we'll have a lot of clusters
  volumesize /= 2;                           // SD card blocks are always 512 bytes (2 blocks are 1KB)
  Serial.print("Volume size (Kb):  ");
  Serial.println(volumesize);
  Serial.print("Volume size (Mb):  ");
  volumesize /= 1024;
  Serial.println(volumesize);
  Serial.print("Volume size (Gb):  ");
  Serial.println((float)volumesize / 1024.0);

  Serial.println("\nFiles found on the card (name, date and size in bytes): ");
  root.openRoot(volume);

  // list all files in the card with date and size
  root.ls(LS_R | LS_DATE | LS_SIZE);
}

void loop(void) {
}
The results are correct.
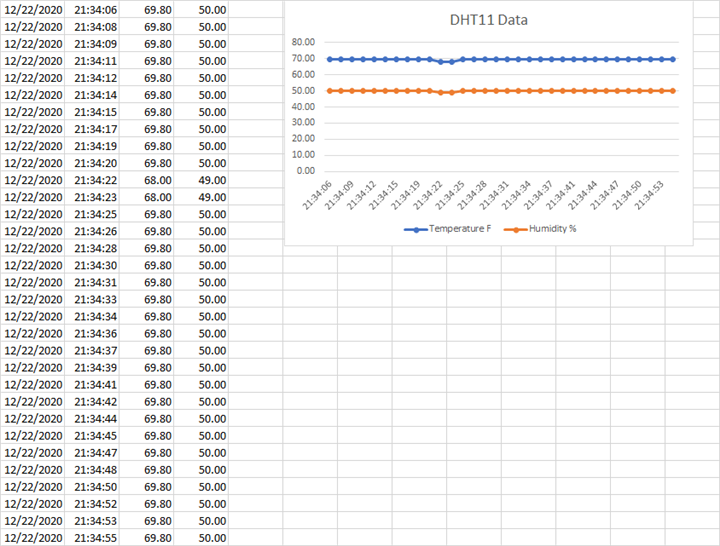
Then I created a simple program to log DHT11 temperature and humidity data with date and time information to the SD card in CSV format. The values are logged approximately every second.
/*
  SD card datalogger for Xiao Expansion Board

  This example shows how to log data from DHT11 temperature sensor
  to an SD card using the SD library.

  The circuit:
   DHT11 on pin 0
   SD card attached to SPI bus as follows: (SPI pins are Xiao hardware default except for CS)
 ** MOSI - pin 11
 ** MISO - pin 10
 ** CLK - pin 9
 ** CS - pin 2

  created  21 Dec 2020
  by Ralph Yamamoto

  This example code is in the public domain.
*/

#include "DHT.h"
#include <SPI.h>
#include <SD.h>
#include <PCF8563.h>  // RTC
#include <Adafruit_GFX.h>
#include <Adafruit_SSD1306.h>

#define DHTPIN 0     // what pin DHT11 is connected to
#define DHTTYPE DHT11   // DHT 11

#define SCREEN_WIDTH 128 // OLED display width, in pixels
#define SCREEN_HEIGHT 64 // OLED display height, in pixels

// Declaration for an SSD1306 display connected to I2C (SDA, SCL pins)
#define OLED_RESET     -1 // Reset pin # (or -1 if sharing Arduino reset pin)

PCF8563 rtc;
Adafruit_SSD1306 display(SCREEN_WIDTH, SCREEN_HEIGHT, &Wire, OLED_RESET);
DHT dht(DHTPIN, DHTTYPE);
Time nowTime;
File dataFile;

const int chipSelect = 2;  // SD CS pin

void setup() {
  // Open serial communications and wait for port to open:
  Serial.begin(115200);
  while (!Serial) {
    ; // wait for serial port to connect. Needed for native USB port only
  }

  rtc.init();   //initialize RTC
  dht.begin();

  display.begin(SSD1306_SWITCHCAPVCC, 0x3C);
  display.clearDisplay();
  display.display();

  Serial.print("Initializing SD card...");

  // see if the card is present and can be initialized:
  if (!SD.begin(chipSelect)) {
    Serial.println("Card failed, or not present");
    // don't do anything more:
    while (1);
  }
  Serial.println("card initialized.");

  nowTime = rtc.getTime();   //get current time

  //print current time
  Serial.print(nowTime.day);
  Serial.print("/");
  Serial.print(nowTime.month);
  Serial.print("/");
  Serial.print(nowTime.year);
  Serial.print(" ");
  Serial.print(nowTime.hour);
  Serial.print(":");
  Serial.print(nowTime.minute);
  Serial.print(":");
  Serial.println(nowTime.second);

}

void loop() {
  double temp, humid;
  temp = dht.readTemperature()*1.8 + 32;
  humid = dht.readHumidity();

  Serial.print("Temperature: ");
  Serial.print(temp);
  Serial.println(" F");
  Serial.print("Humidity: ");
  Serial.print(humid);
  Serial.println(" %RH");

  // write to display
  display.setTextSize(1);
  display.setTextColor(SSD1306_WHITE, SSD1306_BLACK);
  display.setCursor(2, 30);
  display.print("Temperature: ");
  display.print(temp);
  display.print(" C");
  display.setCursor(2, 50);
  display.print("Humidity: ");
  display.print(humid);
  display.print(" %");
  display.display();

  // make a string for assembling the data to log:
  String dataString = "";

  // enter the timestamp
  nowTime = rtc.getTime();   //get current time
  dataString += print_time(nowTime);
  dataString += ",";
  dataString += String(temp);
  dataString += ",";
  dataString += String(humid);

  // open the file. note that only one file can be open at a time,
  // so you have to close this one before opening another.
  File dataFile = SD.open("log0.csv", FILE_WRITE);

  // if the file is available, write to it:
  if (dataFile) {
    dataFile.println(dataString);
    dataFile.close();
    // print to the serial port too:
    Serial.println(dataString);
  }
  // if the file isn't open, pop up an error:
  else {
    Serial.println("error opening datalog.txt");
  }

  delay(1000);
}

// function to return timestamp string
String print_time(Time timestamp) {
  char message[120];

  int Year = timestamp.year;
  int Month = timestamp.month;
  int Day = timestamp.day;
  int Hour = timestamp.hour;
  int Minute = timestamp.minute;
  int Second = timestamp.second;

  sprintf(message, "%d-%d-%d,%02d:%02d:%02d", Month,Day,Year,Hour,Minute,Second);

  return message;
}
Here's a quick look at log0.csv file in Excel. I manually inserted the plot of the data. I'll need to remember to add headers to the log file.