element14 Community
element14 Community
    Register Log In
  • Site
  • Search
  • Log In Register
  • Members
    Members
    • Benefits of Membership
    • Achievement Levels
    • Members Area
    • Personal Blogs
    • Feedback and Support
    • What's New on element14
  • Learn
    Learn
    • Learning Center
    • eBooks
    • STEM Academy
    • Webinars, Training and Events
    • Learning Groups
  • Technologies
    Technologies
    • 3D Printing
    • Experts & Guidance
    • FPGA
    • Industrial Automation
    • Internet of Things
    • Power & Energy
    • Sensors
    • Technology Groups
  • Challenges & Projects
    Challenges & Projects
    • Design Challenges
    • element14 presents
    • Project14
    • Arduino Projects
    • Raspberry Pi Projects
    • Project Groups
  • Products
    Products
    • Arduino
    • Dev Tools
    • Manufacturers
    • Raspberry Pi
    • RoadTests & Reviews
    • Avnet Boards Community
    • Product Groups
  • Store
    Store
    • Visit Your Store
    • 'Choose another store...'
      • Europe
      •  Austria (German)
      •  Belgium (Dutch, French)
      •  Bulgaria (Bulgarian)
      •  Czech Republic (Czech)
      •  Denmark (Danish)
      •  Estonia (Estonian)
      •  Finland (Finnish)
      •  France (French)
      •  Germany (German)
      •  Hungary (Hungarian)
      •  Ireland
      •  Israel
      •  Italy (Italian)
      •  Latvia (Latvian)
      •  
      •  Lithuania (Lithuanian)
      •  Netherlands (Dutch)
      •  Norway (Norwegian)
      •  Poland (Polish)
      •  Portugal (Portuguese)
      •  Romania (Romanian)
      •  Russia (Russian)
      •  Slovakia (Slovak)
      •  Slovenia (Slovenian)
      •  Spain (Spanish)
      •  Sweden (Swedish)
      •  Switzerland(German, French)
      •  Turkey (Turkish)
      •  United Kingdom
      • Asia Pacific
      •  Australia
      •  China
      •  Hong Kong
      •  India
      •  Korea (Korean)
      •  Malaysia
      •  New Zealand
      •  Philippines
      •  Singapore
      •  Taiwan
      •  Thailand (Thai)
      • Americas
      •  Brazil (Portuguese)
      •  Canada
      •  Mexico (Spanish)
      •  United States
      Can't find the country/region you're looking for? Visit our export site or find a local distributor.
  • Translate
  • Profile
Personal Blogs
  • Members
  • More
Personal Blogs
Legacy Personal Blogs 2 - Required Components
  • Blog
  • Documents
  • Mentions
  • Sub-Groups
  • Tags
  • More
  • Cancel
  • New
Blog Post Actions
  • Subscribe by email
  • More
  • Cancel
  • Share
  • Subscribe by email
  • More
  • Cancel
Group Actions
  • Group RSS
  • More
  • Cancel
Engagement
  • Author Author: ge0rgej
  • Date Created: 26 Aug 2013 2:15 PM Date Created
  • Views 365 views
  • Likes 0 likes
  • Comments 4 comments
  • python
  • homeautom8
  • raspberry_pi
  • twitter
  • home_automation
  • float_switch
  • iautom8
  • relay
  • piface
Related
Recommended

2 - Required Components

ge0rgej
ge0rgej
26 Aug 2013

OK lets get started with a description of all the equipment needed to complete this project;


Raspberry Pi - Model B - 512MBimage


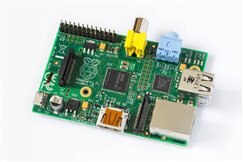
Whilst this project will work with a Model A Raspberry Pi I have opted for a Model B unit given that it has the facility of being able to plug directly into my LAN via the Pi's onboard RJ45 port. As you will see in my later Blogs, having the Raspberry Pi sitting on its own IP address will be a requirement for testing purposes and SSH access. That said, you could always use a WiFi dongle plugged into the Model A's USB port - but personally I prefer to have the Pi connected directly into my LAN.


You will also need an SD Card to boot the Raspberry Pi. My current setup for this project includes a 16GB Class 10 SD Card (mainly because it was laying around at the time) but a cheaper 4GB SD Card will suffice.


When purchasing your SD Card it is worth bearing mind that not all SD Cards function well with the Raspberry Pi. To be sure that you have a card that will function without problems please refer to the Raspberry Pi -  SD Card Compatibility Chart. Last but not least you are going to need a power supply to power the Raspberry Pi. For the purposes of this project make sure that you purchase a power supply that has a 5VDC / 1.0A output (minimum) complete with a micro usb connector to plug into the Raspberry Pi.
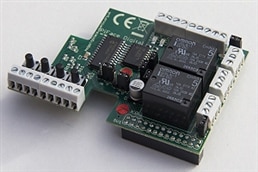


image


PiFace Digital


The PiFace sits nicely on to top of your Raspberry Pi, connecting via the Pi's GPIO socket, and is where all of your inputs and outputs will be connected. Python scripts detailed futher on in this project will tell the PiFace what to switch .... when to switch ... and under what conditions.


  • Make sure you get yourself a case that encapsulates both the Raspberry Pi and the PiFace. Later on in the project we will be installing both of these in an enclosure ... strapped to a (metal) DIN rail. To avoid damaging the circuit boards they will need some form of protection.
    image


Float Switchesimage


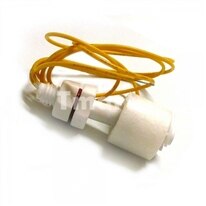
Within this project we will be detecting the high level and low level float status in two water tanks, you will therefore need to have four float switches to hand. You can of course modifiy this project to suit your own requirements but as a minimum two float switches will be required.


When setting up and testing this project you will find it much easier to simulate the float switches being activated by using a 4 gang light switch. You will need the float switches at the end of the project - but for a minimal cost the light switch makes life a lot easier along the way.
image


24v Water Pumpimage


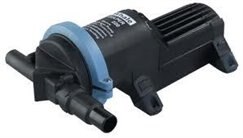
The size of the water pump will be determined by size of your garden irrigation system. If like myself you already have an irrigation system served by mains water and pressure reducing valves you will know what works for you. If you dont know what mains water pressure you currently have, pressure meters are widely available that can clip onto a water tap. Once you know your mains pressure you can size your pump accordingly.


I have opted for a 24v water pump on this project as I have tried to ensure that. whereever possible, the majority of components being used in this project are working on extra low voltage (ELV) or on no volt circuits. That said, there is nothing stopping you using a mains voltage pump if required - the external relay detailed further on in this section is capable of switching mains rated loads up to 10A. If you do choose to use a mains rated pump please note my Disclaimer comments in Section 1 - Introduction.


If you choose to stick with the 24v water pump you are obviously going to need a plug in 24v power supply unit. I will touch on the safety implications associated with using mains rated pumps, and the additional protective measures required, in later blogs.


image

image

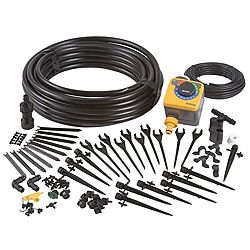
Hozelock Irrigation System Accessories


I have detailed the Hozelock range of accessories as they are affordable - expandable ... and what I currently use on my non-automated setup. There are many other systems out there , equally as good,  but this is where your preference comes in. For more information on Hozelock Irrigation please visit;

http://www.hozelock.com/watering/auto-watering.html


Before you rush out and start grabbing bits and pieces dont be deceived by the picture opposite - you will not need any form of time clock. The Cloud Scheduling detailed later in this project will be acting as your time clock.


You will however need 1) a pressure reducing valve - 2) the larger 10mm hose - 3) the smaller 4mm hose - 4) as many sprinklers, drippers etc that you need for your garden, and a Rain Sensor.The beauty of this system is that you can start out small and expand the system to whatever size you want.


image

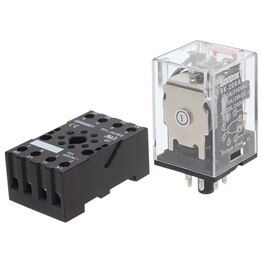
Fixed Base Relay - 12v Coil With 230v (10A) Contacts


Rather than switching loads across the PiFace itself, in this project we will be switching loads across an external relay. There are however variants when you come to purchasing the relay;


11 Pin - This will give you 3 sets of Normally Open / Normally Closed contacts

8 Pin - This will give you 2 sets of contacts of Normally Open / Normally Closed contacts


The cost difference between the two relays is minimal. Although we wil only be using one set of contacts in this project it is worthwhile purchasing a relay that will give you means to expand in the future. I am using the 11 pin version. Manufactured by Europa Components - Relay Base Model Number is RB11R - and the Relay Model Number is R11R12D3PDTimage


You dont need to buy the exact relay but the schematic drawing that follows later in this project will detail connections for the above.
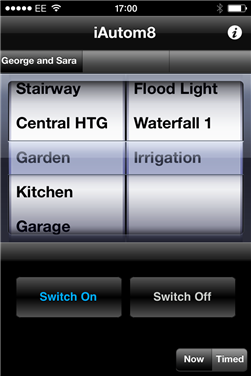


image


The Fun Stuff


In order to be able to control the Garden Irrigation System via an iPhone app and to enable Cloud Scheduling you will need the following in place;


     - an account with www.homeautom8.com (FREE)


     -  iAutom8 iPhone App (FREE)


     - an RFXCOM Transmitter (NOT FREE)


     - a Home Easy RF Device (NOT FREE)


If you dont want to go to the expense of setting up the RFXCOM transmitter with the Home Easy RF device at the moment, I will also show how to activate the irrigation system using just the rain sensor and manual switching when we get to this stage of the project.
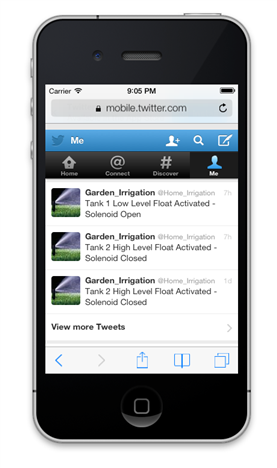


image


A Twitter Account


Later in the project we will be reporting system status using the Twitter API.


To enable this you will need to create yourself a Twitter account. If you already have a Twitter account go ahead an create a new one dedicated to your Garden Irrigation system.


image

PVC Enclosure


Whilst you could always chuck all of the above components into a cardboard box and the irrigation system would work just fine - it would be a shame to have got to the end of the project and not have something worth putting your name to.


Wrapping everthing up neatly in an enclosure is a small price to pay given the work you will have put into the project


* Please note coder27 comments below

  • Sign in to reply

Top Comments

  • ge0rgej
    ge0rgej over 10 years ago in reply to Former Member +1
    Hi Coder27 This is a project in the making - it has not been tried and tested yet but I have enough experience as an electrical designer to know that it will work - safely. I am testing using a Raspberry…
  • ge0rgej
    ge0rgej over 10 years ago in reply to mcb1

    Mark - as ever I agree with your comments, however, I'm not suggesting that anyone should ignore local laws or manufacturers recommendations. We all have have the means at our fingertips to make informed decisions.


    If I used my Raspberry Pi in accordance with the manufacturers recommendations I would be leaving my windows and doors open upon leaving for work in the morning (to achieve the 'well ventilated environment') and have no doubt that on my return home from work my Pi would have gone missing ..... along with the contents of my house. Ok - a bit of an extreme scenario but common sense needs to prevail somewhere along the line. You and I both know the risks involved and how the risks can be reduced.


    I am not off the ground yet and quite rightly already have warning labels all over the tin. I am sure that there will be more to follow which will hopefully enable users to make their own choice about whether they should be atempting this project.


    As I mentioned in response to coder27 -  anyone who has Class A / Class B issues dont attempt this project - better still dont buy a Raspberry Pi until you are happy that the Pi can be used in a domestic environment.


    Time for section 3 I think image

    • Cancel
    • Vote Up 0 Vote Down
    • Sign in to reply
    • More
    • Cancel
  • mcb1
    mcb1 over 10 years ago in reply to ge0rgej

    George

    Are you seriously suggesting that the end user decide if he/she potentially interferes with their neighbour.?


    I brought a small waterproof camera in a housing for another project, and decided while on the way to the skifield to charge it with a locally purchased 12v car charger.

    I was puzzled by the radio not working in some of the areas that it used to work in, and put it down to a dirty aerial, and poor coverage.


    On the return I noted that it was still poor, until I removed the charger and the radio boomed in as expected.


    The point is that you can't always tell what impact you have, and the costs for the affected party to resolve it.


    I imagine in the USA that the lawyers would be lining up to take someone to court to reclaim all sorts of costs, all because you use a device that doesn't meet the required standards ie Class B.

    I don't think you are going to get any comeback on the original seller.


    Mark

    • Cancel
    • Vote Up 0 Vote Down
    • Sign in to reply
    • More
    • Cancel
  • ge0rgej
    ge0rgej over 10 years ago in reply to Former Member

    Hi Coder27


    This is a project in the making - it has not been tried and tested yet but I have enough experience as an electrical designer to know that it will work - safely. I am testing using a Raspberry Pi and PiFace at the moment as both of these are to hand. I am hoping that this will develope into a worthwhile project with a lot of input from this community ... especially programmers


    Both of your comments are good, and valid points


    Re : The Raspberry Pi's generic 'ventilation' disclaimer.

    The next thing that most people (quite rightly) purchase after getting their Pi is a case for it to sit in. Putting the Pi in a case effectively voids your warranty as far as the 'well ventilated environment' disclaimer goes - but it does prevent the board from getting damaged from spills, dust etc. I believe it is up to the end user to decide where the greater risk is on this topic. If users are worried that their warranty will be voided - dont use an enclosure. Or in the case of this project use a fan within the enclosure. When it comes to putting this project together in the enclosure I will make sure that the schematic includes your comments, and a facility for this. On the flip side of this I have already envisaged that the enclosure is more likely to be in an external environment (given the need for close proximity to the water tanks) - thus there will likely also be a need to include a small control panel heater / thermostat in this arrangement.


    Re : The Class A / Class B Debate

    Being in the UK I have not really delved that far into the rights and wrongs regarding Class A / Class B Classification as almost all of the debates that are taking place are FCC / US related. I appreciate the legality issues and am sure that the manufacturer is listening and will act on the debates. If there are any non UK viewers of this blog that have issues with that Class Certification I would suggest that you dont attempt this project.

    • Cancel
    • Vote Up +1 Vote Down
    • Sign in to reply
    • More
    • Cancel
  • Former Member
    Former Member over 10 years ago

    Hi George,

       Do you know if the project would work just as well with a BBB instead of the

    Raspberry Pi and PiFace?   You suggest using an enclosure, but the RPi

    Safety Data Sheet says


    • This product should be operated in a well ventilated environment and should not be covered.

    http://www.element14.com/community/docs/DOC-44828/l/raspberry-pi-safety-data-sheet


    It also says:


    • This equipment has been tested and complies with the limits for a Class A digital device, pursuant to Part 15 of the FCC Rules.


    and since I am in the US, I don't believe it would be legal to import or use a portable computer that

    isn't Class B compliant, according to my understanding of the rules in US Code Title 47 Part 15.

    • Cancel
    • Vote Up 0 Vote Down
    • Sign in to reply
    • More
    • Cancel
element14 Community

element14 is the first online community specifically for engineers. Connect with your peers and get expert answers to your questions.

  • Members
  • Learn
  • Technologies
  • Challenges & Projects
  • Products
  • Store
  • About Us
  • Feedback & Support
  • FAQs
  • Terms of Use
  • Privacy Policy
  • Legal and Copyright Notices
  • Sitemap
  • Cookies

An Avnet Company © 2023 Premier Farnell Limited. All Rights Reserved.

Premier Farnell Ltd, registered in England and Wales (no 00876412), registered office: Farnell House, Forge Lane, Leeds LS12 2NE.

ICP 备案号 10220084.

Follow element14

  • X
  • Facebook
  • linkedin
  • YouTube