element14 Community
element14 Community
    Register Log In
  • Site
  • Search
  • Log In Register
  • Community Hub
    Community Hub
    • What's New on element14
    • Feedback and Support
    • Benefits of Membership
    • Personal Blogs
    • Members Area
    • Achievement Levels
  • Learn
    Learn
    • Ask an Expert
    • eBooks
    • element14 presents
    • Learning Center
    • Tech Spotlight
    • STEM Academy
    • Webinars, Training and Events
    • Learning Groups
  • Technologies
    Technologies
    • 3D Printing
    • FPGA
    • Industrial Automation
    • Internet of Things
    • Power & Energy
    • Sensors
    • Technology Groups
  • Challenges & Projects
    Challenges & Projects
    • Design Challenges
    • element14 presents Projects
    • Project14
    • Arduino Projects
    • Raspberry Pi Projects
    • Project Groups
  • Products
    Products
    • Arduino
    • Avnet Boards Community
    • Dev Tools
    • Manufacturers
    • Multicomp Pro
    • Product Groups
    • Raspberry Pi
    • RoadTests & Reviews
  • Store
    Store
    • Visit Your Store
    • Choose another store...
      • Europe
      •  Austria (German)
      •  Belgium (Dutch, French)
      •  Bulgaria (Bulgarian)
      •  Czech Republic (Czech)
      •  Denmark (Danish)
      •  Estonia (Estonian)
      •  Finland (Finnish)
      •  France (French)
      •  Germany (German)
      •  Hungary (Hungarian)
      •  Ireland
      •  Israel
      •  Italy (Italian)
      •  Latvia (Latvian)
      •  
      •  Lithuania (Lithuanian)
      •  Netherlands (Dutch)
      •  Norway (Norwegian)
      •  Poland (Polish)
      •  Portugal (Portuguese)
      •  Romania (Romanian)
      •  Russia (Russian)
      •  Slovakia (Slovak)
      •  Slovenia (Slovenian)
      •  Spain (Spanish)
      •  Sweden (Swedish)
      •  Switzerland(German, French)
      •  Turkey (Turkish)
      •  United Kingdom
      • Asia Pacific
      •  Australia
      •  China
      •  Hong Kong
      •  India
      •  Korea (Korean)
      •  Malaysia
      •  New Zealand
      •  Philippines
      •  Singapore
      •  Taiwan
      •  Thailand (Thai)
      • Americas
      •  Brazil (Portuguese)
      •  Canada
      •  Mexico (Spanish)
      •  United States
      Can't find the country/region you're looking for? Visit our export site or find a local distributor.
  • Translate
  • Profile
  • Settings
Personal Blogs
  • Community Hub
  • More
Personal Blogs
Legacy Personal Blogs Adventures with the Raspberry Pi pico - part 3
  • Blog
  • Documents
  • Mentions
  • Sub-Groups
  • Tags
  • More
  • Cancel
  • New
  • Share
  • More
  • Cancel
Group Actions
  • Group RSS
  • More
  • Cancel
Engagement
  • Author Author: neilk
  • Date Created: 29 Jan 2021 5:25 PM Date Created
  • Views 1397 views
  • Likes 8 likes
  • Comments 6 comments
  • ​
  • raspberry pico
  • visual studio
Related
Recommended

Adventures with the Raspberry Pi pico - part 3

neilk
neilk
29 Jan 2021

INTRODUCTION


This is the third part of a series of blogs devoted to programming the Raspberry Pi pico:


Adventures with the Raspberry Pi pico - part 1 - Describes setting up the toolchain and building all the examples using the command line


Adventures with the Raspberry Pi pico - part 2  - Tries to understand some of the processes covered in part 1


In this blog I will try and describe the processes necessary to configure and use Visual Studio to build the examples. I have never used VS before and I will be following:


shabaz 's blog: Working with the Raspberry Pi Pico with Windows and C/C++


And the official pico getting started guide: https://datasheets.raspberrypi.org/pico/getting-started-with-pico.pdf

The above document has been revised and sections renumbered since I wrote this blog


Getting to Grips with Visual Studio Code


I had already installed and partially configured Visual Studio Code in Part 1, largely following shabaz's blog.


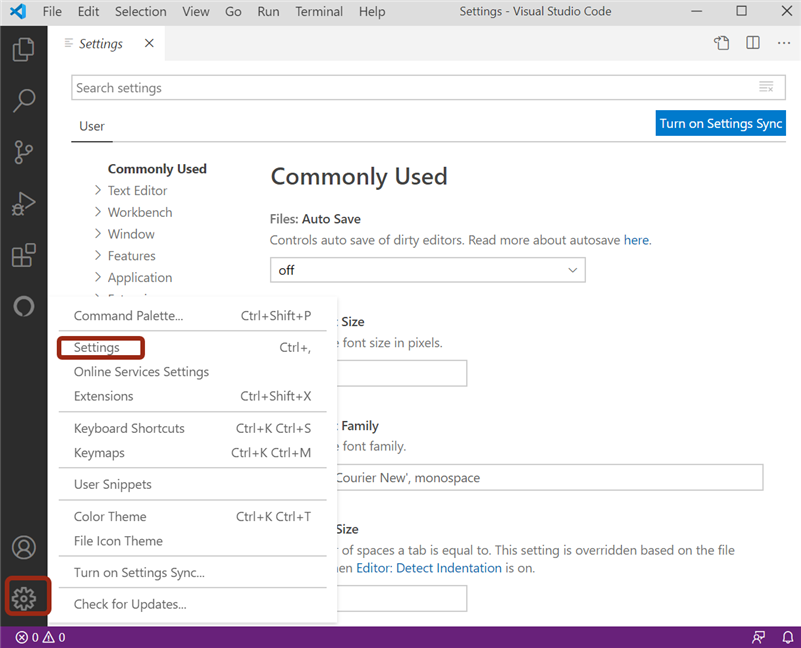
One area of confusion I found was how to actually run VS. Referring to section 8.2.4 EDIT: 9.2.4 in the official pico document, you start it from the Windows Menu:


Windows > Visual Studio 2019 > Developer Command Prompt    What it doesn't say, and what I think I found, was that you need to do this in Administrator mode.


When mine starts up, it does so in:

C:\Windows\System32>

whereas the next instruction in section 8.2.4 EDIT: 9.2.4 is to type:

C:>code  

This requires me to move up the folder tree to C:> before I can enter the command. Is there a way of configuring VS to default to C:> ?


There is a very strong warning:

"If you start Visual Studio code by clicking on its desktop icon, or directly from the Start Menu then the build environment will not be correctly configured. Although this can be done manually later in the CMake Tools Settings, the easiest way to configure the Visual Studio Code environment is just to open it from a Developer Command Prompt Window where these environmental variables are already set."


I had already partiallyconfigured Visual Studio Code in Part 1, flipping between shabaz's blog and and the official pico document, to check each step before acting.


Now I returned to shabaz's blog at this point:


image

And followed shabz's blog faithfully right up to here:


image

I didn't click Build, because I had already built all of the examples in part 1, using the command line.


Instead, in the left hand column of files, I clicked on the blink folder, which opened, revealing two files:


blink.c

CMakeLists.txt


I clicked on blink.c and the file opened in the central editor window, as shown below:

image

I then got very brave and edited the file to change the LED flashing rate:

image

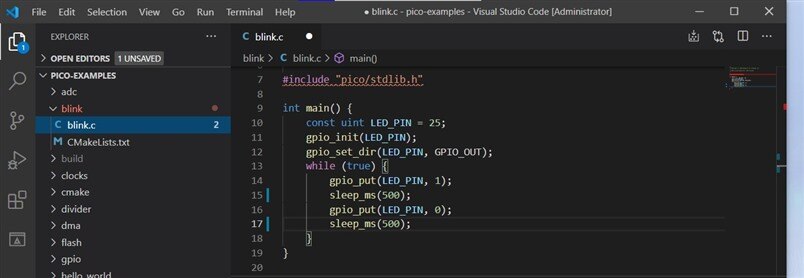
Note: I have scrolled the edit window down so that that :

#include "pico/stdlib.h"

is visible.


Note also that up in the top left hand is a message >OPEN EDITORS 1 UNSAVED, indicating that the edit has not been saved.


Note also the blue bars at line 15 and line 17, which are the lines I have edited.


I wasn't sure how to save the edited file, so I hovered over the white dot next to blink.c in the centre at the top of the screen. I turned into a x and I clicked it to close the file. I then got a message box asking me if I wanted to save the changes. I chose to save.


When I reopened the file the blue bars were still present against lines 15 and 17. Not sure why?


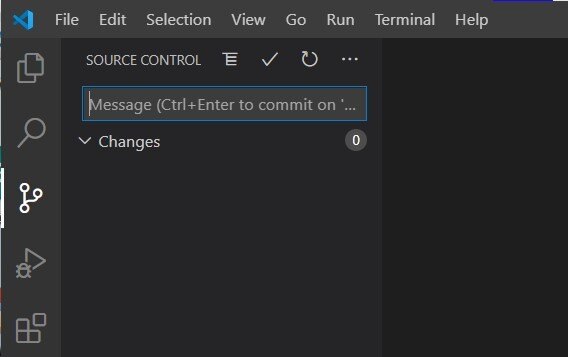
I then noticed this:

image

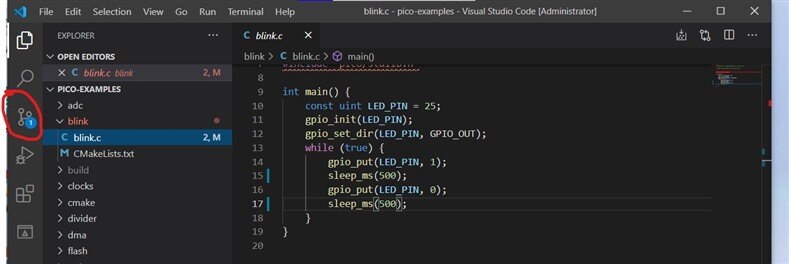
Which I think is telling me that I have 1 change to commit to my git repository. Hovering over it, I could read a message box:


Source Control (Ctrl+Shift+G) - 1 pending change


I closed the editor - nothing to save -  but there was still a pending change. I clicked on the symbol and got this:

image

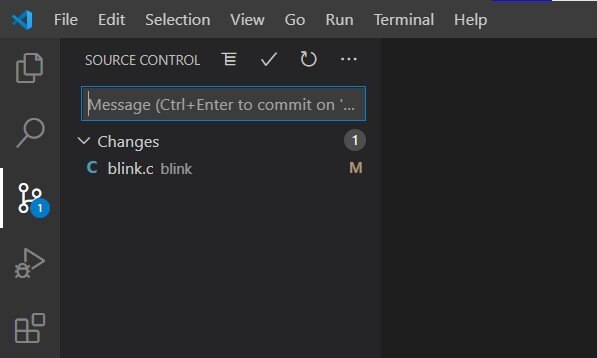
Hovering over the symbols alongside SOURCE CONTROL, I found that the tick represented Commit.

So I clicked it and got a message box relating to "Staged Changes" and asking to make a choice - I chose Always.

I was then asked to provide a message - I put in my initials - and then to press "Enter" to confirm or "Escape" to cancel. I pressed "Enter".


After a few seconds, I got this:

image

Looks like the commit has worked!


I then clicked on the explorer icon and reverted to the file list. I clicked on blink.c to open the editor and found that the blue lines against lines 15 and 17 have gone. Thus I have learned that the blue bars next to lines in the editor are an indicator of an uncommitted change. Wow!


Building the Modified blink file


Referring again to shabaz's blog:


There is a blue bar at the bottom of the window:image

[all], next to Build, indicates that the whole set of examples will be built


Clicking on [all] opens a dialogue box at the top of the screen. Typing in blink and pressing Enter selects blink as the only one to be built:

image

Clicking Build now builds the blink example. It didn't take very long. There are quite a few messages. Presumably problems will show up here.


Using Windows File Manager, I navigated to .....pico-examples\build\blink\

Where I found blink.uf2, with today's date and an appropriate time stamp.......Impressive!


I then prepared the pico for flashing - Power up with BOOTSEL button pressed.

RPI-RP2 drive appeared in File manager.

I copied the new blink.uf2 file and pasted it on the the RPI-RP2 drive.


SUCCESS  the pico started flashing at the rate I had programmed!


Conclusion

I have learned a lot here, never having used Visual Studio before. It's fairly complicated, certainly when compared with the Arduino IDE (my only previous exposure to a C/C++ type development environment). I am self taught in C/C++ and only know and understand enough of C/C++ to do what I need to do!


Questions left:

  1. What does the CMakeLists.txt file, alongside the blink.c file, do?
  2. How do I set up a folder of my own programs, independent of the pico examples.
  3. Will my own folder automatically be included in git, or do I need to do something.


I hope this will be helpful to anyone who has never used Visual Studio before.

  • Sign in to reply

Top Comments

  • shabaz
    shabaz over 4 years ago +3
    Hi Neil! I can help with some of these questions, although probably not as well as an expert! Regarding how to create your own project, I've uploaded a file called project1.zip to the blog post Working…
  • neilk
    neilk over 4 years ago in reply to shabaz +2
    Hi shabaz Wow! thank you very much; that's fantastic. I'll look hard at it tomorrow, with a bit of luck. Neil
  • dubbie
    dubbie over 4 years ago +1
    Neil, It makes my brain hurt just trying to read your Blog. I don't think I will have any possibility of success with Visual Studio. I might stick to Arduino. Maybe one day they'll stick a Raspberry Pi…
  • neilk
    neilk over 4 years ago

    https://datasheets.raspberrypi.org/pico/getting-started-with-pico.pdf


    has been revised and sections renumbered since I wrote this blog. I have edited the blog accordingly.


    Neil

    • Cancel
    • Vote Up +1 Vote Down
    • Sign in to reply
    • More
    • Cancel
  • dubbie
    dubbie over 4 years ago in reply to neilk

    Neil,


    I wouldn't be disappointed! At least I could follow your Blog. I still might try it out one day. Still, if they put the Pico into Arduino that would still be the best solution - for me at least.


    I will have to look again at Pimoroni.


    Dubbie

    • Cancel
    • Vote Up +1 Vote Down
    • Sign in to reply
    • More
    • Cancel
  • neilk
    neilk over 4 years ago in reply to dubbie

    dubbie  wrote:


    It makes my brain hurt just trying to read your Blog. I don't think I will have any possibility of success with Visual Studio

    Dubbie,


    You've made me very sad! I honestly thought if I can do it, then anybody can. I've failed!


    Seriously, Arduino are developing a board based on the RP2040 chip. It will be a super duper job and likely cost a lot more than pico.


    There's a hope that when they have done it, and modified the IDE to support it, then it may also support the pico!!


    Now that would be great. image


    pico seems to back in stock at Pimoroni


    Neil

    • Cancel
    • Vote Up +1 Vote Down
    • Sign in to reply
    • More
    • Cancel
  • dubbie
    dubbie over 4 years ago

    Neil,


    It makes my brain hurt just trying to read your Blog. I don't think I will have any possibility of success with Visual Studio. I might stick to Arduino. Maybe one day they'll stick a Raspberry Pi Pico into Arduino - that would be ideal


    Dubbie

    • Cancel
    • Vote Up +1 Vote Down
    • Sign in to reply
    • More
    • Cancel
  • neilk
    neilk over 4 years ago in reply to shabaz

    Hi shabaz


    Wow! thank you very much; that's fantastic. I'll look hard at it tomorrow, with a bit of luck.


    Neil

    • Cancel
    • Vote Up +2 Vote Down
    • Sign in to reply
    • More
    • Cancel
>
element14 Community

element14 is the first online community specifically for engineers. Connect with your peers and get expert answers to your questions.

  • Members
  • Learn
  • Technologies
  • Challenges & Projects
  • Products
  • Store
  • About Us
  • Feedback & Support
  • FAQs
  • Terms of Use
  • Privacy Policy
  • Legal and Copyright Notices
  • Sitemap
  • Cookies

An Avnet Company © 2025 Premier Farnell Limited. All Rights Reserved.

Premier Farnell Ltd, registered in England and Wales (no 00876412), registered office: Farnell House, Forge Lane, Leeds LS12 2NE.

ICP 备案号 10220084.

Follow element14

  • X
  • Facebook
  • linkedin
  • YouTube