element14 Community
element14 Community
    Register Log In
  • Site
  • Search
  • Log In Register
  • Community Hub
    Community Hub
    • What's New on element14
    • Feedback and Support
    • Benefits of Membership
    • Personal Blogs
    • Members Area
    • Achievement Levels
  • Learn
    Learn
    • Ask an Expert
    • eBooks
    • element14 presents
    • Learning Center
    • Tech Spotlight
    • STEM Academy
    • Webinars, Training and Events
    • Learning Groups
  • Technologies
    Technologies
    • 3D Printing
    • FPGA
    • Industrial Automation
    • Internet of Things
    • Power & Energy
    • Sensors
    • Technology Groups
  • Challenges & Projects
    Challenges & Projects
    • Design Challenges
    • element14 presents Projects
    • Project14
    • Arduino Projects
    • Raspberry Pi Projects
    • Project Groups
  • Products
    Products
    • Arduino
    • Avnet Boards Community
    • Dev Tools
    • Manufacturers
    • Multicomp Pro
    • Product Groups
    • Raspberry Pi
    • RoadTests & Reviews
  • Store
    Store
    • Visit Your Store
    • Choose another store...
      • Europe
      •  Austria (German)
      •  Belgium (Dutch, French)
      •  Bulgaria (Bulgarian)
      •  Czech Republic (Czech)
      •  Denmark (Danish)
      •  Estonia (Estonian)
      •  Finland (Finnish)
      •  France (French)
      •  Germany (German)
      •  Hungary (Hungarian)
      •  Ireland
      •  Israel
      •  Italy (Italian)
      •  Latvia (Latvian)
      •  
      •  Lithuania (Lithuanian)
      •  Netherlands (Dutch)
      •  Norway (Norwegian)
      •  Poland (Polish)
      •  Portugal (Portuguese)
      •  Romania (Romanian)
      •  Russia (Russian)
      •  Slovakia (Slovak)
      •  Slovenia (Slovenian)
      •  Spain (Spanish)
      •  Sweden (Swedish)
      •  Switzerland(German, French)
      •  Turkey (Turkish)
      •  United Kingdom
      • Asia Pacific
      •  Australia
      •  China
      •  Hong Kong
      •  India
      •  Korea (Korean)
      •  Malaysia
      •  New Zealand
      •  Philippines
      •  Singapore
      •  Taiwan
      •  Thailand (Thai)
      • Americas
      •  Brazil (Portuguese)
      •  Canada
      •  Mexico (Spanish)
      •  United States
      Can't find the country/region you're looking for? Visit our export site or find a local distributor.
  • Translate
  • Profile
  • Settings
Personal Blogs
  • Community Hub
  • More
Personal Blogs
Legacy Personal Blogs App Inventor, Bluetooth and Arduino Part 3; Android Slider controls LED brightness
  • Blog
  • Documents
  • Mentions
  • Sub-Groups
  • Tags
  • More
  • Cancel
  • New
  • Share
  • More
  • Cancel
Group Actions
  • Group RSS
  • More
  • Cancel
Engagement
  • Author Author: neilk
  • Date Created: 5 Sep 2014 6:19 PM Date Created
  • Views 7106 views
  • Likes 1 like
  • Comments 28 comments
  • android
  • bluetooth
  • hc06
  • mit
  • appinventor
  • arduino
Related
Recommended

App Inventor, Bluetooth and Arduino Part 3; Android Slider controls LED brightness

neilk
neilk
5 Sep 2014

App Inventor, Bluetooth and Arduino - Part 3


I’ve already done a lot of work controlling Arduino connected devices over Ethernet, including using a slider from Google Visualisations to control the brightness of an LED, and using three sliders to control a Tri-Colour LED.


Both of these exercises were fairly nightmarish, involving a lot of javascript, which I didn’t fully understand, along with the HTTP commands GET and PUT, which I also don’t fully understand! (Anyone interested in this work, let me know and I will post something).


I decided to try my hand at building a couple of similar Android Apps and corresponding Arduino sketches to mirror what I had already done with Ethernet.


I was successful! What really amazed me was how incredibly simple both the Apps and the Arduino sketches turned out to be, compared with the Ethernet/javascript versions.


Here I detail the simple LED brightness solution.


Development of the basic Slider App


image

Above is a screenshot of a simple  Android device display, containing a Slider and a Label to hold the current value of the slider, in a Horizontal arrangement to put them side by side.


The default Slider settings are Minimum 10.0, Maximum 50.0 with an initial slider setting of 30.0.


For use in controlling an LED, try setting Minimum 0, Maximum 255 and initial setting 100.

We should also make the Slider wider - I set it to 250 Pixels wide:


image


It’s very helpful if you connect your Android device to App Inventor at this stage so that you can see how the App behaves and how it needs to be developed.


The first objective is to get Label1 to display the current value of Slider1, as it is moved:


image


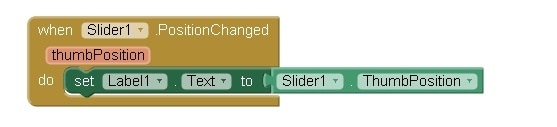
However there are 2 serious problems with this simple approach:


  1. The thumbPosition property is a floating point number which is sometimes displayed to several decimal places - an integer value will be fine!


  1. As Slider1 is moved, updates occur very rapidly; this has the potential to overflow the Arduino input buffer.


What we need is a code Block which will set a Flag and capture the current value of thumbPosition :


when Slider1.PositionChanged

{

  set myFlag = TRUE;

  set myValue = Slider1.thumbPosition;

}


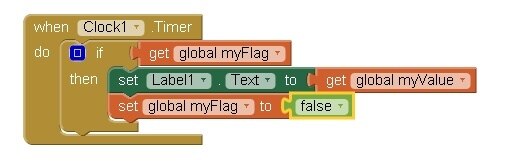
This should be followed by a second code Block which will be executed each time a Timer or Clock ticks:


when Clock1.Timer

{

  do

   {

    if (myFlag)

     {

      set Label1.Text = myValue;

      set myFlag = FALSE;

     }

   }

}


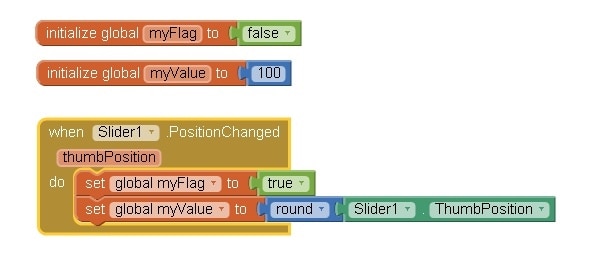
We will also need to declare 2 Global Variables to pass the Flag and the value of thumbPosition between the code Blocks.:


Below are the variable declarations and the changes to the Slider code Block  to use the variables. Note I have used the round fuction to convert the floating point value of thumbPosition to integer:


image


Now to incorporate the Clock - which by default, will have a cycle time of 1000 mS.


Switching to the Design screen, we drag a Clock across to the display and drop it. The Clock is a non-visible component and positions itself below the display.


Returning to the Blocks screen, we can now create the code Block related to the Clock:


image

One final problem remains: the left hand edge of the Slider is hard up against the left hand edge of the screen, making it impossible to adjust the Slider to its minimum value. There is, as yet, no provision in App Inventor to position a component away from the left hand edge.


The easiest solution to this problem is to add a dummy Label to the left of the Slider, make it 20 pixels wide and remove its text so that it is invisible. This moves the Slider 20 pixels to the right.


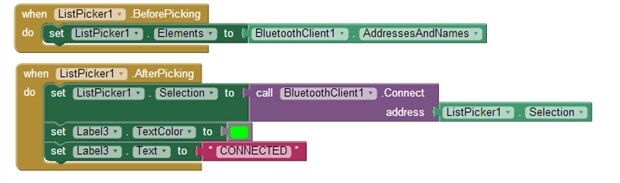
Connecting to the Arduino via the Bluetooth Client


This is the same as in the previous postings:


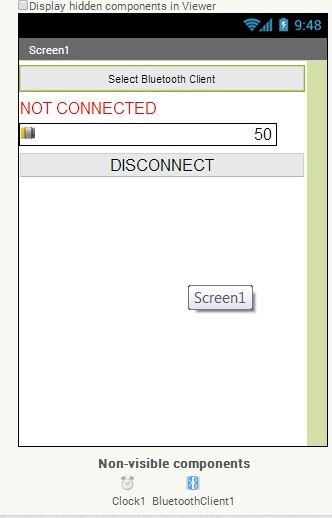
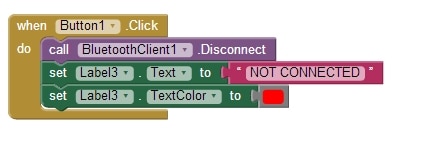
We need a ListPicker, a Label to display the connection status and a Button to disconnect from Bluetooth

The new screen layout becomes:


image


The connection Blocks are here:


image


And, of course, the disconnect Block:


image


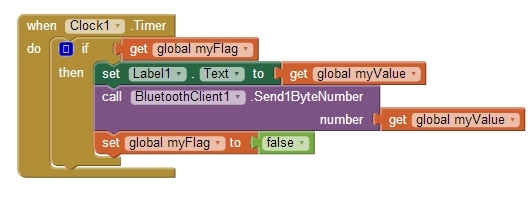
Sending the data to the Arduino via the Bluetooth Client


This is simply a matter of adding a component to the Clock Block to send out the value of myValue as a 1 Byte number (maximum unsigned value 255)


image


The Arduino sketch to work with this App is:


int ledPin = 3;        // Needs to be a pin supporting PWM

int value = -1;


void setup()

{

  Serial.begin(9600);

  pinMode(ledPin, OUTPUT);

}


void loop()

{

  while (Serial.available())         // Read while there is data in the buffer

  {

    value = Serial.read();

    if (value >= 0)                   /  /If we have meaningful data

   {

     Serial.println(value);           // Debug - double check it make sense?

     analogWrite(ledPin,value);    // set PWM for LED brightness

     value = -1;

   }

}

}


Note: a lot has been written about LED brightness needing to be controlled in a non-linear manner, in order for the eye to perceive brightness changes linearly. It is not the purpose of this post to address that issue!


Further Note: instead of controlling the brightness of an LED, with a suitable Arduino sketch, this App could control the position of a Servo.

  • Sign in to reply

Top Comments

  • Former Member
    Former Member over 10 years ago +1
    Hi Neil, I try to rebuild the app from your example. Unfortunately I can't see the pictures anymore... I'm getting below 404 error when clicking them. 404. That’s an error. The requested URL/llQW0xW0a8SnIMsVzpuFV0gd9Za6P2Ubij8cIulQR6CtqIb62gOmlvKiBJKdmS8UPBrSHrG388u5_0x9Gx93XmozusYAUO9gN4XFveNipn5ZiuNrqI6COjPooxh_6nrmzQwas…
  • alacosta
    alacosta over 9 years ago +1
    Hi Neil, pleased to say all systems are working well ...thank you for your guidance. Have a mystery .. you will see from the attached serial read, the output is converting the Decimal Value to the ascii…
  • alacosta
    alacosta over 9 years ago in reply to neilk +1
    Hi Neil, Again thank you for your quick response ... as I said was not an issue to the project but interesting to know what is happening. Regards John
Parents
  • alexis_cy
    alexis_cy over 9 years ago

    its this one

    HM-10 BLE Bluetooth 4.0 CC2540 CC2541 Serial Wireless Module


    when i press the Bluetooth Devices button i can see only the paired devices


    i have test the schematic with another program and works OK with the Arduino

    but i want to do my android program to control my led strips

    • Cancel
    • Vote Up 0 Vote Down
    • Sign in to reply
    • More
    • Cancel
  • neilk
    neilk over 9 years ago in reply to alexis_cy

    Hi @alexis_cy


    When I google:

    HM-10 BLE Bluetooth 4.0 CC2540 CC2541 Serial Wireless Module

    I can find a couple of links to difficulties with this particular device and Arduino etc. Some of the comments suggest that HC-06 works perfectly, but your device doesn't !! image.


    Look here, and also search further:


    https://plus.google.com/117095824606896746809/posts/VwfeX4HiQcX


    One observation I found which is very very relevant is that your device is supplied as a MASTER device and must be reprogrammed as a SLAVE before you can use it in your application. This means


    However, you haven't really answered my questions:


    Are you sure the device is powered on? HC-06 has an LED which flashes when powered on, but not connected, so you can tell. Then, when you establish a conection, the LED stops flashing and is on permanently


    If you haven't paired your device with the Android device, then you probably won't see it when you press the Bluetooth Devices button in your Android App.


    Finally, I don't understand what you mean by "i have test the schematic with another program and works OK with the Arduino"


    Again, to see a schematic could help me, or someone else, to help you image


    Neil

    • Cancel
    • Vote Up 0 Vote Down
    • Sign in to reply
    • More
    • Cancel
  • alexis_cy
    alexis_cy over 9 years ago in reply to neilk

    Hello Neil,


    The Bluetooth module is on an LED is blinking and when a devices is connected the LED stays on permanently


    i have done this project Control RGB lights from Android with Arduino & Bluetooth LE (BLE) and i can control the Arduino.

    The Schematic is this one (12V5A power supply at the input of the arduino:

    image

    this is the bluetooth module:

    image

    • Cancel
    • Vote Up 0 Vote Down
    • Sign in to reply
    • More
    • Cancel
  • neilk
    neilk over 9 years ago in reply to alexis_cy

    Hi @alexis_cy


    First of all, your schematic does not show the Bluetooth adapter.


    Can you pair the bluetooth adapter with your Android device?


    Finally, in the project link you sent, I found the following comment: " I was hoping I could use App Inventor or PhoneGap to create a quick app with BLE support, but this functionality is so new it's not supported yet, so I tried my hand at the Android SDK!"


    I have no idea whether BLE support is currently available in App Inventor; that could be your problem.


    Neil

    • Cancel
    • Vote Up 0 Vote Down
    • Sign in to reply
    • More
    • Cancel
  • alexis_cy
    alexis_cy over 9 years ago in reply to neilk

    You are correct BLE support is not available in App inventor

    • Cancel
    • Vote Up +1 Vote Down
    • Sign in to reply
    • More
    • Cancel
Comment
  • alexis_cy
    alexis_cy over 9 years ago in reply to neilk

    You are correct BLE support is not available in App inventor

    • Cancel
    • Vote Up +1 Vote Down
    • Sign in to reply
    • More
    • Cancel
Children
  • neilk
    neilk over 9 years ago in reply to alexis_cy

    So I presume that is why you can't get it to work ??


    Please mark my answer either helpful, or correct. Thanks


    Neil

    • Cancel
    • Vote Up 0 Vote Down
    • Sign in to reply
    • More
    • Cancel
element14 Community

element14 is the first online community specifically for engineers. Connect with your peers and get expert answers to your questions.

  • Members
  • Learn
  • Technologies
  • Challenges & Projects
  • Products
  • Store
  • About Us
  • Feedback & Support
  • FAQs
  • Terms of Use
  • Privacy Policy
  • Legal and Copyright Notices
  • Sitemap
  • Cookies

An Avnet Company © 2025 Premier Farnell Limited. All Rights Reserved.

Premier Farnell Ltd, registered in England and Wales (no 00876412), registered office: Farnell House, Forge Lane, Leeds LS12 2NE.

ICP 备案号 10220084.

Follow element14

  • X
  • Facebook
  • linkedin
  • YouTube