


My previous post included a photograph of a very untidy Cybot - it was a bit of a lashup, but it worked!
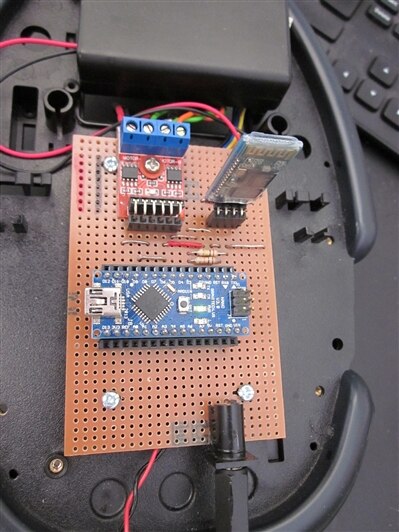
I have resurrected some practical skills that have lain dormant for over 20 years and made a fairly neat and tidy strip board carrier for an Arduino Nano, the HC-06 Bluetooth module and the L9110 break-out board. The battery box for the motors has its own switch and is connected to the strip board with a pair of screw terminals. The 9 V battery for the Nano mounts under the Cybot chassis and connects to the strip board with a standard barrel connector

I'm pretty sure that my strip board layout is far from optimal - years of neglect have withered my previous skills in that area. Some of my soldering leaves a little to be desired as well - again, severely out of practice. Nevertheless, it all worked!
A couple of details:
- I put in a double row of header sockets for the Nano, so that if I develop this further - object avoidance, line following, whatever, I can connect patch leads.
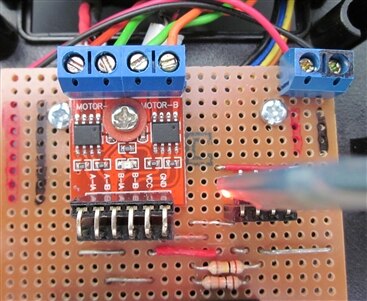
- The L9110 breakout board is not really designed for neat and tidy mounting - the pins are vertical, so if you plug the pins into a normal header socket strip, the board would be upside down. I contemplated replacing the vertical pins with bent pins, like on the HC-06, so that it would stand vertically. I decided against that approach because I didn't want to risk damaging the board with my still, relatively unskilled soldering iron work. I also thought it would be a bit unstable with the motor leads connected into it at the top. In the end I carefully bent the pins of a header socket - see photograph - so that I could use it as an adapter to enable me to mount the breakout board flat, the correct way up and bolt it to the strip board.

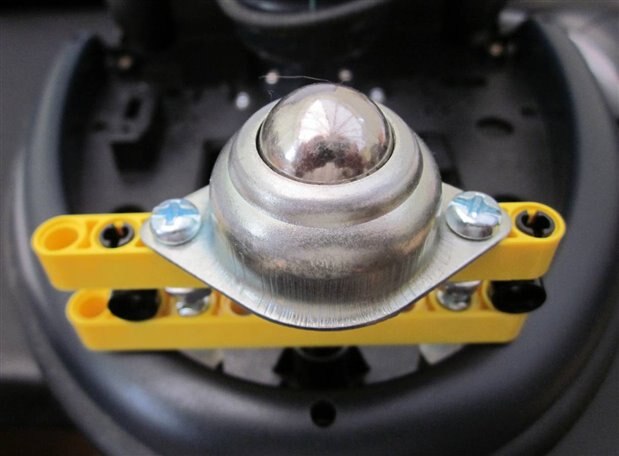
One issue, which I didn't mention in my previous post, was the failure of the Cybot nose wheel mounting spindle to turn correctly. This means that the nose wheel doesn't correctly align itself to the direction of travel, and is sometimes even at right angles! When this happens (most of the time  ), the Cybot does NOT travel in a straight line, when it should and does not turn left or right correctly.
I picked up an idea from a comment made by gadget.iom to a posting made by dtsartsanis to turn the chassis around and use a tail wheel instead of a nosewheel. However, this didn't fix the problem.
I then caught on to the idea of using a ball castor, in place of the nose wheel. I managed to locate one on eBay and was able to use some good old lego technic to attach it to the Cybot. Unfortuntely, Lego don't make beams that are 8 holes long, so the ball castor fixing is asymmetrical. Nevertheless, it works a treat!
I tweaked the Arduino sketch so that the speeds and turns were a little better than in the version I posted last time. The values needed are very much dependent on the motors and affected by the introduction of the ball castor instead of the wheel.
I also modified the Android App to receive and display the comments that were being sent out, originally to the serial monitor, but now to the HC-06. This means that the Android device now displays the last command sent to the Arduino, received by the Arduino and, hopefully, obeyed by the Cybot.