element14 Community
element14 Community
    Register Log In
  • Site
  • Search
  • Log In Register
  • Members
    Members
    • Benefits of Membership
    • Achievement Levels
    • Members Area
    • Personal Blogs
    • Feedback and Support
    • What's New on element14
  • Learn
    Learn
    • Learning Center
    • eBooks
    • STEM Academy
    • Webinars, Training and Events
    • Learning Groups
  • Technologies
    Technologies
    • 3D Printing
    • FPGA
    • Industrial Automation
    • Internet of Things
    • Power & Energy
    • Sensors
    • Technology Groups
  • Challenges & Projects
    Challenges & Projects
    • Design Challenges
    • element14 presents
    • Project14
    • Arduino Projects
    • Raspberry Pi Projects
    • Project Groups
  • Products
    Products
    • Arduino
    • Dev Tools
    • Manufacturers
    • Raspberry Pi
    • RoadTests & Reviews
    • Avnet Boards Community
    • Product Groups
  • Store
    Store
    • Visit Your Store
    • Choose Another Store
      • Europe
      •  Austria (German)
      •  Belgium (Dutch, French)
      •  Bulgaria (Bulgarian)
      •  Czech Republic (Czech)
      •  Denmark (Danish)
      •  Estonia (Estonian)
      •  Finland (Finnish)
      •  France (French)
      •  Germany (German)
      •  Hungary (Hungarian)
      •  Ireland
      •  Israel
      •  Italy (Italian)
      •  Latvia (Latvian)
      •  
      •  Lithuania (Lithuanian)
      •  Netherlands (Dutch)
      •  Norway (Norwegian)
      •  Poland (Polish)
      •  Portugal (Portuguese)
      •  Romania (Romanian)
      •  Russia (Russian)
      •  Slovakia (Slovak)
      •  Slovenia (Slovenian)
      •  Spain (Spanish)
      •  Sweden (Swedish)
      •  Switzerland(German, French)
      •  Turkey (Turkish)
      •  United Kingdom
      • Asia Pacific
      •  Australia
      •  China
      •  Hong Kong
      •  India
      •  Korea (Korean)
      •  Malaysia
      •  New Zealand
      •  Philippines
      •  Singapore
      •  Taiwan
      •  Thailand (Thai)
      • Americas
      •  Brazil (Portuguese)
      •  Canada
      •  Mexico (Spanish)
      •  United States
      Can't find the country/region you're looking for? Visit our export site or find a local distributor.
  • Translate
  • Profile
Personal Blogs
  • Members
  • More
Personal Blogs
Legacy Personal Blogs Getting Started with the Cora Z7 Board - A Step by Step Guide to Creating a SDK Project
  • Blog
  • Documents
  • Mentions
  • Sub-Groups
  • Tags
  • More
  • Cancel
  • New
Blog Post Actions
  • Subscribe by email
  • More
  • Cancel
  • Share
  • Subscribe by email
  • More
  • Cancel
Group Actions
  • Group RSS
  • More
  • Cancel
Engagement
  • Author Author: adamtaylorcengfiet
  • Date Created: 23 Sep 2018 9:06 PM Date Created
  • Views 1476 views
  • Likes 1 like
  • Comments 3 comments
  • c
  • xilinx_explore
  • cora z7
  • xilinx
  • xilinx sdk
  • fpga
  • vivado
  • digilent
  • xilinx zynq
Related
Recommended

Getting Started with the Cora Z7 Board - A Step by Step Guide to Creating a SDK Project

adamtaylorcengfiet
adamtaylorcengfiet
23 Sep 2018

A few weeks ago we looked at how we could create the hardware element of a Zynq design which uses the Cora Z7, in this blog we are going to look at how we can create the software application and run on the hardware.

To do this we are going to use Xilinx SDK which can be opened from within Vivado. However, before we can create the software application we need to export the hardware design from Vivado, this allows SDK to know the drivers it needs to add in to the software and the addresses of the peripherals in the hardware.


To export the hardware, from within Vivado select File->Export->Export Hardware


image

Selecting this will open a export hardware dialog, check the box include bitstream and select OK

Once the hardware has been exported the second stage is to open SDK from Vivado, to do this select File->Launch SDKimage

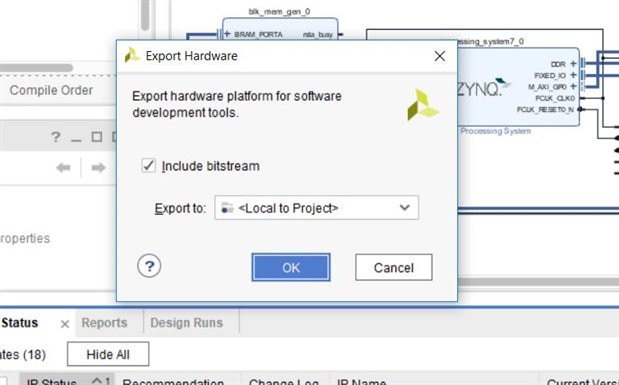
Again selecting this will open a dialog, select OK and Xilinx SDK will openimage

Once SDK Opens you will see Vivado has imported the hardware definition from Vivadoimage

image

With this imported we need to create both an application and a board support package. For those unfamiliar with it the BSP includes all of the APIs and Libraries necessary to work the Cora board and any peripherals we have added in, within Vivado. We can create both an application project and a BSP by selecting File->New->Application Project


image

This will open a dialog which allows us to specify the name of the application, the OS used (for this example we will use bare metal approach), note how the BSP is created automatically.

Clicking Next will open the next page allowing the selection of a project templateimage

Select the Hello World application, this will provide a base with which we can build upon. Once the application is created within the SDK window you will now also see a Application project and a BSP project.image

image

Under the application project, open the file helloworld.c file. It is within this file that we will add in the necessary code to drive the BRAM elements we added in to the PL in Vivado. For this simple application we are going to write 10 words in to the BRAM, before reading them back and checking the values are correct.


To be able to do this we use the XBram API which is provided by the BSP, you can examine this file under  Application BSP-> ps7_cortexa9_0->libsrc->bram_v4_2

If we need to find parameters for the BSP API's we can find the entire configuration of the PS within the Xparametes.h file this is available also under the Application BSP under the Include directory.image

Within the hello_world.c application we need to add in the following codeimage


#include <stdio.h>
#include "platform.h"
#include "xil_printf.h"
#include "xbram.h"

XBram   Bram;

int main()
{

XBram_Config *BRAMConfigPtr;
int Status,i;
u32 addr,data;

    init_platform();

    BRAMConfigPtr = XBram_LookupConfig(XPAR_BRAM_0_DEVICE_ID);

Status = XBram_CfgInitialize(&Bram, BRAMConfigPtr,BRAMConfigPtr->CtrlBaseAddress);
if (Status != XST_SUCCESS) {
return XST_FAILURE;
}

    printf("e14 Blog Example\n\r");
    addr = XPAR_BRAM_0_BASEADDR;

    printf("writing to the BRAM \n\r");
    for(i=0;i<9;i++){
    XBram_Out32(addr,i);
    addr = addr+4;
    }
    addr = XPAR_BRAM_0_BASEADDR;
    printf("reading from the BRAM\n\r");
    for(i=0;i<9;i++){
    data = XBram_In32(addr);
    if (data !=  i){
    printf("Data Read Back is not correct\n\r");
    }
    addr = addr+4;
    }

    printf("Test Complete Read Back Correct\n\r");
    cleanup_platform();
    return 0;
}


Once we have entered the code above, we want to run this on the Cora Z7 and check the performance. We can do this by configuring the Debugger within SDK, this allows us to download code and if necessary break point and fault the application.


We can configure the debugger by selecting the Debug Configuration option from under the debug icon, you can access this by clicking on the down arrow under beside the debug icon.

This will open a debug configuration window, under the Xilinx (C/C++) application system debugger click on the new icon, this will populate the system debugger configuration. However, before we can use it we need to make a few adjustments. The first is to change the debugger from attaching to a running target to being a standalone debugger, the second step is to check the reset entire system option and ensure the program FPGA, Run Ps7_init and run post config options are also checked. image

image

On the application tab, check the download option and ensure the project name is shown in the project column

Once this is completed, with the Cora Z7 board connected via USB, click on debug. This will download the application and halt the processor at the start of the application allowing us to run the application when we are ready. Before we do run this we also need to connect a serial port such that we can see the output. if we want we can use the SDK terminal. image

To run the application click on the Green Run arrow in the menu bar and the application will run, you will see progress reported in the serial port window.image

image

Once the project completes running you should see a pass status reported in your chosen serial application.


These two blogs have shown quite simply how you can create a Cora Vivado design and then create SW which drives that design. Of course this applies to any Zynq and not just the Cora Z7 it is now over to you as to what you wish to develop for your board.

  • Sign in to reply
  • geof23
    geof23 over 4 years ago

    Hey Adam, thanks for the blogs on the Cora z7.


    Just wanted to point out -- you're writing 9 memory locations.


    However, I've found your series of articles extremely helpful.   I haven't done any hardware design since Xilinx ISE, so your step-by-step tutorials clearly demoed the key points in getting a hybrid design going that i needed.


    Cheers -- Geof

    • Cancel
    • Vote Up 0 Vote Down
    • Sign in to reply
    • More
    • Cancel
  • adamtaylorcengfiet
    adamtaylorcengfiet over 4 years ago in reply to cra8000

    Hi I can do it might be a few weeks as I want to wrap up the M1/M3 example first.


    In the mean time if you are struggling with how to do it check out my blog series the microzed chronicles Issue 5 and 6 look at exactly this - it is currently on issue 266


    Best


    Adam

    • Cancel
    • Vote Up 0 Vote Down
    • Sign in to reply
    • More
    • Cancel
  • cra8000
    cra8000 over 4 years ago

    Very good gettings started Adam.


    Could You add one more , how To do a boot.bin for SDcard?


    Thanks a lot.

    • Cancel
    • Vote Up 0 Vote Down
    • Sign in to reply
    • More
    • Cancel
element14 Community

element14 is the first online community specifically for engineers. Connect with your peers and get expert answers to your questions.

  • Members
  • Learn
  • Technologies
  • Challenges & Projects
  • Products
  • Store
  • About Us
  • Feedback & Support
  • FAQs
  • Terms of Use
  • Privacy Policy
  • Legal and Copyright Notices
  • Sitemap
  • Cookies

An Avnet Company © 2023 Premier Farnell Limited. All Rights Reserved.

Premier Farnell Ltd, registered in England and Wales (no 00876412), registered office: Farnell House, Forge Lane, Leeds LS12 2NE.

ICP 备案号 10220084.

Follow element14

  • Facebook
  • Twitter
  • linkedin
  • YouTube