

If Ben hadn't released his recent "Pi No HDMI" build, I would have targetted that mod for my portable Pi Build. Turns out, I’m going to need to follow his guide on that one. For my Portable Pi, Hack Like Heck, build, I’m using a Pi 3. I just finished the first disk of Final Fantasy 8 on my RetroPie (in a Super Famicom Case). It will take me forever to finish FF8, unless I can play it during my train ride to work.
This week I worked on the following aspects.
Got RetroPie Setup
Sometimes the first step is the easiest. I have two Pi 3s. I’ll use one for “development” and one for “production.” My development image is set up with the latest version of RetroPie, FF8, and a couple of NES ROM.
Controller Layout
Instead of using micro switches for my buttons, I am re-using the silicon piece from an existing controller. In this case, it is from a USB SNES-like controller, so I’m not ruining a classic. I 3d modeled the pieces for that controller in Fusion 360, so I could design my layout.
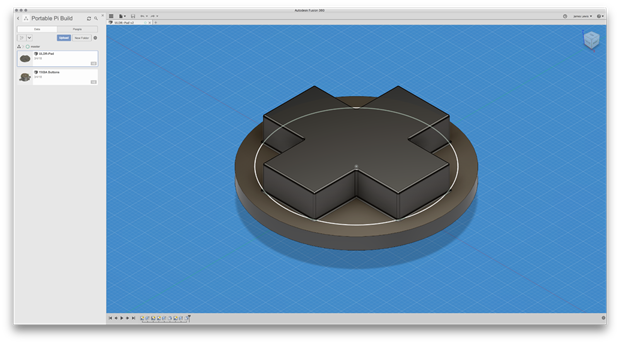
The next step for the enclosure mill out the basic shape with some cheap HDPE, to see how it feels in my hands.

Battery Test
Using the current probe on my R&S RTM3004, I measured the current draw of the Pi with a PiTFT 3.5 inch screen attached. I took this step because my multimeter said the current draw was around 510 mA. However, check out this screenshot with my scope on infinite persistence.
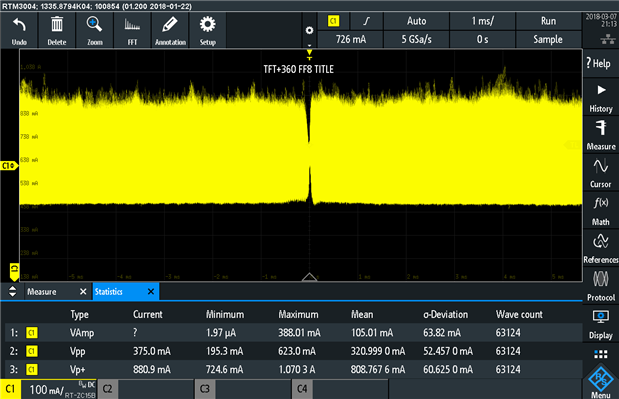
There is a pretty significant amount of ripple current, meaning the Pi is drawing a bit more than what a multimeter shows. And since there is a ripple, that is not a surprise. The actual current draw appears to be closer to an average of 700 mA. There are spikes to 1 A. Especially at boot. Someday, I’d like to explore this aspect more, but that’ll have to be a future video.
My power for the build is an old USB power brick. Originally it was rated for 10400 mAh. However. It is at least 3 years old at this point and has not had an easy life. So I was not sure how much life was left in those cells. Last night I ran a battery life test. If it lasted longer than 4 hours, I would have been happy. Imagine my surprise when I woke up in the morning and IT WAS STILL GOING! So, I’m going to see if I can maybe use a smaller battery.
Note: This test was before I did anything to disable WiFi, Bluetooth, or change the screen brightness. Amazing.
Screen
Disaster and success when it comes to my PiTFT screen. The success is that RetroPie distribution already supports the screen I'm using. So following a simple Adafruit tutorial got it up.
The installation steps aren't critical. You can re-run the script. The only downside is that it takes a few minutes. You'll want the HDMI to be landscape and the TFT to be 270degrees. If you select the wrong screen size, the frame buffer is too small.
The disaster is that the update rate is awful. As beautiful of a screen as it is, the 3.5” TFT just has too many pixels for a reasonable update rate over SPI. So, that brings me to my first comment. I’ll be using Ben’s recent “Pi No HDMI” series to get a TFT screen up and running.
Next
I’m excited to hit the ground running with my build. This next week I plan to do some de-soldering, some milling and finish the PCB designs for the controls.
Can you think of something I forgot or should start to worry about? Let me know in the comments.
Top Comments