


 | Enter Your Project for a chance to win a grand prize for the most innovative use of Arduino or a $200 shopping cart! The Birthday Special: Arduino Projects for Arduino Day! | Project14 Home |
| Monthly Themes | ||
| Monthly Theme Poll |

This Arduino shield will make an end to your 1st project being an LED to be flashed. Now you are able to connect a display (which we are all hooked to anyways) and generate a virtual LED that is going to blink in every color you have ever dreamed of.
Now seriously, the Arduino family of compatible boards is lacking a solid hardware support option to display images, animations or video. This board provides an analog composite video display with integrated frame buffer memory accessible through SPI bus. It will not display 4K video but somebody will hack it to run Doom, Joust or Ultra-Cricket. PAL and NTSC output formats are supported, resolution is up to 720x576 with reduced color count. Yes, there are software solutions available to generate video or RGB signals, but they use critical timing code and a lot of the available computing power of the limited uC.
A 2Mbit SPI FLASH memory is available on-board to store font character bitmaps or graphics.
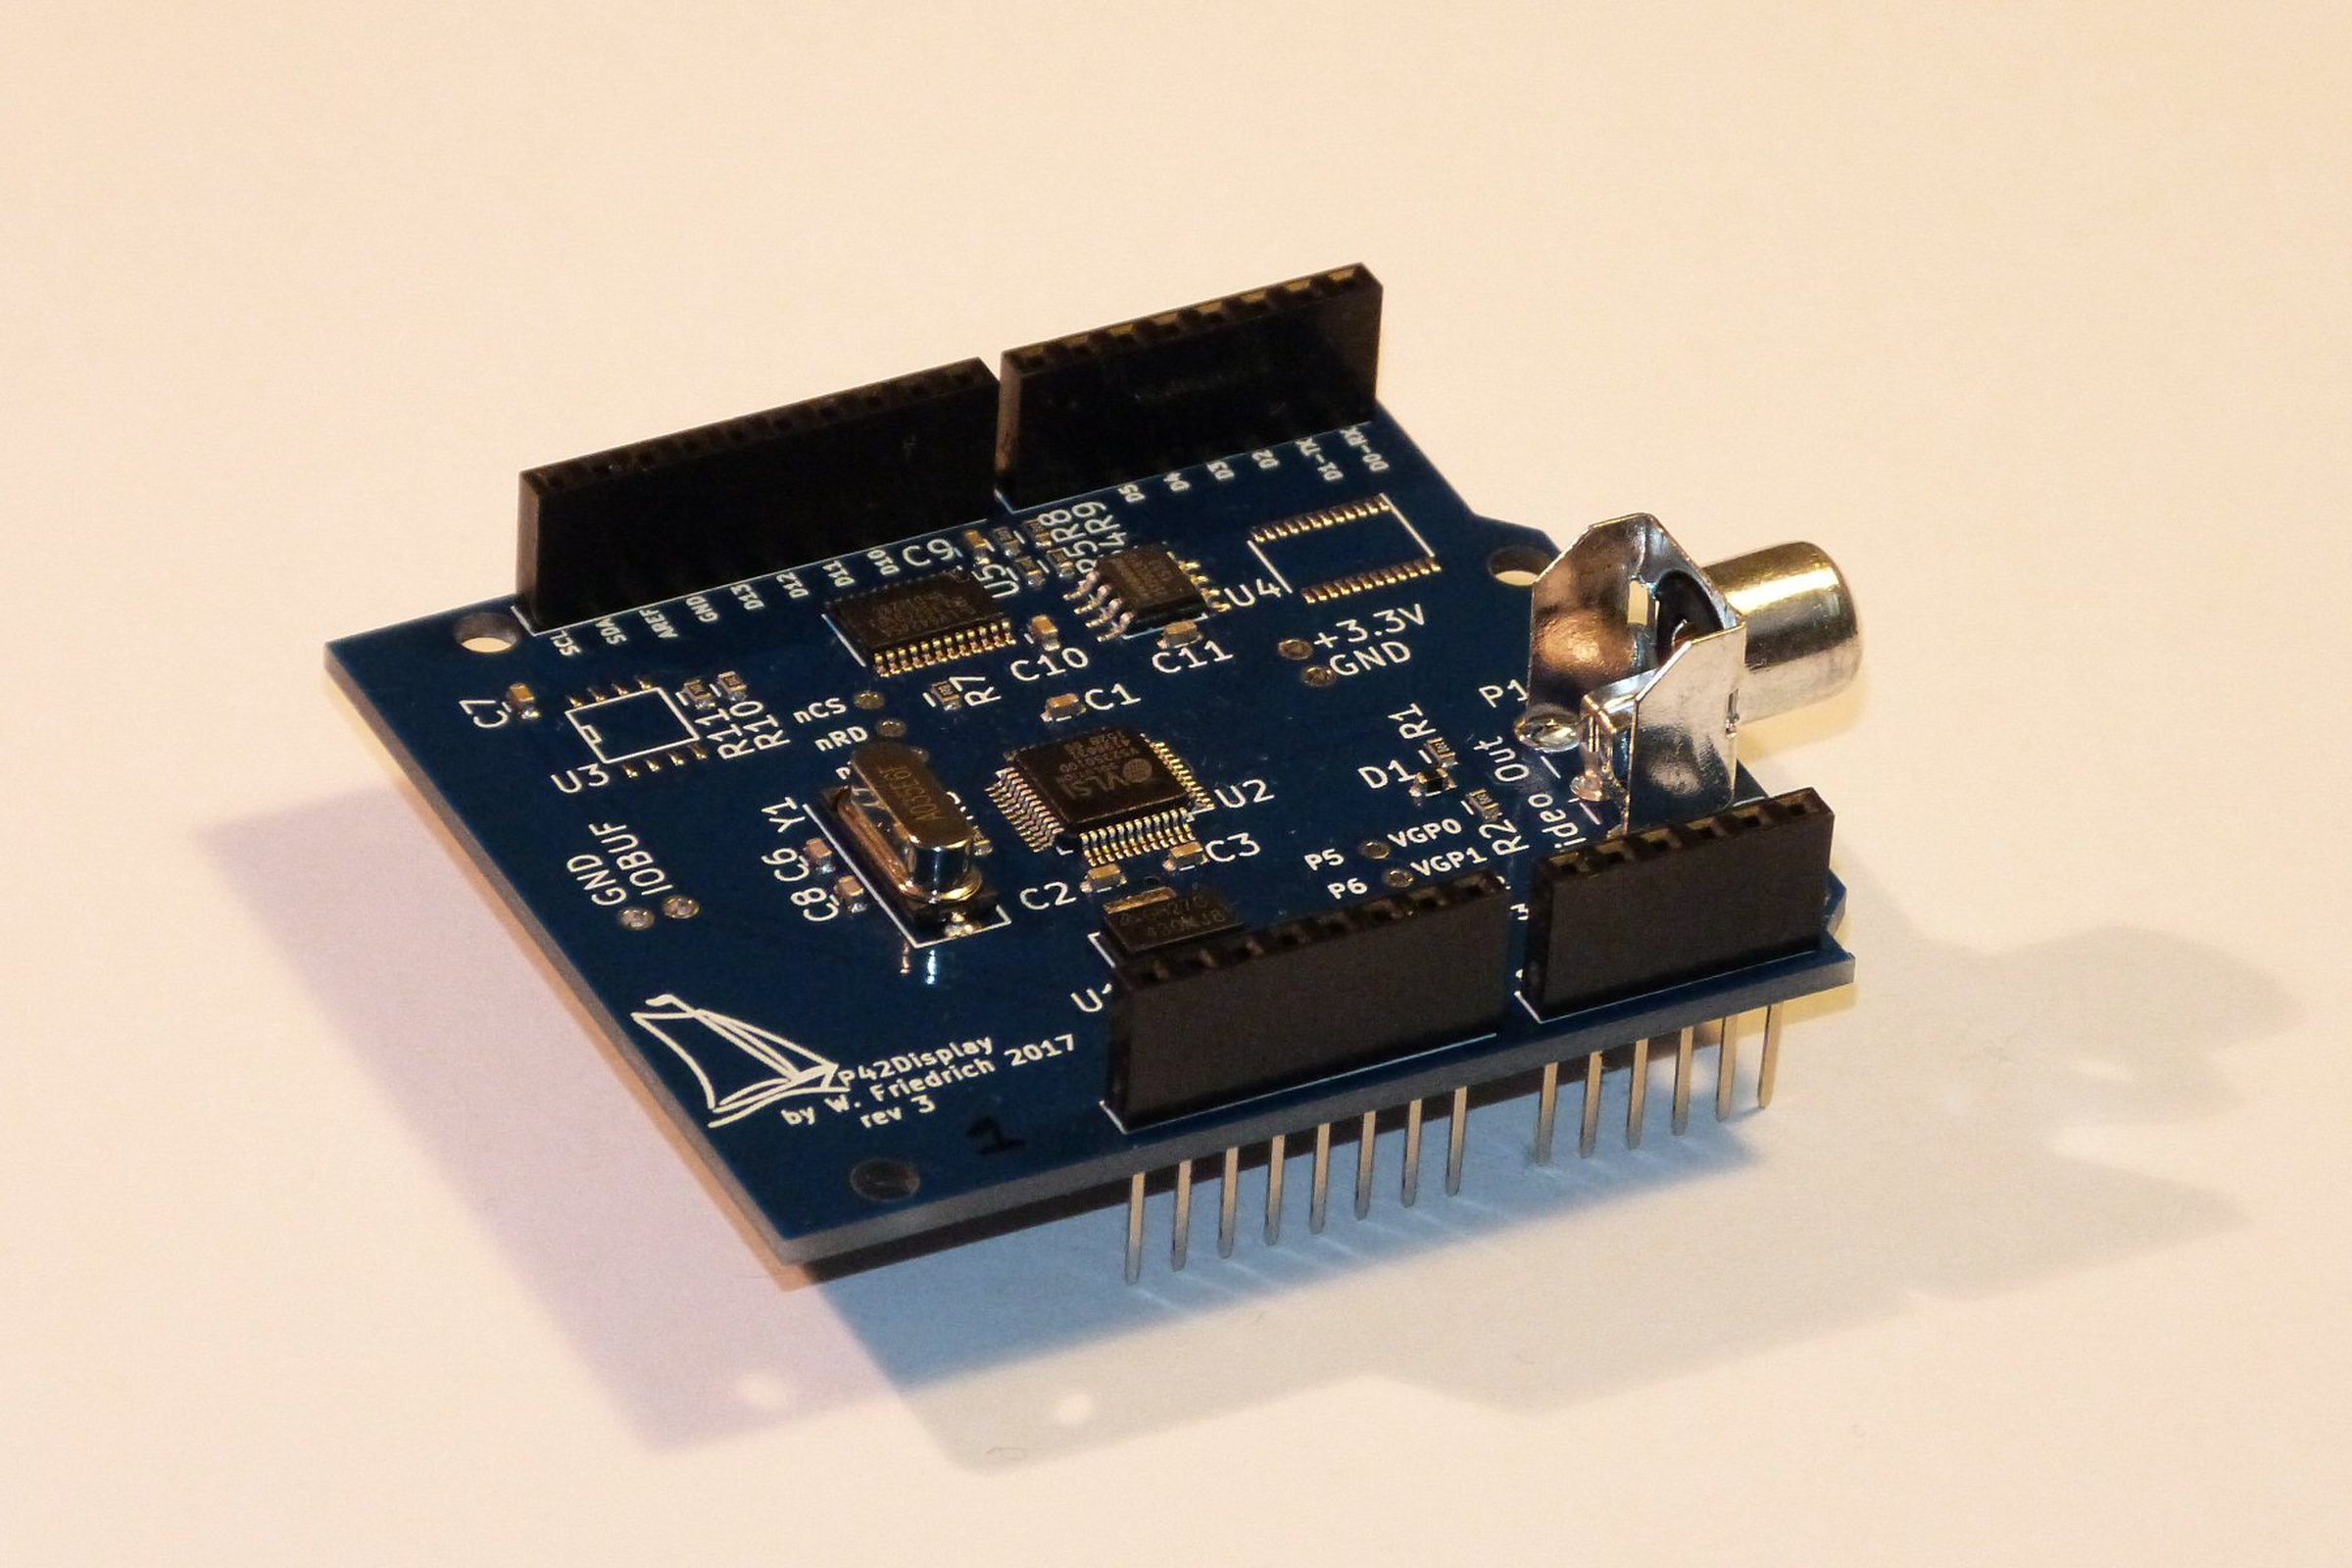
The heart of this design is the VLSI VS23S010D-L chip. It is a 1 Megabit SPI SRAM with Serial and Parallel Interfaces and Integrated Video Display Controller, which outputs a composite video signal. Unused memory can be used for graphics tiles, which can be copied into the image data by the internal fast memory block move hardware.
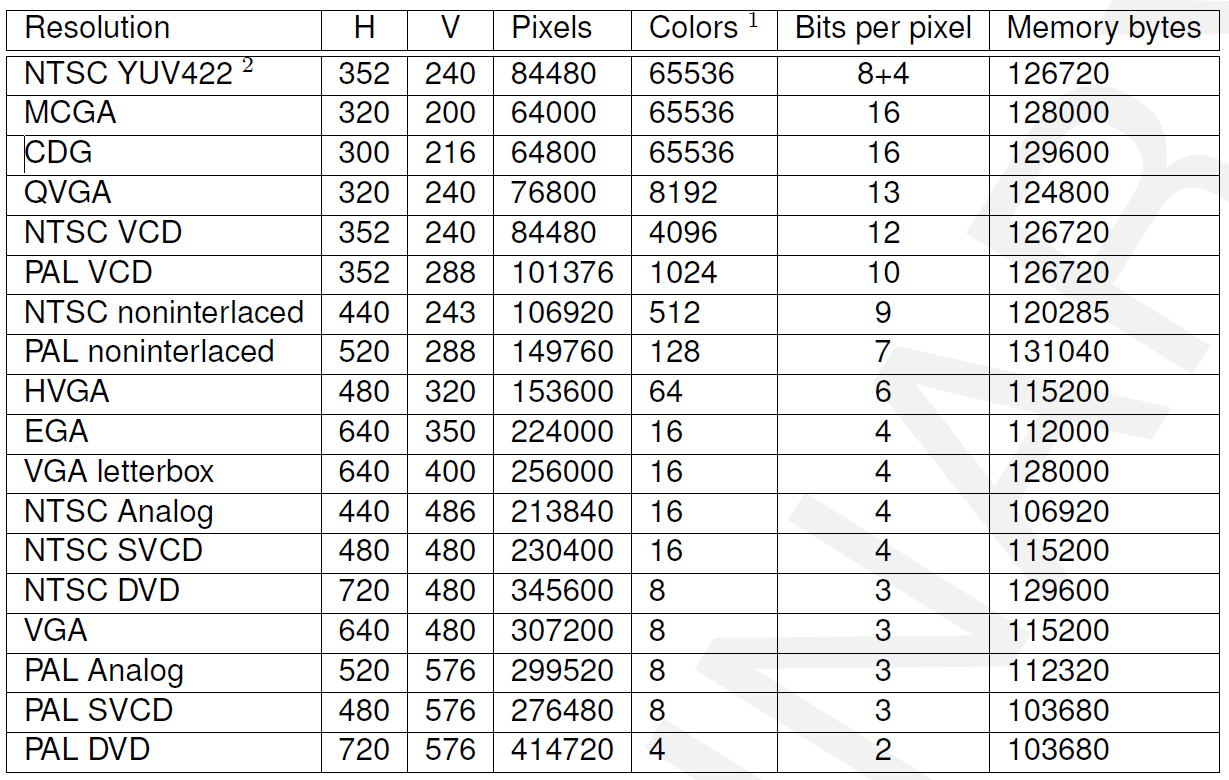
Possible video resolutions, PAL and NTSC modes might be exclusive depending on the mouted crystal (4.433618MHz or 3.579545MHz):
The chip has a 3.3V interface, so a level shifter logic is required, which is done by a 74LVC4245A buffer. It is able to handle SPI Mbps speed better that a simple FET based level shifter. A footprint for a 512Kbit EEPROM for bitmaps and character memory is added, but is probably too slow for effective operation. The current version does have a 2Mbit SPI FLASH chip for better speed and memory size. Now I am dreaming of SPI DMA, which just gave me an idea of a small PLD and a parallel flash memory to implement that.
Rev3 of the board (with added SPI FLASH) is being designed, might be the final one if things go well. Writing SW is so hard in comparison. Currently NTSC 320x200 and PAL 300x240 resolutions are working with an identical color map. This is important to have an unified RGB to YUV conversion table. Both resolutions have 8bit color depth.
The board uses the Arduino IOREF voltage to translate between 3.3V on the shield side and the respective IO voltage on the Arduino side. This shield works together with UNO and also with any 3.3V system that uses the Arduino form factor and pinout, without modifications.
Specifications
- Lead-free components and soldering
- Operating supply voltage 4.5V - 20V
- Board IO voltage (IOREF) 1.5V - 5.5V
- Composite Video Output
- Maximum resolution 720x576 in 4 colours
- Implemented resolutions: NTSC 320x200 with 256 colours (40x25 characters text mode) and PAL 300x240 with 256 colours (37x30 characters text mode)
- Crystal: NTSC 3.579545MHz or PAL 4.43618MHz
- Communication interface: SPI up to 38MHz
- Video Frame Buffer: 1Mbit = 128KByte
- Flash: 2Mbit = 256KByte
- EEPROM: up to 2Mbit (optional, not populated)
- IO connectors Arduino compatible
- Size: 61.3mm x 53.4mm (2.4" x 2.1")
Disclaimer
This board is for sale in my Tindie Store.

Design
Software library and design files are available on my Github page. Updates are happening.
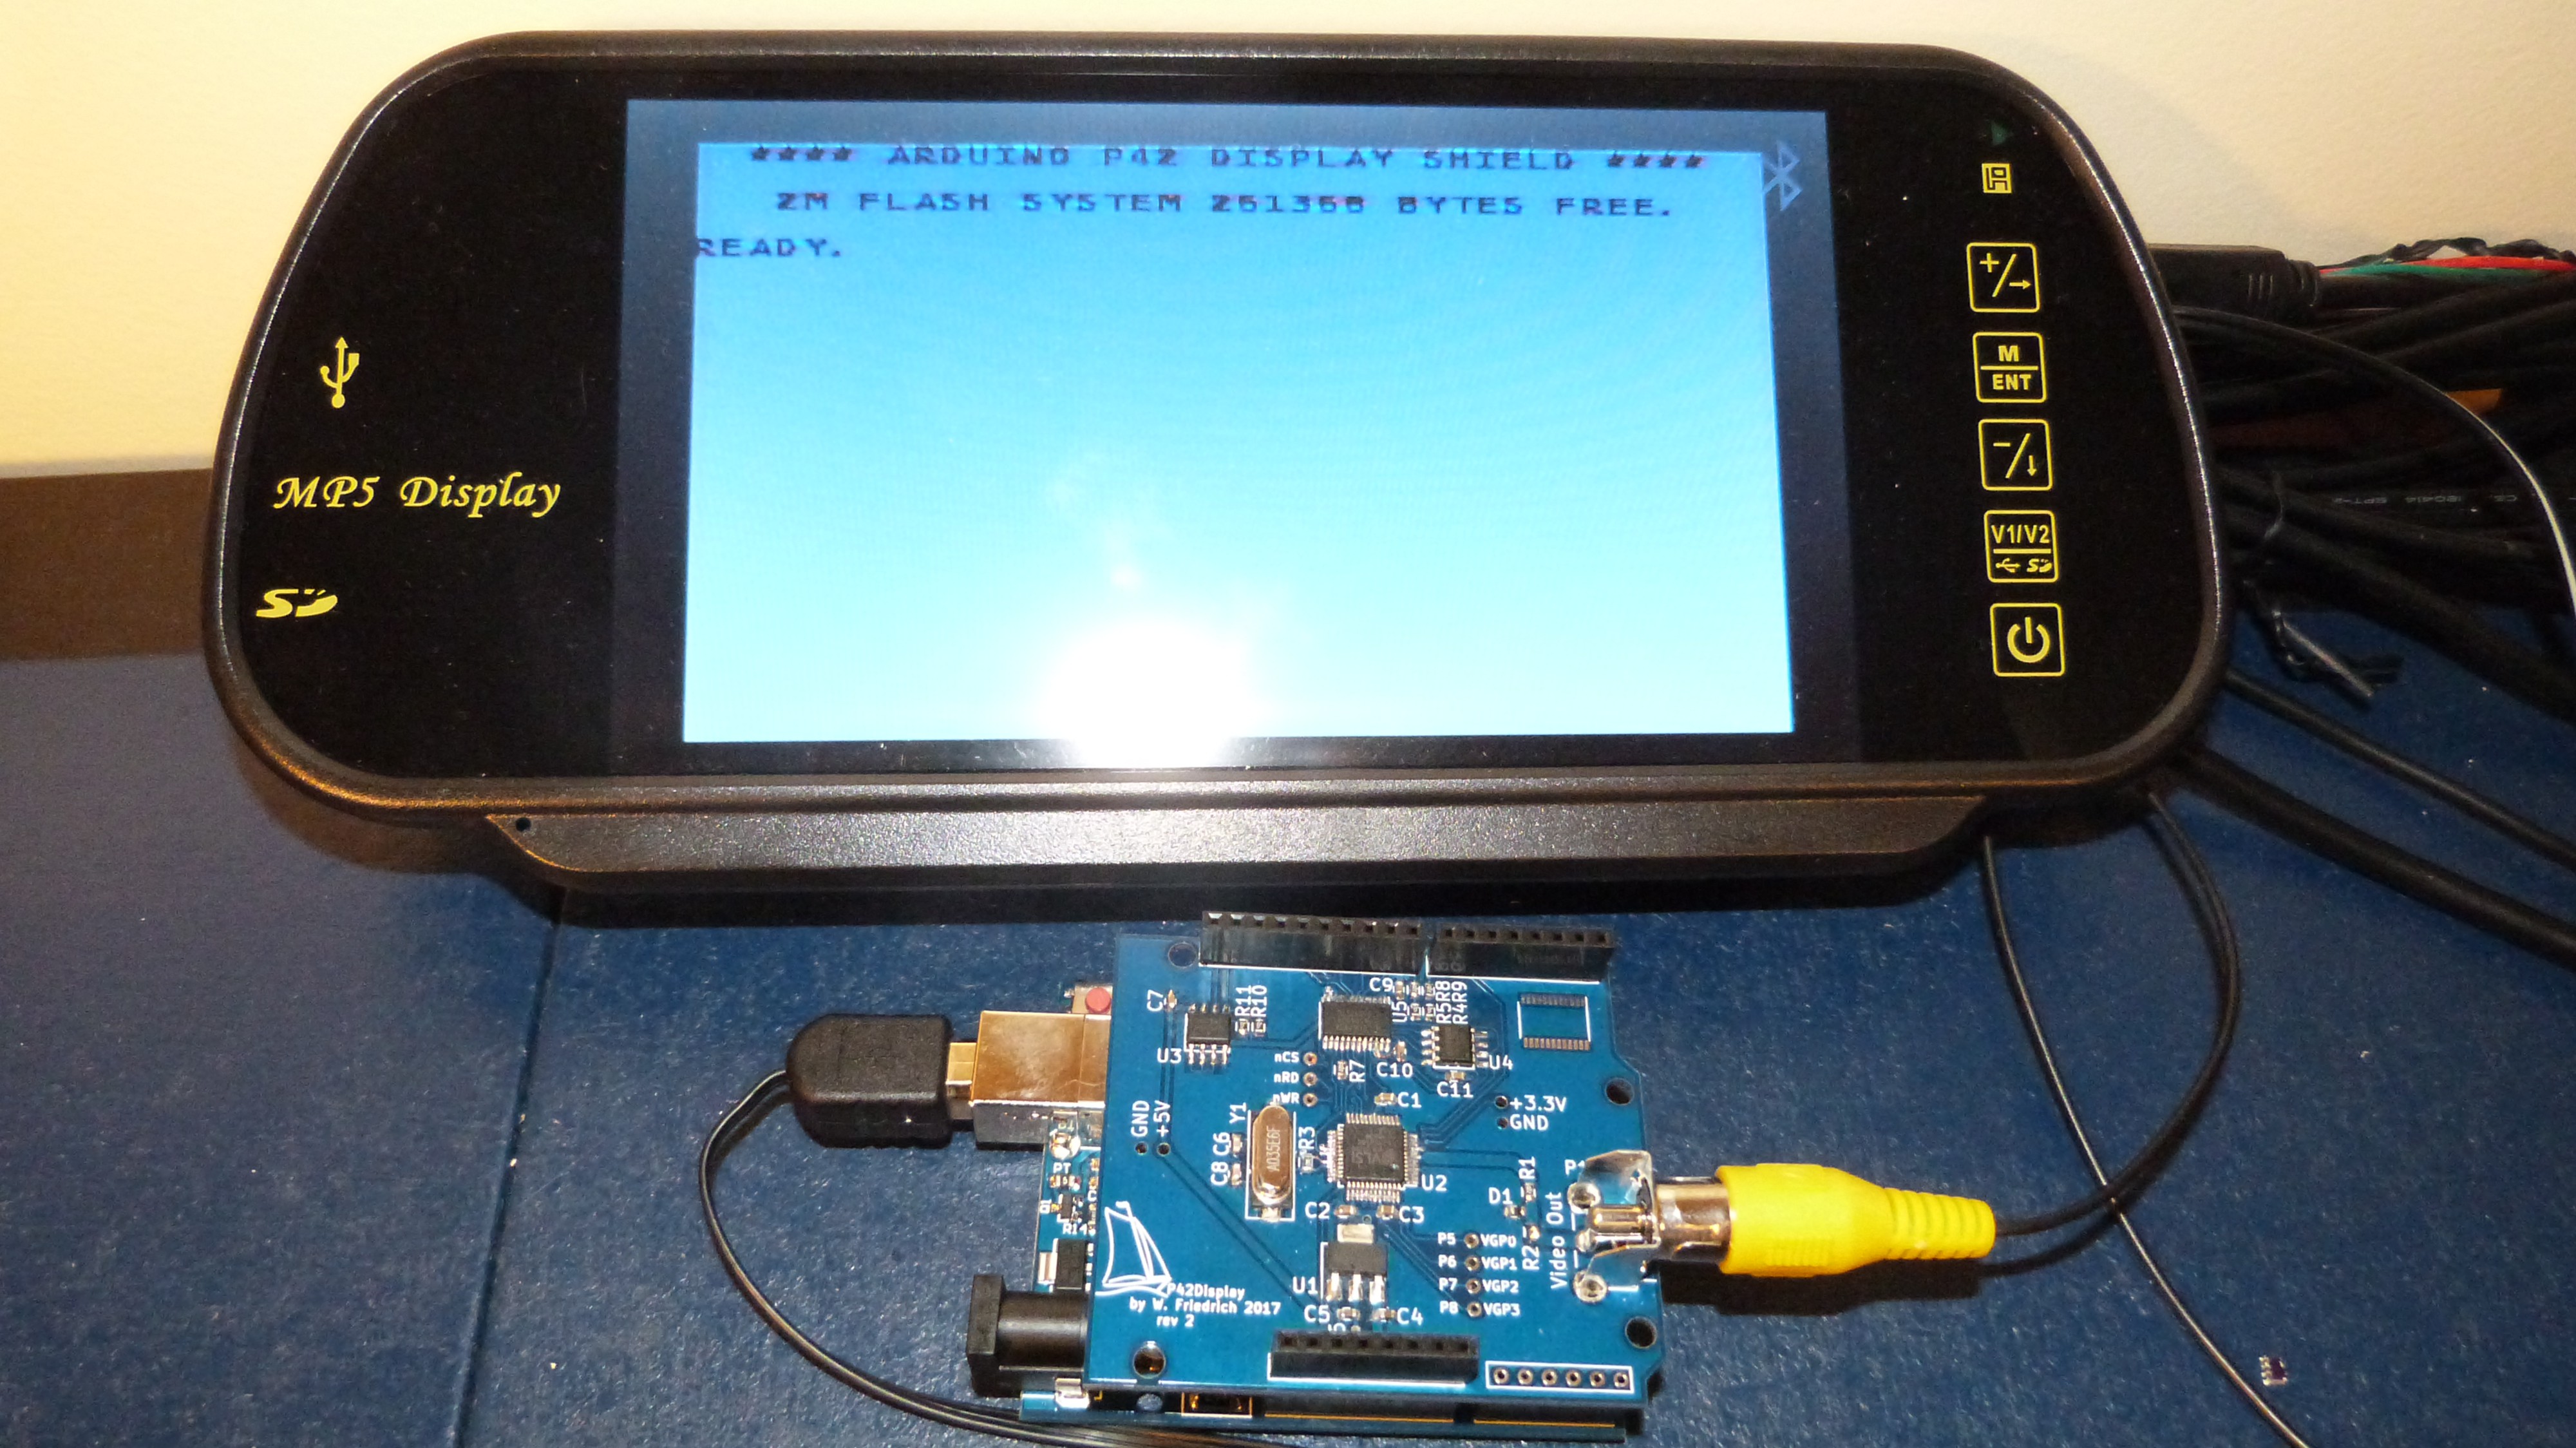
Design Proving
Text output on my new 7" display. Now I can work on my desk instead in front of the 40" TV.
And a scope plot of a nice NTSC video signal displaying the color test image.

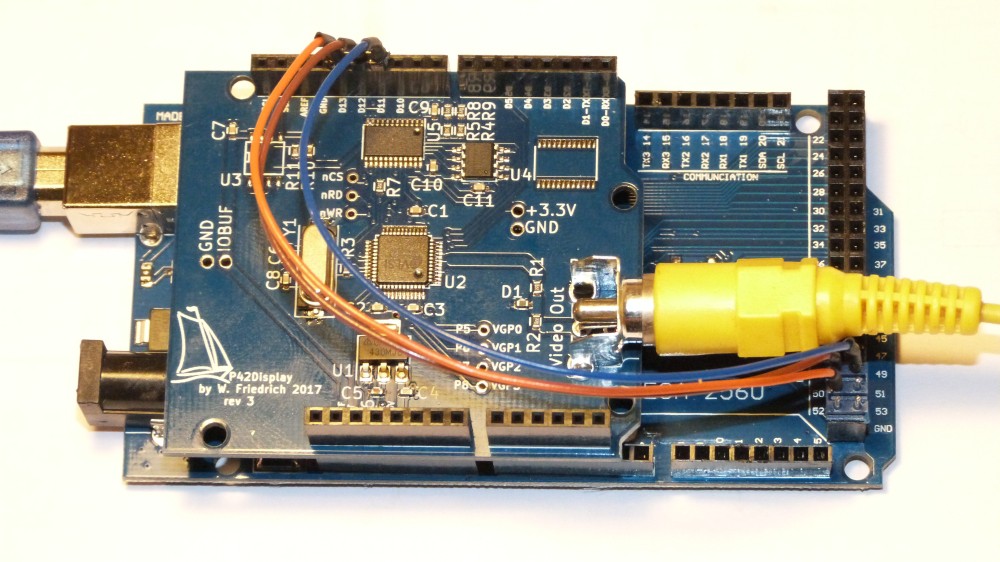
MEGA/DUE
Using the board with an Arduino MEGA or DUE requires a special cable to connect the SPI interface and a few extra commands to disable some pins on the controller. Another option would be to use a SPI soft core and map the same SPI pins as the UNO. I have not tried it yet.
To use my Video Display shield (and any other UNO shield that wants to talk SPI) with my MEGA clone, this is what I did:
Connect the SPI communication signals through jumper wires to the shield.
SCK: Mega pin 52 -> Uno shield pin 13 - orange wire
MOSI: Mega pin 51 -> Uno shield pin 12 - brown wire
MISO: Mega pin 50 -> Uno shield pin 11 - blue wire
The slave select pin 53 does not need to be wired, as it is mapped as a normal GPIO in a normal Uno sketch. The picture for the pin numbers 50-51 on the Mega connector is misleading due to the parallax.
(The RCA connector is not in a ideal location for the wire jumpers. Here is a reason for another spin).
It is also possible to cut a piece of the PCB to get access to the SPI header.

Make pins 11 to 13 on the Mega inputs or tri-stated outputs.
Add the define somewhere in the header file for the shield or at the beginning of the sketch
#define MEGA
Add the code to disable the pins that are used by Uno for SPI in the setup() function
#ifdef MEGA
pinMode(11, INPUT);
pinMode(12, INPUT);
pinMode(13, INPUT);
#endif
This was all I needed to do and the MEGA was happily configuring the Video Display shield and outputting the test patterns. Connecting to the DUE is similar but tricky because the DUE SPI connector is sitting under the shield. To get better access I would raise the shield with an extra set of headers.
NTSC/PAL
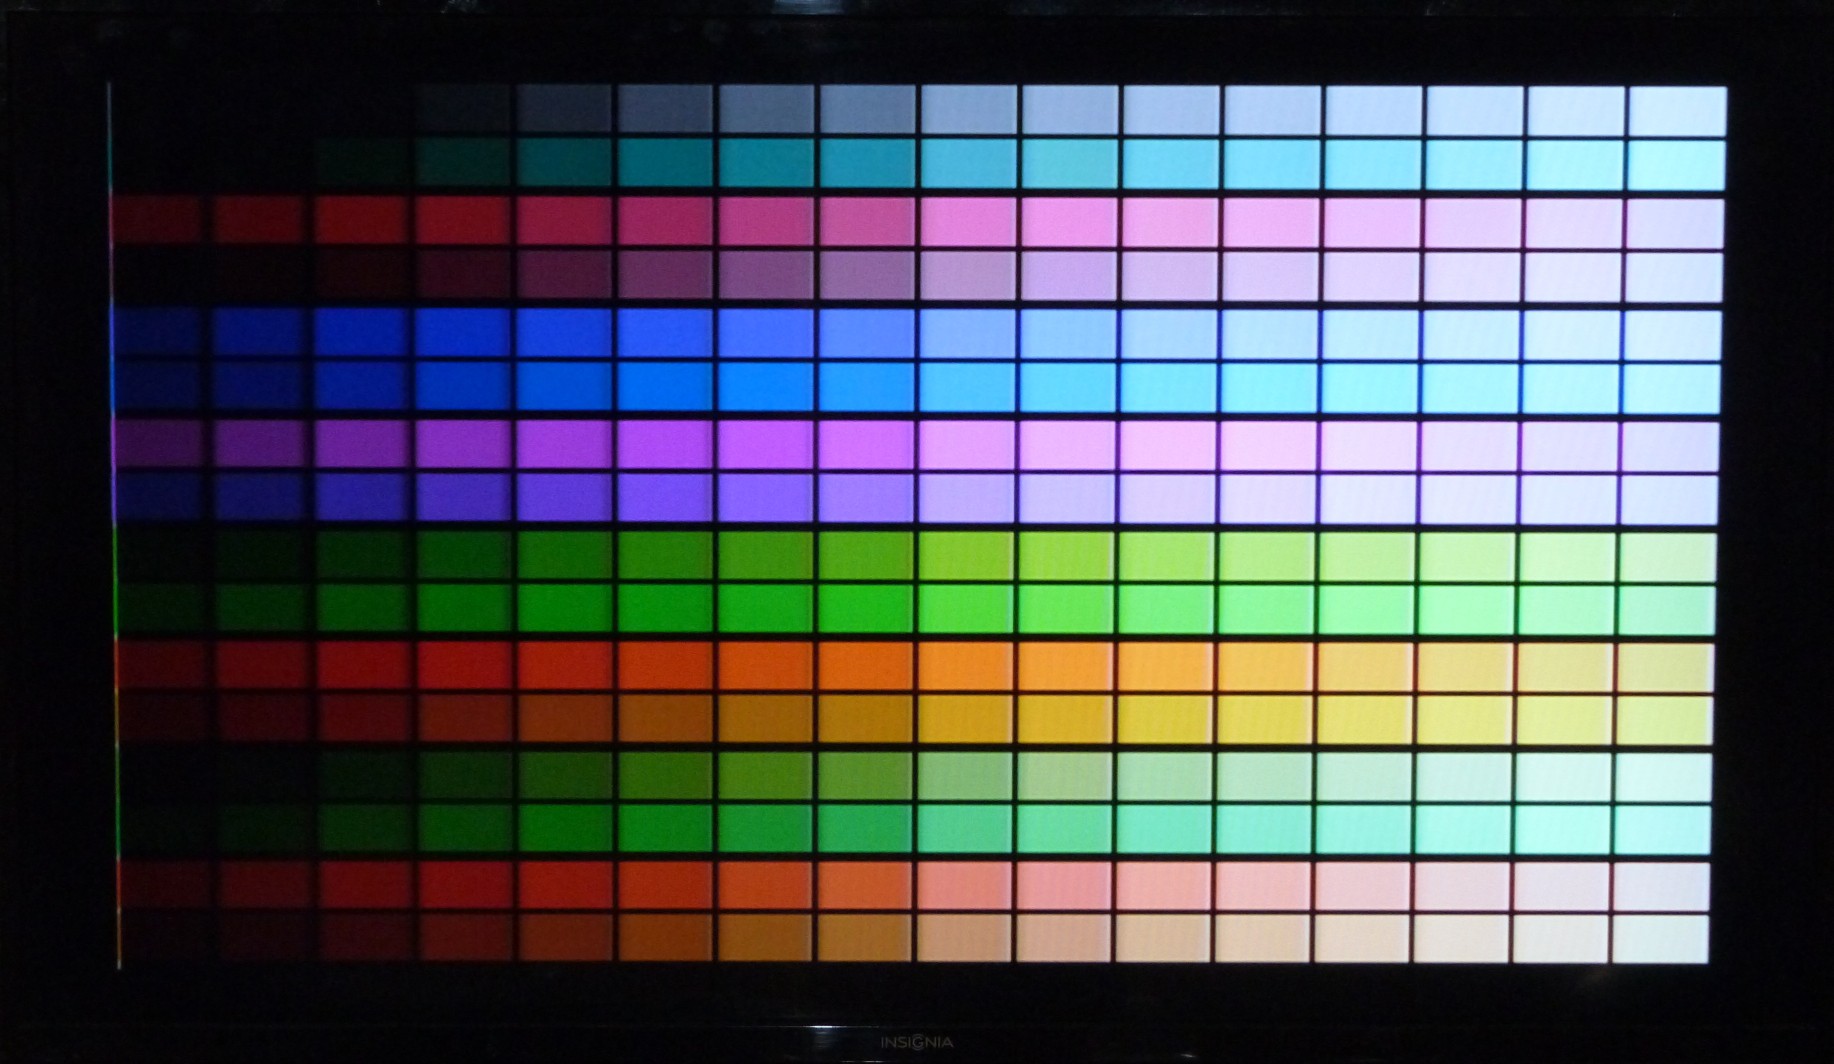
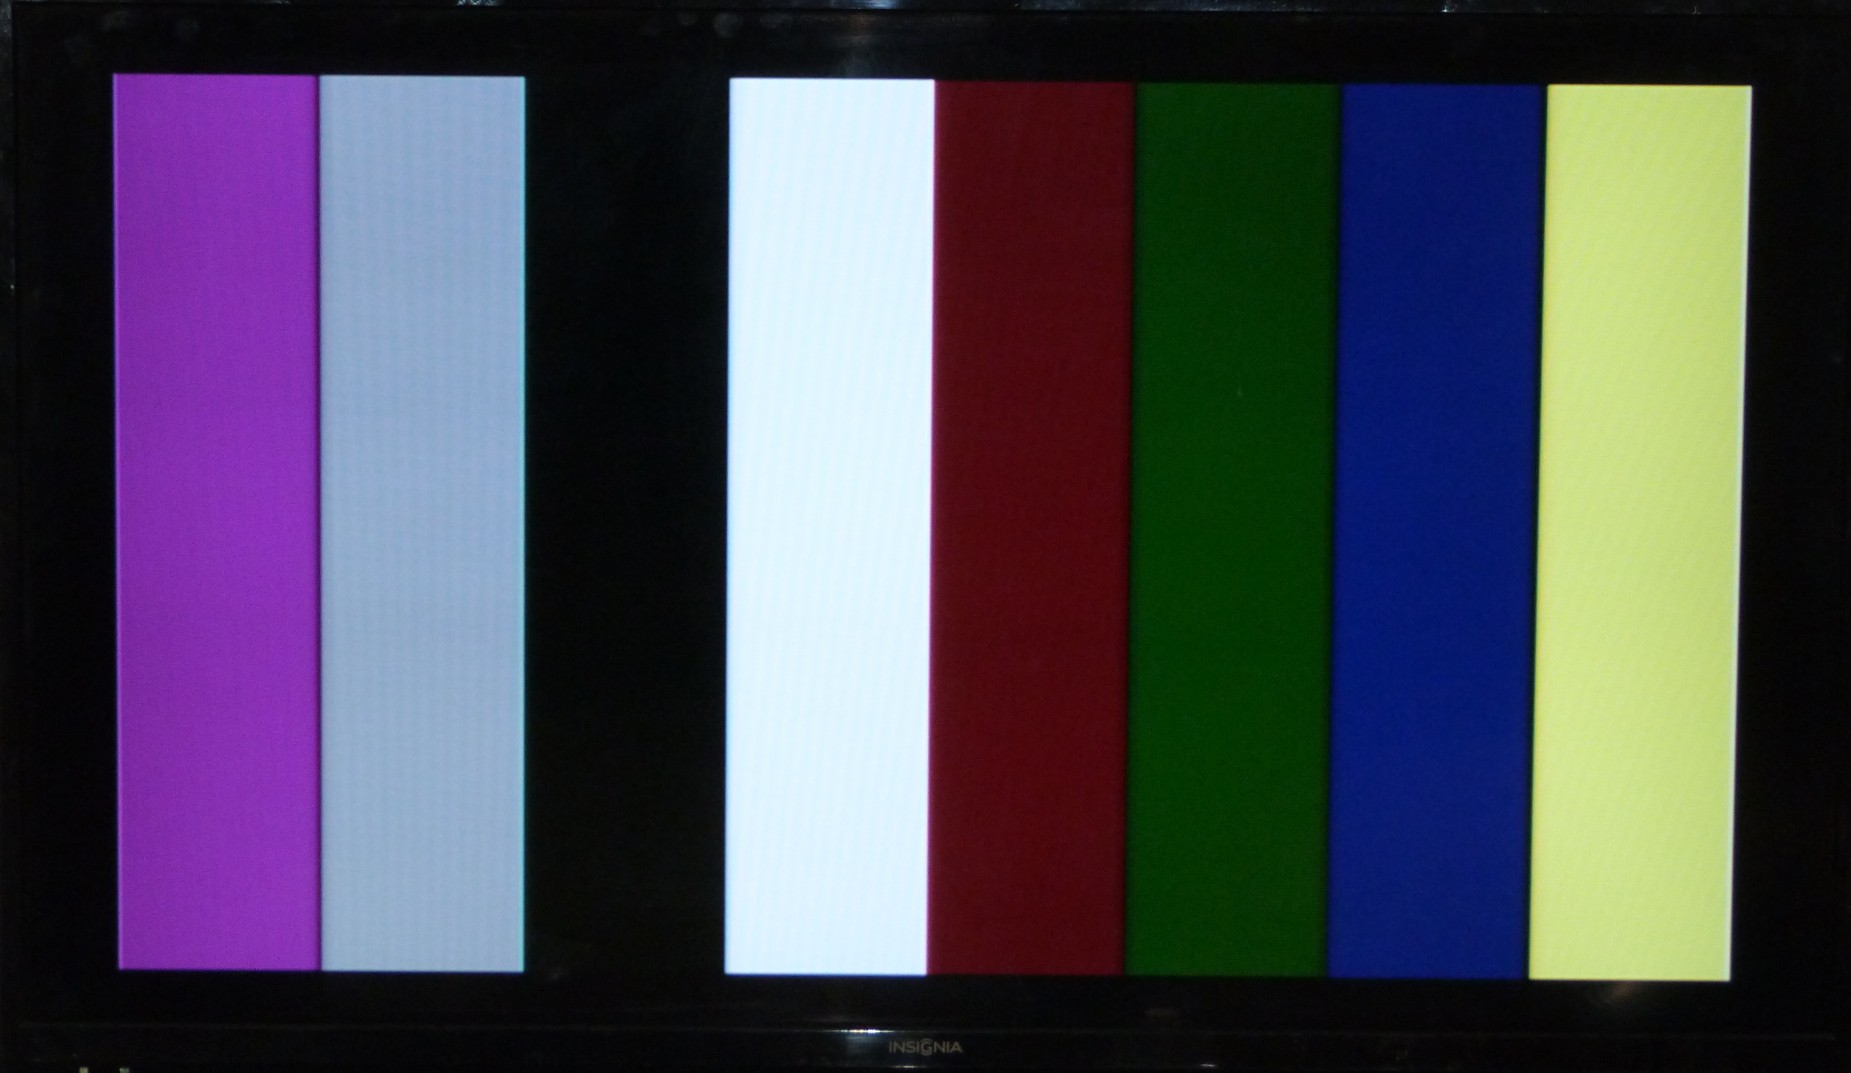
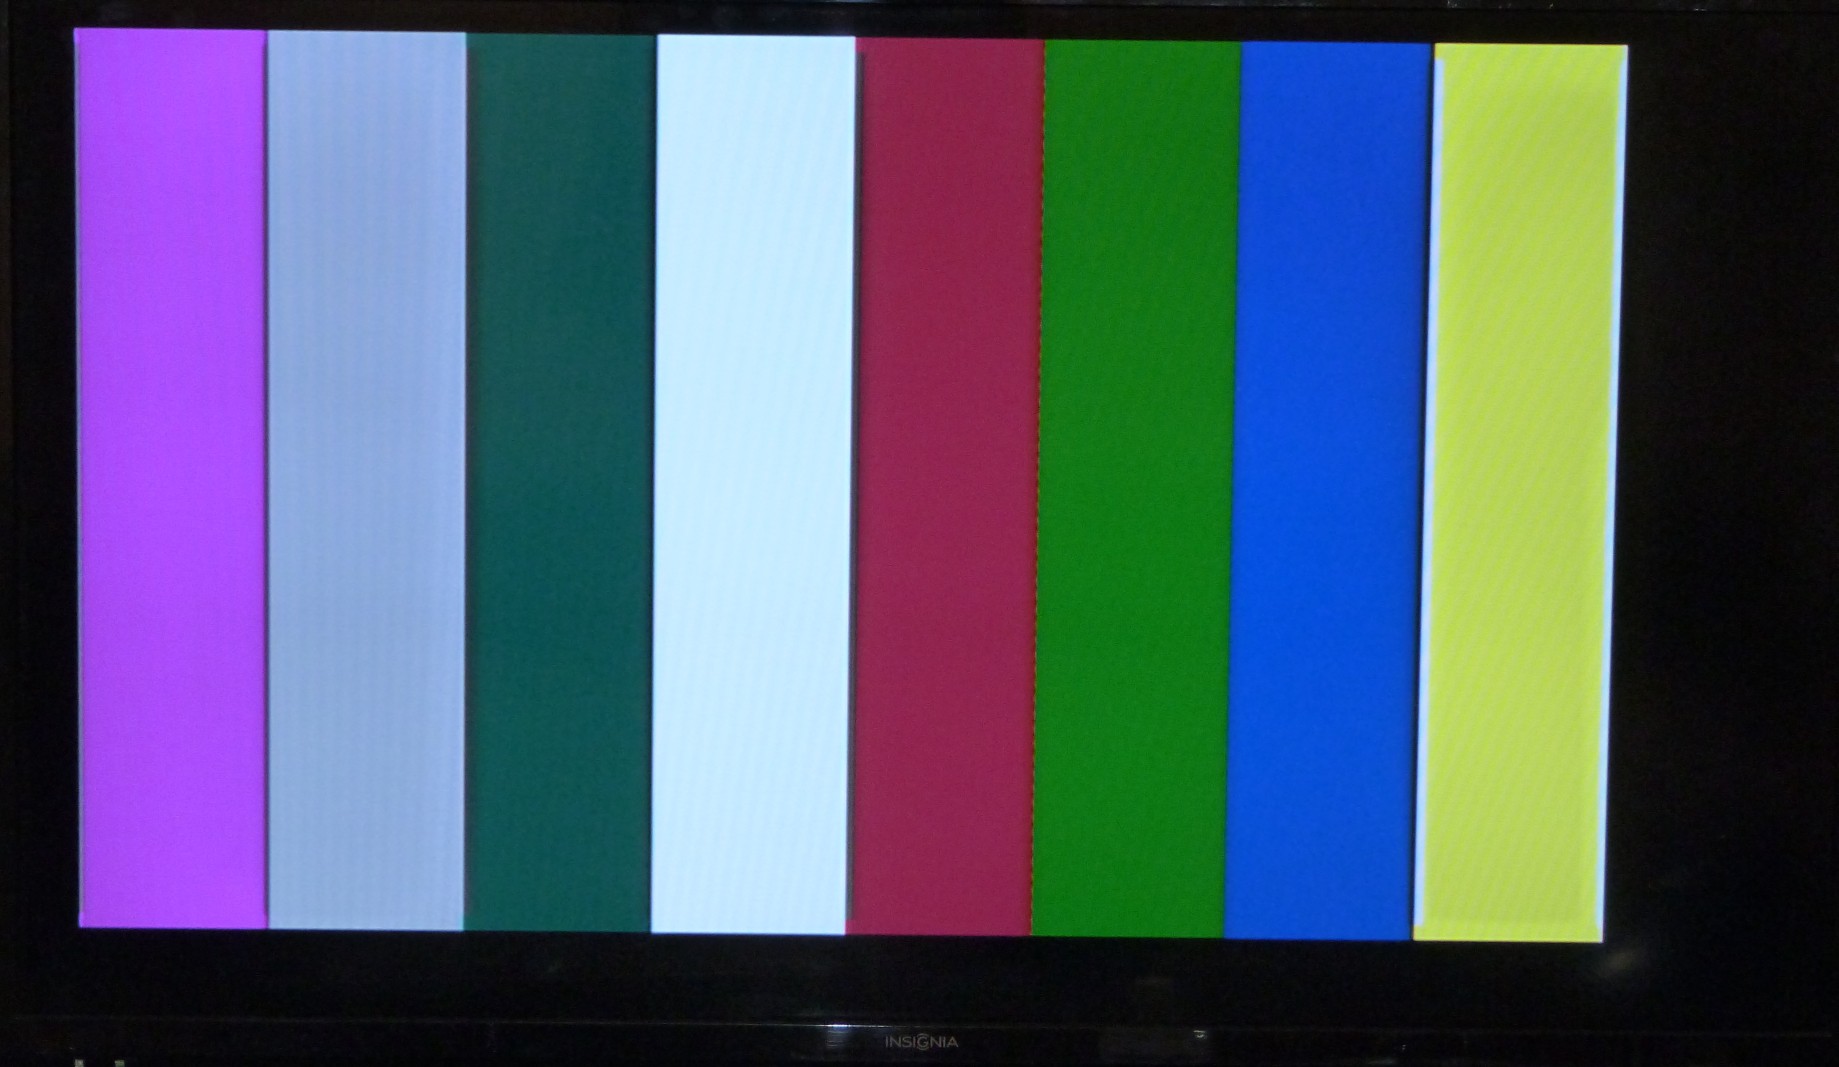
Here are some comparison pictures. All pictures are 8 bit color depth.
NTSC resolution is 320x200 PAL resolution is 300x240.

Animation
Finally I have got the animation demo with the famous Amiga Boing ball running. The video quality is not stunning, but it shows what is possible with very little program overhead once the memory is set up.
Next steps
The to-do list for software is still long.
Currently working on a function to display images sent over UART.
On the hardware end, a cable and more software to support grey scale VGA is next.
Top Comments
-

gam3t3ch
-
Cancel
-
Vote Up
+3
Vote Down
-
-
Sign in to reply
-
More
-
Cancel
Comment-

gam3t3ch
-
Cancel
-
Vote Up
+3
Vote Down
-
-
Sign in to reply
-
More
-
Cancel
Children