


I decided today to try and work on the programming for the Party Ball. I had already written a c++ program to decode the MQTT messages and am using the LED Controller from MK Smart House as a basis for the code.
I wanted to keep the MQTT commands relatively simple, and easy to decode in software, this is the list I decided on. I am also going to try and keep this standard throughout my projects using my openhab server to try and keep things simpler.
| MQTT Command | Description |
|---|---|
| A | Auto Mode |
| M&X | Change Motor Speed to X |
| &R:G:B | Change Neopixels to RGB Value |
| OFF | Turn off |
UPDATE: After Testing it turns out that the String Value is too small to handle the colour commands when all three values are three digits ie: C&100:100:100, and would remove the last digit so the "C" has been removed from the Command
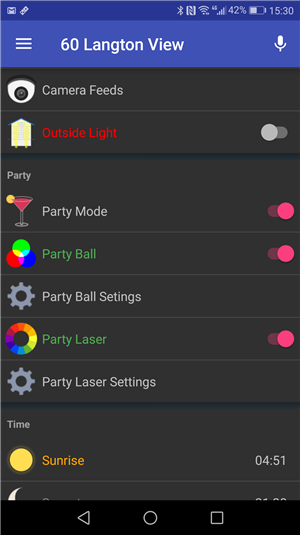
Openhab Configuration
Items
//Party Ball Controls Switch
Party_Ball   "Party Ball"                 ["Switchable"]
Color  Party_BColor "Party Ball Colour"
Dimmer Party_BSpeed "Party Ball Speed"
Switch Party_BAuto  "Party Ball Auto"
//Party Ball Commnad String
String Party_BCom   "Party Ball Command"  {mqtt=">[broker:DF/Party/Ball:command:*:default"}
For the items associated with the party ball I created several different items.
- Party_Ball : the power button
- Party_BAuto : Auto mode for the Party Ball
- Party_BColor : For setting all the neopixel Colours
- Party_BSpeed : the motor Speed of the kaleidoscope
- Party_BComm : the command string sent to the device
I used a seperate string for sending the commands as to not have to mess around with mappings for the MQTT binding in openhab, as it would have made making modifications to commands harder. It also would not have allowed me to send the colour value as RGB as openhab stores the colour as an HSB value. So all of the commands sent to the device are constructed using rules
Sitemap
Switch  item=Party_Ball     visibility=[Party_Time==ON] labelcolor=[ON="green"]//Party Ball Settings
Text    label="Party Ball Setings"  icon="settings"     visibility=[Party_Ball==ON] {
     Switch          item=Party_BAuto    label="Auto"
     Colorpicker     item=Party_BColor   label="Colour"  visibility=[Party_BAuto==OFF]
     Switch          item=Party_BSpeed   label="Speed"   mappings=[0="Off", 20="Slow", 60="Half", 100="Full"]    visibility=[Party_BAuto==OFF]
        }
I wanted to make the Sitemap more dynamic, so the controls are hidden when Party Mode is turned off, and the settings controls are hidden when the Party ball is turned off.


Rules
//=============Party Ball===================
rule"Party Ball ON"
when
Item Party_Ball changed to ON
then
Party_BAuto.sendCommand("ON")
end

rule"Party Ball OFF"
when
Item Party_Ball changed to OFF
then
Party_BCom.sendCommand("OFF")
Party_BAuto.sendCommand(OFF)
end

rule"Party Ball Colour Change"
when
Item Party_BColor received command
then
//Turn Off Auto When Selecting Colour
Party_BAuto.sendCommand("OFF")

var HSBType hsbvalue
var int redval
var int greenval
var int blueval

    hsbvalue = Party_BColor.state as HSBType
    redval = hsbvalue.red.intValue
    greenval = hsbvalue.green.intValue
    blueval = hsbvalue.blue.intValue

Party_BCom.sendCommand("C&" + redval + ":" + greenval + ":" + blueval)
end

rule"Party Ball Auto ON"
when
Item Party_BAuto changed to ON
then
Party_BCom.sendCommand("A")
end

rule"Ball Speed Changed"
when
Item Party_BSpeed received update
then
if (Party_BAuto.state == OFF)
    {
var bspeed = Party_BSpeed.state
Party_BCom.sendCommand("M&" + bspeed)
    }
end
The Rules take the values of the other items and feed them into the Command String.
The Colour and Speed commands will only send their values when the Auto mode is turned off.
Arduino
The arduino code needs to take the MQTT commands, decode them to find the mode to operate in and extract the values (if any) from the message. it does this by using the indexOf() and substring() functions to look for the "&" between the mode and the value, then looking for ":" between the rgb values
String InCommand = payload;Serial.println(InCommand);
String mode = InCommand.substring(0, InCommand.indexOf("&"));

String msg = InCommand.substring(InCommand.indexOf("&") + 1, sizeof(InCommand));


String MSpeed;
String Rval;
String Gval;
String Bval;
size_t  found = msg.indexOf(":");

if(found == -1){
if(mode.equals("M")){
M_Speed(msg.toInt());
  }
else if(msg.equals("A")){
M_Auto();
  }
else if(msg.equals("OFF")){
M_Colour(0,0,0);
M_Speed(0);
  }
  }
if(found!= -1){
  MSpeed = 50;
  Rval = msg.substring(0, found);

String intval = msg.substring(found +1, sizeof(msg));
  Gval = intval.substring(0, intval.indexOf(":"));
  Bval = intval.substring(intval.indexOf(":") + 1, sizeof(msg));

Serial.println("colour mode: R=" + Rval + " G=" + Gval + " B=" + Bval);
M_Colour(Rval.toInt(), Gval.toInt(), Bval.toInt());
  }
The code is still a bit messy, and still has some references to the initial c++ code i used to test the functionality.
The code will fist look for the ampersand "&" in the payload of the MQTT message (InCommand). then looks for the semicolon ":", if it doesn't find the semicolon there are three possibilities of what the command is;
- Auto
- Motor Speed change
- OFF
and so compares the mode string to these. For turning of the ball, the colour is set to black (0,0,0) and motor speed to zero, as I wasn't sure of how to turn of neopixels using the Adafruit Library.
The colour values are extracted by repeated looking for a semicolon and taking the value between them, then sending the values to the colour function.
There are three functions for controlling the Party Ball
void M_Auto()
{M_Speed(50);
  pixels.setPixelColor(0, pixels.Color(255,0,0));
  pixels.setPixelColor(1, pixels.Color(0,255,0));
  pixels.setPixelColor(2, pixels.Color(0,0,255));
  pixels.show();
}

void M_Speed(int speedVal){
analogWrite(14, speedVal*10.23);
}

void M_Colour(int red, int green, int blue){
for(int i=0;i<numpixels;i++){
  pixels.setPixelColor(i, pixels.Color(red * 2.55 ,green * 2.55 ,blue * 2.55));
  pixels.show();
  }
}
M_Auto sets the three leds to show one red, one green and one blue, along with setting the speed to 50%. This is to match with how the device currently operates, with one led for each colour.
M_Speed sets the speed using the anlogWrite function to one of the pins, it is multiplied by 10.23 as the value passed to the function is a percentage value of motor speed.
M_Colour is the Adafruit Simple example sketch without the delay. The values passed to the Pixels.Color() are all multiplied by 2.55 as the RGB values received from Openhab are in the range of 0-100, i can only assume it the percentage value for the RGB.
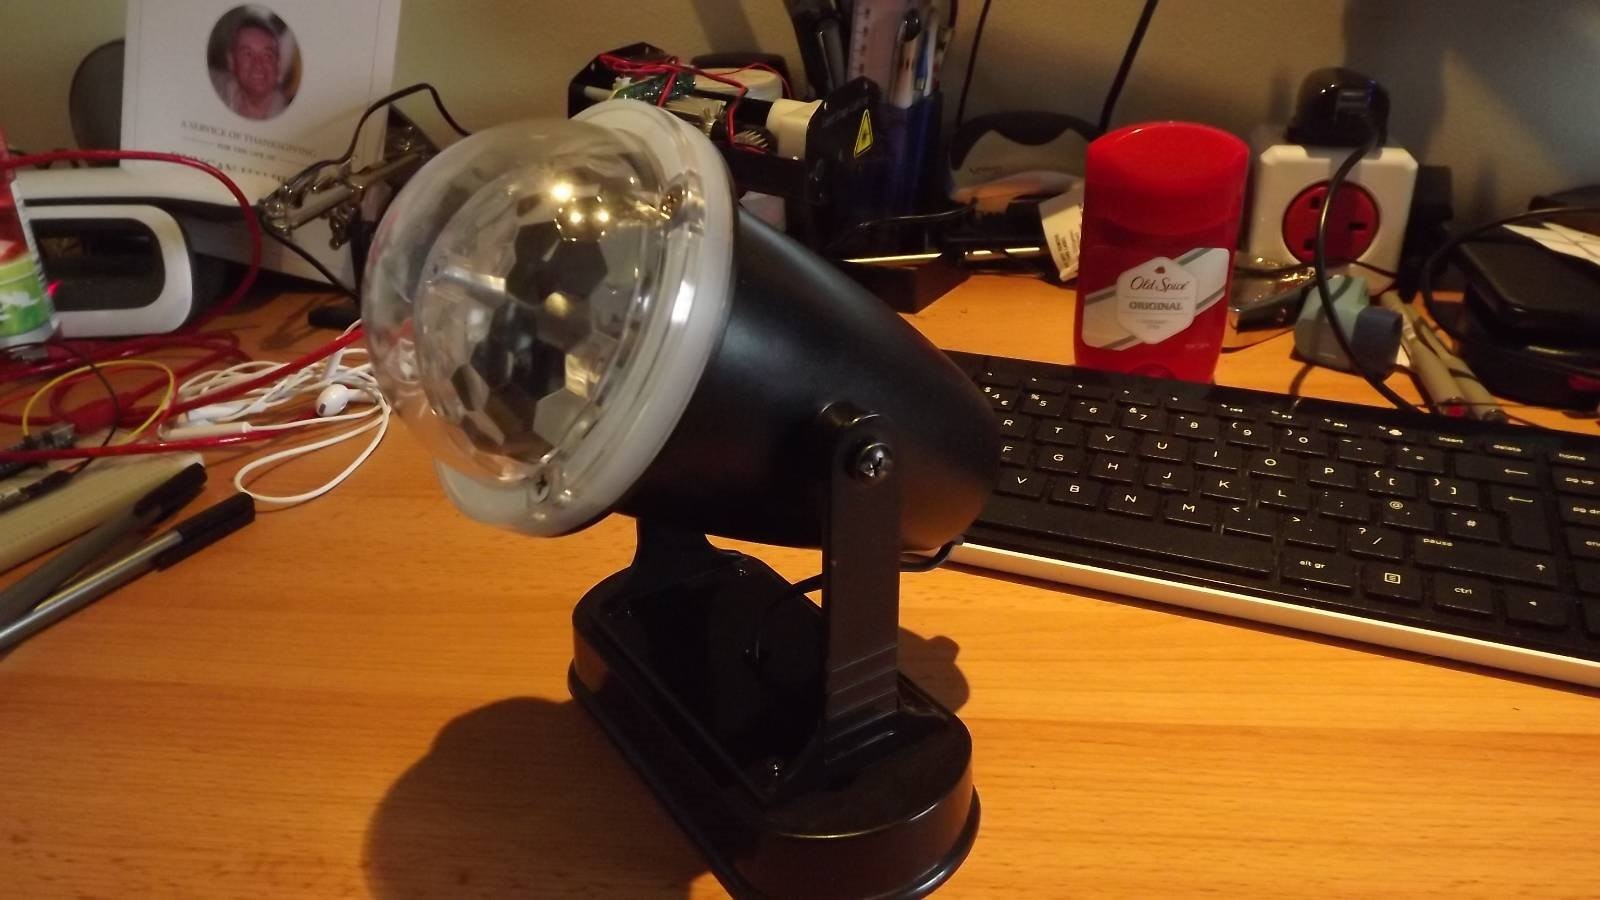
Test Circuit
Writing the code is all fun and games, but it is much better to see the results of the code in the real world. So I made up a quick test circuit using a Neopixel Strip and an led to simulate the motor (I couldn't be bothered wiring up a motor so troubleshooting the code).
They are connected to a NodeMCU ESP-12 development Board.
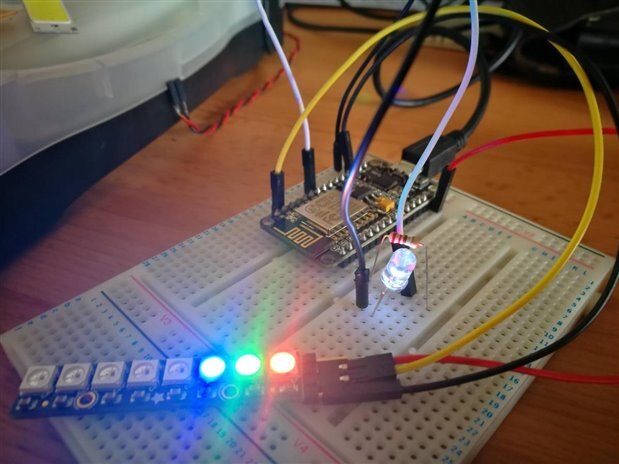
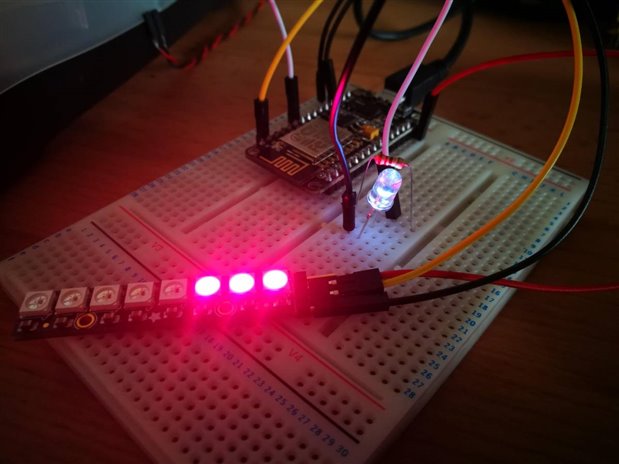
Here showing both the Auto mode on the left and (what should be) Red on the right.
I say what should be red as although in the image, it shows up more red the leds look more pink in person, the actual value sent to the device is 255,0,22. I Am not sure the reason, i may not even matter once installed in the body
What Next?
The next thing i want to do with the device is;
- Tidy up the code and add error catching
- Add presets into Openhab Sitemap for common colours, such as red, green and blue. Most likely with expandability for more presets
- Put in into the body, mount on the wall and get the beers on ice.
I may eventually want to add more functionality to the code once installed within the body, maybe moving the position of the coloured leds for auto mode may create different effects, maybe even fade between them. but this will need to wait until I have ordered some parts for installing within the body. Mainly acrylic for the mounting internal mounting bracket and some stand alone Neopixels which are easily solderable and can be hot glued onto the mounting plate. And designing some simple circuitry for driving the motor, i may make my own or order a cheap motor controller off of eBay, as i am not wanting to just use a Transistor to drive the motor as I am not sure how it would handle being driven for long periods of time with the motor in the unit I will give this some more testing when the time comes to install.
Top Comments