


Welcome to my new Coronavirus (Covid-19) use case for Bluetooth Low Energy Observer and Broadcaster modes (together with NFC Tag technology)
Introduction
As you may know, Google and Apple surprised many by announcing, back in April 2020, that they would be working together to develop an Contact Tracing API framework and specification for their mobile phone operating systems. This would allow users, who had suitable phones, to be able to download an app made by their recognised public health authorities and receive exposure notifications directly to their phones.
Then last month (end of August 2020) Google and Apple announced that they would be rolling out phase two of their contact-tracing or recently renamed exposure-notification system to allow for interoperability between all the customised covid-19 apps used in different countries and local states.
According to press reports, the operating system updates for Android and IOS will now allow user opt-in to coronavirus exposure notifications directly via their phone settings without the need for a dedicated app. These users will then receive notifications directly via the phone OS about any exposure to any infectious person who was found to be in close proximity and also had the exposure-notification service enabled (and had marked themselves as infectious using their local health authority app).
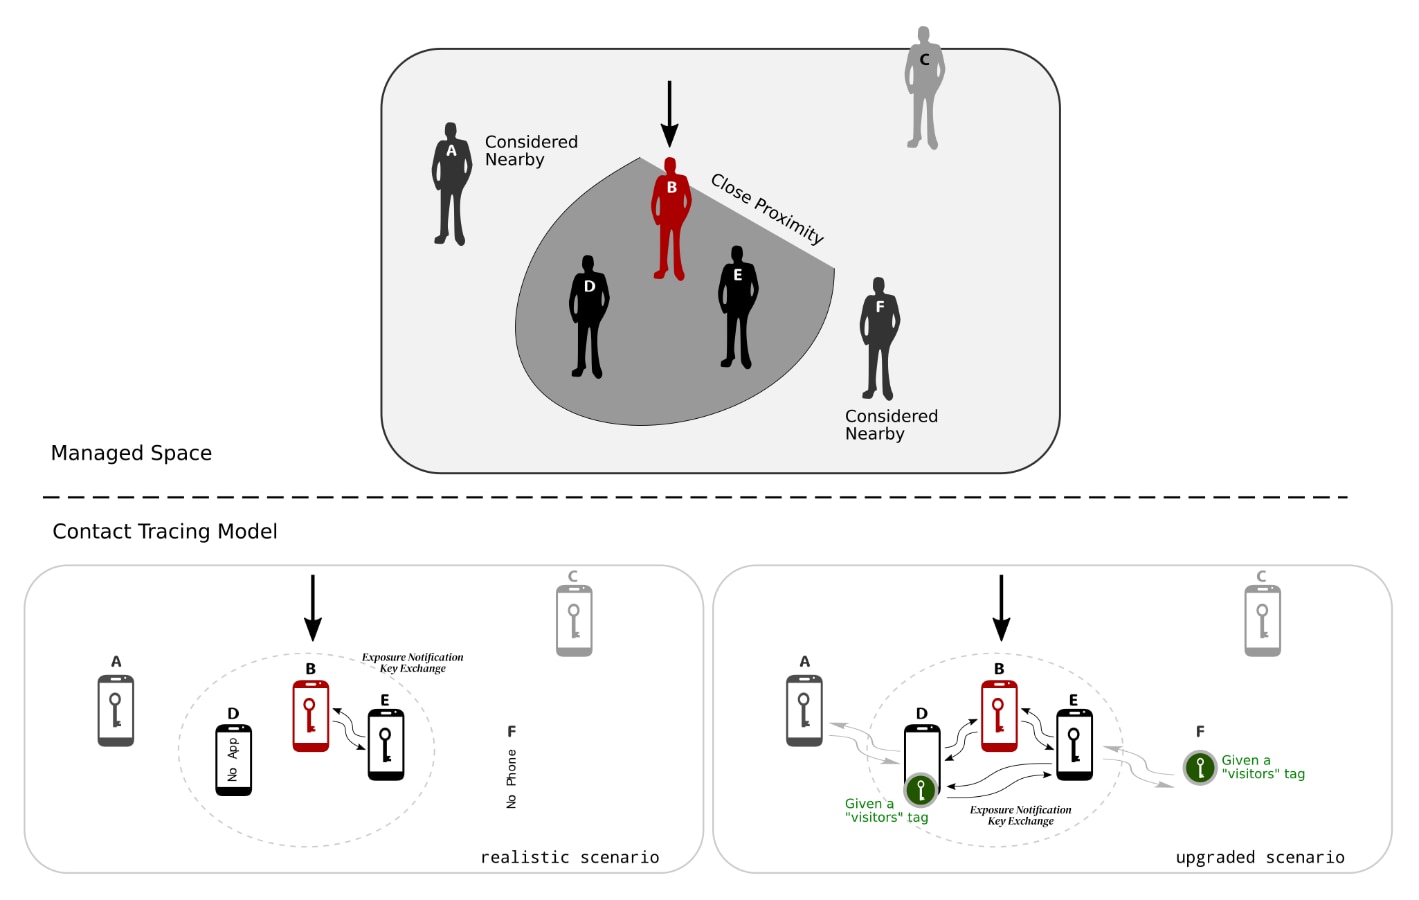
The basis for the Contact Tracing Model is that a person typically carries their phone around with them and thus the phone can be used as a proxy for that person. Bluetooth Low Energy is used because most modern phones now incorporate a a Bluetooth Low Energy transceiver. These transceivers not only provide short to medium range wireless communication between phone and a peripheral device but can also control the strength of a transmitted signal as well as measure the strength of signal from the transmission received. With a bit software and knowledge of these two parameters one can approximate the distance between the transmitted signal and where that signal was received. Thus phones can be used to approximate the distance of two people.
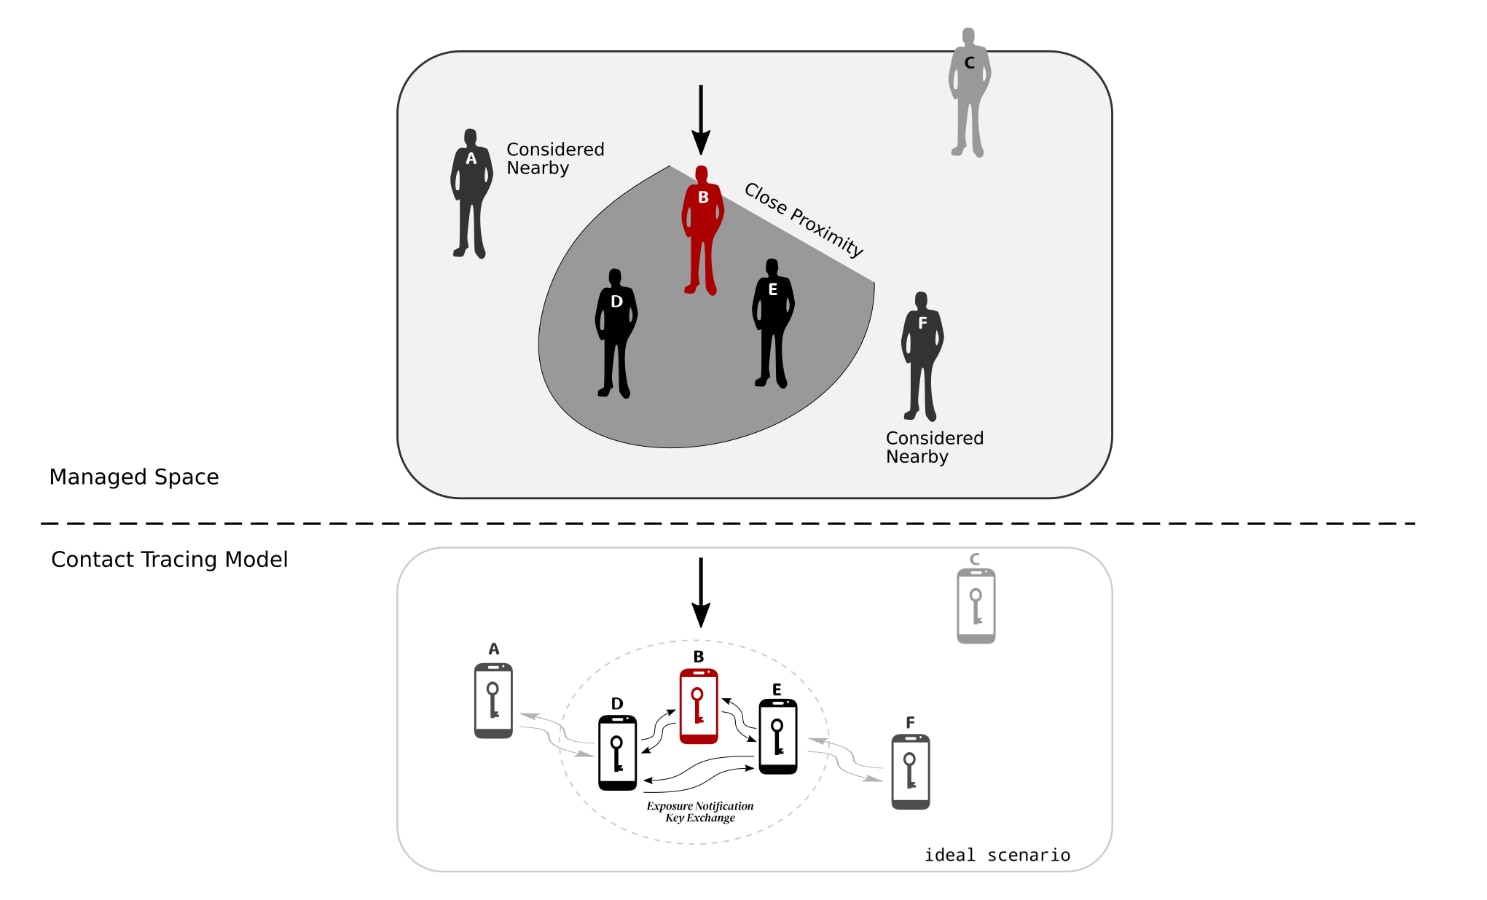
What makes Bluetooth Low Energy rather useful is that it has different modes of operation depending on application and the desired role for the device. In most cases phones operate as a central device which can scan for BLE peripheral devices advertising a MAC address and a local name, as well as other unique identifier codes called UUID’s. If any of these parameters match what the central device is looking for then the phone (i.e. the central device) can, depending on the nature of the application, either initiate a connection request with this peripheral device (in order to set up a secure communication channel) or simply extract out any other data that was advertised. When a phone is simply scanning and extracting undirected broadcast data without connection this is commonly referred to as an observer role. BLE “beacons” would be a typical example of this type of device operating in a broadcaster role, which is transmitting specific or tailored information.
What is the Bluetooth Low Energy (BLE) Exposure Notification Service
The Google and Apple Exposure Notification (GAEN) framework is quite unique in that it combines both observer and broadcaster roles with additional software to handle the periodic changing of key identifiers such as MAX address and UUID. The framework also includes other non-BLE related aspects such as cloud communication and encryption for key exchanges etc. But that is not covered in this blog.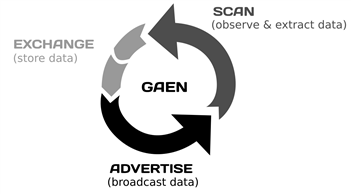
The new non-connectable undirected Contact Detection or Exposure Notification BLE service is registered with the Bluetooth SIG using a 16-bit UUID 0xFD6F.
The Advertising Service Data broadcasted with this service UUID contains a 128-bit (16 byte) Rolling Proximity Identifier, which will change periodically. Both the advertiser MAC address and the Rolling Proximity Identifier changes synchronously so that the phone cannot be tracked by linking previous transmissions.

Then there is another 4-bytes attached to the Rolling Proximity Identifier, which contains within a transmit power value to indicate bluetooth TX signal strength at 1 metre distance. This is used to provide better distance estimation. Of course phone location relative to body position makes this a fairly rough guestimate.
Then the real flesh around this skeletal BLE framework relates to how Google/Apple and the app developers handle the Proximity Identifiers detected. The design ensures that this is done using a decentralized privacy-centred methodology. As mentioned this is covered in the blog.
So what’s wrong with the GAEN model
I cannot see anything fundamentally wrong with the GAEN model in theory as it is based on proven technology.
However, I did spot one news article on Forbes.com, which highlighted some asynchronous or poor timing behaviour with the rolling MAC and Proximity Identifiers. The author of the article described the observed behaviour as leaving pebbles behind so that someone can retrace your steps. Considering that the current advertising frequency is approximately 200ms, this may well be the reason why it happens occasionally. In my mind, it does not make sense having such a high frequency for advertising, especially if the app is only supposed to detect if someone has been lingering close by for an extended period of time, not passing by. You can only imagine that there is now a cacophony of BLE broadcasting “noise” created by users with this new notification service enabled, especially within busy spaces like a restaurant or a supermarket.
But there is one high level or architectural weakness with application of the overall model. This GAEN framework only works well if the vast majority of people have the Exposure Notification Service enabled on their phones. Otherwise you end up with this sort of scenario, where the GAEN key exchange is limited because someone does not have the app or service enabled or don’t have their phone with them etc. - and there are a variety of reasons for this in the real world:
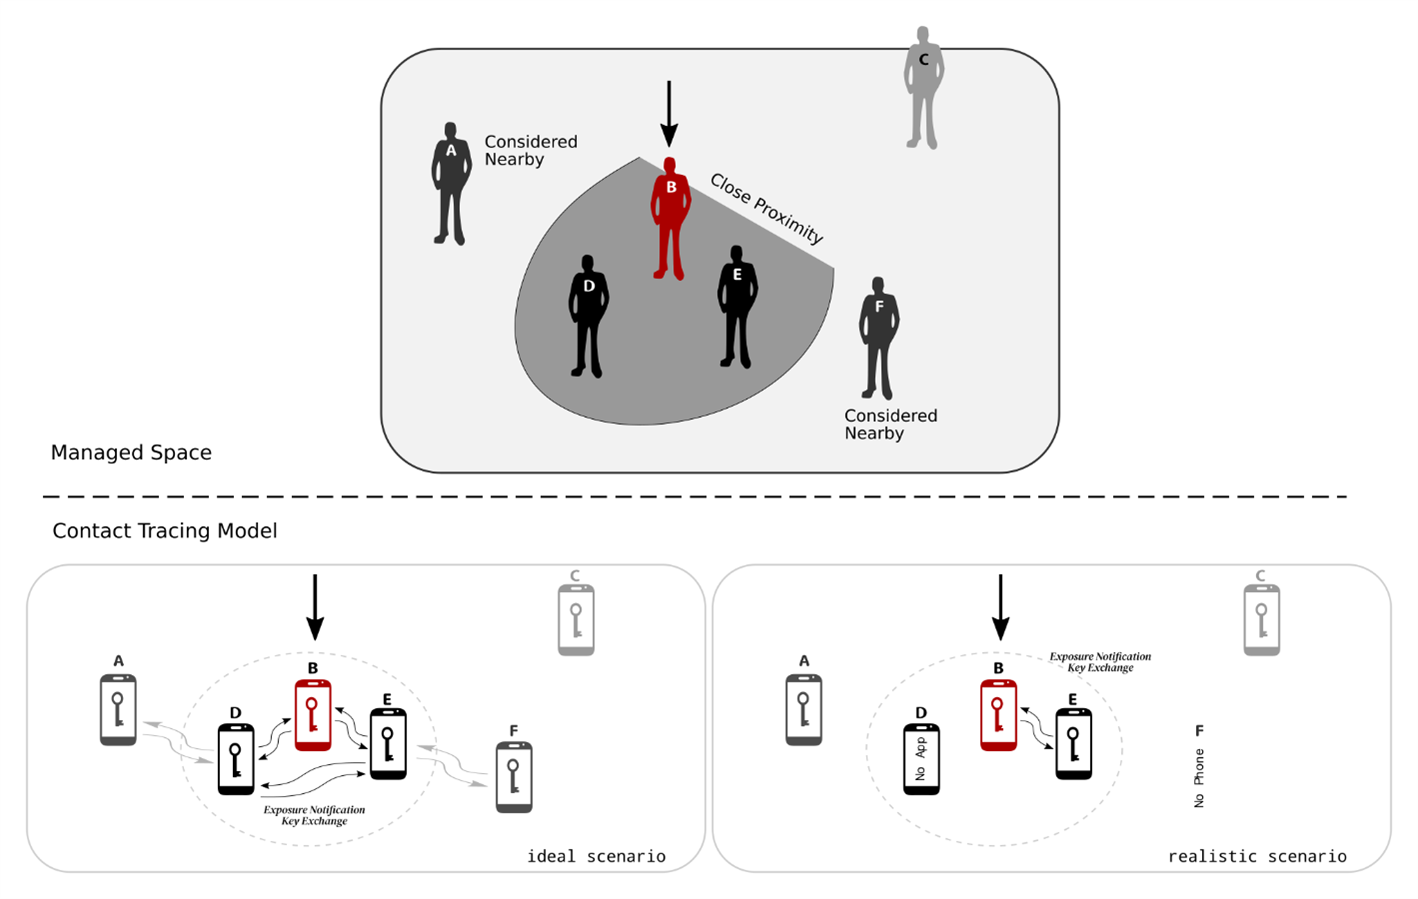
As such, in my opinion, it may only deliver sporadic benefits rather than deliver a consistent universal impact. But there is scope for improvement of course and here is one suggestion.
Introducing a Gateway / Boundary type enhancement
As you well know, it is in everyone's interest that the number of people entering a defined space is controlled to prevent overcrowding etc. It appears to me anyway that most managed spaces, such as restaurants and bars, have introduced various measures to control access which is aided by people counters, for example. This type of control is typically handled at the point of entry.
It should also be in everyone's interest that those entering this space can be traced should someone be unknowingly infected with the coronavirus and have come into close contact with other strangers. I have come across press reports that some managed space owners are manually checking to see if users have the Exposure Notification Service enable. No doubt they can appreciate the benefits of having these checks but doing it manually must be costly.
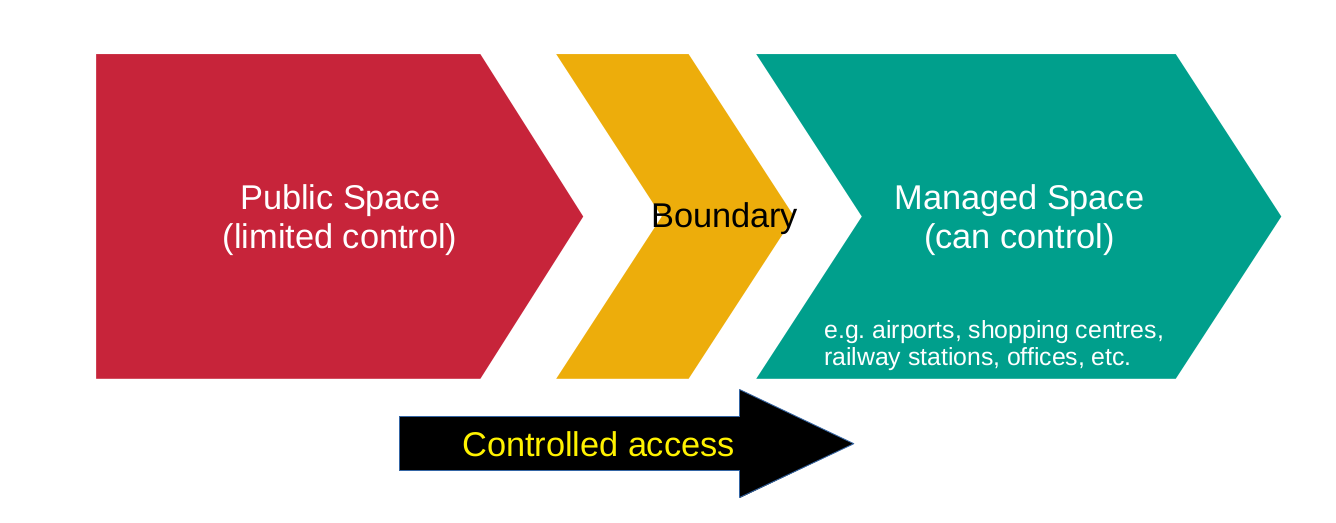
Now, as you know, when visiting another business premises you are required to sign in for health and safety reasons. This is typically done at the office reception desk and once you’ve manually signed in and have been vetted you are given a temporary security pass to access the building etc. The exchange of details provided means that you can be traced, should it be required.
This manual sign-in and vetting process is definitely not suitable for the general public entering into managed spaces, such as a train station or shopping centre, for example. So, the proposed Proof of Concept is to come up with a semi automated solution that provides automatic entry to those you have the Exposure Notification Service enabled and to open up opportunities to either remind those who don’t have the service enabled to enable or to provide some type of workaround, like visitors tag, for example. The logistics of how this might work in practice is outside the scope of this blog.
Using the EBSHSNZWZ board to develop a BLE GAEN scanner with NFC Tag NDEF messaging
The objective of this project is to demonstrate how Bluetooth Low Energy, when operating in observer mode only, can be used in conjunction with the NFC tag functionality to create a type of semi-automated access control system or can be used to facilitate in creating a mechanism whereby those users who do not have the Exposure Notification service enabled are reminded to enable and those who do have it enabled are rewarded for doing so.
The design of the system is such that no private user data is read either by the NFC tag or by the BLE module. The purpose of the NFC tag is simply to push data to the user and therefore there is no issue on data privacy as nothing new is recorded. Similarly, the BLE module acts as observer only and merely scans for the GAEN UUID and nothing much else.
As it just so happens that the Nordic Semiconductor nRF52840 and nRF52832 chipsets offer both NFC tag and BLE functionality, these modules were perfect for this application.
It also just so happens that I am road testing the EBSHSNZWZ board from Taiyo Yuden and this includes the nRF52832 module. So I developed this Proof of Concept using this board.
Setup
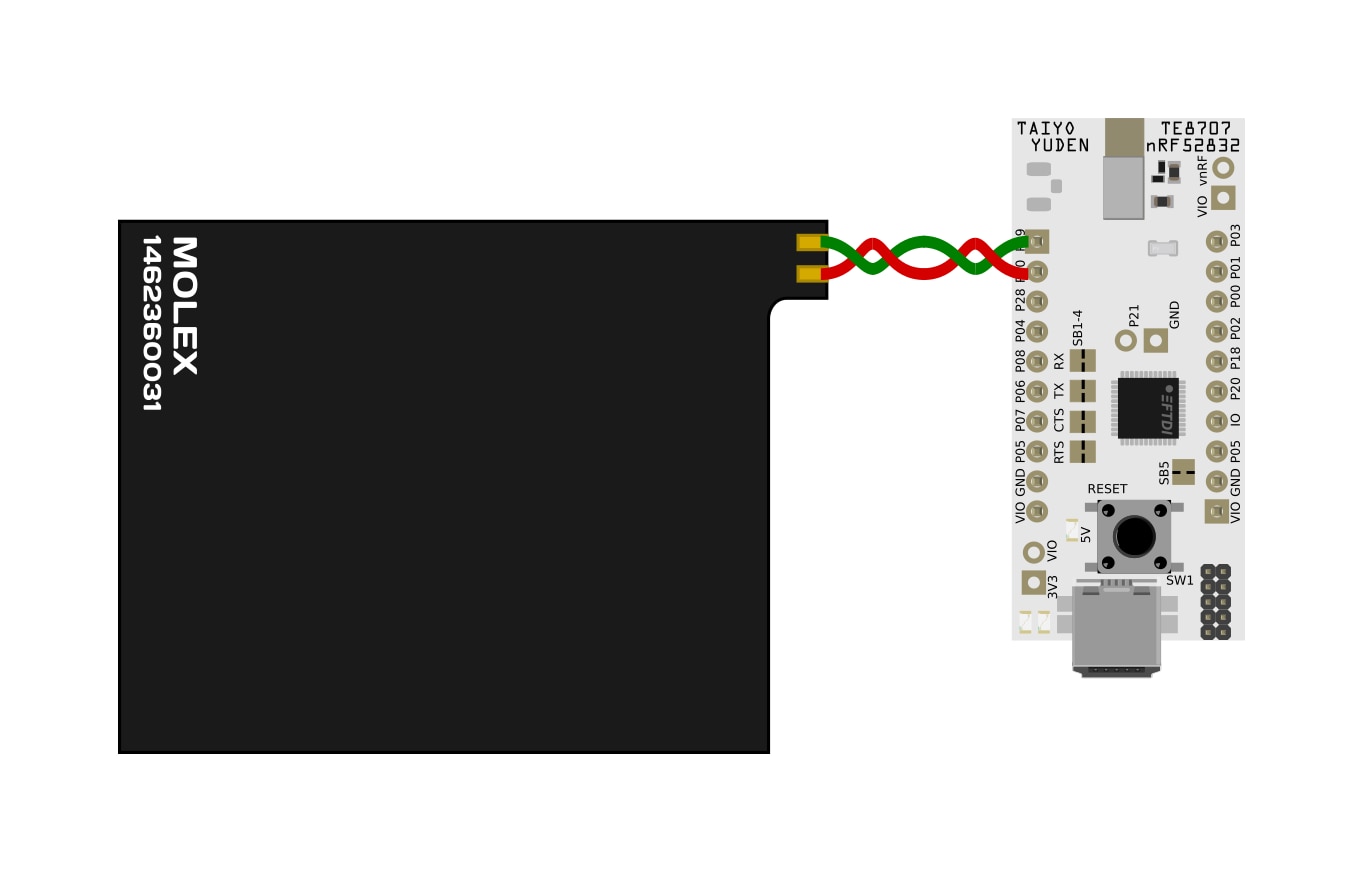
Connecting the NFC antenna to the EBSHSNZWZ board is dead simple as it connects directly onto pins P0.09 and P0.10.
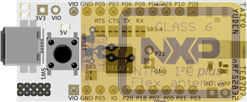
To get a sense of just how small the Taiyo Yuden EYSHSNZWZ module really is, here is an image showing a class 6 NFC antenna overlaid on the development board. You could literally include the BLE module and necessary components within the confines of the NFC antenna (note the black square seen on the dev board is the FTDI chip and is not needed). That is pretty impressive, in my opinion.
Anyway, that is really it regarding the hardware - assuming that you are using a tuned NFC antenna of course. The flexible NFC antenna used in my demo came from Molex (part number: 1462360031), which was part of an antenna kit sent to me by Element14 some time back (it is proving very handy from time to time). This antenna seems to work pretty well, but I haven’t checked how well (i.e. no tuning assessment was done).
The rest of the application is software driven.
Firmware
The firmware was developed on Segger Embedded Studio using the Nordic Semiconductor nRF52 SDK version 17.02.
The logic behind the demo application was to deliver two scenarios.
- The Reminder scenario - here when a user presents their phone, which does not have the app loaded, the NFC reader triggers the web browser to open with the Irish HSE (Health Service Executive) public health website, giving info about COVID-19 and the app.
- The Reward scenario - here when a user presents their phone, which has the app loaded, the NFC reader triggers the web browser to open with the Dublin Tourism website – inferring that they are free to roam, while obeying the local Covid-19 rules (because they are traceable).
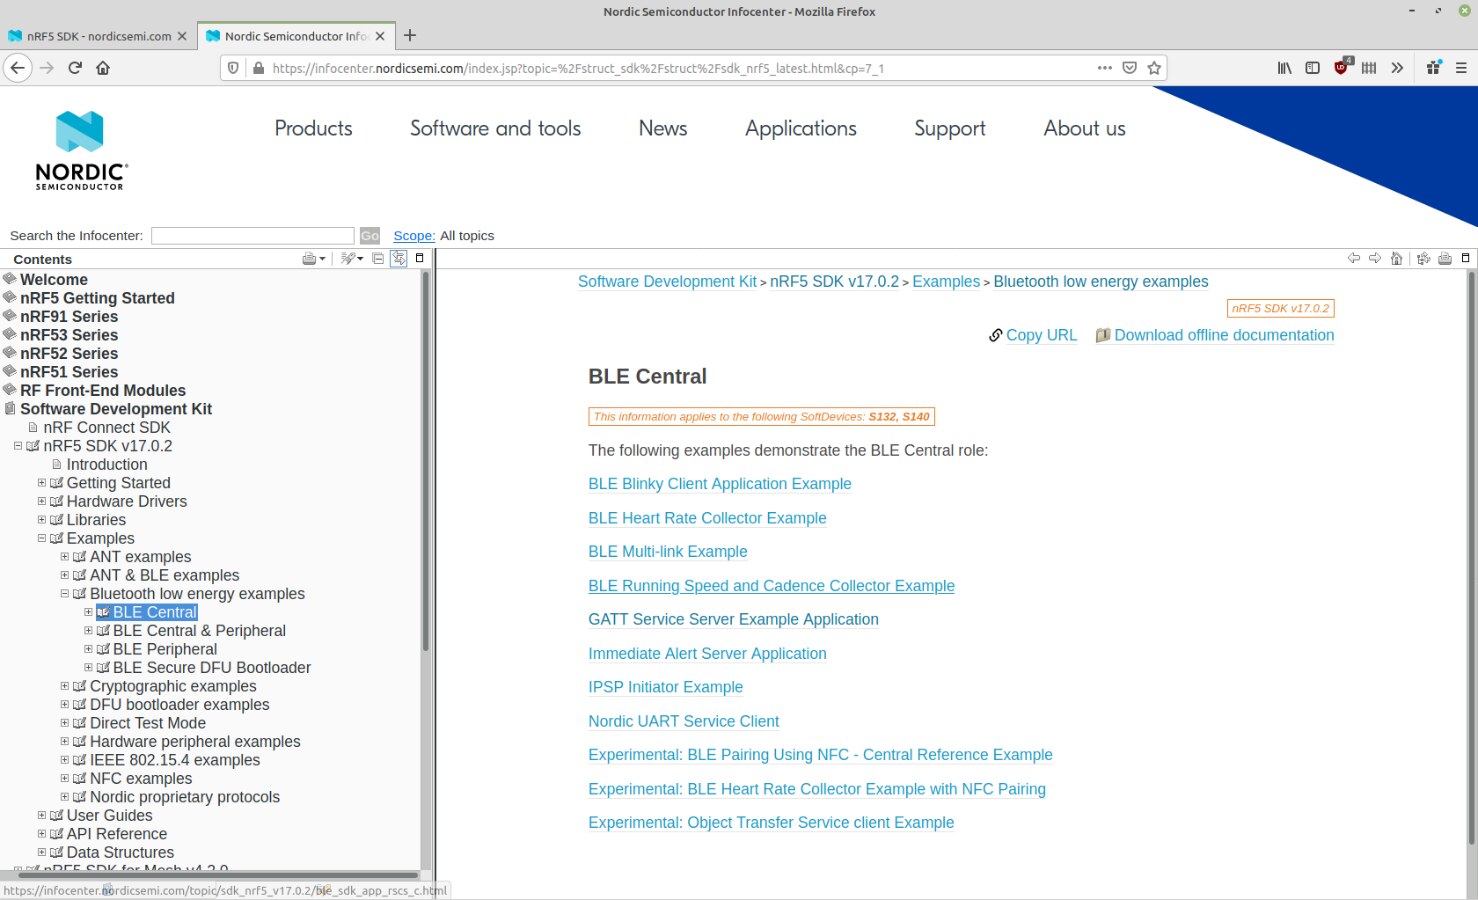
For scanning functionality, the module needs to be setup as a central BLE device. Thankfully, the nRF5 SDK contains a good number of BLE central examples, although all the examples presented here go beyond what is needed. Still, it tends to be easier to remove code than add more code as my app does not require connection functionality. On a positive note there are also two experimental examples which use NFC for BLE pairing purposes. This at least confirms that you can set up an app using a BLE central role and use NFC as well. Nevertheless the experimental examples presented are also not quite what I am after as my app does not require pairing functionality.
Looking at the NFC example folder, there are also some very useful examples to get started with.
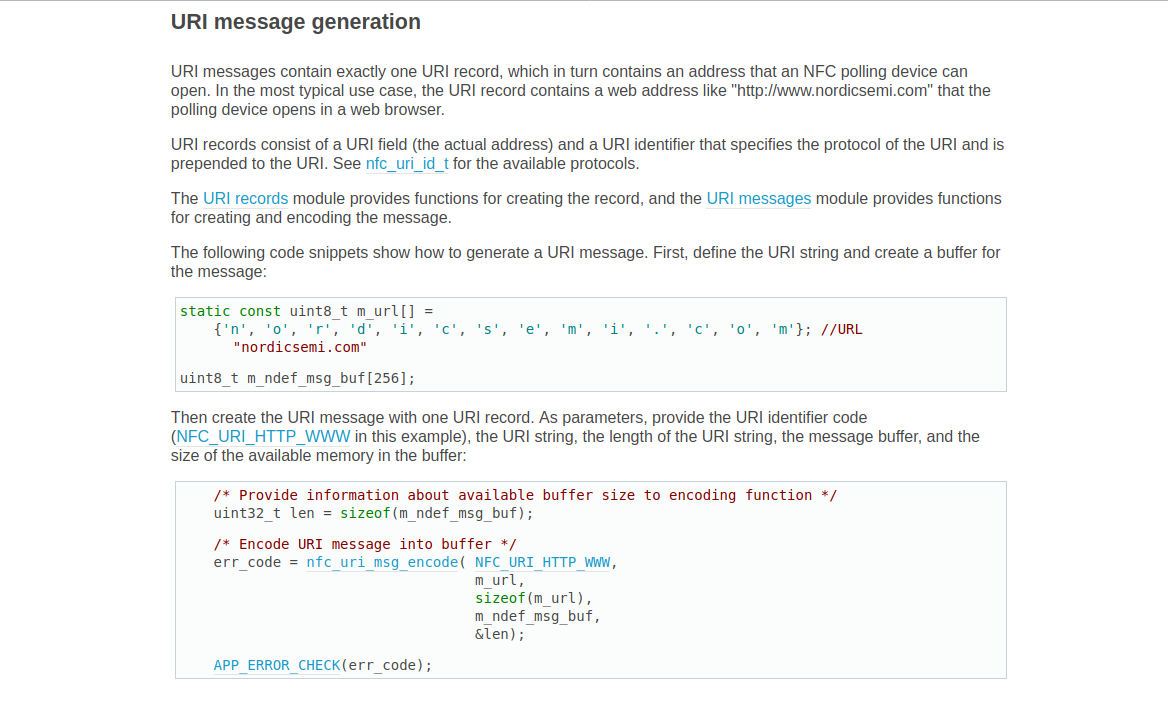
The URI message example provided was exactly what I needed as it handles URI message encoding.
This NFC URL demo code is also pretty straightforward too. Here’s a quick overview.
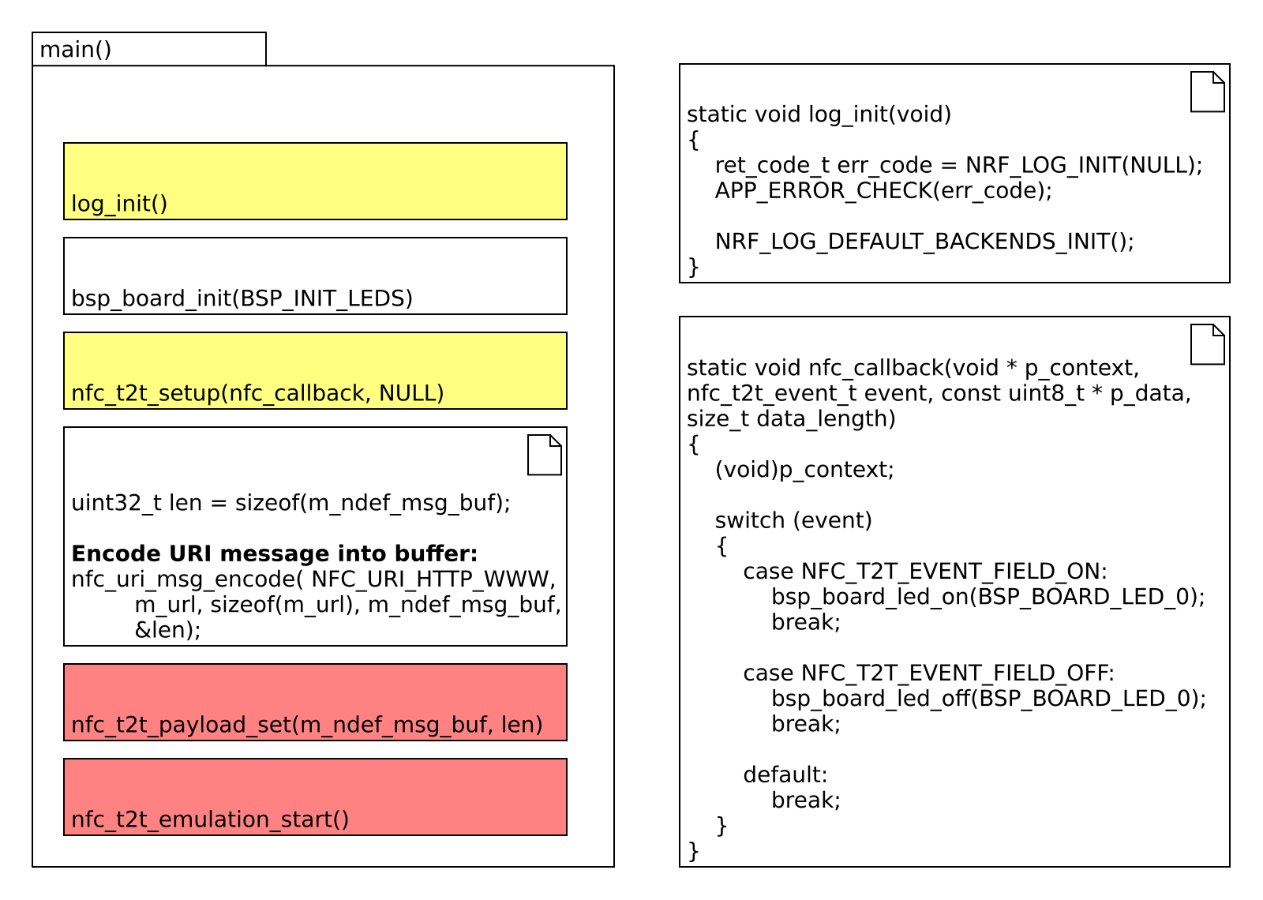
The main routine includes a number of functions of which only two can be directly modified within the main.c file. These being log_init(), which is just for debug messaging and the other being nfc_callback(), which handles all the NFC events. The function bsp_board_init() is found within the “boards.c” file, which is a common library file linked to the hardware rather than the app itself. Then there are 2 other functions, nfc_t2t_payload_set() and nfc_t2t_emulation_start() which is from a precompiled nfc library module for type 2 tags (named nfc_t2t_lib_gcc.a). So we don’t get any visibility on that code.
But that is just part of the story.
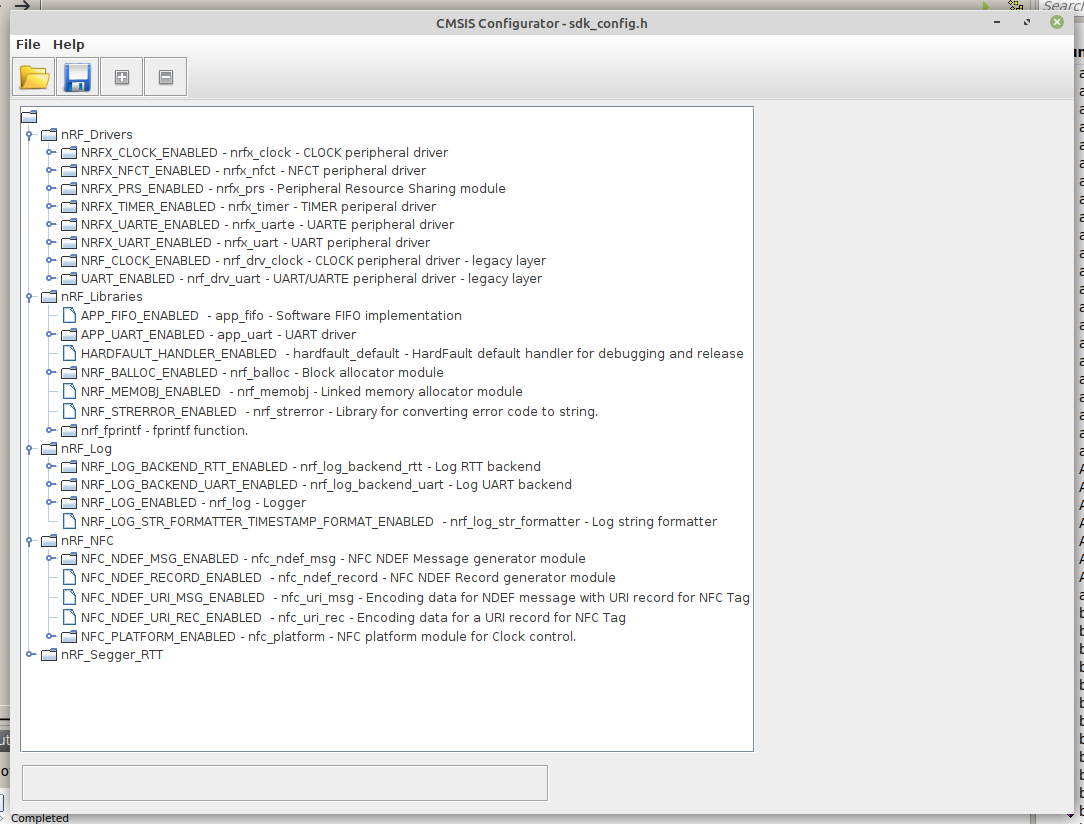
Behind the scenes, what defines which parts of a library are made available for your app and how different parts of a library are configured is all controlled via a header file called “sdk_config.h”.
This is a large config file and I discovered that the best way to view this file is to use the special tool wizard provided called “CMSIS Configuration Wizard”. You will need to use this wizard as merging the "sdk_config.h" file for NFC and the one used for BLE central takes some doing to get right.
And that’s really it for getting a NFC type-2 tag application to spit out a URL NDEF message when someone taps their phone of the NFC antenna attached to a nRF52832 or nRF52840 module.
Let’s now jump in and look at the combined BLE Central + NFC tag code.
int main(void)
{
    uint32_t  err_code;

    log_init();

    /* Configure LED-pins as outputs */
    taiyo_board_init_output(PIN_CN3_3);
    taiyo_board_led_off(PIN_CN3_3);


    /* Set up NFC */
    err_code = nfc_t2t_setup(nfc_callback, NULL);
    APP_ERROR_CHECK(err_code);
    update_NFCurl();
    NRF_LOG_INFO("NFC started.");

    ble_stack_init();
    scan_init();
    gatt_init();

    // Start execution.
    scan_start();
    NRF_LOG_INFO("BLE CENTRAL scan started.");

    while (1)
    {
        NRF_LOG_FLUSH();
        __WFE();
    }
}
The code presented follows a similar structure as described above. Instead of using the standard boards.c file, I create a custom version so that code can work with the EBSHSNZWZ dev board. In the code I have used a GPIO as an output for an LED. Setting up the nfc_callback is the same. However this I wanted to use 2 URL's so some new logic was required. This is handled in a routine called update_NFCurl().
static void update_NFCurl()
{
    uint32_t  err_code;
    /** @snippet [NFC URI usage_1] */
    /* Provide information about available buffer size to encoding function */
    uint32_t len = sizeof(m_ndef_msg_buf);
    memset(m_ndef_msg_buf, '\0', len);

    if (NFCstarted) {
      /* Stop sensing NFC field */
      err_code = nfc_t2t_emulation_stop();
      APP_ERROR_CHECK(err_code);
    }

    if (URLmode) {

        /* Encode URI message into buffer */
        err_code = nfc_uri_msg_encode( NFC_URI_HTTPS_WWW,
                                       CTapp_url,
                                       sizeof(CTapp_url),
                                       m_ndef_msg_buf,
                                       &len);

        APP_ERROR_CHECK(err_code);
        /** @snippet [NFC URI usage_1] */

    }
    else {

        /* Encode URI message into buffer */
        err_code = nfc_uri_msg_encode( NFC_URI_HTTP,
                                       NoCTapp_url,
                                       sizeof(NoCTapp_url),
                                       m_ndef_msg_buf,
                                       &len);

        APP_ERROR_CHECK(err_code);
        /** @snippet [NFC URI usage_1] */

    }

    /* Set created message as the NFC payload */
    err_code = nfc_t2t_payload_set(NULL, 0);
    err_code = nfc_t2t_payload_set(m_ndef_msg_buf, len);
    APP_ERROR_CHECK(err_code);

    /* Start sensing NFC field */
    err_code = nfc_t2t_emulation_start();
    APP_ERROR_CHECK(err_code);
    if (!NFCstarted) NFCstarted = true;

}
Then the code moves on to set up the BLE stack ( ble_stack_init() ) and to initiate scanning ( scan_init() ). It is within the scan_init() function that a scan event callback handler is setup. This is our key control function for the app. It is within this function that the app detects the advertising service UUID and can extract out other parameters. In this demo code, just the RSSI value is used. The other payload data is ignored for now.
/**@brief Function for handling Scanning Module events.
 */
static void scan_evt_handler(scan_evt_t const * p_scan_evt)
{
    ret_code_t err_code;

    switch(p_scan_evt->scan_evt_id)
    {
         case NRF_BLE_SCAN_EVT_FILTER_MATCH:
         {
            int read_rssi = p_scan_evt->params.filter_match.p_adv_report->rssi;
            if (read_rssi > -76) {
              NRF_LOG_INFO("CT App is close by: %d", read_rssi);
              if (!URLmode) {
                URLmode = true;
                update_NFCurl();
                NRF_LOG_INFO("URL Switched");
              }
            }
            else {
              NRF_LOG_INFO("CT App detected: %d", read_rssi);
              if (URLmode) {
                if (TraceCntr > 5) {
                  TraceCntr = 0;
                  URLmode = false;
                  update_NFCurl();
                  NRF_LOG_INFO("URL Switched");
                }
                else TraceCntr++;
              }
            }

         } break;

         case NRF_BLE_SCAN_EVT_NOT_FOUND:
         {
            //NRF_LOG_INFO("No Filter Match");
         } break;

         case NRF_BLE_SCAN_EVT_SCAN_TIMEOUT:
         {
             NRF_LOG_INFO("Scan timed out.");
             scan_start();
         } break;

         default:
             break;
    }
}
And that's really it and here is a taster demo (I suggest slowing the video down a bit to see what is going on - sorry my video editing skills are not the best)
Video Demo
Top Comments