

| Related posts by Jan Cumps |
|---|
| part 1: from Zero to Hero |
| part 2: Circuit and Test Bed |
| part 3: Testing SPI Protocol with Bus Pirate |
| Talk SPI to EEPROM with Hercules Launchpad - part 4: First Trial on the RM46 |
Our plan was to get them working with the Texas Instruments Hercules LaunchPad MK II. That was back in January. And then we stalled. This blog is our path from Zero to Hero. |
| 25LC256 connection pins to Hercules Launchpad (@Jan Cumps) |
|---|
 |
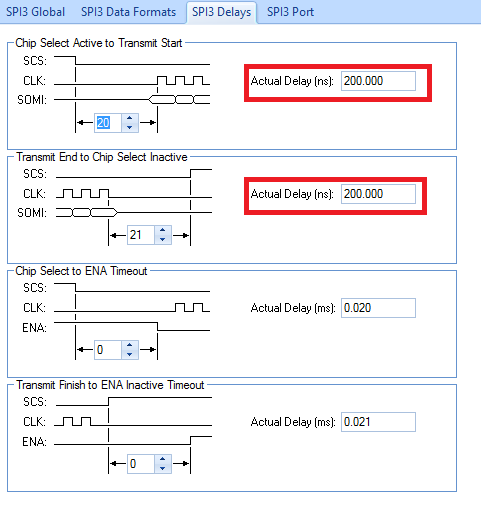
Details SPI communication
When configuring the SPI Bus HalCoGen, you have SPI_CS0 settings such as automatic so that the internal MCU module generates the control signal CS0 for enabling the external memory module 25LC256 (Microchip).

The result of this configuration, gives a signal CS, which changes state whenever the SPI (Hercules RMx) module finishes sending a byte by its bus.
in other words, send 1 byte and CS value change, this is what creates compatibility problems of Texas Instruments with Microchip series.


In the following Link my partner Jan Cumps explains how the SPI module is configured HalcoGen
Talk SPI to EEPROM with Hercules Launchpad - part 4: First Trial on the RM46
I make some changes to the configuration of the output pins, thus allowing me to my control signal CS, manually by program.

need change the configuration of CS [0], to work as a GIO

Extras configuration for the SPI module:

And
Codes for controlling the memory 25LC256 (Microchip)
As you can in the following example code, the control to the state of CS, and programming is not automatically generated by the internal SPI module.
| Memory Status |
|---|
int Ready_25LC(void) {
uint16 buffer_status[2]={0x05,0x00}; // Initial Instruction
gioSetBit(spiPORT3, SPI3_CS0, LOW);
spiTransmitData(spiREG3, &dataconfig1_t, 1, (uint16*) buffer_status); spiReceiveData(spiREG3, &dataconfig1_t, 1, (uint16*) buffer_status);
gioSetBit(spiPORT3, SPI3_CS0, HIGH);
return (!bit_test(buffer_status[0], 0)); } |
| #define bit_test(byte,bit) (byte & (1 << bit)) // test for bit set |
| Memory read |
|---|
uint16 Read_25LC(int address) { uint16 read_data[2]; uint16 buffer_read[4];
while (!Ready_25LC()); /*Load Instruction and address and data*/ buffer_read[0] = (uint16) 0x03; buffer_read[1] = (uint16) address >> 8; buffer_read[2] = (uint16) address;
gioSetBit(spiPORT3, SPI3_CS0, LOW); spiTransmitData(spiREG3, &dataconfig1_t, 3, buffer_read); spiReceiveData(spiREG3, &dataconfig1_t, 1, (uint16*) read_data); gioSetBit(spiPORT3, SPI3_CS0, HIGH);
return (read_data[0]); } |
| Memory Write |
|---|
void Write_25LC(int address, uint8 write_data) { uint16 buffer_write[4]={0x06,0x00,0x00,0x00}; // Initial Instruction while (!Ready_25LC());
gioSetBit(spiPORT3, SPI3_CS0, LOW);
spiTransmitData(spiREG3, &dataconfig1_t, 1, buffer_write);
gioSetBit(spiPORT3, SPI3_CS0, HIGH);
/*Load Instruction and address and data*/ buffer_write[0] = (uint16) 0x02; buffer_write[1] = (uint16) address >> 8; buffer_write[2] = (uint16) address; buffer_write[3] = (uint16) write_data;
/*Low CS0 and Transmit Data SPI to 25LC256 and High CS0*/ gioSetBit(spiPORT3, SPI3_CS0, LOW);
spiTransmitData(spiREG3, &dataconfig1_t, 4, buffer_write);
gioSetBit(spiPORT3, SPI3_CS0, HIGH); } |
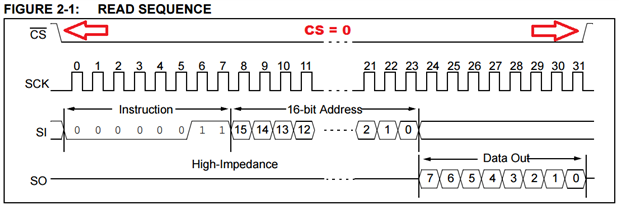
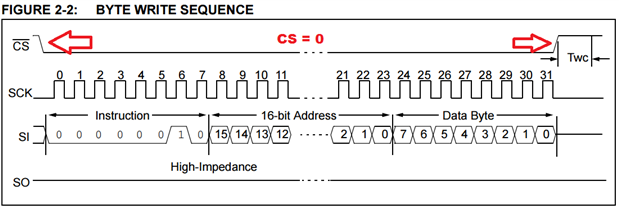
Resulting Waveform


waveform 25LC256 Datasheet (Microchip)
For the sequence of reading and writing, the state of CS remains low.
even after full 1Byte transmitted.
Program execution and memory read successfully!

Source Code:
Hercules RM46x SPI MEMORY 25LC256 (Microchip)
| Muchas gracias Jan Cumps (Spanish) |
|---|
| Desde Inicios del año 2015, yo he tenido la curiosidad de poder usar los modulos de comunicacion SPI del Hercules RMx, pero siempre lo note algo dificil; pero gracias a la ayuda de usted Jan Cumps, yo he podido comprender el uso de este modulo y poder terminar el trabajo que iniciamos a principios de año, Muchos Saludos desde Peru / Arequipa. |
Top Comments
-

terabyte21
-
Cancel
-
Vote Up
+2
Vote Down
-
-
Sign in to reply
-
More
-
Cancel
-

martinvalencia
in reply to terabyte21
-
Cancel
-
Vote Up
+1
Vote Down
-
-
Sign in to reply
-
More
-
Cancel
Comment-

martinvalencia
in reply to terabyte21
-
Cancel
-
Vote Up
+1
Vote Down
-
-
Sign in to reply
-
More
-
Cancel
Children