element14 Community
element14 Community
    Register Log In
  • Site
  • Search
  • Log In Register
  • About Us
  • Community Hub
    Community Hub
    • What's New on element14
    • Feedback and Support
    • Benefits of Membership
    • Personal Blogs
    • Members Area
    • Achievement Levels
  • Learn
    Learn
    • Ask an Expert
    • eBooks
    • element14 presents
    • Learning Center
    • Tech Spotlight
    • STEM Academy
    • Webinars, Training and Events
    • Learning Groups
  • Technologies
    Technologies
    • 3D Printing
    • FPGA
    • Industrial Automation
    • Internet of Things
    • Power & Energy
    • Sensors
    • Technology Groups
  • Challenges & Projects
    Challenges & Projects
    • Design Challenges
    • element14 presents Projects
    • Project14
    • Arduino Projects
    • Raspberry Pi Projects
    • Project Groups
  • Products
    Products
    • Arduino
    • Avnet Boards Community
    • Dev Tools
    • Manufacturers
    • Multicomp Pro
    • Product Groups
    • Raspberry Pi
    • RoadTests & Reviews
  • Store
    Store
    • Visit Your Store
    • Choose another store...
      • Europe
      •  Austria (German)
      •  Belgium (Dutch, French)
      •  Bulgaria (Bulgarian)
      •  Czech Republic (Czech)
      •  Denmark (Danish)
      •  Estonia (Estonian)
      •  Finland (Finnish)
      •  France (French)
      •  Germany (German)
      •  Hungary (Hungarian)
      •  Ireland
      •  Israel
      •  Italy (Italian)
      •  Latvia (Latvian)
      •  
      •  Lithuania (Lithuanian)
      •  Netherlands (Dutch)
      •  Norway (Norwegian)
      •  Poland (Polish)
      •  Portugal (Portuguese)
      •  Romania (Romanian)
      •  Russia (Russian)
      •  Slovakia (Slovak)
      •  Slovenia (Slovenian)
      •  Spain (Spanish)
      •  Sweden (Swedish)
      •  Switzerland(German, French)
      •  Turkey (Turkish)
      •  United Kingdom
      • Asia Pacific
      •  Australia
      •  China
      •  Hong Kong
      •  India
      •  Korea (Korean)
      •  Malaysia
      •  New Zealand
      •  Philippines
      •  Singapore
      •  Taiwan
      •  Thailand (Thai)
      • Americas
      •  Brazil (Portuguese)
      •  Canada
      •  Mexico (Spanish)
      •  United States
      Can't find the country/region you're looking for? Visit our export site or find a local distributor.
  • Translate
  • Profile
  • Settings
Personal Blogs
  • Community Hub
  • More
Personal Blogs
Frank Milburn's Blog A Beginning Journey in TensorFlow #6: Image Augmentation and Dropout
  • Blog
  • Documents
  • Mentions
  • Sub-Groups
  • Tags
  • More
  • Cancel
  • New
  • Share
  • More
  • Cancel
Group Actions
  • Group RSS
  • More
  • Cancel
Engagement
  • Author Author: fmilburn
  • Date Created: 20 Oct 2019 3:56 AM Date Created
  • Views 3094 views
  • Likes 7 likes
  • Comments 8 comments
  • neural network
  • tensorflow
  • image classification
  • colab
  • cnn
  • vision thing
  • keras
  • image recognition
  • raspberry pi
  • machine learning
  • deep learning
  • regression
Related
Recommended

A Beginning Journey in TensorFlow #6: Image Augmentation and Dropout

fmilburn
fmilburn
20 Oct 2019

This is the 6th post of a series exploring TensorFlow.  The primary source of material used is the Udacity course "Intro to TensorFlow for Deep Learning" by TensorFlow.  My objective is to document some of the things I learn along the way and perhaps interest you in a similar journey.  In a follow-on series I intend to cover TensorFlow Lite using a Raspberry Pi.


Recap


In the last post complex color image categorization and the concept of validation was introduced.  The issues associated with overfitting and underfitting the model were presented.  In this post Dropout, a method for reducing overtraining will be covered as well as Augmentation, a method for increasing the training dataset size and quality.


Dropout


During training the neural network adjusts weights and biases to minimize the loss function.  This can result in certain neurons obtaining large weights relative to other neurons which causes them to dominate the network.  As a result the neurons with smaller weights don't get trained much.  Dropout is a way to avoid this by randomly turning off some neurons in the network during training.  This allows the other neurons to receive more training.  For example, in the example below taken from the Udacity training two neurons (shown filled with black) are randomly turned off, one in each row during an epoch.  In subsequent epochs this random selection is continued.


image

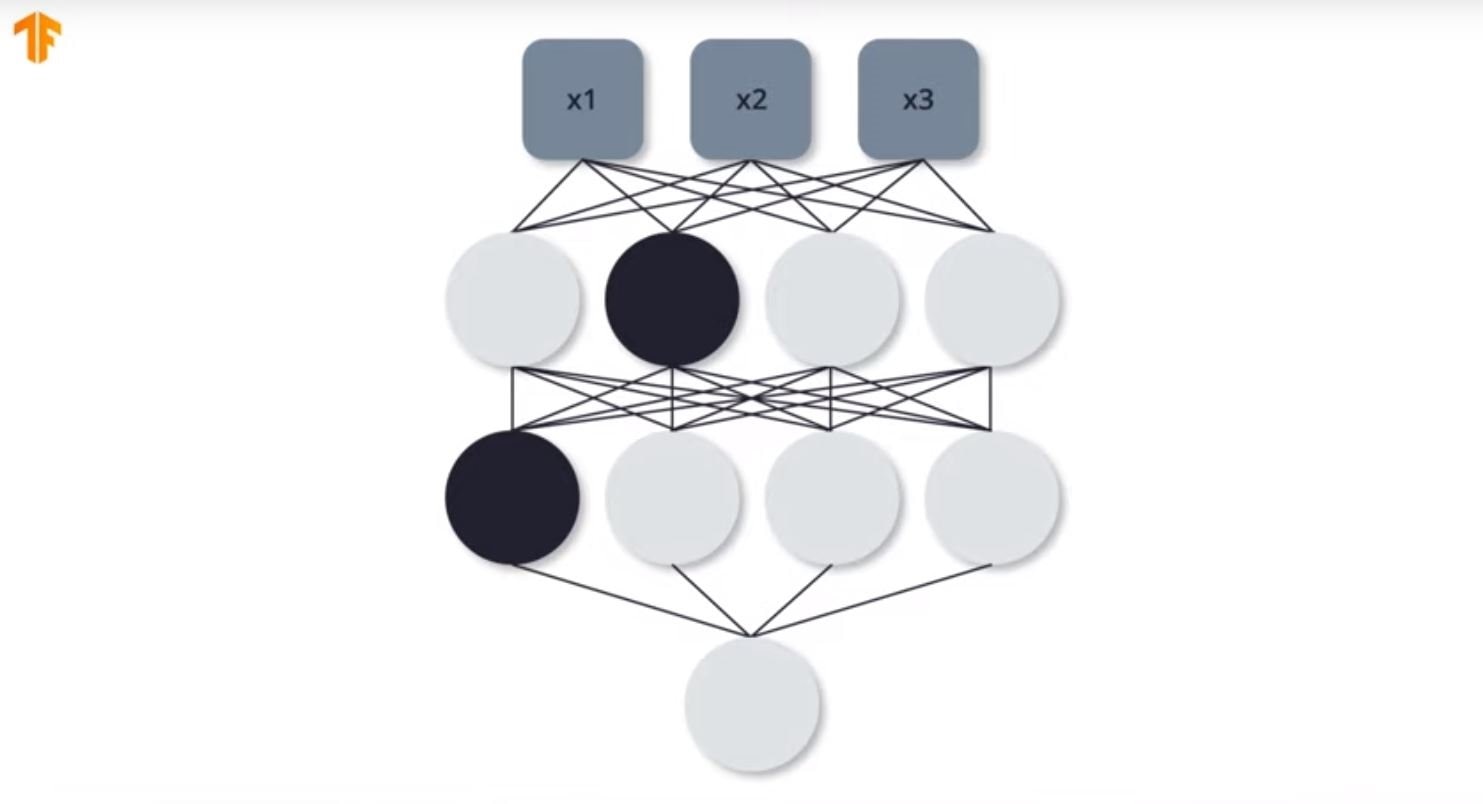
Feed forward and back propagation continues without using the neurons that have been turned off.  This helps avoid overfitting and the network utilizes all the neurons more efficiently.


Augmentation


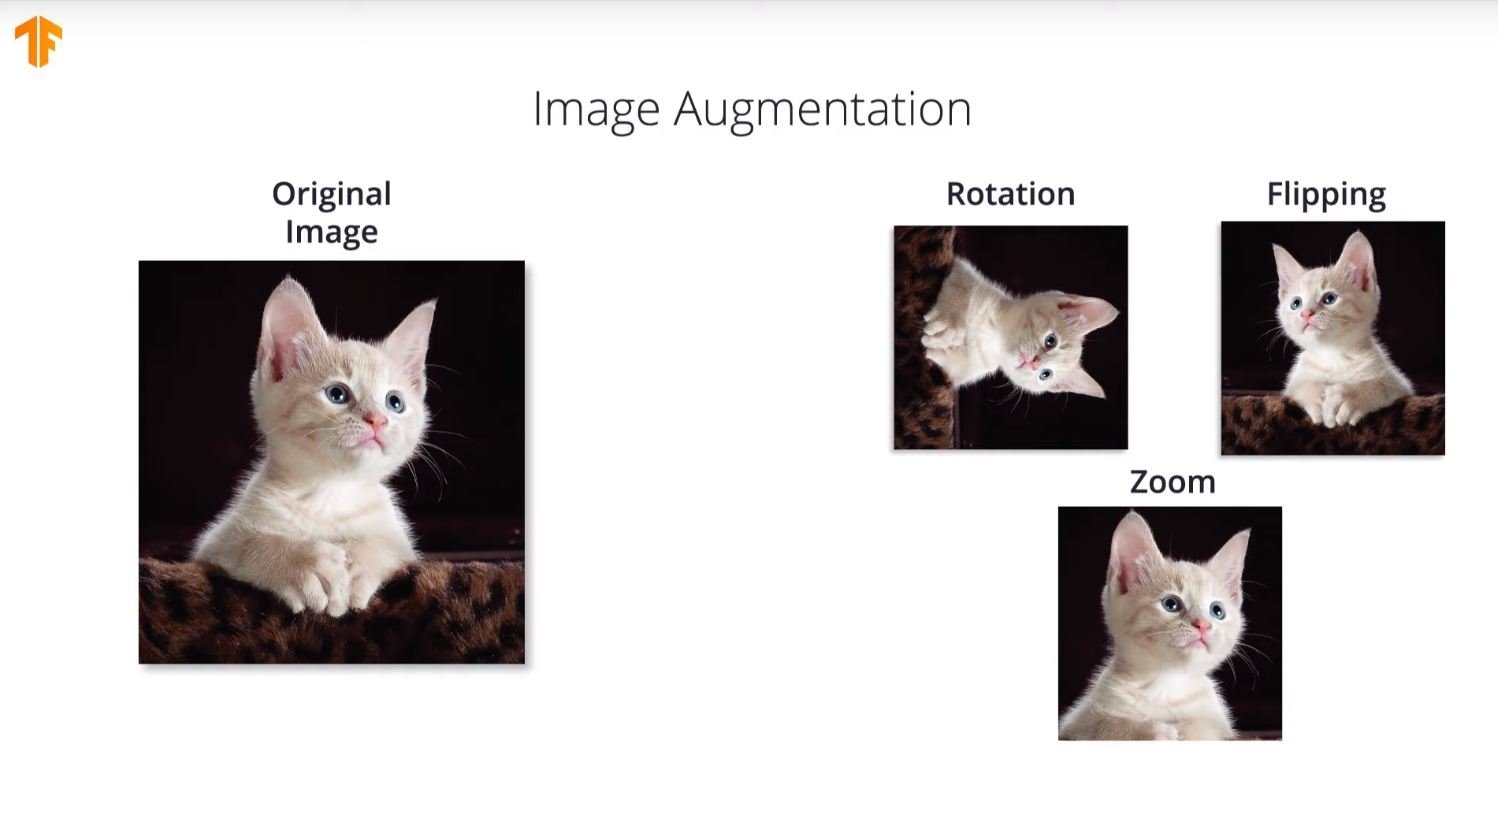
It is desirable for the model to recognize the subject no matter the size, position or where it is in the image.  In a large enough dataset all of this information may be included in the training dataset and it will be less likely to overfit.  If not, augmentation is a way to add examples with different angles, size, orientation, etc. which allows it to generalize better.


For example, TensorFlow can modify or transform an image as shown in the example below.

image

Example snippets of code and the results are shown below.


Flipping Images

image_gen = ImageDataGenerator(rescale=1./255, horizontal_flip=True)


train_data_gen = image_gen.flow_from_directory(batch_size=BATCH_SIZE,
                                               directory=train_dir,
                                               shuffle=True,
                                               target_size=(IMG_SHAPE,IMG_SHAPE))

image


Rotating Images

image_gen = ImageDataGenerator(rescale=1./255, rotation_range=45)


train_data_gen = image_gen.flow_from_directory(batch_size=BATCH_SIZE,
                                               directory=train_dir,
                                               shuffle=True,
                                               target_size=(IMG_SHAPE, IMG_SHAPE))

image


Zoomed images

image_gen = ImageDataGenerator(rescale=1./255, zoom_range=0.5)


train_data_gen = image_gen.flow_from_directory(batch_size=BATCH_SIZE,
                                               directory=train_dir,
                                               shuffle=True,
                                               target_size=(IMG_SHAPE, IMG_SHAPE))

image


Building a Model


It is possible to apply all the augmentation transformations as shown in the code snippet that follows:

image_gen_train = ImageDataGenerator(

      rescale=1./255,
      rotation_range=40,
      width_shift_range=0.2,
      height_shift_range=0.2,
      shear_range=0.2,
      zoom_range=0.2,
      horizontal_flip=True,
      fill_mode='nearest')

train_data_gen = image_gen_train.flow_from_directory(batch_size=BATCH_SIZE,
                                                     directory=train_dir,
                                                     shuffle=True,
                                                     target_size=(IMG_SHAPE,IMG_SHAPE),
                                                     class_mode='binary')

image


Validation data is generally scaled but not augmented.

image_gen_val = ImageDataGenerator(rescale=1./255)


val_data_gen = image_gen_val.flow_from_directory(batch_size=BATCH_SIZE,
                                                 directory=validation_dir,
                                                 target_size=(IMG_SHAPE, IMG_SHAPE),
                                                 class_mode='binary')


The convolution and compiling of the model remains the same as the previous example.  The model definition remains the same as the previous example except that a dropout of 0.5 (50% of the values coming into the dropout layer are zeroed) is specificied just before flattening and the dense layers.

model = tf.keras.models.Sequential([

    tf.keras.layers.Conv2D(32, (3,3), activation='relu', input_shape=(150, 150, 3)),
    tf.keras.layers.MaxPooling2D(2, 2),

    tf.keras.layers.Conv2D(64, (3,3), activation='relu'),
    tf.keras.layers.MaxPooling2D(2,2),

    tf.keras.layers.Conv2D(128, (3,3), activation='relu'),
    tf.keras.layers.MaxPooling2D(2,2),

    tf.keras.layers.Conv2D(128, (3,3), activation='relu'),
    tf.keras.layers.MaxPooling2D(2,2),

    tf.keras.layers.Dropout(0.5),
    tf.keras.layers.Flatten(),
    tf.keras.layers.Dense(512, activation='relu'),
    tf.keras.layers.Dense(2, activation='softmax')
])


Below is the model summary.

image

Remember that previously, without augmentation or dropout, the training accuracy was 100%  (overfit) at 100 epochs and the validation accuracy of 75% was achieved in less than 20 epochs.  Adding augmentation and dropout results in the following.


image

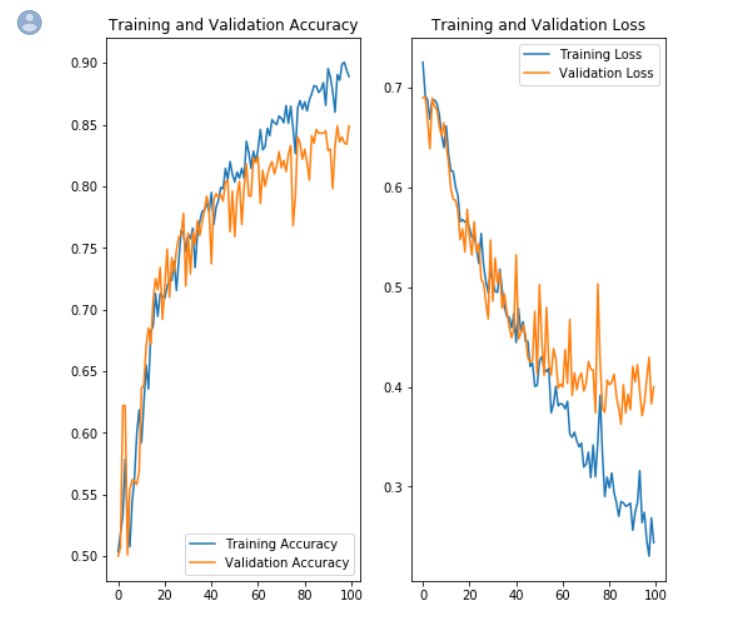
Training accuracy is now about 88% (Vs. 100% before) due to the use of image augmentation.  But the image validation has improved to 84% (Vs. 75% before), a significant improvement.  According to the course training video, training should probably cease around 60 epochs which is where the curves for the training and validation start to diverge.


More Useful Stuff


The following site gives more information on overfitting:  Memorization is not learning!


There is some additional material in the course that I recommend but which will not be covered here::

  • Transfer Leaning, a way to use existing networks created by experts for your own models.
  • Housekeeping such as how to save and load models
  • Time Series Forecasting
  • Introduction to TensorFlow Lite


I plan to cover TensorFlow Lite in more detail in future posts.


Conclusions and Look Ahead


This brings us to the end of how image classification works in TensorFlow.  At the start of the journey my knowledge was limited to following a recipe without much understanding of the underlying model.  My objective was to gain understanding without going too deeply into the math.  Conceptually, it is fairly easy but as they say the devil is in the details.  As is often the case, XKCD is able to convey this in one frame:

XKCD Machine Learning

My knowledge has now been extended to following recipes with a somewhat improved understanding of the underlying model.


In future posts I plan to develop my own model from scratch and move it to a Raspberry Pi running TensorFlow Lite.  Hopefully I will be able to stir the pile until something useful comes out.


Useful Links


RoadTest of Raspberry Pi 4 doing Facial Recognition with OpenCV

Picasso Art Deluxe OpenCV Face Detection

Udacity Intro to TensorFlow for Deep Learning

A Beginning Journey in TensorFlow #1: Regression

A Beginning Journey in TensorFlow #2: Simple Image Recognition

A Beginning Journey in TensorFlow #3: ReLU Activation

A Beginning Journey in TensorFlow #4: Convolutional Neural Networks

A Beginning Journey in TensorFlow #5: Color Images

  • Sign in to reply

Top Comments

  • Sean_Miller
    Sean_Miller over 5 years ago +2
    Great blog series! Hope to see more. My big question is, after I run code to train a model, how to I use it with my BBAI classification.cpp code? The classification example has close to a 1000 objects…
  • Sean_Miller
    Sean_Miller over 5 years ago in reply to fmilburn +2
    I just binged the TIDL API. Unfortunately, the page I was after, training and converting for TIDL use is temporarily down. This is the time of year I get my personal deep learning on, so I hope they get…
  • genebren
    genebren over 5 years ago +1
    Frank, The augmentation concepts seem very powerful. Covering a range of angles and sizes seems like a great way to stretch your images to improve your model. Images that are going to be recognized will…
  • Sean_Miller
    Sean_Miller over 5 years ago in reply to fmilburn

    I just binged the TIDL API.  Unfortunately, the page I was after, training and converting for TIDL use is temporarily down.  This is the time of year I get my personal deep learning on, so I hope they get it back up.


    I'll head to Udacity now.


    See ya',

    Sean

    • Cancel
    • Vote Up +2 Vote Down
    • Sign in to reply
    • More
    • Cancel
  • fmilburn
    fmilburn over 5 years ago in reply to Sean_Miller

    Hi Sean,


    I completed the training but opted not to continue posting because I wasn't sure it added much to what the training series offered.  As well, I didn't really have what I felt to be a compelling project in mind.  The final training videos covered moving TensorFlow Lite to an embedded device and included the Raspberry Pi which is what I have been using.


    I did have a look at the Beagle Bone AI when it came out and considered getting one and maybe doing a shoot out between it and the Raspberry Pi.  Not a fair comparison perhaps but maybe interesting.  It would also be possible to add a Tensor Processing Unit (TPU) to the Raspberry Pi which would even things up.  In any event, I had a looked at the BB AI and it appeared possible to develop a model in Keras and then move output through some TI software and use it in the BB AI.  But I didn't pursue it far at all.


    One of the things emphasized in the training was that existing models can be easily added to.  So if the user wants to add new objects to a visual identification model that is fairly easily done.  The advantage is that a proven model complete with a large dataset developed by experts can be quickly modified and used.  My interest was understanding the basics of how a neural network works and developing my own small datasets so I worked the examples but did not explore modifying one further.


    Glad you enjoyed the series.  It is an interesting subject.  I may explore facial recognition more and will keep object recognition in mind but have put it aside for the moment.

    • Cancel
    • Vote Up +1 Vote Down
    • Sign in to reply
    • More
    • Cancel
  • Sean_Miller
    Sean_Miller over 5 years ago

    Great blog series!  Hope to see more.


    My big question is, after I run code to train a model, how to I use it with my BBAI classification.cpp code?


    The classification example has close to a 1000 objects it runs through it appears.  The default code takes it down to just 10 its interested in for the demo - although I think it is still processing against all 1000.  I don't know where the model data actually sits, so I'll try to figure this out today.


    The magic of all this is to train some things like "door open, door closed" and then be able to get models on an embedded device that can help you out in life.  I'll post back here if I can figure it out.


    -Sean

    • Cancel
    • Vote Up +2 Vote Down
    • Sign in to reply
    • More
    • Cancel
  • genebren
    genebren over 5 years ago in reply to fmilburn

    Frank,


    You would think that the general outline/body of the bird would have the greatest score in determining the recognized species.  The size difference of the beak would be a minor score difference.  This is one of my objections to a training based classifier.  When developing a cell counting algorithm that also determined live/dead cells, we developed dual scoring algorithms, where live and dead cells where treated somewhat differently.  We could easily add tests to assist in determining the live/dead aspects as we went deeper and deeper into the classification process.  That was one of the most challenging and fun projects that I have been involved in.


    Gene

    • Cancel
    • Vote Up +1 Vote Down
    • Sign in to reply
    • More
    • Cancel
  • fmilburn
    fmilburn over 5 years ago in reply to genebren

    Yes, that is what it does by default.  And when it resizes it squishes instead of cropping.  I am thinking of when variable ratio might not be desirable. Maybe not a good example, but say two species of birds where the defining feature is one has a stouter beak.  The training set should resize to scale without squishing.

    • Cancel
    • Vote Up +1 Vote Down
    • Sign in to reply
    • More
    • Cancel
>
element14 Community

element14 is the first online community specifically for engineers. Connect with your peers and get expert answers to your questions.

  • Members
  • Learn
  • Technologies
  • Challenges & Projects
  • Products
  • Store
  • About Us
  • Feedback & Support
  • FAQs
  • Terms of Use
  • Privacy Policy
  • Legal and Copyright Notices
  • Sitemap
  • Cookies

An Avnet Company © 2025 Premier Farnell Limited. All Rights Reserved.

Premier Farnell Ltd, registered in England and Wales (no 00876412), registered office: Farnell House, Forge Lane, Leeds LS12 2NE.

ICP 备案号 10220084.

Follow element14

  • X
  • Facebook
  • linkedin
  • YouTube