


In this blog I intend to outline a reasonably simple way to control Wi-Fi enabled Arduino compatible boards and single board computers like the Raspberry Pi or Beaglebone. In addition an Apple or Android device that can run the Google Assistant app is needed.
Introduction
I have been thinking about this for a while and there are a number of approaches. For example, two Ben Heck episodes Part 1 and Part 2 automated the workbench with voice control using Alexa. More recently there was a post on Hackaday by igorfonseca83 that automated a robot using the process outlined here. The approach used by Ben Heck seemed more versatile but the approach on Hackaday seemed easier to implement and I started with that.
Here is how it works... The user speaks into a tablet or smart phone that is running the Google Assistant app and makes a request - e.g. "Set voltage 3.3" or "Turn coffee pot on". The request then goes off into the cloud where Google Assistant and If This Then That (IFTTT, a free service) somehow make sense of what you are asking. Or maybe not. Assuming IFTTT works as planned a message is sent to the Adafruit IO site which stores it for future use. An Arduino or Python program can then access Adafruit IO and take action - like setting the voltage on a power supply to 3.3V or turning the coffee pot on. Or not. It is also possible to use Adafruit IO to set up a dashboard which can be used for control and reporting but that won't be covered today.

My limited experience with this technology is that it has improved greatly in recent years but errors are still not infrequent. Most of the write-ups and videos I have seen don't really cover this problem although there are some pretty funny (and not so funny) posts occasionally about the misunderstandings that occur with Siri, Alexa, Google, and the like. I will report on the issues I encountered at the end of the post.
NOTE: I am not going to give a step by step detailed overview of how to set this up. The Hackaday article does a fair job of this and there are many other tutorials on the individual pieces. Feel free to ask questions on details though and I will be glad to answer.
Objectives
- Turn LED on and off with voice control
- Set LED brightness with voice control
- Flag errors when unrecognized commands are received or limits are exceeded
- Investigate some of the current issues and problems when using voice control
Hardware
As stated above, an Apple or Android device that can run Google Assistant is needed. Start by signing up for that - I used an Apple iPad and downloaded the app from the app store.
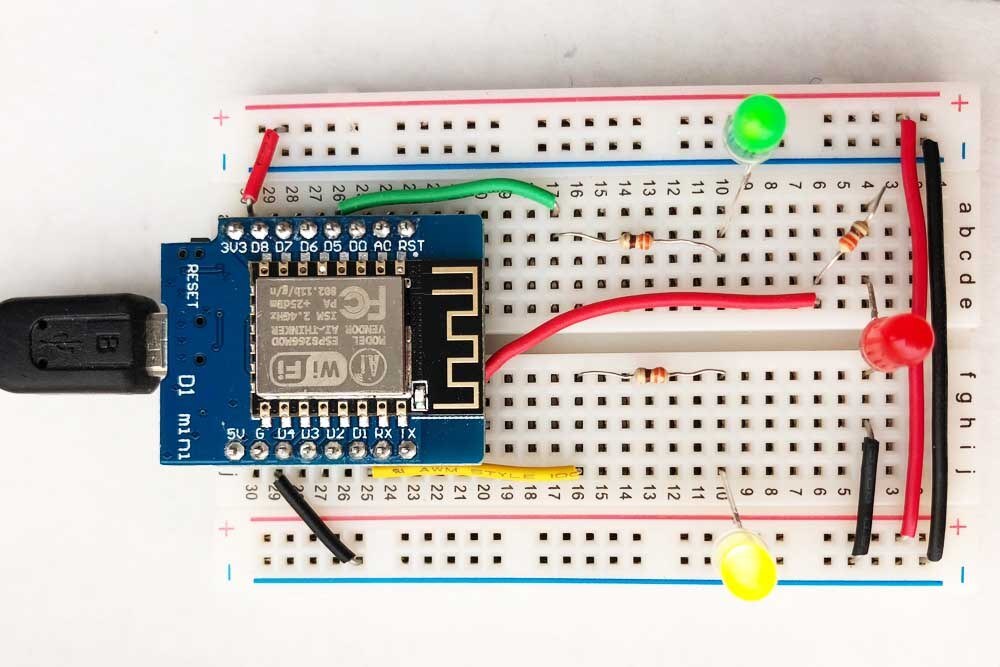
For an end device I am using a D1 mini ESP8266 but the Adafruit libraries are written for Arduino and should work with many more devices. Adafruit also offer Python libraries for the Raspberry Pi and Beaglebone. I tried using a Raspberry Pi but had difficulty getting it to work. Ultimately I would like to use a Pi so that the dashboard on Adafruit IO could also be displayed. To test the physical interface I set up a breadboard with the ESP8266 and attached yellow, green, and red LEDs.
Software
The Arduino libraries are all from Adafruit. Commands and the values associated with them will be discussed in the section on IFTTT. The sketch continuously polls Adafruit IO and then parses new data when it is received. When it recognizes a command (e.g. "YELLOW LED ON") it performs the action. Errors result in the red LED being turned on until such time as a valid command is recieved. Serial print is sent to the terminal to aid debugging.
// Adafruit invests time and resources providing this open source code.
// Please support Adafruit and open source hardware by purchasing
// products from Adafruit!
//
// Written by Todd Treece for Adafruit Industries
// Copyright (c) 2016 Adafruit Industries
// Licensed under the MIT license.
//
// All text above must be included in any redistribution.
/*
 * Modified by F Milburn September 2018 to demonstrate voice  commands
 * from Google Assistance and IFTTT to control a Wemos D1 Mini
 */
#include <ESP8266WiFi.h>
#include <AdafruitIO.h>
#include <Adafruit_MQTT.h>
#include <ArduinoHttpClient.h>
#include "AdafruitIO_WiFi.h"
// Pin definitions
#define RED_PIN           4         // Flags errors in input
#define YELLOW_PIN        5         // PWM (0 to 255) and ON/OFF
#define GREEN_PIN        14         // ON/OFF only
// Adafruit IO
#define IO_USERNAME    "USERNAME"
#define IO_KEY         "IOKEY"
// WiFi
#define WIFI_SSID       "SSID"
#define WIFI_PASS       "PASSWORD"
// Adafruit IO WiFi and feed setup
AdafruitIO_WiFi io(IO_USERNAME, IO_KEY, WIFI_SSID, WIFI_PASS);
AdafruitIO_Feed *deviceValue = io.feed("device-value");
AdafruitIO_Feed *deviceStatus = io.feed("device-status");
void setup(){

  // Setup pins
  pinMode(YELLOW_PIN, OUTPUT);
  digitalWrite(YELLOW_PIN, LOW);
  pinMode(GREEN_PIN, OUTPUT);
  digitalWrite(GREEN_PIN, LOW);
  pinMode(RED_PIN, OUTPUT);
  digitalWrite(RED_PIN, LOW);

  // Start serial communication
  Serial.begin(115200);
  // Connect to io.adafruit.com
  Serial.println("Connecting to Adafruit IO");
  io.connect();
  // Function to handle feeds received from Adafruit IO
  deviceValue->onMessage(handleValue);
  deviceStatus->onMessage(handleStatus);
  // Loop until connected
  while(io.status() < AIO_CONNECTED) {
    Serial.print(".");
    delay(50);
  }
  // Connected
  Serial.println();
  Serial.println(io.statusText());
}
void loop(){

  // Continuously run Adafruit IO
  io.run();
}
// Handle new message from Adafruit.io to set device value
void handleValue(AdafruitIO_Data *data) {
  // Clear errors
  digitalWrite(RED_PIN, LOW);

  String commandStr = data->toString();
  Serial.print("Received <- ");
  Serial.println(commandStr);

  String cmd;
  int value;
  // separate text and number ingredients
  for (int i = 0; i < commandStr.length(); i++) {
    if (commandStr.substring(i, i+1) == ":") {
      cmd = commandStr.substring(0, i);
      value = commandStr.substring(i+1).toInt();
      break;
    }
  }

  // YELLOW LED
  if (cmd.equalsIgnoreCase("YELLOW LED")){
    if ((value >= 0) && (value < 256)){
      analogWrite(YELLOW_PIN, value);
    }
    else{
      handleError(2);
    }
  }
  else{
    handleError(1);
  }
}
// Handle new message on Adafruit.io to set device status
void handleStatus(AdafruitIO_Data *data) {
  // Clear errors
  digitalWrite(RED_PIN, LOW);

  String commandStr = data->toString(); // store the incoming commands in a string
  Serial.print("Received <- ");
  Serial.println(commandStr);

  // YELLOW LED
  if (commandStr.equalsIgnoreCase("YELLOW LED ON")){
    digitalWrite(YELLOW_PIN, HIGH);
  }
  else if (commandStr.equalsIgnoreCase("YELLOW LED OFF")){
    digitalWrite(YELLOW_PIN, LOW);
  }

  // GREEN LED
  else if (commandStr.equalsIgnoreCase("GREEN LED ON")){
    digitalWrite(GREEN_PIN, HIGH);
  }
  else if (commandStr.equalsIgnoreCase("GREEN LED OFF")){
    digitalWrite(GREEN_PIN, LOW);
  }
  // Not recognized
  else {
    handleError(1);
  }
}
void handleError(int errorNumber){
  digitalWrite(RED_PIN, HIGH);
  switch(errorNumber){
    case 1:
      Serial.println("Invalid command");
      break;
    case 2:
      Serial.println("Outside range");
      break;
    default:
      Serial.println("Unknown error");
  }
}
An Adafruit IO account must be set up and the feeds that it will process from IFTTT defined. I have two feeds that are named device-status and device-value. They must be present in the sketch and in the Adafruit IO account. A useful feature of the Adafruit IO site is that the feeds can be monitored as they arrive.
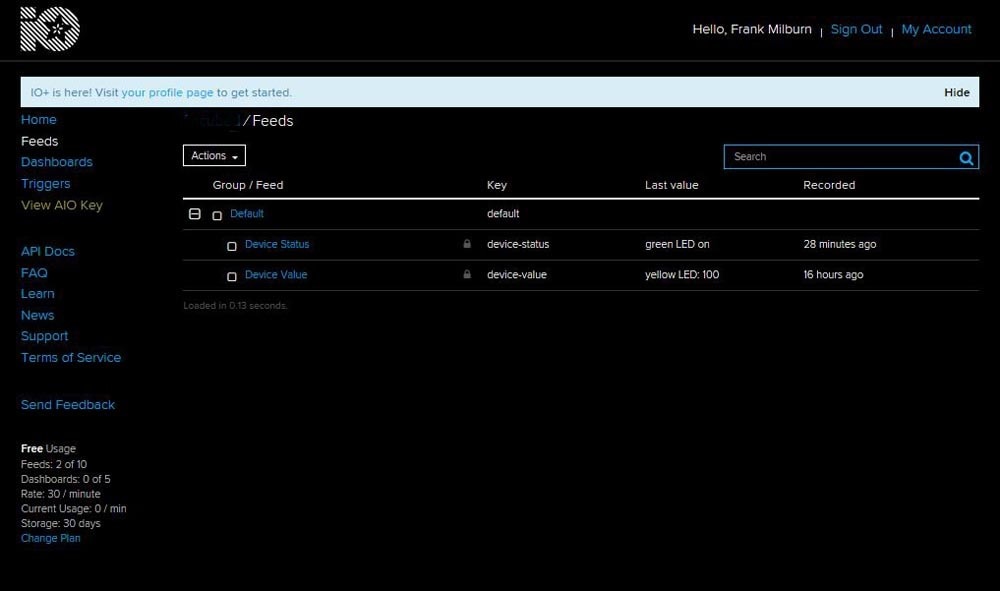
The need for two feeds result from the way that IFTTT works. In our application, if something happens in Google Assistant where one of four possible triggers is activated then Adafruit IO will be called. Each trigger is treated as a different feed by Adafruit IO and in this example two triggers are used.
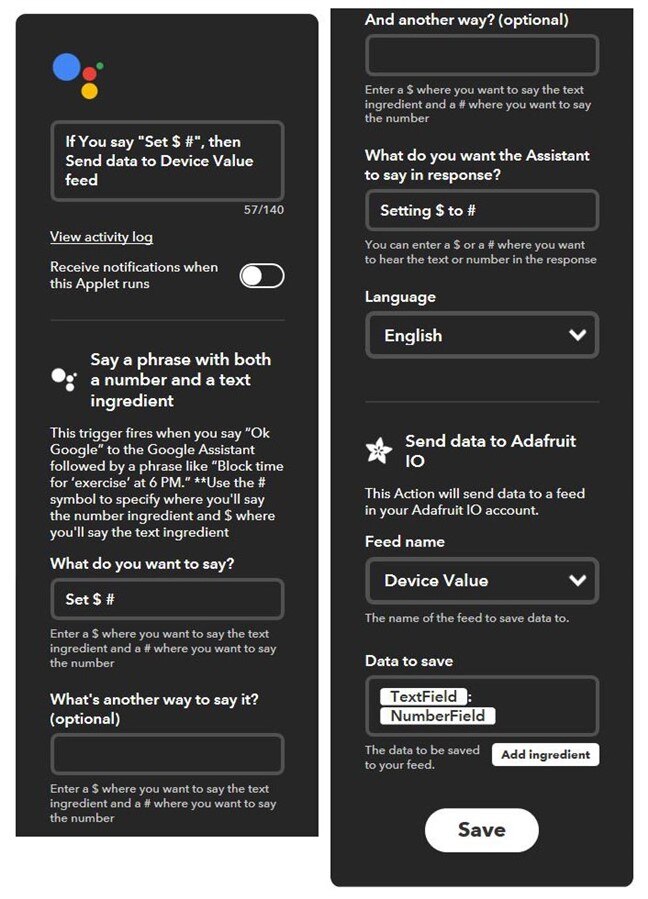
There are four possible types of triggers in IFTTT for Google Assistant: "say a simple phrase", "say a phrase with a number", "say a phrase with a text ingredient", and "say a phrase with both a number and a text ingredient". To minimize the number of feeds to Adafruit IO I am using just "say a phrase with a text ingredient" and "say a phrase with both a number and a text ingredient". They are set up in the following form:
- "Set $ #" where $ is a text ingredient and # is a variable holding a number - example: "Set YELLOW LED 200" where the underlined phrase is $ and the number 200 is #
- "Turn $" where $ is a text ingredient - example: "Turn RED LED ON" where the underlined phrase is $
We could set up more but quite a bit can be done with just these two. For example it would be possible to define "Set Power Supply Voltage 3.3". After defining the trigger, the then portion of the construct is defined. In our case if one of the triggers is activated then we call Adafruit IO with a message (which our end device then grabs while polling).
The following shows the completed "Set $ #" applet.
The messages that the Arduino sketch above can process and act upon are:
- Turn yellow LED on
- Turn yellow LED off
- Turn green LED on
- Turn green LED off
- Set yellow LED # - where # is an integer between 0 and 255 and the LED is dimmed by PWM accordingly
If an unrecognized message is received then the red LED is turned on until such time as a valid message is received.
Demonstration
The following is a video demonstration. Google Assistant and IFTTT give both verbal and text feedback as commands are made. Note at approximately 40 seconds into the video Google Assistant appears to correctly recognize a command to turn off the yellow LED but something in the chain breaks and it fails to do so. Near the end I request it to turn on a nonexistent purple LED which instead lights the red LED to indicate an error.
As can be seen, the commands were all processed properly with the one exception but that exception is of some concern. Most of the time it processed my plain midwestern American English properly but I did encounter various difficulties and issues.
Issues
- Properly recognized command improperly processed - The single occurrence of this happened at the 40 second mark in the video. The command was properly recognized by Google Assistant and then by IFTTT. It appears it was then properly sent to Adafruit IO. The Arduino sketch then recognized there was a new message but either did not receive the correct message from Adafruit IO or improperly processed it. I suspect the error was in Adafruit IO but have not been able to reproduce it. Notice that later in the video when I repeat the command it processes it correctly.
- Improperly recognized commands - I made numerous efforts to trip up the voice recognition AI such as speaking quickly, speaking slowly, speaking with an accent, etc. Surprisingly, speaking slowly was a fairly easy way to trip it up along with throwing in "ummm" and other fillers not uncommon in speech. Any deviation to the pattern set up in IFTTT can result in error. It sometimes made errors such as changing "Set yellow LED 200" to "Set yellow LED to hundred". It once mistook one of my commands for a request to look up a rock band on google search. This should not be surprising to anyone who has used voice assistants on their smart phone for any length of time.
- Poor feedback on properly recognized commands that are not valid - I could not find a way to screen improper commands with IFTTT - e.g. when a range is exceeded or a text ingredient is not in the vocabulary of the Arduino parser. This is not unexpected but is misleading when set up the way I did here where Google Assistant gives feedback that it is going to do something it cannot do.
- Delay between voice command and action - this can occur anywhere along the chain and could be particularly bad if one of the sites, say Adafruit IO, is down.
- Limited options in IFTTT for triggers - Only one text ingredient or variable number is allowed in a trigger. It appeared from the Ben Heck videos that "Alexa" is more versatile than this.
Summary
I enjoyed investigating this voice control approach and the technology has improved greatly over the years. All of the objectives set out at the beginning of this post were met. However, I would be cautious using it in a situation where safety or property is an issue. I was considering using it in my lab to control instruments but am now wary of that. For example, what if the voice assistant mistook "Four-teen" for "Four-tee" milliamps or a command was delayed or failed entirely when trying to shut down an experiment quickly. I would definitely consider it for noncritical applications. Other voice control services and approaches are available and this blog is just the tip of the iceberg.
Thanks for reading. Let me know if there are questions and as always corrections and suggestions for improvement are welcome.
Edited 10 September 2018: minor changes for clarity and to add issue of delay between voice command and action
Links
Google Assistant (Use the app store to get this for your device)
Hackaday Article (get more detailed information on setting up voice commands here)
Top Comments