


The Tin Man is now mechanically and electrically complete.

Printed Parts
I didn't take any photographs during assembly but it was straightforward. The front and sectional view from the back below shows the parts minus the electronics.

Here are my comments on the outcome:
- Appearance: The appearance differs from the model, at least to me. As printed, he looks thinner and the gap between the eyes and the shell is more prominent.
- Print Quality: As noted previously, print quality is not that great and is most apparent on the face. I think that is due to the thin (1.6mm) shell and the orientation which shook the print as the filament was laid down.
- Eye Movement: Eye movement has been improved by tightening up the tolerances and slop in the joints. I have several ideas for improving this further.
- Assembly: The nose cap, eye irises, base plate, and funnel cap handle were glued on with epoxy. The eye assembly and bottom entry panel are screwed in using heat-set inserts.
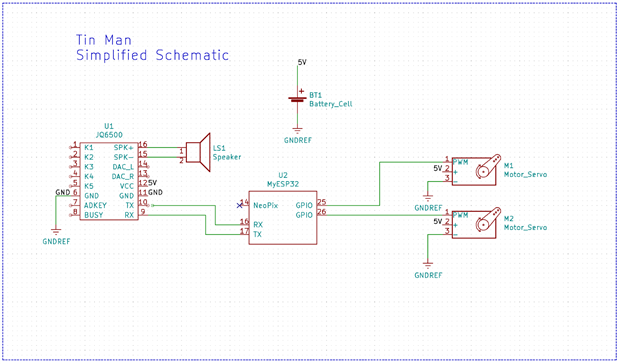
Electronics
A connection for a future "Neopixel" string was tested and added to the schematic but otherwise, it is unchanged. The battery shown is a 18650 and resides in a power circuit with charging capability, boost to 5V, and 3V3 LDO regulator (not shown). The ESP32 can be powered from the 3V3 output of the power circuit.
The circuit was then transferred from a breadboard to a prototyping board with the connections shown below.
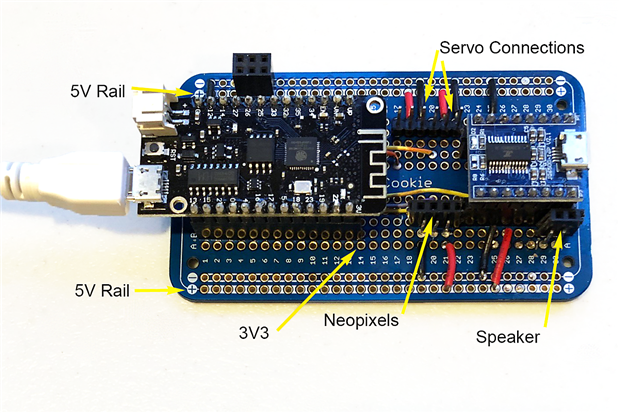
I essentially use this arrangement in all my animatronic projects and it would probably be worth having a PCB made and standardizing on a microcontroller and sound chip.
Firmware
The firmware uses the same algorithm described in a previous post but modified to accommodate multiple expressions. The main function in the example code below loops through the animatronic events stored in an array as sequences of events.
/* Sequencer_V0_2
 * Sequences servo movement and speech from JQ6500
 * Contains ESP32 specific code, tested on generic ESP32
 *
 * Utilizes JQ6500 library from James Sleeman: http://sparks.gogo.co.nz/
 * Utilizes servo smoothing algorithm by James Bruton: https://github.com/XRobots/ServoSmoothing
 *
 * F Milburn,  Oct 2021
 */


// Libraries
#include <ESP32Servo.h>
#include <HardwareSerial.h>
#include <JQ6500_Serial.h>
#include <Adafruit_NeoPixel.h>
#include "Sequencer.h"


const int SEQ_NUMBER = 1;


// JQ6500
// Create the mp3 module object. We're using the ESP32 Hardware Serial UART2, so:
// ESP32 Pin 16 (RX) is connected to TX of the JQ6500
// ESP32 Pin 17 (TX) is connected to RX of the JQ6500
HardwareSerial mySerial(2);
JQ6500_Serial mp3(mySerial);


// Servos
int leftEyeServoVal = sequence[0][0].leftEyeMove;
float leftEyeServoScaled = 1200;
float leftEyeServoSmoothed = 512;
float leftEyeServoSmoothedPrev = 512;
const int leftEyePin = 25;


int rightEyeServoVal = sequence[0][0].rightEyeMove;
float rightEyeServoScaled = 1200;
float rightEyeServoSmoothed = 512;
float rightEyeServoSmoothedPrev = 512;
const int rightEyePin = 26;


Servo leftEyeServo;
Servo rightEyeServo;


// NeoPixels
const int neoPixelPin = 14;
const int numNeoPixels = 3;
Adafruit_NeoPixel pixels(numNeoPixels, neoPixelPin, NEO_GRB + NEO_KHZ800);


// Global variables
long newEventStart = sequence[SEQ_NUMBER][0].eventLength;
unsigned long currentMillis;
long previousMillis = 0;    // set up timers
long interval =  5;         // update interval in milliseconds
int eventNum = 0;
long previousEventStart = 0;


void setup() {


  Serial.begin(115200);


  // Servos
  leftEyeServo.attach(leftEyePin);
  rightEyeServo.attach(rightEyePin);


  // Speech
  mySerial.begin(9600);
  mp3.reset();
  mp3.setVolume(10);                            // volume can be set 0 to 30
  mp3.setLoopMode(MP3_LOOP_NONE);               // play one file and stop


  // NeoPixels
  pixels.begin();
  pixels.clear();
  for(int i=0; i<numNeoPixels; i++){
    pixels.setPixelColor(i, pixels.Color(100, 0, 0));
  }
  pixels.show();
}


void loop() {


  currentMillis = millis();
  if (currentMillis - previousMillis >= interval) {  // start 5ms timed loop
      previousMillis = currentMillis;


      // Check to see if time for new event
      if ((currentMillis - previousEventStart) > newEventStart) {
        previousEventStart = currentMillis;
        leftEyeServoVal =  sequence[SEQ_NUMBER][eventNum].leftEyeMove;
        rightEyeServoVal = sequence[SEQ_NUMBER][eventNum].rightEyeMove;
        newEventStart =    sequence[SEQ_NUMBER][eventNum].eventLength;
        if (sequence[SEQ_NUMBER][eventNum].speechFile > -1){
          mp3.setVolume(sequence[SEQ_NUMBER][eventNum].speechVolume);
          mp3.playFileByIndexNumber(sequence[SEQ_NUMBER][eventNum].speechFile);
        }

        // set to next event
        if (eventNum < numEvents-1){
          eventNum++;
        }
        else{
          eventNum = 0;
        }
      }

      // scale all inputs for the servo microseconds range
      leftEyeServoScaled =  (leftEyeServoVal - 512)  + 1200;
      rightEyeServoScaled = (rightEyeServoVal - 512) + 1200;

      // smooth inputs
      leftEyeServoSmoothed =  (leftEyeServoScaled * 0.01) +  (leftEyeServoSmoothedPrev * 0.99);
      rightEyeServoSmoothed = (rightEyeServoScaled * 0.01) + (rightEyeServoSmoothedPrev * 0.99);

      // save previous values
      leftEyeServoSmoothedPrev =  leftEyeServoSmoothed;
      rightEyeServoSmoothedPrev = rightEyeServoSmoothed;


      // write servos
      leftEyeServo.writeMicroseconds(leftEyeServoSmoothed);
      rightEyeServo.writeMicroseconds(rightEyeServoSmoothed);


  } // end of timed loop


} // end of main loop
The events and sequences are stored separately in a header file named Sequencer.h and shown below.
const int numSequences = 3;
const int numEvents = 6;


// Event and Sequence Definition
struct event{
  int leftEyeMove;       // 0 to 1024
  int rightEyeMove;      // 0 to 1024
  int speechFile;        // -1, no file called
  int speechVolume;      // 0 to 30
  long eventLength;      // milliseconds
};


event sequence[numSequences][numEvents] = {
// Leye   Reye  File Vol Time      0 = Laugh Sequence
  {{512,   512,  -1,  0,  1000},
  {0,     0,    -1,  0,  1000},
  {512,   512,  -1,  0,  1000},
  {1024,  1024, -1,  0,  1000},
  {512,   512,  -1,  0,  1000},
  {512,   512,   3,  10, 3000}},
// Leye   Reye  File Vol Time      1 = Bite Sequence
  {{512,   512,  -1,  0,  1000},
  {0,     0,    -1,  0,  1000},
  {512,   512,  -1,  0,  1000},
  {1024,  1024, -1,  0,  1000},
  {512,   512,  -1,  0,  1000},
  {512,   512,   2,  10, 3000}},
// Leye   Reye  File Vol Time      2 = Cake Sequence
  {{512,   512,  -1,  0,  1000},
  {0,     0,    -1,  0,  1000},
  {512,   512,  -1,  0,  0000},
  {1024,  1024, -1,  0,  1000},
  {512,   512,  -1,  0,  1000},
  {512,   512,   1,  10, 3000}}
};
In this example, there are 3 sequences each of which consists of 6 events. The events can contain separate eye movement, speech, speech volume, and the length of the event in milliseconds. Different events and sequences can be added by changing these files.
Conclusion
To finish the project I need to give the Tin Man his personality. Will he be scary or friendly? Happy or sad? As noted here, I have a "voice changer" to create a voice, or a recording can be made and altered with software prior to storing it on the JQ6500. I plan to get the grandchildren involved in that and to perhaps record the voices. Modifications to the firmware will then be made to accommodate the personality.
Thanks for reading. Comments and suggestions are always welcome.
Links
The Tin Man - Getting Started | element14 | Frank Milburn
The Tin Man - Smooth Moves | element14 | Frank Milburn
The Tin Man - Velleman "Voice Changer Kit&... | element14 | Frank Milburn
-

robogary
-
Cancel
-
Vote Up
0
Vote Down
-
-
Sign in to reply
-
More
-
Cancel
-

fmilburn
in reply to robogary
-
Cancel
-
Vote Up
0
Vote Down
-
-
Sign in to reply
-
More
-
Cancel
Comment-

fmilburn
in reply to robogary
-
Cancel
-
Vote Up
0
Vote Down
-
-
Sign in to reply
-
More
-
Cancel
Children