


I'm still experimenting in the scope of the Cypress CY8CKIT-058 PSoC 5LP Prototyping Kit RoadTest. This time, I experimented with a 16x2 LCD display.
Character LCD
Simple 16x2 character LCDs provide an easy way of visualising textual and numerical data, such as sensor data.
Workspace
Rather than starting from scratch and having to figure out every aspect of controlling a character LCD, it's possible to load an example, try to understand the example, verify it works and start making modifications to it.
To load the example workspace, go to "File > Example Project ...". In the popup, enter "LCD" as a search criteria for project name. This should leave a few projects to pick from. Pick "CharLCD_CustomFont".
Finally, once the project is loaded, right-click the project name and select "Device Selector ...". In the popup, make sure to select the device that matches yours.


You can then proceed to build the project and program your device.
Connections
The connections required for the LCD are specified in the datasheet, which can be accessed by right-clicking the "Character LCD" component and selecting "Open Datasheet ...".


Test
If the kit was programmed successfully and the connections to the LCD are correct, the following should appear:

The top row are a bunch of custom characters spelling out the word "CYPRESS", the bottom row is the string "Perform".
The custom characters can be modified by double-clicking the "Character LCD" component in the TopDesign.
Modifications
Once the sample code is working properly, it is of course possible to modify it.
My first modification was to display two different strings statically, including two custom characters. This is the code:
#include <device.h>

extern uint8 const CYCODE LCD_customFonts[];

void main() {

  LCD_Start();
  LCD_LoadCustomFonts(LCD_customFonts);

  LCD_Position(0u, 0u); // first row, first position
  LCD_PrintString("element14");

  LCD_Position(1u, 9u); // second row, ninth position
  LCD_PrintString("Cypress");

  LCD_Position(0u, 10u);
  LCD_PutChar(LCD_CUSTOM_1);

  LCD_Position(1u, 7u);
  LCD_PutChar(LCD_CUSTOM_0);

  CyDelay(200u);

  for(;;) {}
}
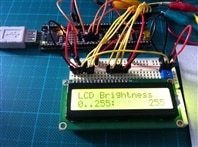
And the result:

The previous modification is static. it displays the strings of text and leaves them as is.
To have a more dynamic example, I combined the LCD with the CapSense slider I created in the previous post (Cypress CY8CKIT-059 PSoC 5LP Prototyping Kit - CapSense Linear Slider) to control the LCD's backlight and report the brightness.
The LCD's anode pin is now connected to a digital output pin controlled by a PWM signal. The PWM signal's duty cycle is controlled by the CapSense slider, making it possible to change the brightness of the backlight.
The code:
#include <device.h>
#include <stdio.h>

#define NO_SLIDE 0xFFFFu

extern uint8 const CYCODE LCD_customFonts[];

void main() {

  uint16 SliderPos = NO_SLIDE;
  uint16 LastPos = NO_SLIDE;
  char SliderPosString[3];

  // PWM initialisation and start
  PWM_1_Start();
  Clock_1_Start();

  // LCD initialisation and start
  LCD_Start();
  LCD_LoadCustomFonts(LCD_customFonts);

  // CapSense related initialisation and start
  CyGlobalIntEnable;
  CapSense_1_Start();
  CapSense_1_InitializeAllBaselines();

  // Display a startup message for two seconds
  LCD_Position(0u, 0u); // first row, first position
  LCD_PrintString("element14");

  LCD_Position(1u, 9u); // second row, ninth position
  LCD_PrintString("Cypress");

  LCD_Position(0u, 10u);
  LCD_PutChar(LCD_CUSTOM_1);

  LCD_Position(1u, 7u);
  LCD_PutChar(LCD_CUSTOM_0);

  CyDelay(2000u);

  // Clear the startup message
  LCD_ClearDisplay();

  // Display the static part of the text
  LCD_Position(0u, 0u); // first row, first position
  LCD_PrintString("LCD Brightness");

  LCD_Position(1u, 0u);
  LCD_PrintString("0..255: ");

  for(;;) {
    CapSense_1_UpdateEnabledBaselines();
    CapSense_1_ScanEnabledWidgets();

    while(CapSense_1_IsBusy());

    SliderPos = CapSense_1_GetCentroidPos(CapSense_1_LINEARSLIDER0__LS);

    if(SliderPos != NO_SLIDE && SliderPos != LastPos) {
        PWM_1_WriteCompare(SliderPos);
        // Convert the SliderPos to String, add leading 0's if needed
        sprintf(SliderPosString, "%03i", SliderPos);
        // Display the dynamic part of the text
        LCD_Position(1u, 13u);
        LCD_PrintString(SliderPosString);
    }
  }
}


I've attached the workspace bundle containing the code, topdesign, etc ... to this post.
Top Comments
-

Former Member
-
Cancel
-
Vote Up
+1
Vote Down
-
-
Sign in to reply
-
More
-
Cancel
-

Jan Cumps
in reply to Former Member
-
Cancel
-
Vote Up
+1
Vote Down
-
-
Sign in to reply
-
More
-
Cancel
Comment-

Jan Cumps
in reply to Former Member
-
Cancel
-
Vote Up
+1
Vote Down
-
-
Sign in to reply
-
More
-
Cancel
Children