One of the most interesting features of the Digilent Analog Discovery Pro ADP3450 is the Linux Mode for embedded development. This represents a bit of a paradigm shift in USB test instruments – no longer are they just following the commands of a remotely connected host, instead, they have a brain of their own and thus can be “self-hosting”. This means that you can have the unit perform measurements without the need to have a dedicated PC switched on all the time. Of course, by default, the ADP3450 operates in standard USB mode with an Ethernet mode as well for hassle-free connection to WaveForms with full performance capabilities.
Introduction to Linux Mode
In the past, if you wanted to emulate what was possible in Linux Mode, you would probably take a USB MSO and connect a Raspberry Pi to it such that you can control the USB MSO from the Raspberry Pi. Then you would write your programs or scripts which could execute on the Raspberry Pi, thus allowing you to operate independently of a controlling PC. Such an arrangement can be quite economical as it eliminates the need for an expensive host and reduces power consumption, allowing for new in-field applications.
In the case of the ADP3450, using a Raspberry Pi is not necessary as it already has the necessary parts inside! It uses the Xilinx Zynq SoC’s ARM cores and by reconfiguring the boot parameters, (presumably) causes the unit to use the eMMC as the main block storage and the DDR3L DRAM buffer as system RAM instead. As a result, the ADP3450 would boot Linux by itself and can run your own programs written using the WaveForms SDK, but better still, doesn’t stop you using it via USB, Ethernet or Wi-Fi (via supported adapters) with the WaveForms software interactively if you wish. If you want to use a Raspberry Pi as it has support for driving a display, this is still a possibility, making this a very flexible option.
However, this option does come with a few minor catches. With great power comes great responsibility as the ADP3450 is now a Linux host on the network, ensuring security is important to avoid compromise or use in network pivoting attacks. Another catch is that performance in record mode is limited to ~1MS/s compared to the headline figure of 100/125MS/s likely because of the loss of the DRAM buffer. One upside is that Digilent offers some authentication for network connections to avoid others on the network potentially taking over your instrument.
Setting up Linux Mode is as simple as following Digilent’s guide. However, as my device was already installed with the latest Linux image, it was as simple as switching the boot mode to Linux through WaveForms and then connecting via serial terminal over USB.
The default username and password is digilent/digilent and should be changed immediately. The kernel is 4.19 and is for armv7l architecture.
To ensure security, it is important to update the software. Because of some changes in repository values, I found it necessary to use the –allow-releaseinfo-change option in the apt-get update command to ensure the latest package lists are used. Then, it can be followed-up with apt-get upgrade.
I discovered that SSH access is enabled by default, although it can take a while to come-up via Ethernet. If you wish to use Wi-Fi, then connecting first via USB-Serial console would be necessary to configure the network parameters. By default, the network connections are auto-configured through DHCP, so it may be worthwhile setting up an address binding in your DHCP server so it is easier to find the ADP3450 on your network.
From there, it’s similar to having a Raspberry Pi SBC at your disposal, although there are some differences as well. The use of eMMC as the boot device deserves some care as it is not replaceable, thus avoiding excessive writes is highly advisable. If the eMMC fails, the other standard modes should still be available as I suspect they boot from the Spansion 128MBit Serial Flash instead (see Teardown for more details). As a result, I encourage users to use external USB storage for their scripts and data logging. External devices are not auto-mounted by default, so you must create a mount point and use a mount command to use the device – e.g. sudo mkdir /media/usb followed by sudo mount /dev/sda1 /media/usb. Likewise, you should sync and sudo umount /media/usb prior to unplugging the device. It should be noted that the pre-built kernel does not have support for FUSE modules, thus it seems only Linux-type filesystems (ext2/3/4) and FAT-type filesystems (FAT16/32) are supported.
LAN & Wi-Fi Connectivity
Getting connected by Ethernet is quite straightforward as it will auto-configure using DHCP once booted as long as the Ethernet cable is connected. Configuration for Wi-Fi can be undertaken through terminal commands to configure wpa_supplicant as detailed by Digilent here.
Testing the connectivity by Ethernet was great, as it utilises a Gigabit Ethernet interface. Running iperf3 tests between the ADP3450 and my main desktop produced throughput rates of 557Mbit/s in the download and 507Mbit/s in the upload direction. While this was not saturating the full Gigabit Ethernet link, it is plenty fast enough for the instrument as compared to the 40Mbit/s offered by USB 2.0.
At the time of publication, Digilent lists the following Wi-Fi adapters as being compatible:
- TL-WN823N (RTL8192CU chipset)
- TL-WN823N (RTL8192EU chipset)
- TL-WN722N v1 (AR9002U chipset)
- Cudy WU1300 (RTL8812BU chipset)
- Cudy WU1300S (RTL8812BU chipset) - 2.4 GHz is unsupported
- Alpha[sic] AWUS036ACH (RTL8812AU chipset) - must be connected to the circled USB ports
- Panda PAU05
- Panda PAU09
I suspect they mean Alfa rather than Alpha, however, I only owned one compatible adapter on the list – the TP-Link TL-WN722N v1 with the Atheros AR9002U chipset. Unfortunately, following their instructions, I was not able to get it to work. It just would not be detected as a network interface at all. I tried enabling non-free repositories and installing linux-firmware-nonfree and even firmware-atheros with no change.
Thankfully, I do have a vast collection of adapters to hand and was able to identify the following adapters as working:
Raspberry Pi Wi-Pi [OYR-COMFAST88] 2.4GHz 148f:5370 Ralink Technology, Corp. RT5370 Wireless Adapter
TP-Link TL-WN725N [TE7WN725N] 2.4Ghz 0bda:8179 Realtek Semiconductor Corp. RTL8188EUS 802.11n Wireless Network Adapter
Unbranded 300M 2.4GHz 0bda:818b Realtek Semiconductor Corp. RTL8192EU 802.11b/g/n WLAN Adapter
Unbranded 802.11n 2.4GHz 0bda:8176 Realtek Semiconductor Corp. RTL8188CUS 802.11n WLAN Adapter
D-Link DWA-140 [KA2WA140B1] 2.4GHz 07d1:3c09 D-Link System DWA-140 RangeBooster N Adapter(rev.B1) [Ralink RT2870]
Tenda W522U 2.4 + 5GHz 148f:3572 Ralink Technology, Corp. RT3572 Wireless Adapter
Unbranded AC1200 2.4 + 5GHz 0bda:b812 Realtek Semiconductor Corp. RTL8812BU
That should give ADP3450 owners a few more options with regards to adapters. It should be noted that some of these adapters will list under iwconfig as “no wireless extensions” but it should still operate correctly.
By default when running in Linux Mode, an nmap scan returns the following open ports:
PORT STATE SERVICE VERSION
22/tcp open ssh OpenSSH 7.9p1 Debian 10+deb10u2 (protocol 2.0)
1534/tcp open micromuse-lm?
5355/tcp open llmnr?
33890/tcp open unknown
Can You Run WaveForms in Linux Mode?
Seeing as the Digilent WaveForms software is available for armhf primarily for use with the Raspberry Pi, I wondered whether it would be possible to host the software on the ADP3450’s Linux Mode. It would be a great demonstration of the power of the instrument. I didn’t realise that Digilent already had a guide about just this, so I went about doing it in my own round-about way.
To get started, I needed to install X server for graphical display with the xserver-xorg-video-dummy driver to create a virtually connected display. This can be done by running sudo apt-get install xserver-xorg-video-dummy and then writing a dummy configuration file as per this guide.
It is then necessary to install a graphical environment. For this, I chose LXDE as it is a lightweight desktop which is easy to use. This can be done through sudo apt-get install lxde although perhaps lxde-core would be an even lighter metapackage that will not install other bundled applications. Note that this will consume significant disk space.
Then, it is necessary to configure a remote desktop solution to serve the virtual display. I chose x11vnc as this is lightweight and also a known-reliable solution. This can be installed using sudo apt-get install x11vnc and configured following this guide using the Autostart of the X11VNC server before the user section. This should let you connect remotely to the desktop and login to the desktop.
To make things a little more comfortable, you can enable auto-login to the main account by editing /etc/lightdm/lightdm.conf to uncomment the autologin-user line and fill in the appropriate username (e.g. digilent).
To complete the installation, I had to install the Digilent Adept Runtime and Digilent Waveforms software, fixing any missing packages:
sudo dpkg -i digilent.adept.runtime_2.26.1-armhf.deb
sudo apt-get install -f
sudo dpkg -i digilent.waveforms_3.17.1_armhf.deb
sudo apt-get install -f
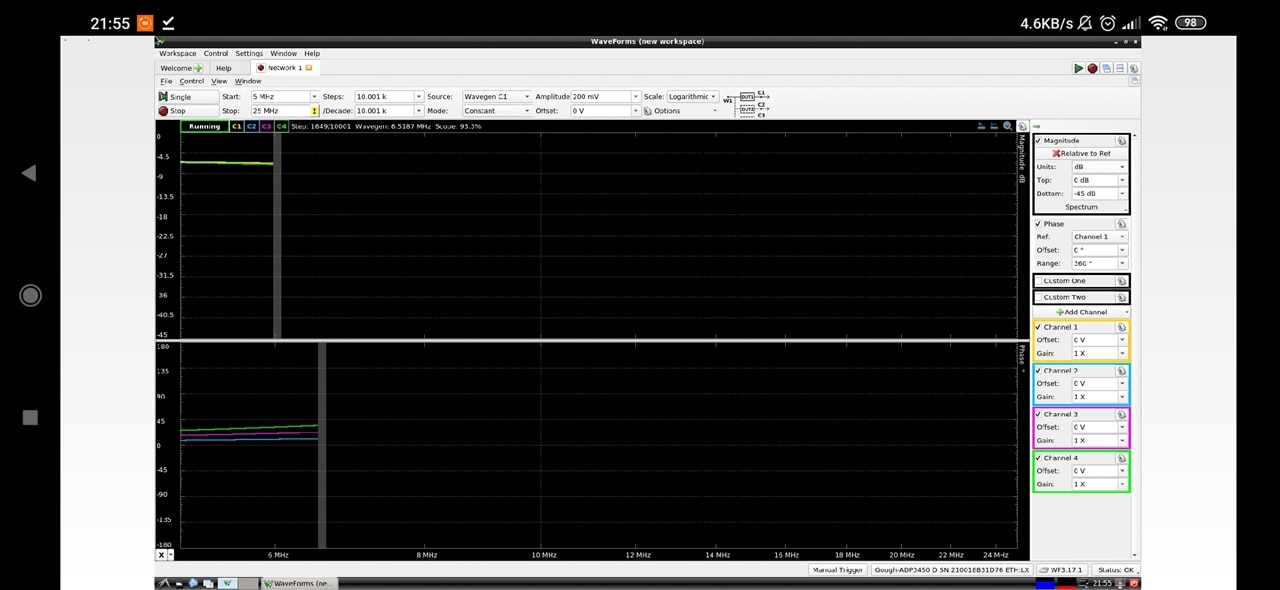
If everything worked out, then you will have yourself a copy of WaveForms running inside a LXDE session on a virtual monitor captured by VNC. This means you can even login via a mobile phone and make some measurements without installing any software on your client device!

It is noticeably slower operating on the device due to limited RAM and CPU resources. Enabling averaging could easily bring things to a grinding halt or even crash the application. But basic measurements seem perfectly possible.
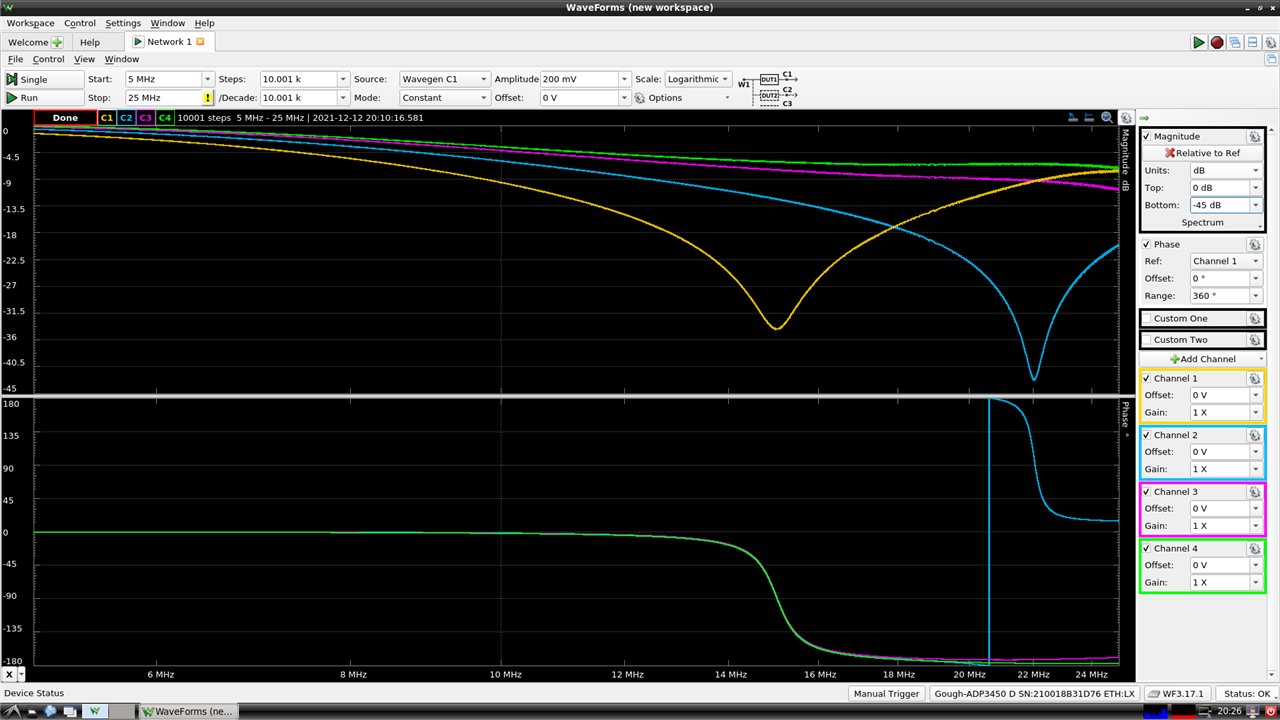
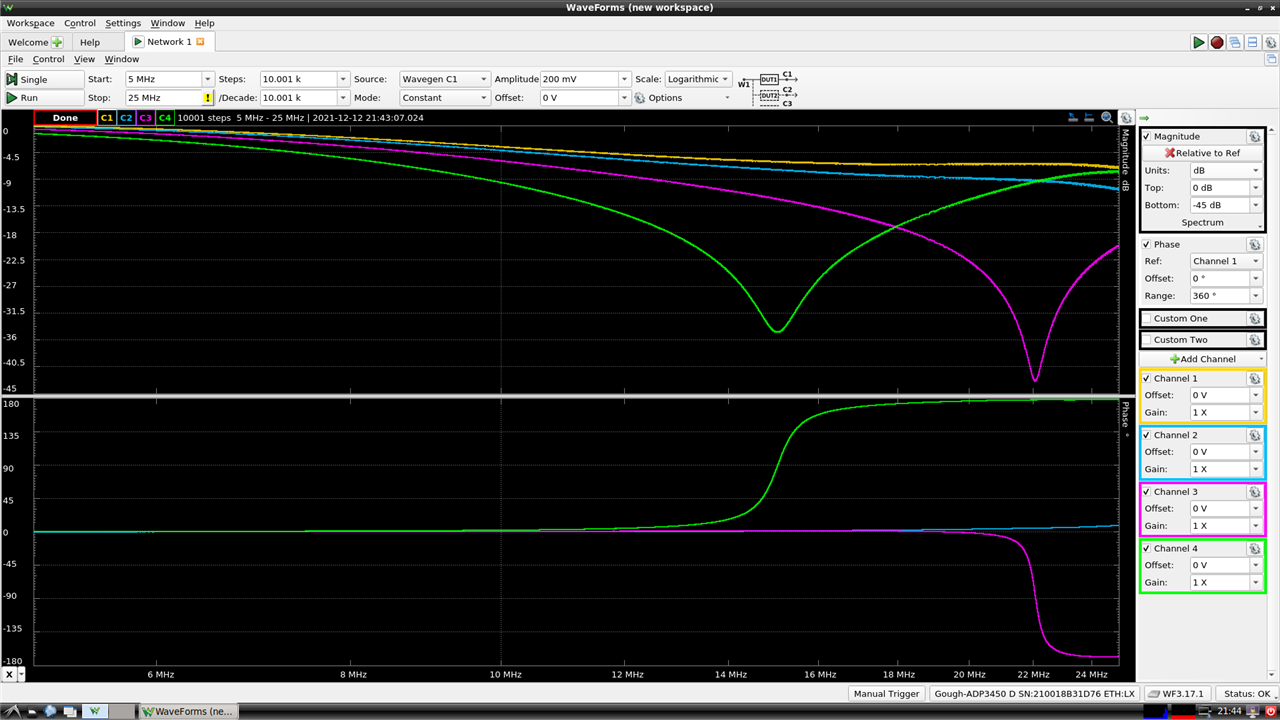
Hooking up the wavegen output into all inputs through tees, without proper termination, and running a bode plot gives the expected dips due to signal reflections. Reversing the order of the channels reverses the order of the dips, as expected.


Checking utilisation of resources in different modes, it seems that the CPU is being pegged near maximum and RAM is mostly utilised as well.
Running multiple instruments simultaneously can also be possible, but I would avoid it if possible as this is very much stretching what the device is capable of.
I would say that perhaps the biggest downside of the ADP3450’s Linux Mode implementation is the limited 512MB of system RAM. This can easily get stressed when running even a light desktop environment. A non-ideal way of getting around this limitation (albeit at the cost of performance and flash media lifetime) is to provision a swap file on an external USB device to act as additional RAM when system RAM begins to run out. This improves stability by avoiding unexpected crashes due to lack of RAM and I would recommend creating a 1GiB swap file even if it is unlikely to ever be fully utilised. Just don’t remove the device containing the swap file otherwise the system will crash.
Another strange observation is that the power switch on the side of the unit appears to operate as a hardware power switch. This does not gracefully shut-down Linux when it is switched off, thus could lead to corruption if it occurs during a write. It is hence preferable that a proper shutdown be issued through the terminal at least 30 seconds before flipping the power switch to avoid potential issues (as you would usually do with a Raspberry Pi).
What Else Can You Do in Linux Mode?
To make your life a little better in Linux mode, I would suggest installing screen to allow you to run terminal processes even when logged out. Installing python3 and python3-pip will allow you to run Python programs and install libraries to support additional peripherals. This can include using pyvisa to talk to SCPI-enabled instruments, pymodbus to talk to Modbus-TCP enabled instruments or using the ADP3450 as a USB-TMC bridge to interface USB-TMC instruments to a network as I have done. I would also suggest using timedatectl to set your time-zone and perhaps even renaming the device from the default ADPro name in case you have a few on the same network.
For those who prefer interactive web-browser based development, it is possible to install a jupyter-notebook server on the ADP3450. This allows for easy tinkering with Python example scripts from the SDK without needing to work on a text-only console.
By default, you can transfer files to and from the ADP3450 using SCP or SFTP as you would with any Linux machine. However, if you’re not too fond of this, you can even install a samba server to let the ADP3450 appear as a Windows Share on your network. If you have a desktop environment installed that auto-mounts USB drives to /media/digilent/ path, then adding this into smb.conf would allow you to automatically share any connected USB drives. The ADP3450 doesn’t make a “fast” NAS with its USB 2.0 connectivity to drives, but it’s certainly plenty fast for editing a few scripts and shuffling data files back and forth.
It should be noted that the pre-built kernel is a little old as 4.19.0 and in its “long-term support” phase until end-2024. As built, it doesn’t have support for UVC, thus webcams do not seem to work. I did not see any sources for the kernel available, thus it seems you are out of luck if you wanted to try supporting specific devices (e.g. other Wi-Fi adapters, DisplayLink docks for video output). A Raspberry Pi would be slightly more flexible in this regard, although I suspect the GPL rules means that Digilent must provide the sources if requested.
Conclusion
The inclusion of Linux Mode comes courtesy of intelligently using the Xilinx Zynq SoC which powers the ADP3450. By reconfiguring it such that the unit boots from a 4GiB eMMC with the 512MiB DDR3L RAM buffer as the system RAM, it converts the instrument from a host-driven instrument to one that can host itself and run independently from a host. This can be considered similar to attaching a USB MSO to a Raspberry Pi, however, unlike such a solution, Linux Mode doesn’t mean that the instrument is dedicated to the Linux instance – it can still be used as a host-driven instrument over Ethernet or Wi-Fi, offering maximum flexibility. Key advantages include the ability to perform experiments and operate independently of a host, benefiting from higher throughput rates and lower latency. The main downsides are the loss of record mode sample rate – from 100/125MSPS to about 1MSPS, likely due to the loss of buffer memory, and the fact the instrument is now a computer node on the network so good security practices are necessary to avoid compromise. Careful use of the Linux Mode is necessary to avoid unnecessary wear to the eMMC which is not designed to be replaced – logging data to USB mass storage devices is highly recommended.
The implementation increases the flexibility of the ADP3450 quite dramatically. It is actually possible to even run a desktop environment, with a virtual display and VNC remote access to host a copy of WaveForms on the device itself. While performance is relatively limited, it demonstrates the capability of the solution. Other uses include installing Python for running WaveForms SDK scripts for standalone data acquisition and signal generation, Jupyter Notebook for web-browser based development, samba for Windows file-sharing, pyvisa and pymodbus for interfacing with other instruments that speak SCPI or Modbus-TCP protocols. It can even serve as a USB-TMC to Ethernet bridge, making it extremely versatile.
Linux Mode is easily enabled by changing the boot options and both SSH and a USB-Serial terminal is available for administration. In case of problems or an upgrade, the Linux Mode eMMC can be re-imaged. Linux Mode is Debian-based and runs on a 4.19.0 kernel, which is somewhat dated at this point, with the kernel family in long-term support until December 2024. The kernel appears to be built without support for certain devices (e.g. UVC, FUSE) which limits hardware compatibility, while sources do not appear to be openly available for users to build their own kernels. Perhaps the biggest limitation is the 512MB of system memory which can be limiting when a graphical environment and several servers are installed, so having a swapfile as a workaround is recommended for stability if such services are used. One quirk observed relates to the power switch on the side, which appears to be a hardware power switch that does not gracefully shut-down the Linux operating system which is not ideal for system integrity in the long-run.
The network connectivity by Ethernet is quite impressive for a device of this class, offering Gigabit Ethernet with an iperf3 measured performance of above 500Mbit/s in both directions. Wi-Fi connectivity is more limited in the adapters that are supported, with one of the claimed supported adapters (TL-WN722N v1 based on the AR9002U chipset) not working. However, rummaging through my collection of Wi-Fi adapters, I found adapters based on the RTL8812BU, RTL8188CUS, RTL8188EUS, RTL8192EU, RT2870, RT5370 and RT5372 were functional although your mileage may vary.
---
This post is a part of the Digilent Analog Discovery Pro ADP3450 USB/Ethernet Mixed Signal Oscilloscope RoadTest Review.
