


If you’ve read my last blog, you would have seen my review of the first-half of the Grand Prize from the Experimenting with Thermistors Design Challenge. Of course, this leaves me with the second half to cover … and in true Gough fashion, I will be reviewing this too. Welcome to this full review of the Fluke 279 FC/iFlex Thermal Imaging Digital Multimeter set.
Thanks to element14 and Molex for choosing me as one of the challengers and especially for choosing me as the grand prize recipient. I feel extremely fortunate to be the winner, as the prizes were something I actually wished I had (but didn’t know it at the time). Thanks also goes to srutledge and danzima for their speedy divide-and-conquer approach to sourcing and shipping the prizes half-way across the world to me in Australia.
Table of Contents
I Can Haz Thermal Imaging?
It has been many years since I’ve wished I could have something with thermal imaging in my test arsenal. Thermal imaging isn’t exactly a “miracle” when it comes to providing accurate temperature readings, but it offers a whole new level of safety and convenience in being able to visualise temperature trends at a distance, without the need for contact. Such images are great for spotting hot components, bad connections, inefficient devices, or even heating/cooling losses around the house and leaking pipes (under some conditions).
The one thing that has precluded me from having thermal imaging in my suite is really cost. Thermal imagers are not cheap, especially if one wants high thermal resolution (NETD) or spatial resolution (HxV pixels). There are image blending methods (e.g. FLIR’s MSX) which try to cheat a little bit by combining edges from a visual camera with thermal data, but having purchased a FLIR TG267 for the university I work at, it has a number of significant drawbacks which make it undesirable for my intended use.
As a result, whenever the “What would you like to RoadTest?” or “What do you need for your bench this Christmas?” threads come up, I usually come begging for thermal imaging equipment. It’s only natural to lust for what you don’t have … and need! I even placed a few orders in the interim, but they were cancelled as they were on perpetual backorder, thanks to the shortage caused by the COVID-19 pandemic. As a result, this desire went unanswered for quite a while …
Just like the last half of the prize – it turns out this half is equally just as desirable. The Fluke 279 FC/iFlex is a handheld CAT III 1000V/CAT IV 600V digital multimeter targeted at field service applications, with a difference – it has an inbuilt 102 x 77 pixel (7,854 total pixels) thermal imager and is supported by Fluke Connect to allow images to be exported. While the thermal imaging resolution is towards the low-end especially compared to more modern devices, it’s not the worst, as some thermal imagers I was previously considering have resolutions of just 80 x 60 (4,800 total pixels). The 200mK NETD is perhaps not ideal, as some of FLIR’s consumer offerings claim 70mK NETD and others are claiming even as low as 40mK (although whether this is truly achievable is uncertain). The things I like best are the fact that this unit doesn’t have the funky image-fusion technology that creates messy images and the central spot temperature is taken from the same sensor, so no parallax error occurs unlike with the TG267 I previously used.
Fluke isn’t alone in this market – Teledyne/FLIR have their own thermal imaging DMM as well, the DM285 being the closest match. The DM285 offers 160 x 120 pixels and 150mK NETD with a 10-year warranty, besting the Fluke while also offering comparable accuracy. The DM285-FLEX-KIT seems to be a direct competition with a similar flexible current transformer and accessories – the Australian element14 site lists it at AU$1,650 at this time, while listing the Fluke 279 FC/iFlex at AU$1,919.50. Knowing this, perhaps you might be tempted to choose the FLIR DM285 instead, but the reason for the difference is in part because the DM285 was announced in January 2018, while the 279 FC/iFlex was announced in April 2016, making it almost two years earlier to market! It also means that this product is now a bit long-in-the-tooth, having celebrated its 6th year on the market, which seems like a bit of an eternity when it comes to technology. The Fluke brand also commands a loyalty and reputation that often leads to a price premium. Nevertheless, this is money that I wouldn’t find myself spending on a tool unless I knew it was exactly what I needed!
Unboxing

The Fluke 279 FC/iFlex comes in a substantially large retail-colour cardboard box which seems to suggest it was to be hung on pegs for display. Given the price and weight, I suspect this was rarely ever the case, but it is a “New True-rms Thermal Multimeter”. Or was new, when it was first introduced. The concept is a great one – thermal imaging can help spot bad connections, overloaded circuits and failing components in a quick and safe way. This unit probably tries to capitalise on those working on power supply distribution, HVAC, elevators or related industries who may need such a DMM and could benefit from the addition of thermal imaging. It is noted that this bundle does not have the extra battery.

The rear of the box lists a few of its key features and specifications, including the thermal imager with 100 image storage and on-board review capabilities, the iFlex current probe, rechargeable lithium-ion battery with 10-hour lifetime and 15 measurement functions. It boasts a 0.09% basic accuracy which is quite decent.

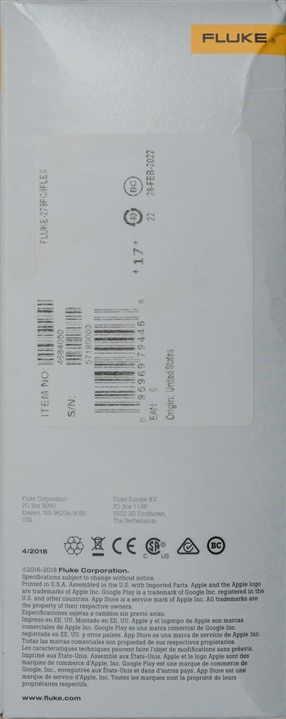
One side of the box advertises the Fluke Connect system and accessories. The other contains the specific information about this unit. The box is dated April 2018, while the label indicates this unit is dated 28th February 2022 which is very recent considering the age of the product. Rather surprisingly, this product is Made in the USA.
The name, Fluke, often gives me a chuckle as it’s often informally taken to mean “by chance” or “through sheer luck”. I certainly hope that the world is not running because of that …
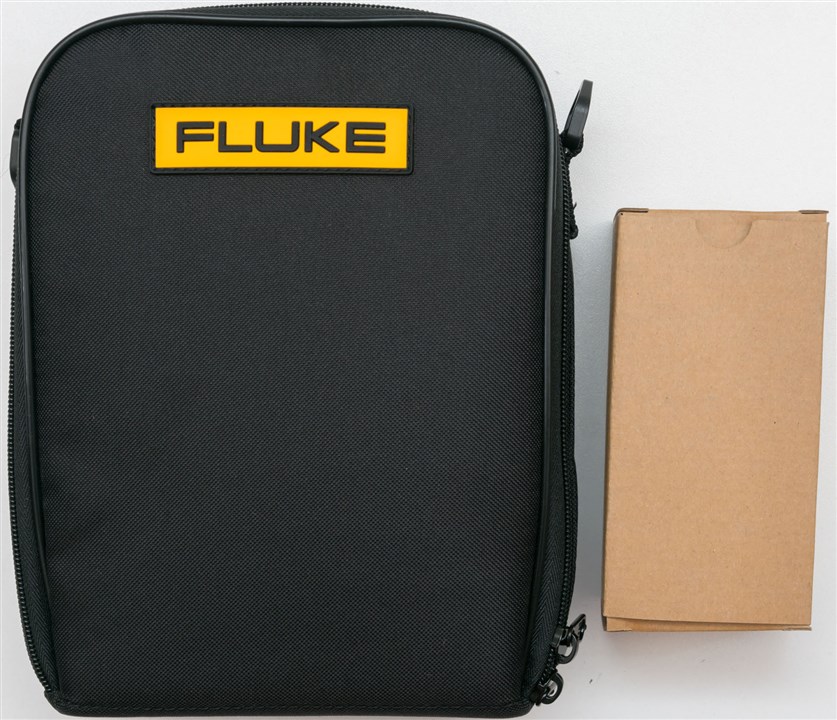
Inside the box, we have the Fluke C115 Soft Carrying Case with a lot of stuff inside, and a smaller cardboard box with more stuff inside.
The Charger
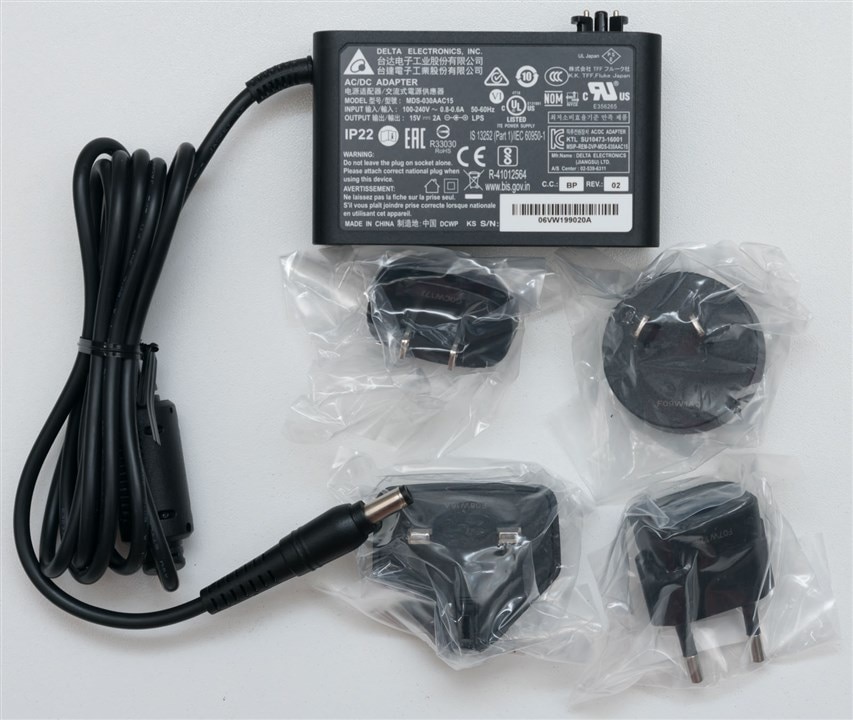
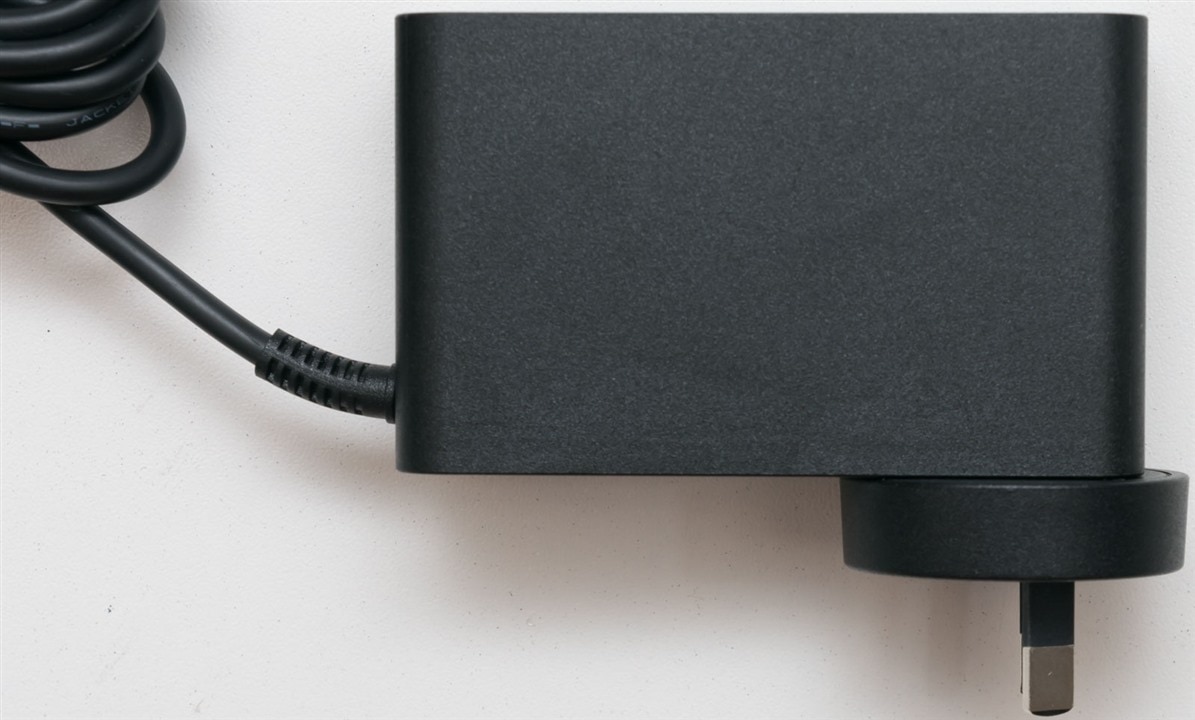
Inside the cardboard box is a 15V 2A (30W) power supply from Delta with adapters for worldwide usage. I definitely appreciate this, as being in Australia, this means I don’t have to use dubious plug adapters.
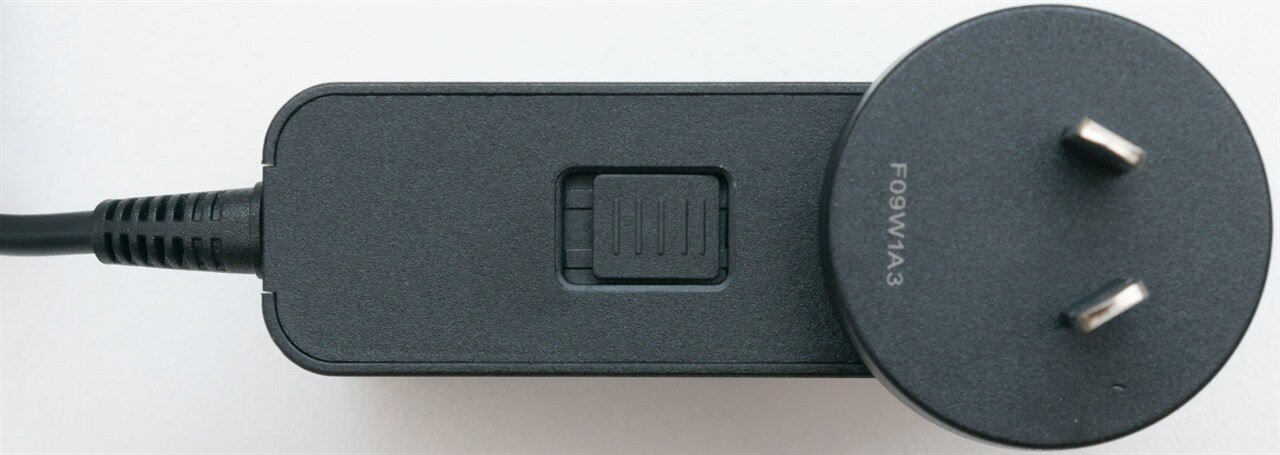
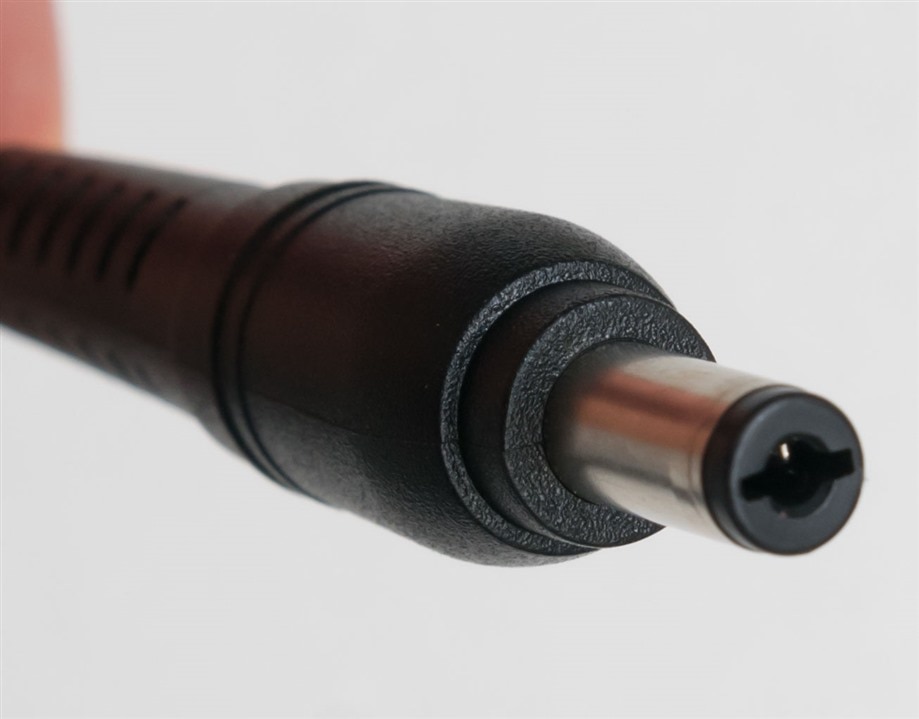
The supply is a bit on the chunky side, seemingly suitable for a netbook perhaps and is terminated in a 2.1mm inner-diameter barrel plug. Nothing too out-of-the-ordinary.
Inside the Case
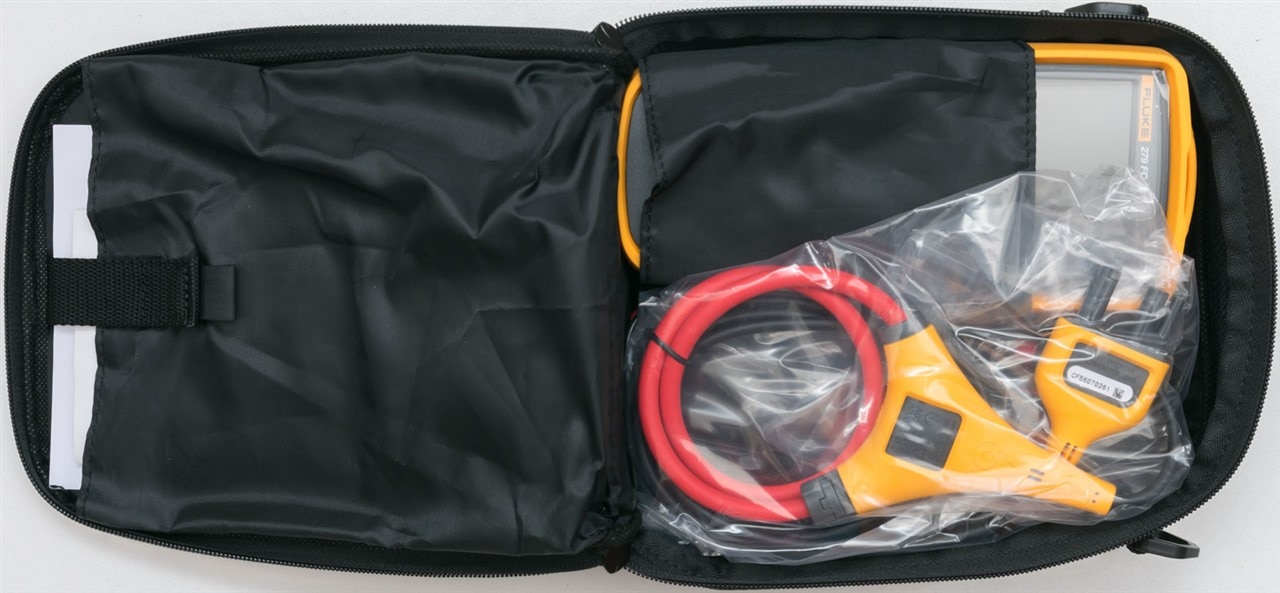
The inside of the carrying case is packed full of goodies, protected with plastic film or plastic bags.
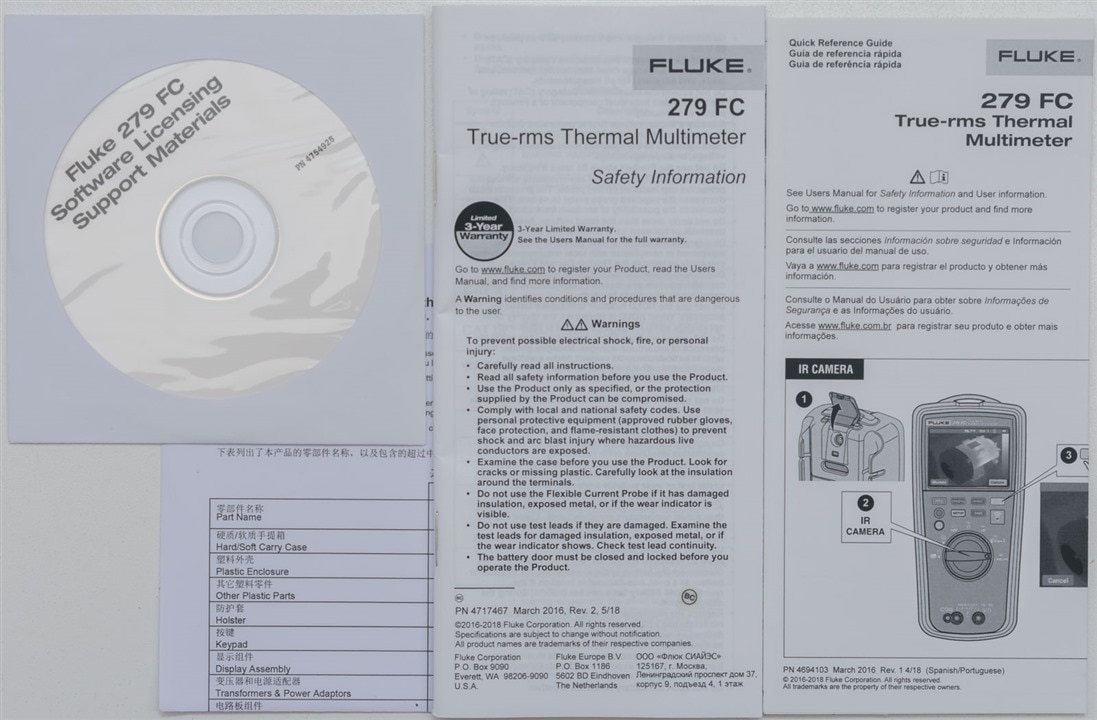
There is a copious amount of paperwork and a CD-R containing “software licensing support materials”, which include open-source licenses as well as the sources for the packages they used. I don’t think it’s the full bundle required to roll-your-own firmware, but even if it were, I probably am not skilled enough to set up an appropriate build environment.

Aside from this, there is the iFlex current probe, the shoulder strap for the carry bag, a hanging clip and strap, a pair of TL175 TwistGuard test leads and AC175 alligator clips, and the DMM itself.
The case overall has relatively thin padding, with only nylon fabric pockets for the DMM and side compartment I feel that this is not quite up-to-scratch, especially as the dividers aren’t exactly a good fit for the included accessories.
The DMM Itself
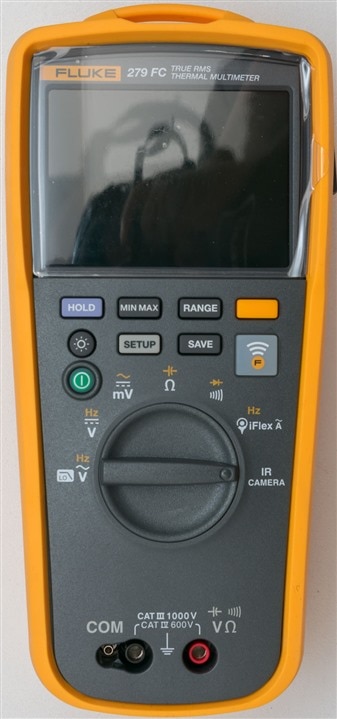
The DMM itself is pretty big, chunky and yellow. Sounds like Fluke in a nutshell. Unlike many conventional DMMs, there are a few differences – for example, there is no current shunt jack at all as there is no current measurement aside from the iFlex current probe. There are also fewer functions than most – for example, the AC volts position is low-pass filtered only (no choices) which is perhaps good for those working on variable frequency drives (to ensure they get the right values). The power is turned on and off with a button, rather than a dial position, but this seems to be a “Fluke thing”. There is also a big translucent Fluke Connect button as well, just underneath the rather noticeable colour LCD screen.
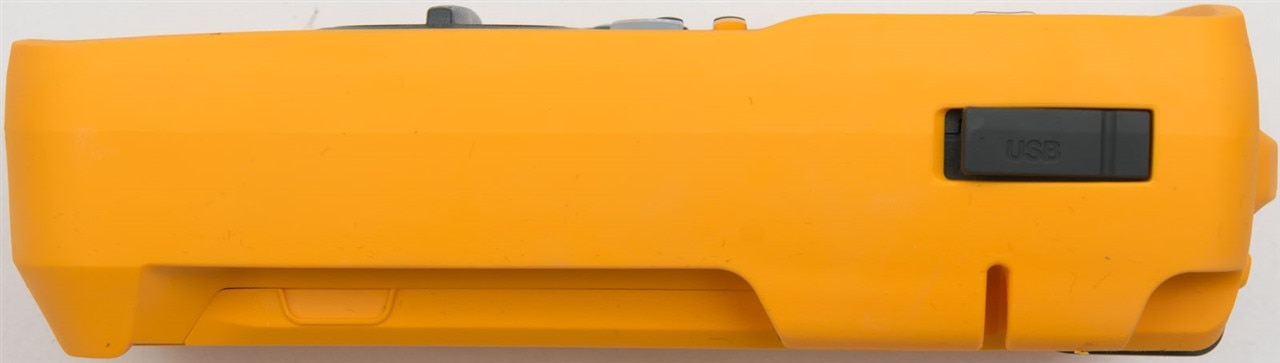
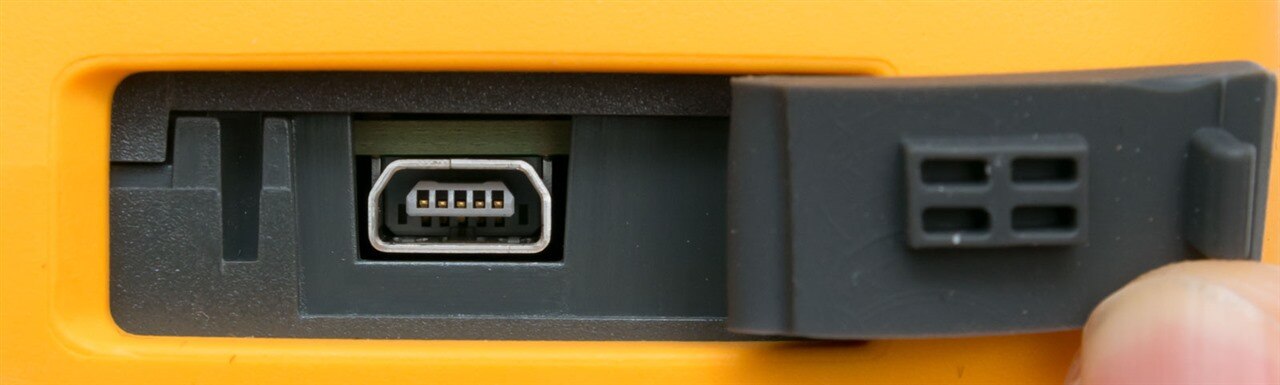
The side of the unit has a USB socket for connection to a computer, protected behind a rubber flap.

The kickstand is integrated into the body on the rear and the thermal imager resides behind a protective grey plastic flap.
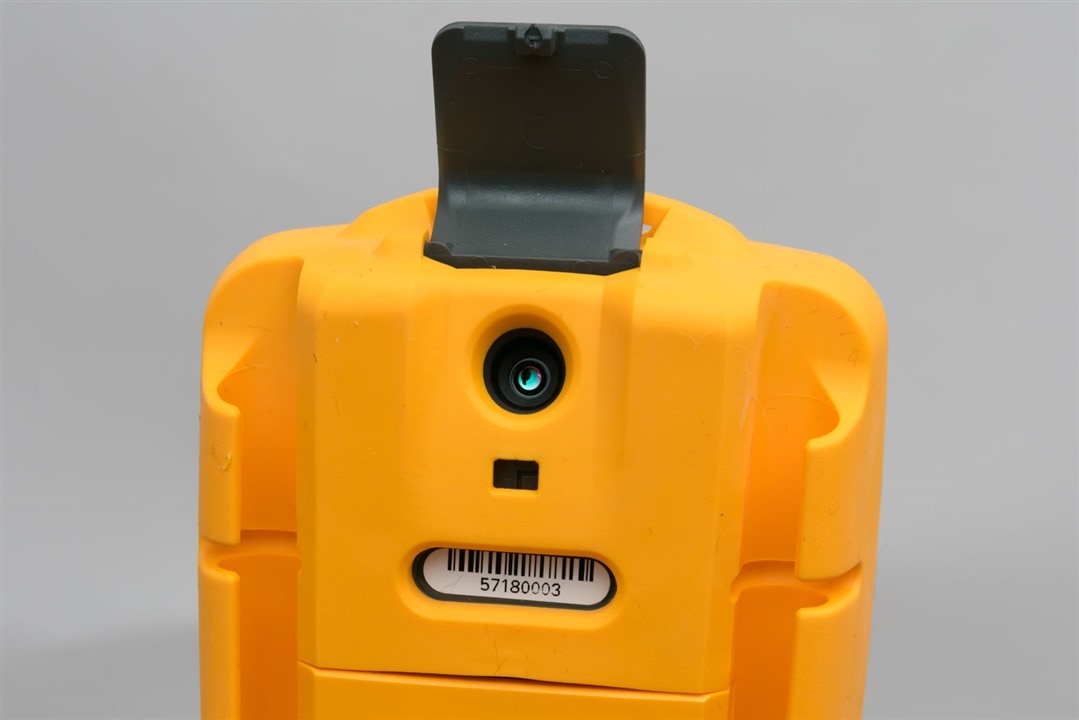
The imager itself is angled upwards slightly, to make for a more ergonomic experience when holding the meter and scanning a switchboard, for example. There is only a single lens, as there is no image fusion, auxiliary spot thermometer or laser pointer guidance.
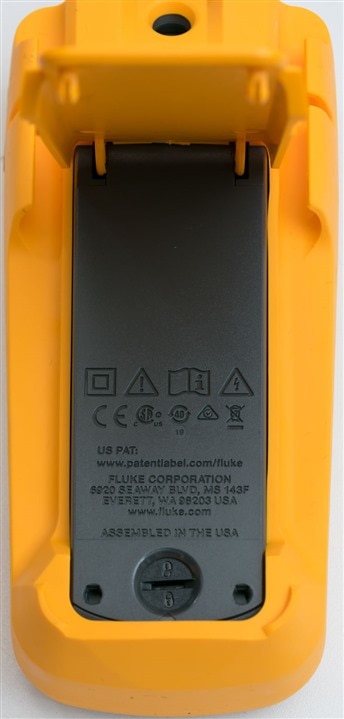
Battery access is underneath the kick-stand.
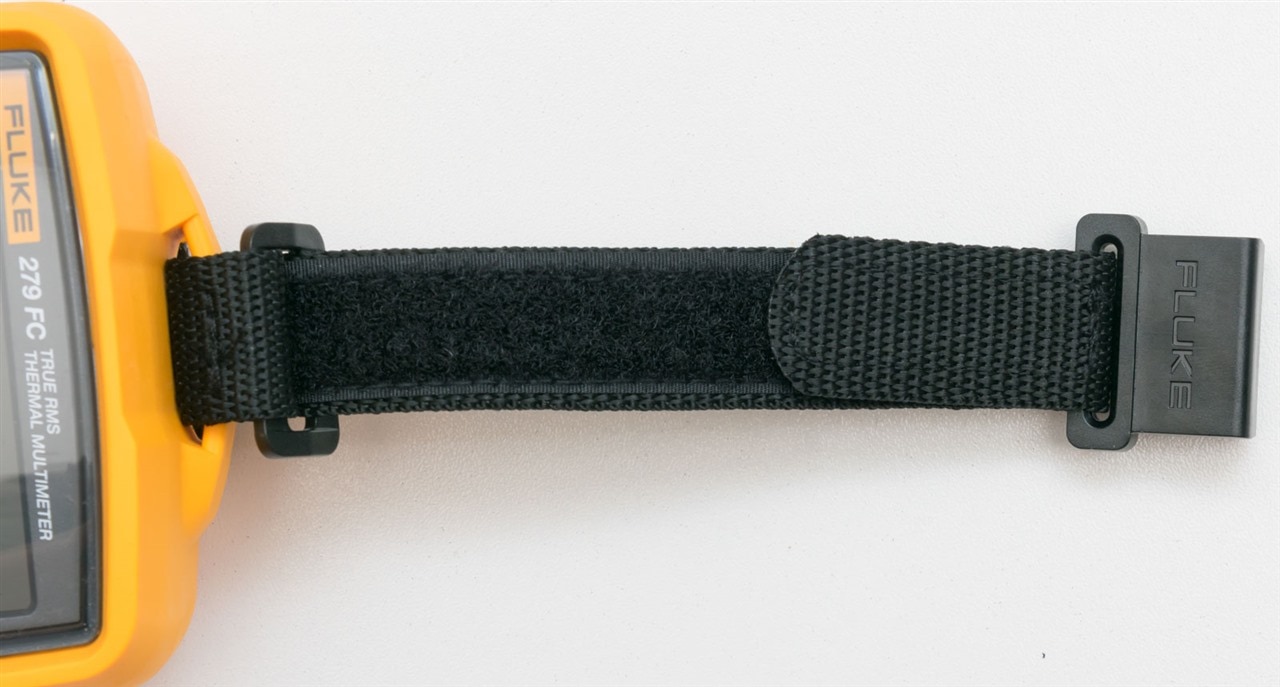
There is a supplied strap and hook which can be attached to the eyelet at the top of the meter, allowing the meter to hang off a door or panel. It is a shame that this is only the plastic hook and not the strong magnet type which Fluke also sells as that might be even more useful.
The Battery
Once the latch underneath the kick-stand is unlocked with a flat-bladed screwdriver or coin, the whole assembly comes out to reveal the battery underneath. There is no need to remove the protective yellow rubber holster – although I did so to see if there were any surprises to be uncovered.
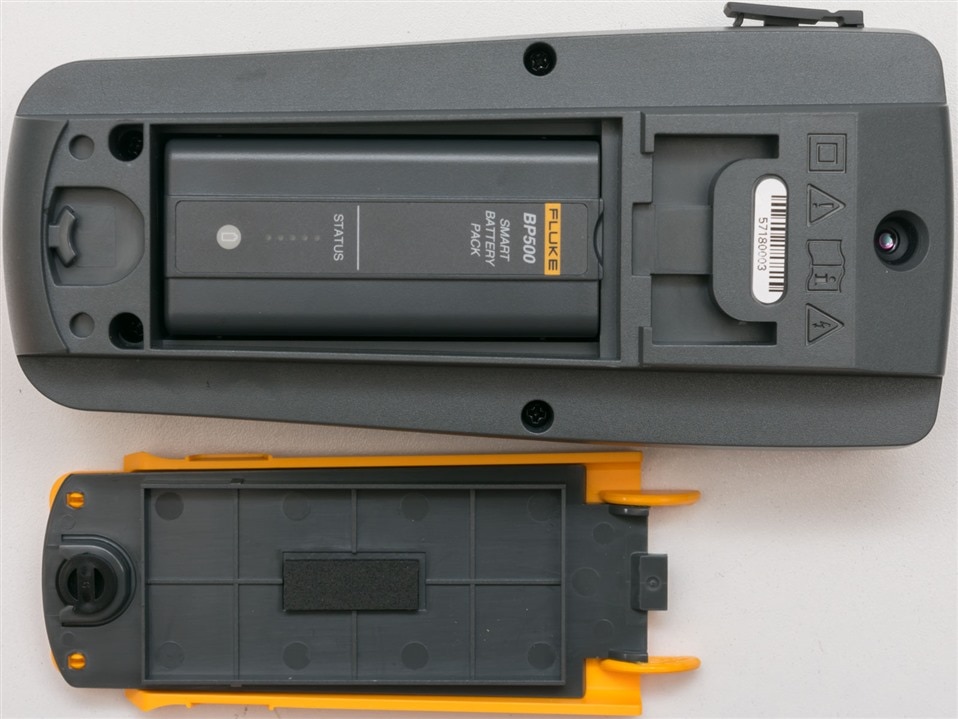
The battery is a Fluke BP500 Smart Battery Pack which has an LED battery status indicator which can be activated by pressing the button. This reminds me of older laptop battery packs that had a similar feature.
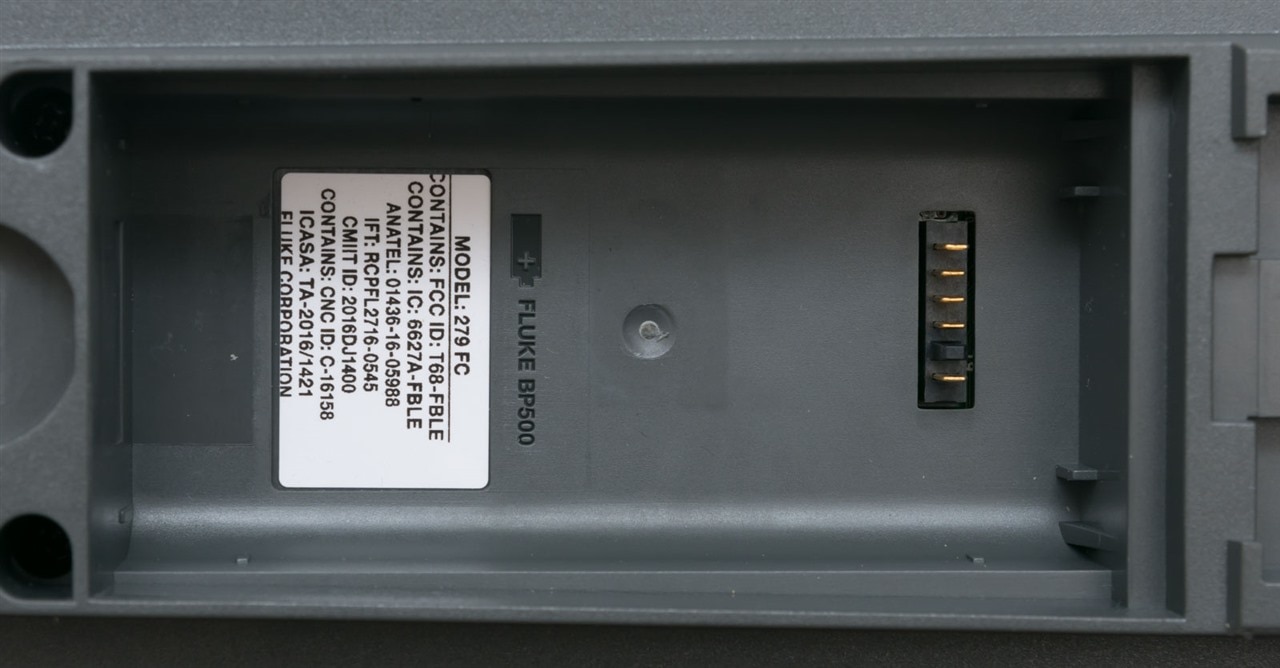
The battery lifts out of the bay, where vertical blade contacts are visible. There is also the approval numbers for the wireless communication module within the unit.
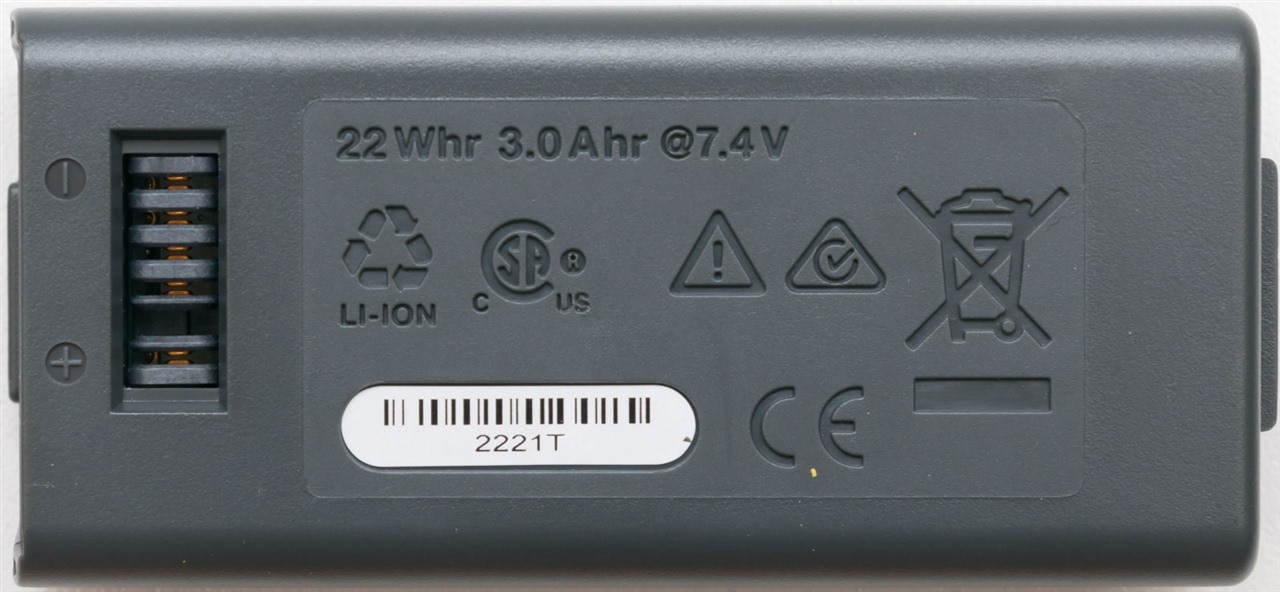
The battery is rated 22Wh with a 3Ah capacity at 7.4V. The chemistry is Li-Ion. Given the number of contacts, this is indeed a smart battery with internal fuel gauge communicating with the DMM for more accurate battery life estimations. It’s nice to see the approvals moulded into the casing include the Australian Regulatory Compliance Mark (RCM).
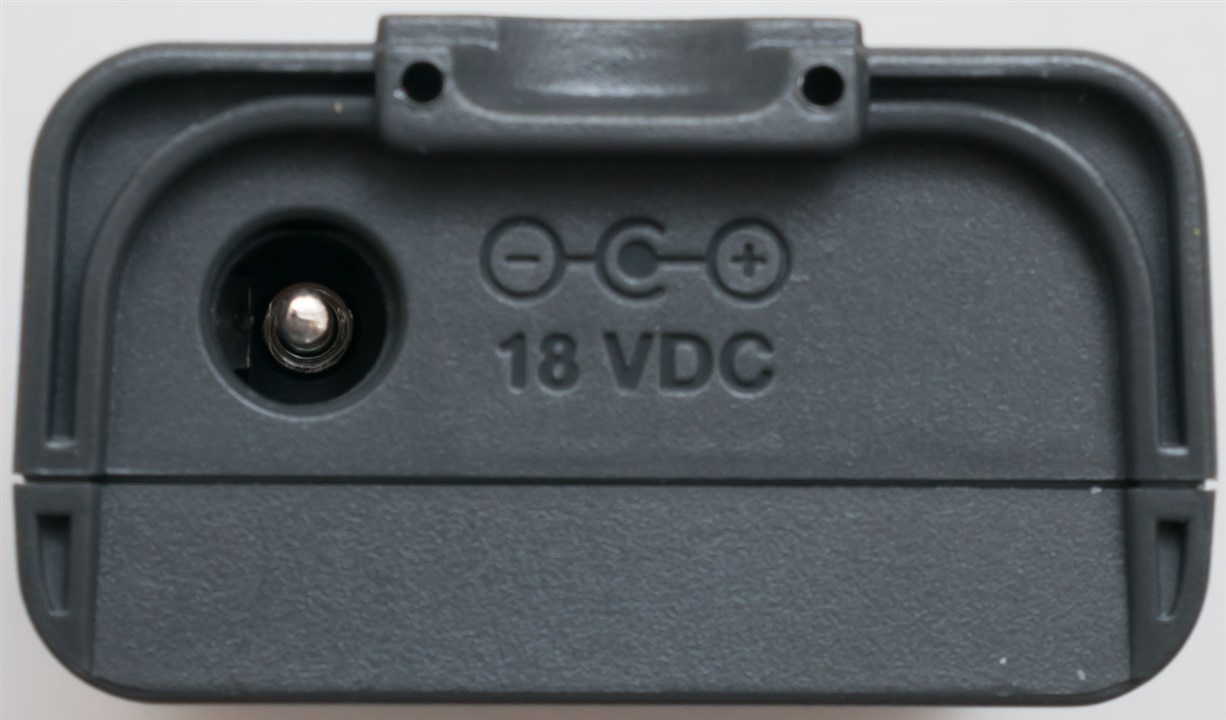
Not only that, the battery itself has a barrel socket at the top for charging the battery directly. On the upside, this means not needing a dedicated charging dock or station as some other tools need and they can be easily charged aside from the unit. The downside is the mild inconvenience it is to open up the back to extract the battery every time it needs to be charged.
A key inconsistency is the fact that the battery claims to want 18V DC but the power supply provided is a 15V DC power supply. I suspect this may just be a supply issue, but being a 7.4V battery (two-series 18650 cells at a guess), it seems that possibly even 8.4V to 9V would be enough ordinarily, however, with the buck converter inside, perhaps it would be happier with around 12V.
The TL175 TwistGuard Test Leads and AC175 Alligator Clips
The unit was supplied with the TL175 probes which were a nice treat to hold –

I really liked the flexibility of the leads and the rubber texture was nice for grip without being sticky (at least, initially). I wonder how well they will age, given some people have complained of the leads internally breaking, but they definitely flex better than any test lead I already have in the house.

Their main claim-to-fame is the TwistGuard which allows for just a twist to retract the shield around the test probe. This makes it easy to swap between the less-guarded, more convenient exposed probe situation for working at CAT I/II situations, and the protected probes for CAT III/IV. The downside is that it is possible for a user to deliberately circumvent the protection, which maybe why the Keysight U1461A Insulation Resistance Testing DMM kit contained two sets of probes instead.
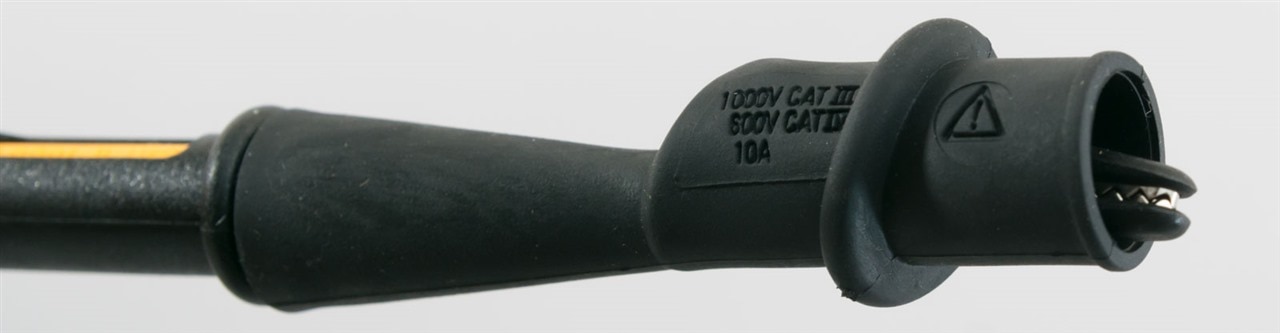
The alligator clips are also much nicer than any other I have – these screw onto the tips of the probe so they cannot fall off, and have their jaws insulated from the outside too. I guess that’s just as well as they claim to be CAT III 1000V and CAT IV 600V 10A rated.
The iFlex Current Probe
The final item of note is the iFlex current probe which is a flexible current transformer.
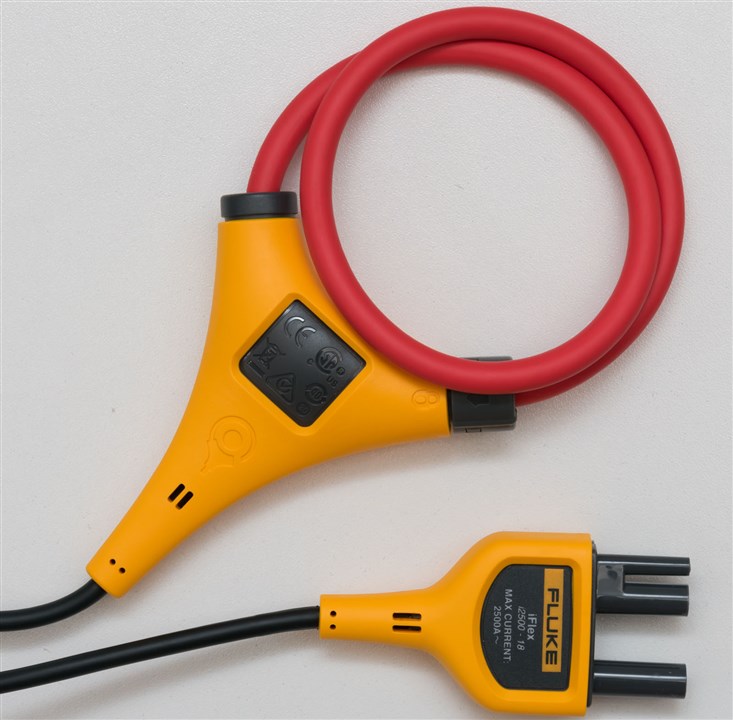
The unit plugs right into the front and offers a loop that can be wrapped around wires coming in/out of a board to measure currents up to 2500A.
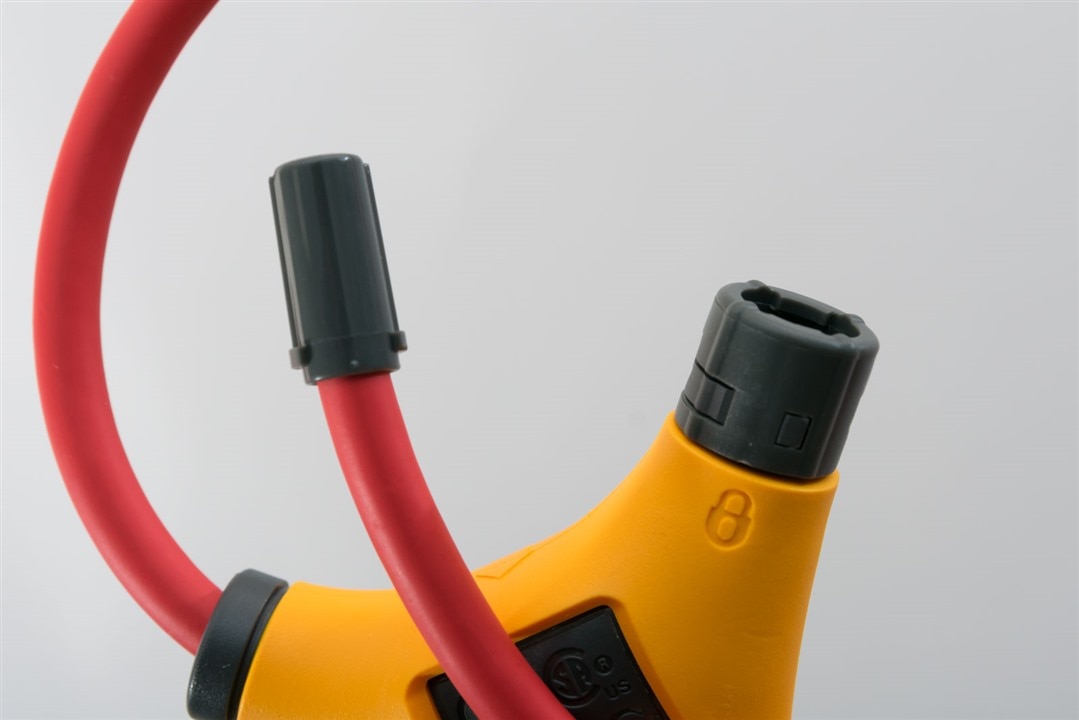
The loop itself can be opened up with a simple twist of the locking collar. The whole thing is well insulated, to ensure safety when working with high voltages.
User Experience Opinions
In this section, I share some of my opinions from my few weeks using the DMM and in trying to test some of its more unique capabilities. I also use it as a basis to decide whether DMMs should have colour LCDs or not, a subject of recent debate on the forums.
Standalone DMM Usage and Accessories
This DMM is unlike any other I’ve used, in more ways than one. For one, you have to wait for it to boot up.
These screens show regardless of the selected function. If you’re looking for thermal imaging, then you’re going to have to wait another second or two as the module wakes up and takes its shutter dark frame subtraction.
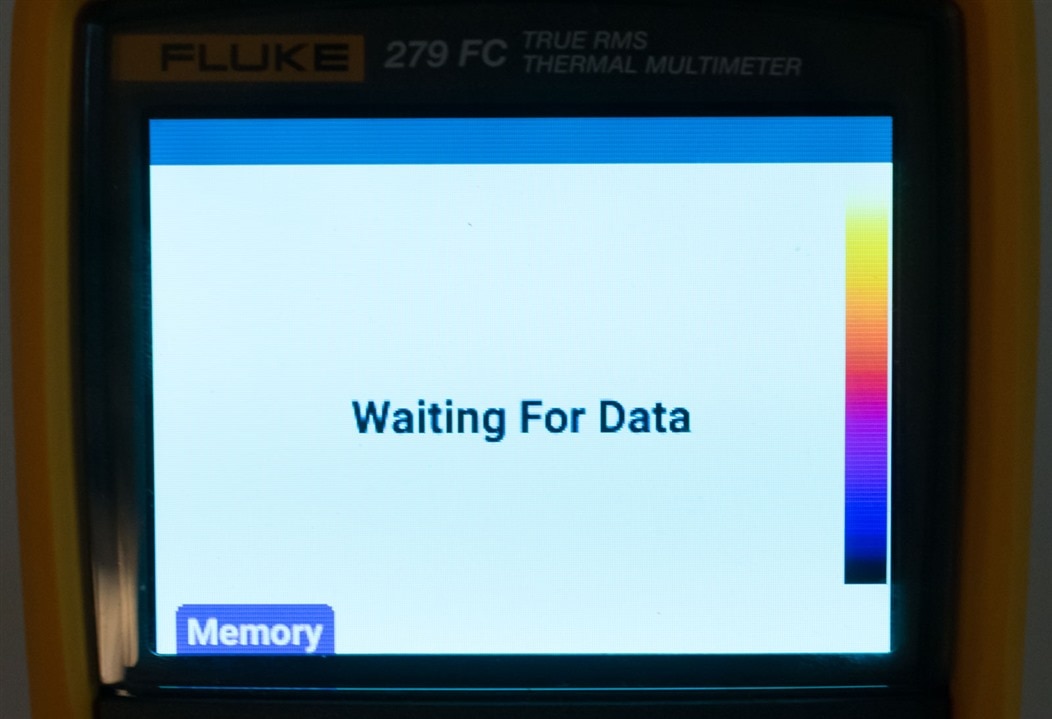
I guess this is the downside to complexity – it’s running a whole OS of sorts in there.
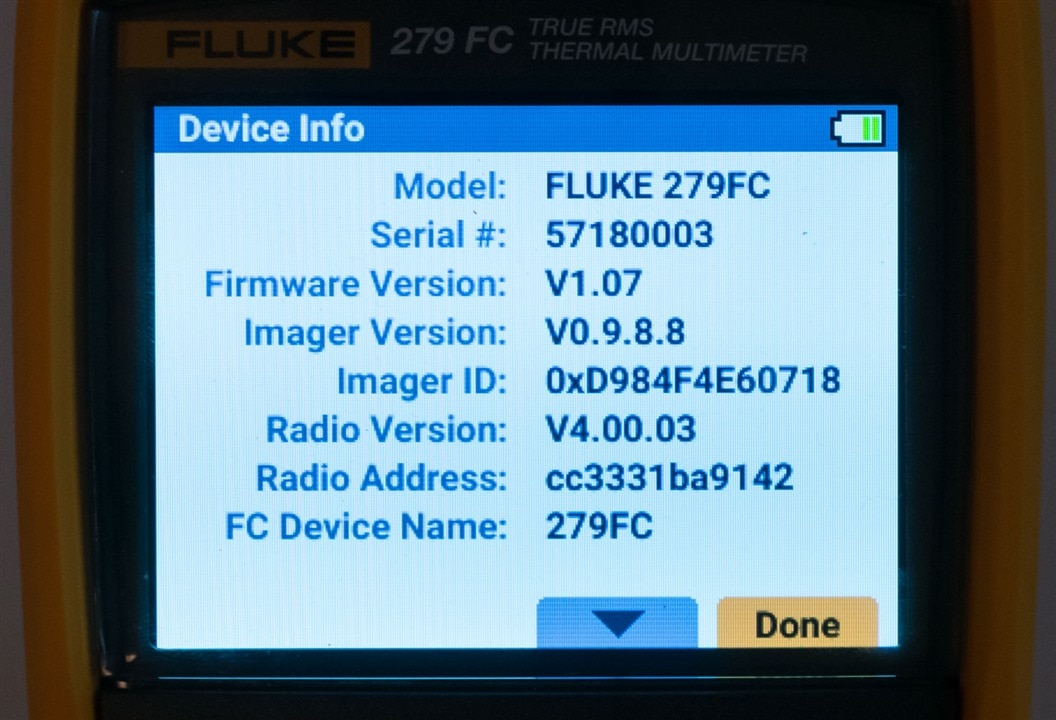
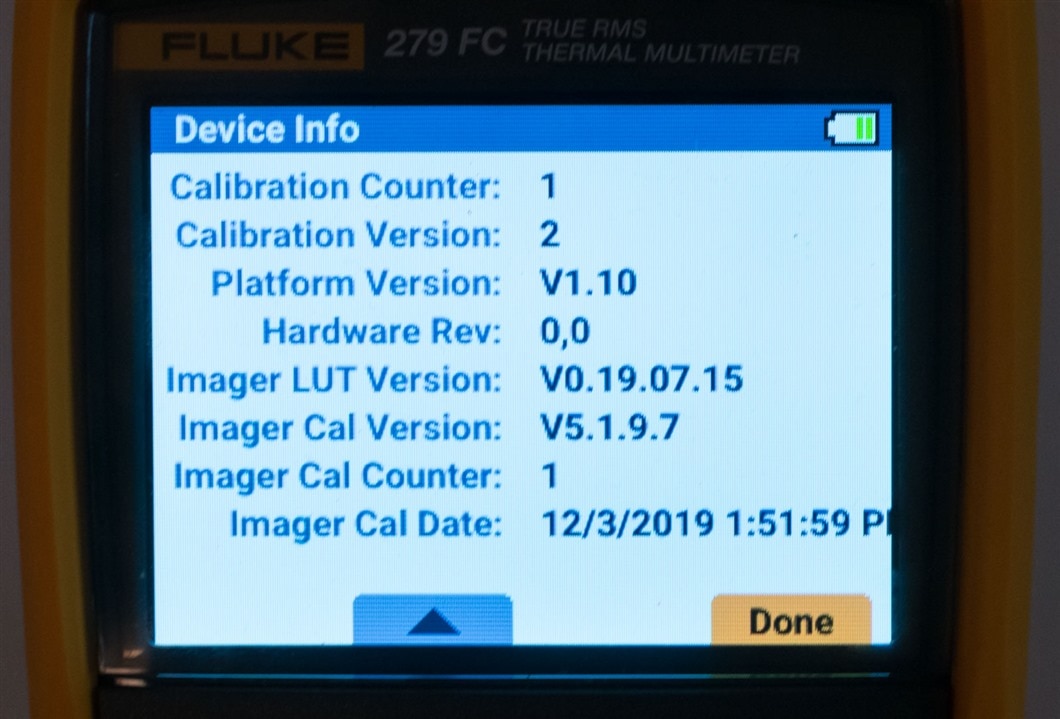
The unit had Firmware 1.07 installed, which appears to be later than any download available online. The thermal imager seems to have been calibrated on 3rd December 2019 (assuming American date) which seems to be quite a while back compared to the manufacturing date.
A quirk of the unit that I dislike is its propensity to turn on automatically when the battery is inserted after charging. The fact the power on button is a button and not a selection on the rotary dial also means there is a potential for the meter to be accidentally powered-up in transit which could mean a dead meter by the time you realise it. At least you can recharge the battery, I suppose.
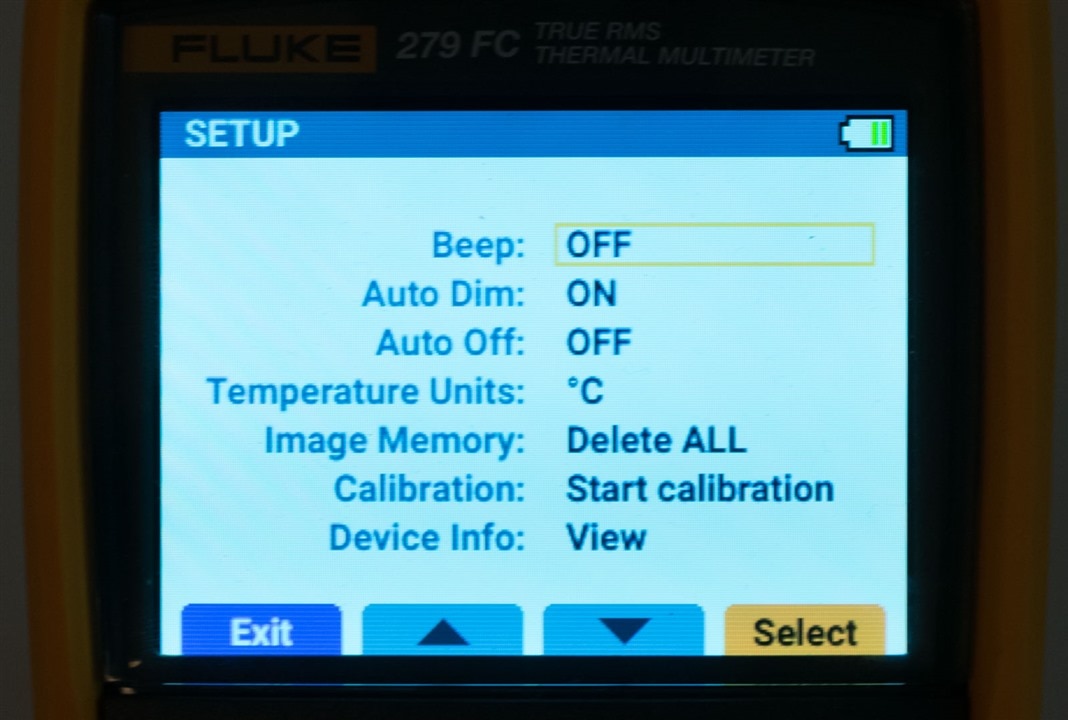
It is a “beepy” meter by default, but one can change the settings to turn that off. I also turned off the automatic power off which could help with the above situation as it can get annoying when in thermal imaging. The auto-dim function was left on – it basically allows you to select high LCD brightness (out of normal or high) and then it will automatically step back to normal after a while.
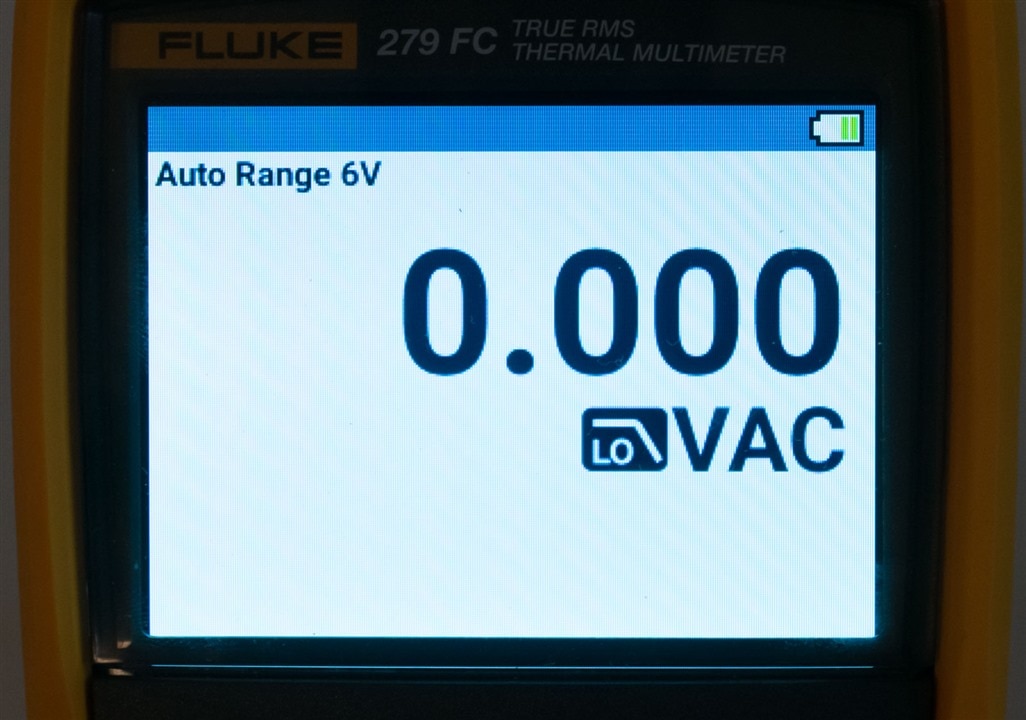
The DMM functions all display moderately large black text on a white background for maximum contrast. Unfortunately, aside from this and iconography that indicates high voltage, there is nothing in the way of graphics or colour which take advantage of the LCD’s capabilities. Some people will be really unhappy with the lack of a bar graph display, for example.
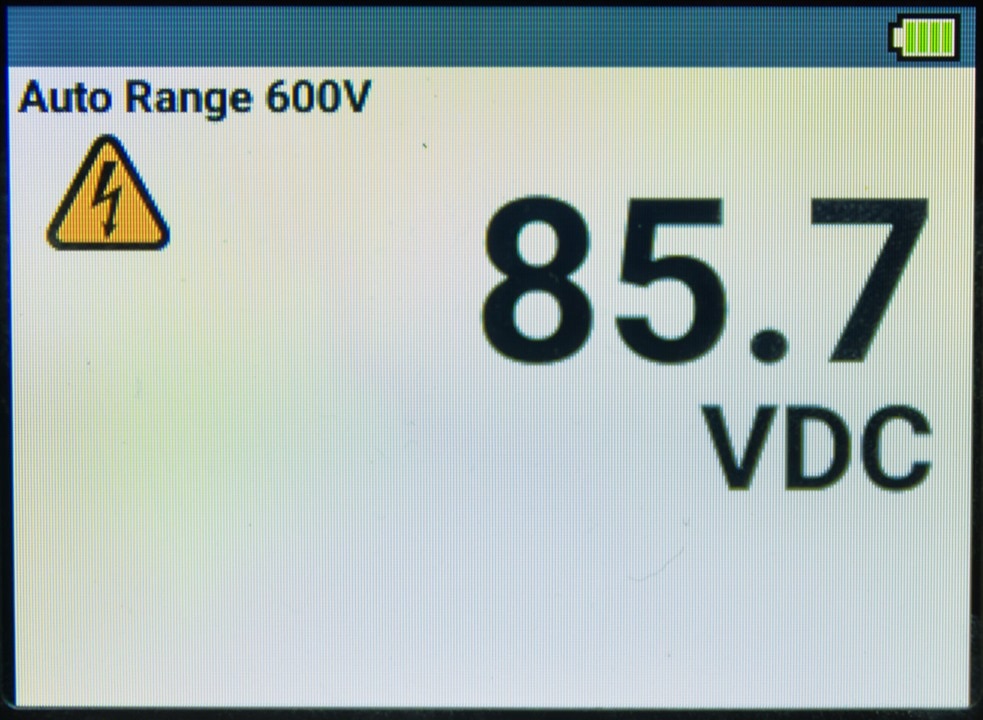
One thing that seems good is that the auto-ranging speed is quite quick. Testing on DC, it was hopping around four ranges per second, matching the sustained reading update rate of 4Hz.

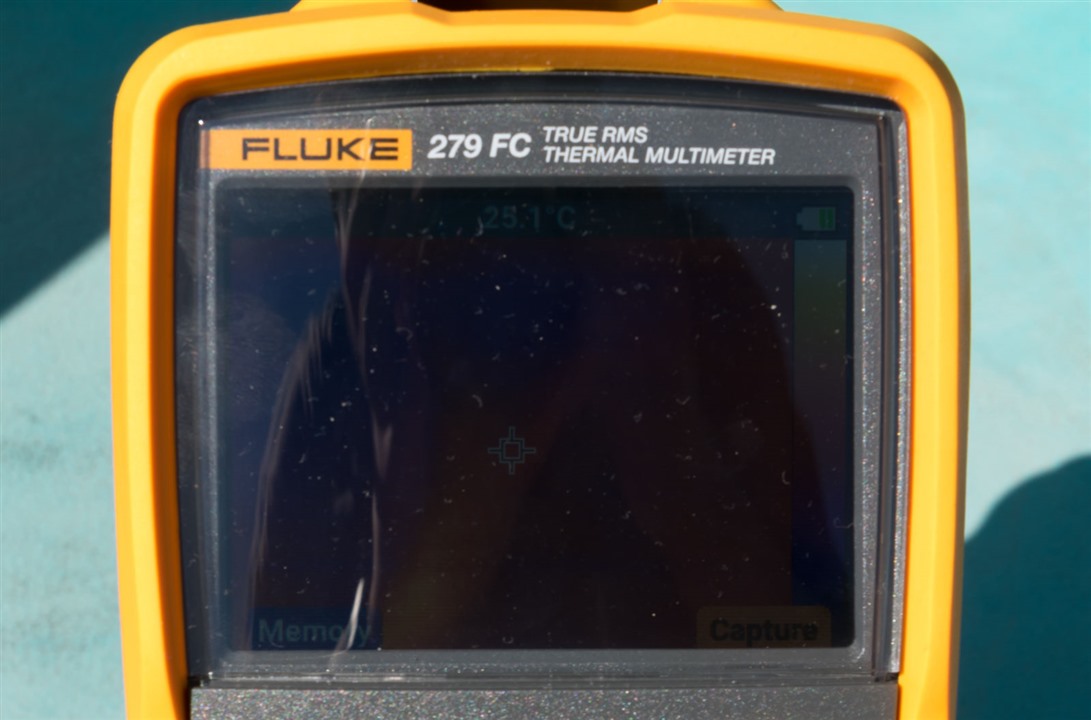
Testing the display in full sun, the DMM mode text is readable although with diminished contrast, while thermal images were very difficult to see.
I did really like the included probe leads, as they are insanely flexible and have a good feel to them. The TwistGuard mechanism means no more missing caps and the alligator clips attach securely as well. The iFlex is a bit more of a niche probe that will only be useful to those working on switchboards (not so much myself) and is limited to AC current only. The fact the meter doesn’t have a shunt-based current measurement capability is perhaps a blessing in disguise as it avoids accidents from mis-connected probes. However, the functionality of this meter seems very much restricted towards what those in industrial power and HVAC industries might need.
The design of the protective rubber jacket of the meter may need a little improvement, as when attempting to open the rear cover to charge the battery, the sides of the rubber holster stop the cover from coming open without bending it out of the way. Perhaps this is by design, but it makes this task more difficult than absolutely necessary.
The fact the battery has to be removed to be recharged is a downside from a convenience standpoint and the bulky charger doesn’t help for portability. It really could be slimmed down in my opinion, however, not providing in-device charging is probably necessary to maintain the safety rating as the battery terminals may not be isolated from the measurement terminals.
On the whole, the smart battery did not fail me, with the battery warning of depletion well in advance of actual shutdown and run-times surpassing the claimed amount. The gauge is relatively accurate in spite of it not being very granular, registering all red when it is nearly ready to shut down.

The thermal imager is perhaps not as “clean” as one might like, with some noticeable fixed pattern banding when pointed at the cover. The emissivity value is non-adjustable, thus the spot temperature readout is not likely to be accurate for many materials. Likewise, there is no way to relocate this spot temperature readout, suggesting only the central pixels were radiometrically calibrated. While convenient, the memory onboard has capacity for only 100 thermal images and downloading them is not as easy as copying and pasting as some other devices may be capable of. No metadata is stored for the images (e.g. time, date) and downloaded files have random filenames which makes organisation a bit messy.

Another limitation is that the display on the DMM is limited to just one colour palette. In spite of this and the limited resolution of the sensor, many useful images can be had.
I have noted the carry bag feels a bit sub-par and the included hanging strap and clip is perhaps not the most useful. However, one thing that really broke my heart was the fact that the plastic window in front of the LCD is so soft that I managed to scratch it right after taking the protective film off – and that is treating it very carefully. I still can’t work out how it happened! Another thing is that the meter itself seems to not be as solid as one may expect – shaking the meter results in a small thumping rattle like shaking a lens with optical image stabilisation that has a “floating” element. This makes me feel as if the meter is probably a little fragile in some way.
Fluke Connect (Mobile, Bluetooth-Connected)
![]()
There is a Fluke Connect app for mobile that allows you to work with the 279 FC/iFlex over a Bluetooth connection. This app is available free on your app store of choice – I tested the Android app downloaded from Google Play.
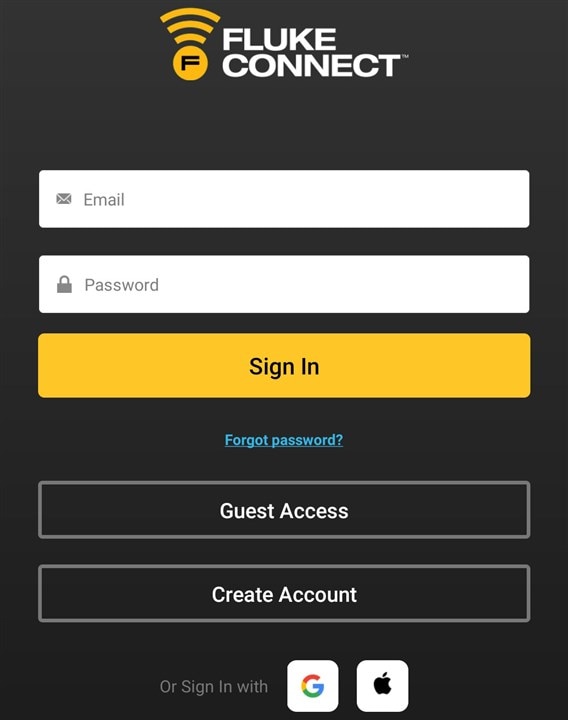
Opening the app, you are given a quick three-screen introduction to the app and permissions are requested for the purposes of storing files and connecting to devices. Then you are implored to login or create an account, or use Guest Access. I initially tried the app using the latter, but it seems they’ve forcibly made it such that you need to go with an account to get some important basic features.
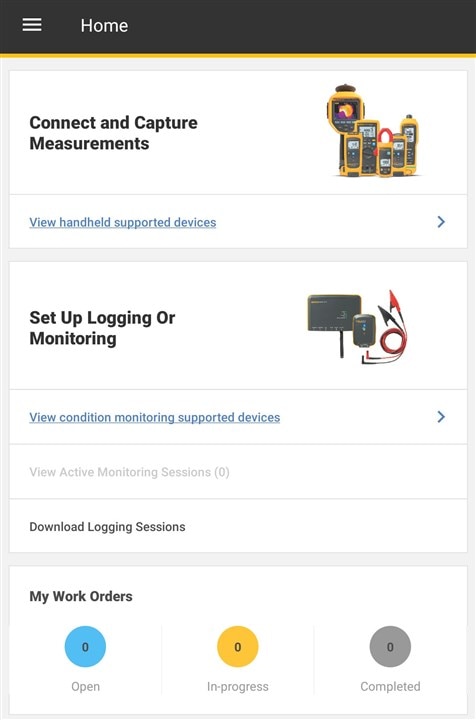
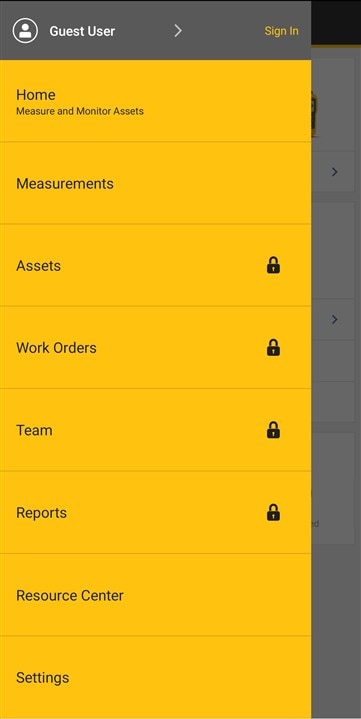
The home screen is a bit like an ad for their products and it takes navigating to the side bar to see the other pages. The locked pages are not available to guest users.
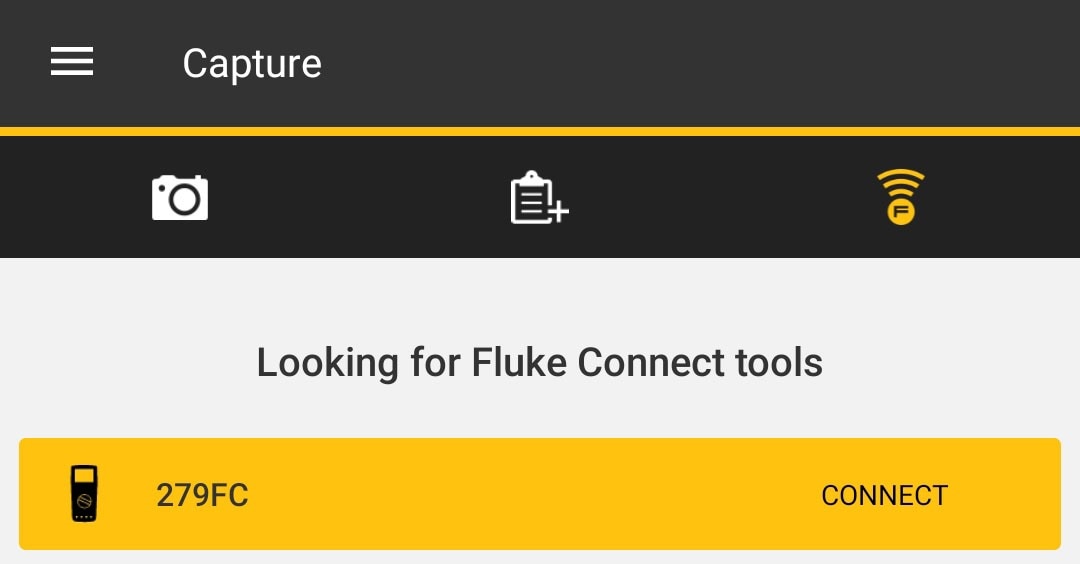
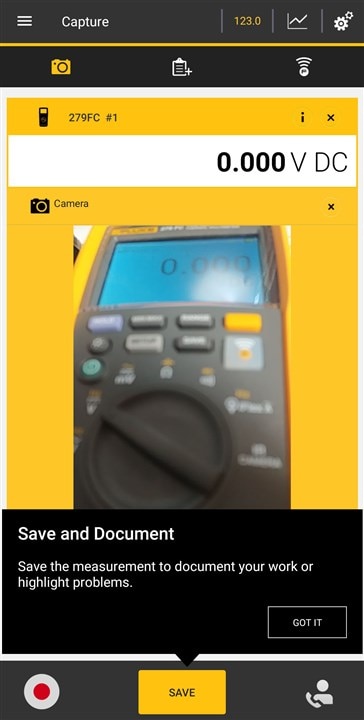
The Measurements page is where the important things happen, allowing you to connect to devices and capture readings along with photos. The interface is very-much job oriented, helping you compile a report for a given job. This is not so ideal for other users, but the account allows such information to be automatically synchronised to their cloud storage.
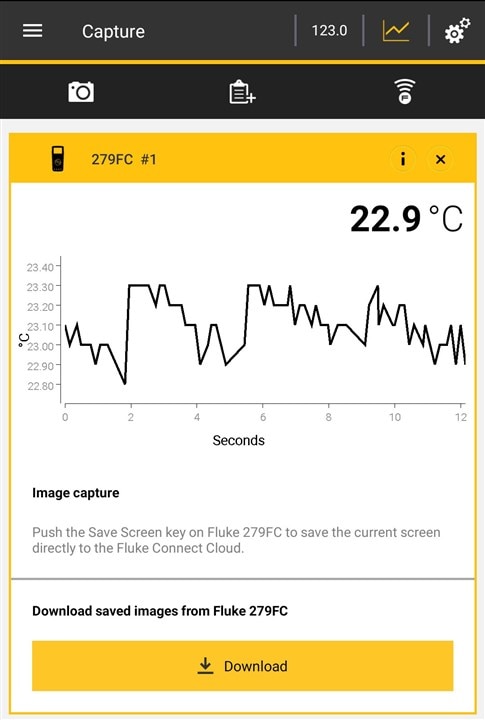

When in the thermal image mode, one can either have the temperature of the central spot being measured and graphed or they can choose to download images from the camera’s memory. No live view is available, unfortunately.


Thermal images can be recoloured in the app and the resulting images can be shared from the app, with a choice of formats. However …


… if you’re in Guest Access, then you’ll find your downloaded files can only be viewed, not shared. If you then choose to sign-up for an account, you are told that the data will be merged but it didn’t seem to work properly in my case, causing data to be lost. What did work was their example jobs being pulled down, creating clutter in my Fluke Connect app.


Above are examples of the .JPG and .PDF export types. Overall, while the app does work, I find it a little clunky and the push to sign-up for a Fluke Connect account just seems unnecessary if it were not for an artificial restriction on sharing files from the app without an account.
Fluke SmartView (PC, USB-Connected)
Getting the meter to work on the PC is a bit of a mess. It seems that the software and support are being fast left behind, so the experience is a bit troublesome, and so is the fact that no USB A to mini-B cable is included as those are starting to get rare.
If you follow the link given in the manual (http://www.fluke.com/downloads/smartview), it leads you to download a file named 9034190_ENG_A_X.EXE which is an older copy of Fluke SmartView.

Seemingly not upgraded since Windows 8, this software will still install on Windows 10. But what you will get may not be what you expect as it had no indication of detecting an attached thermal camera.

The 279 starts up automatically when a USB cable is attached and is detected by the PC as a USB-Serial adapter with VID 0F7E and PID 900E. I tried opening the serial port and talking to it – it doesn’t speak SCPI or anything standard that I can tell.

I ended up force-installing the supplied driver in the program folder, which is an older driver, to see if I can progress further.

This led me to a point where now the camera was detected, of an unknown model and none of the features worked.
To fix this, I had to download SmartView Classic (V4.4) from Fluke’s newer webpage (https://www.fluke.com/en-au/support/software-downloads/software-for-fluke-infrared-cameras).

With the software updated, I now had some luck …

… the camera is detected and I can initiate a download which asks me where to put the files to …

… then opens up a HTML file reporting the download result. Note the cryptic random filenames which are not ideal.

It is possible to open files and process them within SmartView as well, although I found .BMP exports seem to produce black-only files. The software is not without its own quirks too – I tried Download & Delete All which led to the software downloading the first file, misidentifying how many files are in memory (suggesting there are 30,000+), erroring out and then deleting all my 90-or-so images at the time.
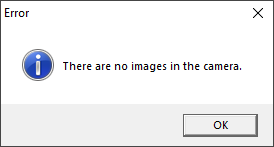
The deletion worked. The DMM says there are no images, and the software agrees after a reconnect. That’s a bummer.

So, I thought, given the Fluke Connect branding and the fact that SmartView seems to be deprecated, I would try the latest software.

Signing into the account I was practically forced to make as part of using the mobile app …

… I am greeted to the software not detecting the 279 FC/iFlex at all, regardless of driver. This is a very poor outcome – it seems the SmartView Classic V4.4 will have to be the software of choice until someone reverse-engineers the communication protocol. It’s just not the experience I expect from a leading name in the in-field test and measurement industry.
What’s in an .IS2 File?
Having thermal imaging data rendered as a compressed image (e.g. .jpg) is not always ideal, as compression can add additional artifacts to the data. Uncompressed formats are preferred, however, my attempt to export .bmp failed miserably (seemingly due to a bug in the software). As a result, we are left with the original native .IS2 format files as the best format.
This led me to wonder – what is an .IS2 file and can we open it in a third-party application? Examining the file in a hex editor gave me a good hint – the PK header tells me it’s a ZIP file. Unzipping the file gives me the following directory structure:
|   CameraInfo.json
|
\---Images
    \---Main
            IR.data
            IR.raw
            IRImageInfo.json
This shows a bunch of interesting files – the CameraInfo.json file contains all the information about the sensor:
{"cameraFamily":"Muse","devinfo":[{"Model":"FLUKE 279FC"},{"Serial #":"57180003"},{"Firmware Version":"V1.07"},{"Imager Version":"V0.9.8.8"},{"Imager ID":"0xD984F4E60718"},{"Radio Version":"V4.00.03"},{"Radio Address":"cc3331ba9142"},{"FC Device Name":"279FC"},{"Calibration Counter":"1"},{"Calibration Version":"2"},{"Platform Version":"V1.10"},{"Hardware Rev":"0,0"},{"Imager LUT Version":"V0.19.07.15"},{"Imager Cal Version":"V5.1.9.7"},{"Imager Cal Counter":"1"},{"Imager Cal Date":"12\/3\/2019 1:51:59 PM"}]}
The main file of interest by size is the IR.raw file as the others seemingly contain metadata which are not all that useful. Judging from the file size, the image is stored as a raw 8-bit-per-pixel, single-channel format.
Luckily, Adobe Photoshop can handle this –

Because of the file size, it was able to auto-guess the dimensions for us too.

It doesn’t have the colour palette rendering, being only in greyscale, but it is exactly what is expected. This is great news if you have a bunch of .IS2 files and no easy way to open them, but they're still not radiometric as far as I can tell (if that's what you were hoping for).
Test Results
As with all of my reviews, a little bit of testing is a vital ingredient. Unfortunately, I don’t have an easy way to remotely read measurements from the meter (at least, without attempting to reverse-engineer the Bluetooth protocol just yet), so there are no tests of accuracy although this is probably not the primary aim of such a meter. I also opted not to disassemble the meter to avoid damaging the internals – unlike other DMMs, there is no reason to disassemble this one as there is no fuse inside as there is no current shunt at all. This avoids the potential for accidentally shorting something with your probes in the wrong position, but does mean that the only current measurements that can be taken are either with the iFlex current transformer or an external shunt. Oh, and I wasn’t going to test the drop resistance of the meter either … I love it too much to dare trying.
Runtime and Charging
Given that this meter uses an LCD and has a thermal imaging sensor, the runtime is of key interest. The manufacturer claims the battery to last for 10 hours minimum, with a charge taking 4.5 hours. Using the meter in thermal imaging mode, at the normal brightness, I achieved 13 hours and 35 minutes from a fully charged battery. That exceeds the claimed lifetime and isn’t entirely bad, especially if using it for spot-checks rather than constantly.
Recharging was tested with the original charger and the Tektronix PA1000 Power Analyzer recording power input to the power supply unit.

Charging was achieved in just under 3.5 hours, delivering 27.368Wh for an estimated charge efficiency of 81.1% end-to-end, or about 84.8% from AC to DC for the power supply. The peak AC power was just 9.029W with a quiescent power of 0.341W. This suggests that the power supply is very oversized and doesn’t need to be that big – this seems to be because of their design decision to reuse parts from their 500-series Battery Analyzer which uses the same battery and charger, but allows the charger to charge the analyser while the battery is within the unit. I suppose that arrangement wasn’t carried forward to this unit for safety reasons, but it seems the power requirements could even be fulfilled by a 5V/2A USB power supply.
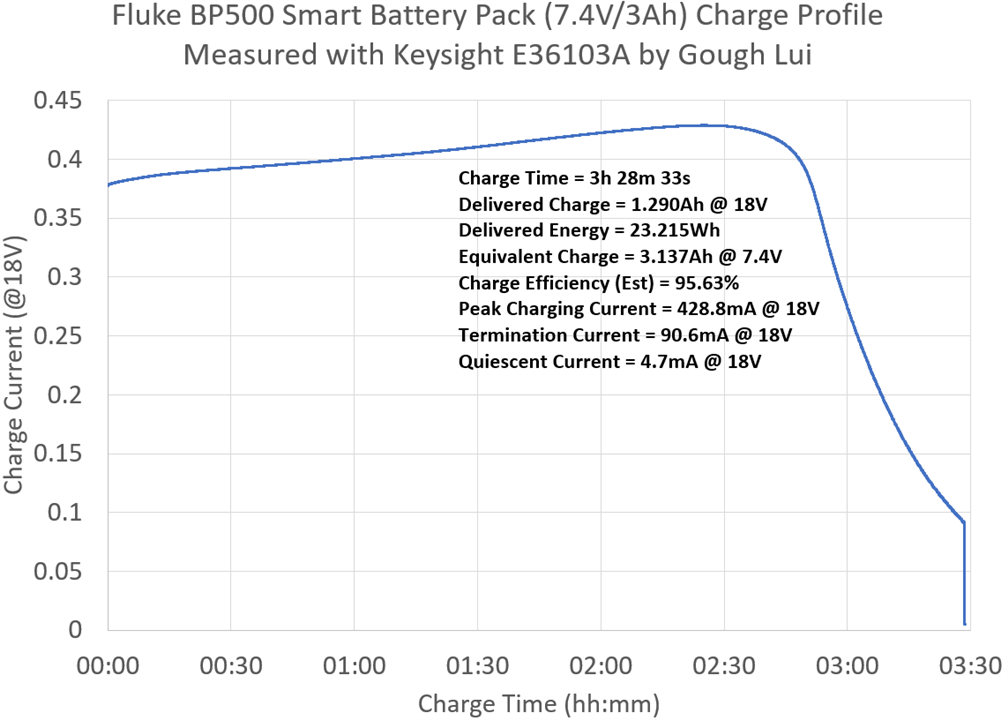
I decided to repeat the test in DC by using the Keysight E36103A Power Supply as a stand-in for the supplied power adapter. This time, charging was achieved within nearly an identical amount of time, with the delivered energy being 23.215Wh suggesting an estimated charging efficiency of 95.63% (based on nominal cell capacity). Peak charging current was 428.8mA at 18V with a termination current of 90.6mA at 18V and a quiescent current of 4.7mA at 18V.
Based on these results, I may opt to build a USB to 15V cable with one of the standard boost converter modules for more convenient and compact charging of the battery, although that may not need to happen as often as one thinks when the meter is not being operated continuously. A USB-C PD trigger could be set to get 15V from most USB-C PD ports which would mean no conversions at all.
Without a Battery? (and Current Consumption)
One thing I’m really worried about is the BP500 Smart Battery Pack. A quick glance at the unboxing showed it basically has an onboard charger and battery management, similar in complexity to a laptop battery. Replacements are only available from Fluke, with no aftermarket replacements, and the reviews seem to indicate the battery may also fail unexpectedly after just a few cycles. I certainly don’t fancy having to pony up AU$302.50 for a new battery – some DMMs cost less than that.
I decided to clip some alligator clips to the terminals in the battery bay and find out what happens if I just supply power without any of the “smarts” using a Rohde & Schwarz NGM202.

As it turns out – it seems to work just fine, but with the battery indicator always showing red (empty). At the nominal 7.4V, in thermal imaging mode, the current consumption averages 187.14mA and peaks at 655.98mA.
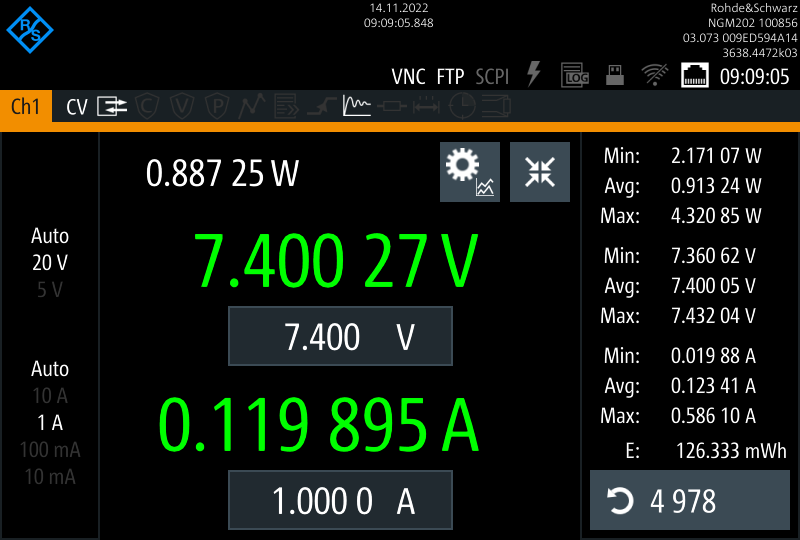
In the DMM mode, the current consumption averages 123.41mA and peaks at 586.10mA.
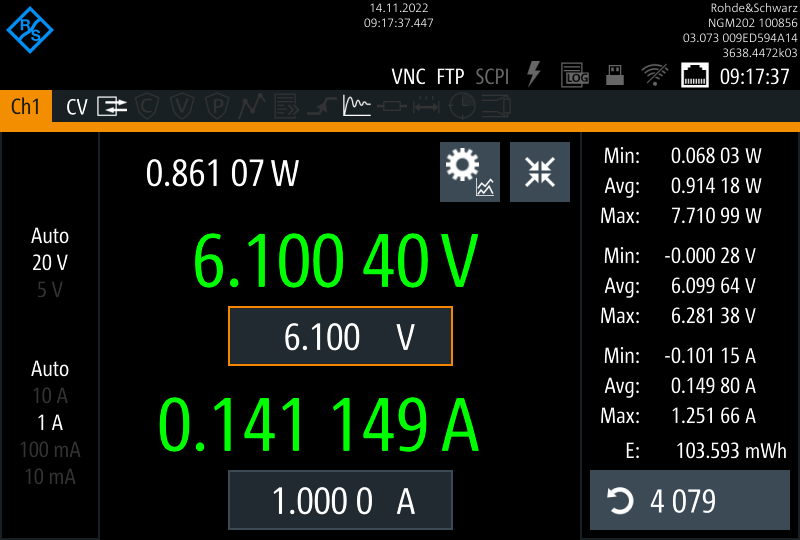
Low-battery shutdown occurs when the input voltage hits 6.0V regardless. At 6.1V, current consumption has increased in DMM mode to 149.80mA with a peak of 1251.66mA, suggesting that there is an internal switch-mode converter that generates the operating voltages.
As a result, it seems that the meter doesn’t stop you from hacking in your own power supply, if you wish.
iFlex Probe
The iFlex probe is a pretty fancy flexible current transformer which can be used to safely measure AC current without interrupting the conductors.
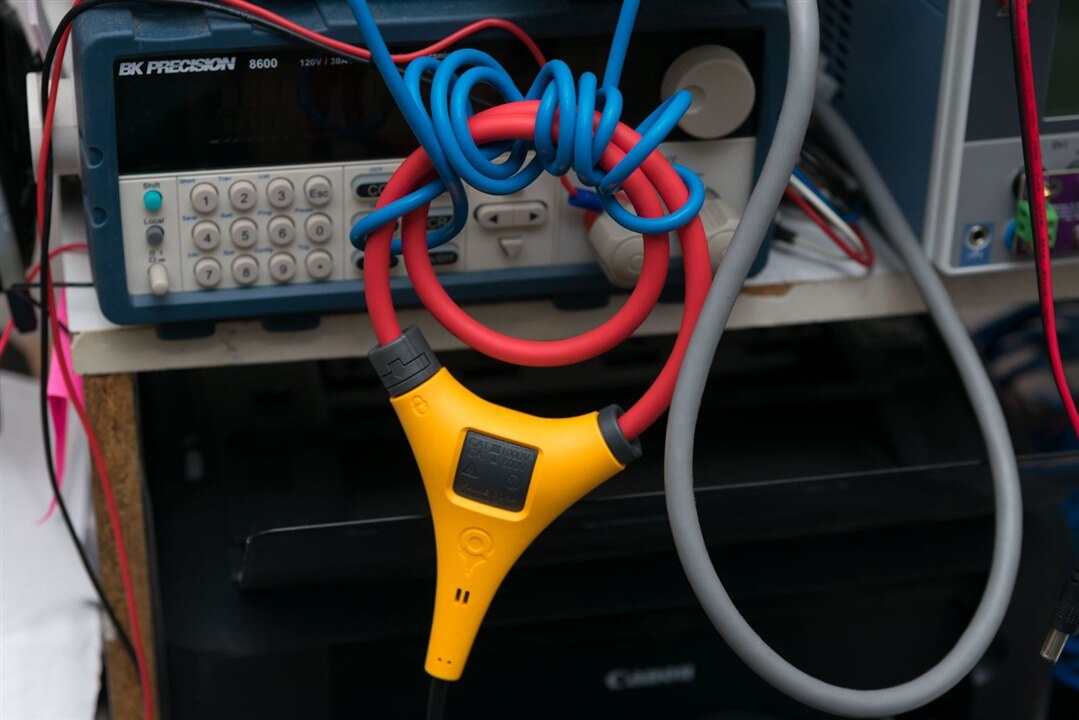
Note: the below image depicts usage of the iFlex probe in a manner contrary to manufacturer recommendations. Danger - do not attempt to replicate. Scene conducted by professional test equipment reviewer in controlled test environment.

If I said the probe had a large aperture, that might mean something different to each reader. But if I show you visually, then you might get a better idea – yes, I can fit my entire neck inside the aperture with room to spare. It almost looks like a leash or a noose … hmm, am I’m a slave to Fluke now?
It’s big both in size, but also in current range, measuring up to 2500A (or about as much current as a pad-mount substation may see) at a resolution of 0.1A. The accuracy is 3% ± 5 digits, with additional error up to 2% due to non-optimal positioning. While this doesn’t sound impressive, inductive measurements usually are not highly accurate and the flexible nature of this current transformer does result in some trade-offs.
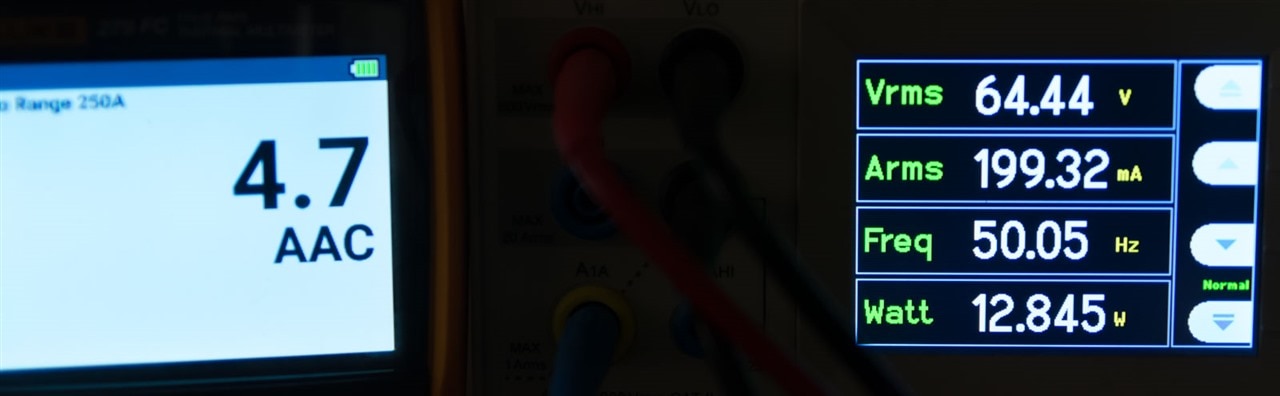
As I don’t work in such power distribution industries, the best I could do was to use an incandescent light bulb as a load and a Variac to create a controllable AC current. To mimic higher current levels, I wrapped the current wire from my Tektronix PA1000 Power Analyzer breakout around the iFlex 10 times, and threaded the iFlex itself through this twice, leading to a 20x multiplication factor.
With no load, I did see the Fluke report up to about 0.5A which is within the claimed specification.
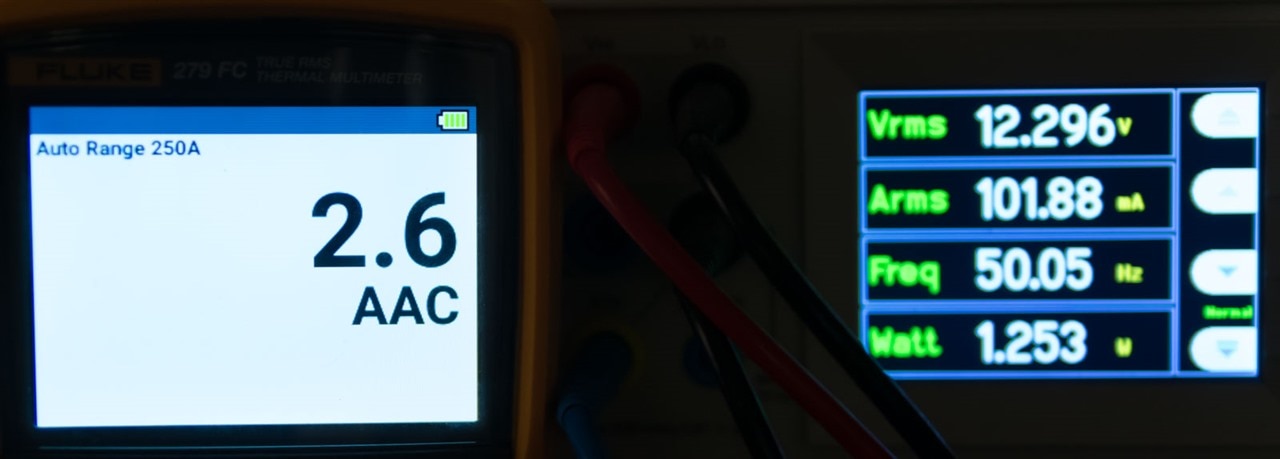
At 100mA, the expected reading would be 2A. The Fluke reported 2.6A which is within specification.
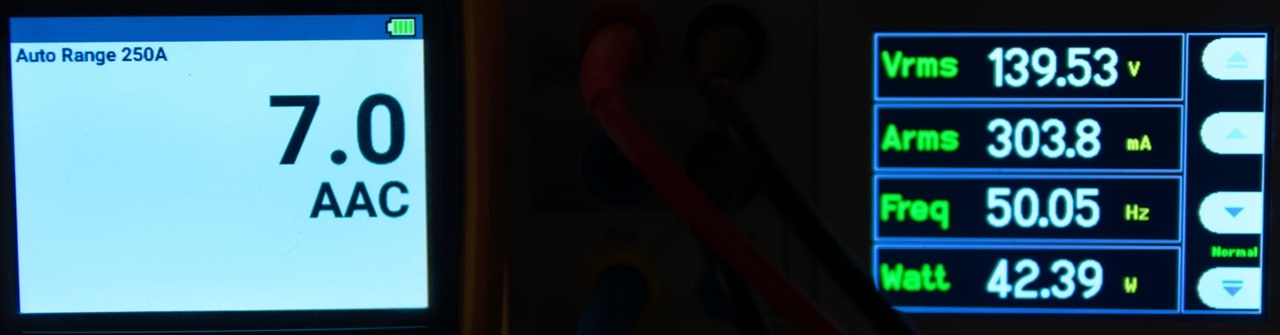
At 200mA, the expected reading would be 4A. The Fluke reported 4.7A, which is again, within specification.
At 300mA, the expected reading would be 6A. The Fluke reported 7A, which is a little high, but consider the sub-optimal geometry of this arrangement and adding the additional penalty, it seems reasonable.
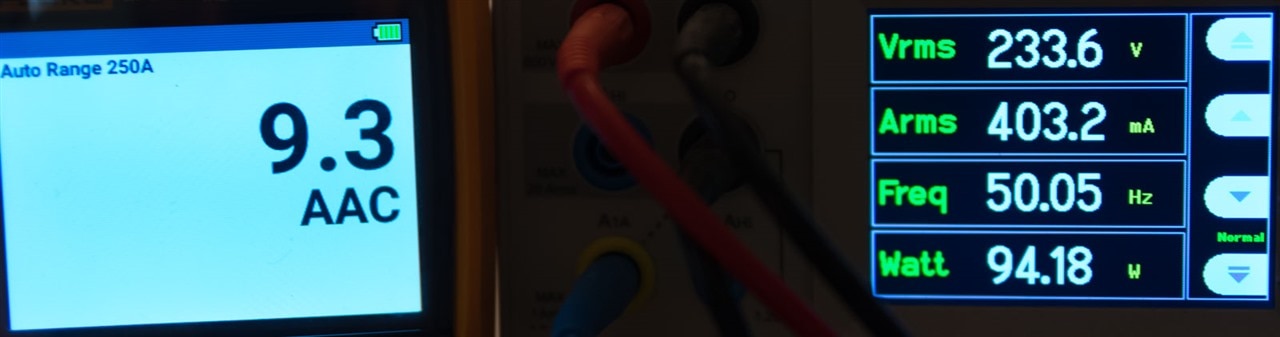
At 400mA, the expected reading would be 8A. The Fluke reported 9.3A, so it seems the error gets bigger with magnitude (gain error) in addition to a bit of offset. This is not unexpected, considering we are still measuring very small values compared to its 2500A current rating (0.4% of full scale).
Conclusion
The Fluke 279 FC/iFlex seems to be an innovative meter that opened the market for thermal-imaging DMMs. At present, only the Teledyne/FLIR DM285 is a head-to-head competitor, introduced almost two years after the 279 FC/iFlex. Nevertheless, the meter does show its age, having been introduced in 2016 and being more expensive than the DM285 which often boasts better specifications. The lack of development since then is evidenced by the unit still being sold today with its USB mini-B port, limited thermal image memory capacity and poor PC software support.
That being said, it does mostly work well at doing what it needs to do – key functionality relevant to industrial power and HVAC users are present with good measurement accuracy and fast auto-ranging. While the LCD doesn’t take full advantage of the graphical capabilities and the meter can be a little slow to start-up, it is still readable in direct sunlight for the most part. The probes they are supplied with feel great to use and the iFlex current probe is relatively unique for those who need such high-current AC current measurement capabilities. While the resolution of the thermal imager is not particularly special, it seems to be enough to get very useful thermal images. In spite of the chunky size, it still manages to run a whole workday on a single charge.
To me, this seems to be a first-generation product that was simply “good enough” for those who cared for it but perhaps not popular enough to justify a follow-up just yet. Even the Teledyne/FLIR unit hails from 2018 which is quite a while ago when it comes to technology. So perhaps it is a little too early to expect people to appreciate a thermal imaging DMM, or perhaps those who do prefer to have dedicated thermal imaging cameras separate from their DMM. Whatever the case may be, it’s hard to call this product a runaway success, but I do like it nonetheless as I can work around its quirks and benefit greatly from having thermal imaging within my reach at all times.
Once again, thanks to element14 and Molex for these wonderfully useful prizes and hope you enjoyed this rather lengthy review.
Top Comments