


The final part of my the tools from my prize winnings that has not been reviewed yet is the soldering station. Originally, they intended to include the Multicomp Pro MP740139 80W ESD Safe Soldering Station, however, this turns out to be a 120V-only product with no direct 230V-equivalent at the same power level or price point. As a result, I was permitted to choose an alternative, of which there were not many to choose from. I settled on the Tenma 21-21310 UK 80W Soldering Station with UK Plug listed on the UK Farnell website at GBP 83.44, which is equivalent to the Tenma AT980D UK listed on the Australian element14 website at $164.66 inc. GST at the time of publishing. As the model number of the latter and my experience with my Tenma hot-air rework station suggests, this is a rebadged Atten product which usually means that it's at least half-decent. While it's no Hakko FX888D, it's a noticeably cheaper alternative that might just do the trick, depending on your needs.
Prior to my holiday, I did apply for the recent Weller WT-series RoadTest, but unfortunately, was not selected. Because of this, I did have some ideas that I wanted to try with that RoadTest that were temporarily shelved - so perhaps I should try them with this Tenma instead.
Unboxing

The unit came inside a medium sized rectangular cardboard box with the Tenma logo printed in black in the top left corner. Along the other sides of the box, a model number was listed.


The box had come apart during shipment, thus I tried to repack the items as they may have been originally packed. This includes an instruction leaflet on top. The unit is protected by plastic bags and foam pieces. The base unit on the left has a bit of weight to it, indicating it is a conventional transformer-based design. The stand is on the right, and the unit is equipped with a UK power plug.

Underneath the plastic wrap, the display is protected by a piece of cling film, the soldering iron tip by a piece of hose and the power plug by a plastic cover. Along with it, unfortunately, were shards of black plastic. The unit itself had a rattle, so it was not in good shape.


The plastic from the side of the display even disintegrated while the unit was being handled. The unit has a fixed angle design which tilts the front panel up for better readability. The power switch is on the side of the unit, with a label indicating a 1A fuse.

The rear of the unit has a captive cable, entering the plastic case without any form of grommet or strain relief. This is an unfortunate design choice, as it complicates the replacement of a damaged power cable and also appears to leave no way to access the claimed 1A fuse. The rear of the casing also has a QC pass label, the appliance label and serial number. The casing has also come apart at the rear, revealing the use of rather brittle-feeling plastic.


The top of the unit has a ribbed design, with some ventilation grilles on the sides. A label at the top indicates the disassembly instructions for the soldering iron pencil and necessary precautions. The underside of the unit has some ventilation grilles as well, four recessed Philips screws that hold the unit together and hard plastic feet which can slide about on smooth benchtops.


The UK style plug comes from E-JUN and houses a dirty-looking Jade (unknown brand) 3A fuse as rated on the plug. This means that the 1A fuse on the unit must reside within the unit itself and the plug fuse arrangement is just there to meet UK requirements.
.
The soldering pencil itself has a moderately slender shape which feels comfortable to hold and relatively well balanced. It has a rubberised grip for comfort.
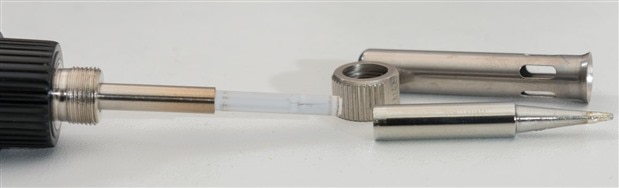

The front barrel section disassembles easily, revealing a ceramic heating element and interchangeable tip. The iron can also be further disassembled by undoing the plastic collar to access the heater connections in case the heater and sensor need to be replaced. The cable is terminated in a seven-contact round connector with a captive screw.


The stand comes with a sponge included and accommodates the iron with a little room to move. The sponge is cut across its surface to help wipe solder from the tip, but no provision is made for brass wool. The rear section which houses the hot tip is covered with some grilles.

The stand is made completely of metal, but like the base, has hard feet and is liable to sliding across smooth benches.
Teardown
Because the unit has suffered in transit due to the "expedited" nature of the shipping, the base unit still had a few rattling bits within. I decided to open it up for a teardown prior to powering it up, just in case any of these bits are conductive and in the wrong place. The unit comes apart by removing the four Philips head screws from underneath the base, which allows the two halves of the case to separate.

The cable can be seen to be kept captive inside by a cable grip. The power comes in and passes a PCB with the power switch and a fuse - if this should ever blow, opening the case is necessary to replace it. This then runs to the transformer which has two windings - one for logic and the other for heater power. All control is undertaken with the PCB mounted behind the front panel, itself made of aluminium.


The PCB that holds the fuse has some silicone goop to insulate the wires at the point they join the PCB. It seems there are holes for other components which are not fitted, but on the rear, an X2 capacitor is haphazardly put into position with one of the legs threaded through a PCB pad and seemingly not properly soldered! This seems to be an EMI suppression capacitor, so perhaps not so critical in this application, but is definitely not a good look. Besides, it seems that this fusing arrangement could have been avoided if they were willing to design the case in such a way that a fused IEC socket with externally-accessible fuse holder could be used. That way, it would be much easier to replace a damaged cable and adapt units for use in other countries.

The transformer itself seems to state AT969D YSD-1773 as possible part numbers, dated September 2018. The AT969D was a previous model of soldering station from Atten, rated for just 60W, so perhaps there is a bit of "leeway" in the power claims just as in the hot-air rework station that I have previously purchased. The transformer has a 230V 50Hz primary winding in red, with 24V secondary winding in yellow for the soldering iron heater and 8.5V secondary winding in blue for logic. Interestingly, this 24V output is at odds with the manual which claims the iron to run on 26V AC. Such discrepancies are quite common amongst low-end Chinese equipment especially, but I suppose it probably doesn't make a world of difference in practical terms. The transformer itself is protected by a 125 degrees Celsius thermal fuse rated at 5A/250V for safety.


The main PCB definitely says the unit is an AT980D, with a date of 20th October 2015 for the design and Week 4 of 2018 for manufacture. The input for the logic is labelled 9V and the input for the heater is labelled 26V on the board, so that is a bit curious when compared with the transformer markings. Regardless, the logic power seems to be half-wave rectified and goes through a linear ST 78M05 regulator to power the main microcontroller, a Microchip PIC16F688. There is an On Semiconductor MOC3041 Triac Driver Output Optocoupler nearby, which is likely used to drive a TRIAC on the heatsink to modulate the AC power to the heater. The 9V AC input also drives a bit of circuitry near the bottom which involves an Texas Instruments OP07C Precision Op-Amp which is probably related to the temperature feedback. It's good to see that practically everything on the board is socketed - including the ISP connector used to program the board at manufacture. Viewed from the side, the TRIAC in question appears to be an NXP BT136-600E Sensitive Gate TRIAC, mounted with some thermal paste. The front panel LCD is mounted to the control PCB using brass stand-offs, with the pins soldered.
In all, the only things found rattling about were plastic shards which were cleared out. The remainder of the unit looks to be in good condition - so lets put this to use.
In Use
I set up the station for use - which includes aligning the connector for the pencil, pushing it in and screwing on the locking collar. Operation is quite simple, flip the power switch on the side and the unit begins to warm up. There isn't much more to it. The unit is capable of self-diagnostics, reporting H-E for heater error and S-E for sensor error - thankfully, it seemed to be working properly first time.

The front panel LCD display indicates set temperatures, current temperature, power level being sent to the iron and three pre-set temperatures. The four buttons along the bottom allow users to set preset temperatures, lock the front panel and adjust a temperature offset to calibrate the temperature read-out on the iron. The buttons are bumps in the plastic cover sheet which actuate tactile switches on the PCB behind. These buttons do have a slightly inconsistent feel due to the construction, but luckily, you probably won't need to touch them too often. The LCD display is backlit in a white on blue "negative" LCD display, with the unit capable of a temperature range of 200 - 450 degrees Celsius.

The stand is included in the package, made of metal and feeling somewhat hollow. The fact that all elements do not have any rubber feet does allow them to slide along smooth bench-tops, but this is a problem that is easily remedied. The stand is supplied with a sponge for cleaning, with no provisions for brass wool. On the whole, I am familiar with the pencil design, being thin, light and relatively well balanced. The silicone sheathed soldering pencil cable is, however, somewhat short at around 1m and retains the kinks in it from shipping, making it slightly difficult to route neatly around the bench. The pencil design and tips appear to be interchangeable with the ones from the Tenma Hot-Air Rework Station, which is a bonus. Unlike some other irons I have tried in the past, this unit did not give off any appreciable smell when first powered up, which is a nice plus.

To test out the iron, I decided that I should attempt this SMD practice soldering kit that I ordered off eBay in anticipation of potentially needing to review a soldering iron. Having bodged a few SMD components on in the past and no systematic training or experience with SMD, I wanted to perfect my techniques, so the copious amount of repetition on this board should help. Unfortunately, the iron had a slightly wider tip than I would have liked - the Tenma SMD rework station came with a micro-conical which I find very comfortable to use for small components, but this iron had a slightly larger flat-tipped conical which is perhaps more abuse resistant and better at heat conduction but not ideal for SMD work. However, that being said, if I wanted to, I could purchase the finer tip at a fairly reasonable AU$7.12 inc. GST. For the purposes of this review, I decided to make do with the tip as supplied, along with some 0.8mm 60/40 tin/lead solder and a set of fine tweezers.

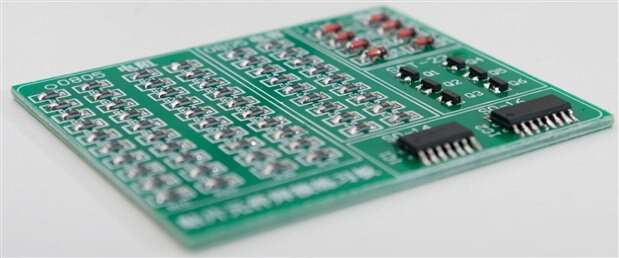
Given that this kit was ordered during the height of an MLCC shortage, no capacitors were included, instead they just provided the same resistors. In quite a few cases, I put too much solder, rarely too little. However, in all cases, while not pretty, the joints look to be electrically complete which is perhaps more than I had hoped for initially and I managed to lose precisely zero components. I didn't make any solder bridges nor require any desoldering braid - so I suppose it is possible with some care to do SMD work with a single iron that has a not-so-fine tip. My fear of SMD components has begun to subside - at least for 0805 and larger footprints.

In completing this project, the iron has been "christened", receiving its initial charring on the barrel and non-contact portions of the tip. Proof of its trial-by-fire.
Testing
This section contains the results of a number of tests undertaken on the Tenma Soldering Station, separated by type of test.
Thermal Tests
Thermal testing of soldering irons was a subject of discussion in one of the RoadTests and perhaps not as simple as one may expect. Using infrared thermometers would not result in an accurate reading, not least because of the low-emissivity of shiny surfaces of the iron, but also the shape of the iron and tip do not focus well for most laser-spot type units. Instead, a contact method is necessary - e.g. by thermocouple. There are dedicated soldering iron tip thermometers such as the Hakko FG100 (AU$455.38 inc GST) which are often trusted, but as I don't have one, I decided to try emulating a similar concept using equipment I already have.

To do this, I decided to employ the recently-reviewed B&K Precision DAS240-BAT Multi-Channel Recorder as it has high portability, resolution and accuracy compared to my other thermocouple-reading devices. On one channel, I attached a standard K-type bare-bead thermocouple and set the data sampling rate to 10Hz for some reasonable trends. My initial attempt used a very precarious but carefully arranged alignment of the springy thermocouple wire to just touch the tip of the soldering iron tip, as the iron rested across the stand in a manner not recommended by the manufacturer. This proved to be inadequate, as thermal conductivity to the bead was not assured and a noticeable temperature differential existed.


Taking a cue from the Hakko FG100 users, I decided to change the setup with the iron resting on a different support and using the stand to hold the thermcouple wire such that it instead pushed up on the tip from the underside. I then proceeded to add a blob of 60/40 tin-lead solder to the tip. This caused the temperature to read exactly as expected - note how the iron's temperature was set to 350 degrees Celsius and the read-out now matches, unlike in the earlier data with spikes due to repositioning of the thermocouple. Now that I have found the preferred measurement configuration, I turned off the iron and allowed it to cool down for two hours to room temperature before running experiments.
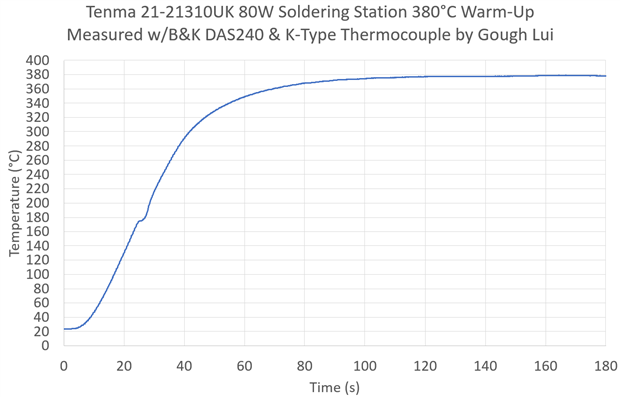

Warm-up testing showed that from cold, the unit was able to reach 80% of the selected 380 degrees Celsius by about 45 seconds. It was noted that the temperature display and feedback from the sensor element in the iron was several seconds ahead of the actual tip temperature, owing to the thermal mass of the tip and thermal resistance between heater and tip. As validation of the measurement process, a small bump is seen about 180 degrees Celsius which appears to be the result of the phase transition of the solder from solid to liquid, requiring the input of the latent heat causing a pause in the temperature profile. When the iron is switched off, the process of cooling down takes approximately three minutes before the 60/40 solder hardens, indicating a moderate thermal mass reserve.


In the static operation phase, temperature regulation seens to keep the temperature roughly within a two degree window, although with a slight slope over time as it may not have fully heated up. The temperature is practically spot-on, when considering the potential error in the measurement device. A calibration offset feature is available in the iron that can change the display by +/- 50 degrees Celsius but it seems it comes properly set from the factory. The behaviour when changing temperatures shows that at 420 degrees Celsius, however, seems to show the iron stopping short by about 5 degrees Celsius when given around two minutes to settle. When changing back down to 350 degrees Celsius, it seems to settle about two to three degrees above the target temperature. At a setting of 380 degrees Celsius, the iron's temperature is spot-on. This seems to suggest that the temperature regulation of the iron is quite good in general, even though the absolute temperature accuracy at the top end of the scale may be slightly lacking.
Power Consumption Tests
Power consumption testing was performed with the Tektronix PA1000 Power Analyser, with power supplied from a true sine wave inverter through a Variac to trim the voltage to 230V at 50Hz (within 1% for both parameters).

Starting up from a cold state, the power input spiked to 125W which tapered down quickly to just below 60W. This then dropped off dramatically as the iron approached its set-point temperature with the regulation causing the power to "blip" occasionally from a resting point of about 20W (at a setting of 350 degrees Celsius). The rapid change in power initially may be due to changing resistance in the heating element as it warms up from cold - a similar inrush current can be seen for incandescent light globes. The peak power is definitely above the 80W claimed, but the continuous running power may only be just shy of 60W based on the characteristics observed. This could be incorrect if the smooth curve is actually "active" regulation, however, from my interpretation of the data, it seems unlikely. Regardless, this still seems sufficient for most electronics work.
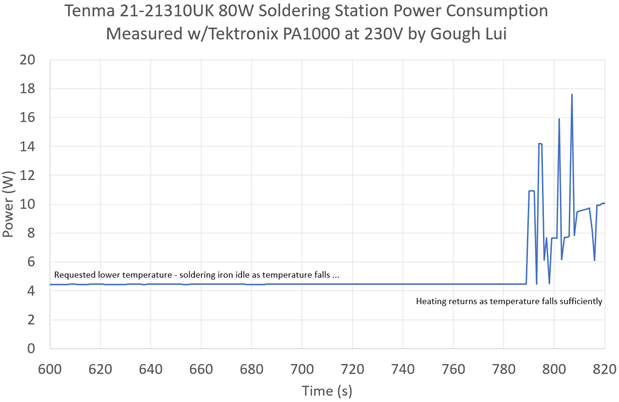
Changing the temperature setting to something below the current temperature, it seems that the transformer losses and logic uses about 4.5W of power. This means that perhaps the heating power is more 120W peak and around 54W continuous.
Resistance Tests


For ESD safety, the metal of the iron must be connected to ground, preferably through a moderate to low resistance. Testing performed using the Keysight U1461A Insulation Resistance DMM showed 2.25 ohms from tip to earth pin was measured, with 1.26 ohms from barrel to earth pin. A null-measurement from earth pin to earth pin registered 0.08 ohms. This was fairly close to the claimed 2 ohms on the specifications table in the manual and sufficient to ensure ESD safety.

Insulation resistance testing was performed at 1000V between earth and both live and neutral conductors with the switch turned on. A result of 6.64 gigaohms was recorded, which is far above the necessary level for safety indicating effective insulation in the transformer.
Conclusion
On the whole, the Tenma 21-2310 UK (AT980D) 80W Soldering Station seems to be quite an decent soldering station for the price. While it's a bit less compact compared to the Hakko FX888D and doesn't carry the same name, it is noticeably cheaper while providing a little more power (on paper). Its performance is similar to other Atten products, that is, a simple design sufficient to meet the needs of most hobbyists. In testing, the iron showed good temperature regulation capabilities and peak powers exceeding the listed power, although continuous power may only be around 60W. The supplied tip was of a conical design that had a flat tip, and while not as fine as I would have liked, was still good enough to get reasonable results soldering SMDs using leaded solder - despite this being my first serious SMD soldering attempt. The iron is ESD safe, comes with stand and sponge and shows good electrical isolation between active conductors and Earth.
On the downside, the unit's plastic enclosure leaves a little to be desired, made of a more brittle type of plastic that did not endure shipping abuse very well. The use of a captive cable at the rear is also an inconvenience, especially should the cable be damaged. The use of an internal 1A fuse is another surprise, requiring complete disassembly of the unit to access and change. The length of the silicone-sheathed soldering pencil cable is not generous, being around 1m and is slightly stiff, retaining the bends in the cable from shipping. Finally, the power ratings and voltages seem to have been slightly "generous" from the factory. Even internal construction seems to show that soldering of a suppression capacitor was not properly done. These are, ultimately, minor drawbacks which are not unexpected from Chinese-made products in this price range and do not detract in any great meaningful way from the user experience assuming the damage and construction issues are once-off.
On the whole, I'm quite happy with the soldering station in terms of how it performs - there were no great surprises, but that's a good thing. It would be a great upgrade from the uncontrolled thermally-balanced irons, while being versatile and capable enough to undertake more advanced rework tasks, especially with the availability of an array of inexpensive tips. It might not enjoy the same long-term level of support as a Weller or Hakko, but I don't foresee this being a major problem for most people. I've had the same one tip on my Tenma Hot Air Rework station for the past six years, and I've managed to do everything I needed with it.
Top Comments