


For many years this has been my soldering iron. I have liked it and continued to use it because it gives me a choice of a high 40 watt and a low 20 watt heat setting. I also like the variety, durability, and economy of the tips that are available for it. Here is a link to the type of tips that are used. It is manufactured by Weller but I am pretty sure that it was an Ungar design originally.
Here is the list of the things that I do not like about it which will be corrected or ameliorated by this modification.
(1) The heat is either too hot or not hot enough for my needs depending on the high - low setting. I can work with the High but it tends to oxidize the solder too quickly which leads to the need for frequent cleaning and re-tinning. The Low setting is ok for very light work but doesn't have the power for larger joints or thick copper traces.
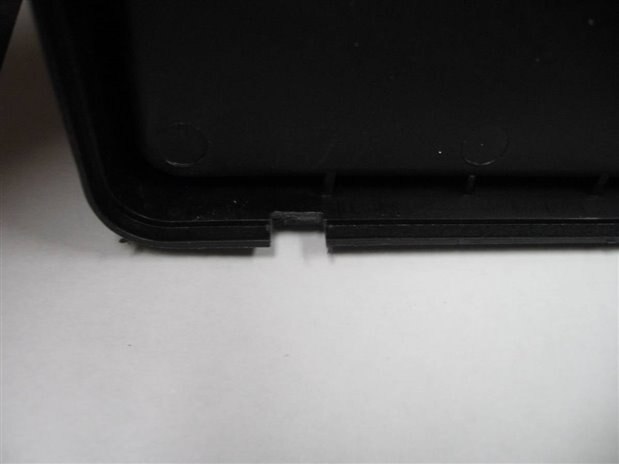
(2) The designer of the solder iron was apparently an artist not a user of solder irons. By designing so that the handpiece wire exits from the back of the unit we get a pretty unit but it is a functional disaster. The problems caused by the wire exiting the unit from the back are: 6 inches of length are lost, the wire is always in jeopardy of being melted by the tip, and the use of the iron causes a torque on the unit that spins it around.
(3) The unit is too light to be stable and is always shifting and moving around when the iron is being used.
These are the goals that will be addressed by the modification:
(1) The exit for the handpiece cord will be moved to the front of the solder iron stand.
(2) Weight will be added to the stand to increase its stability.
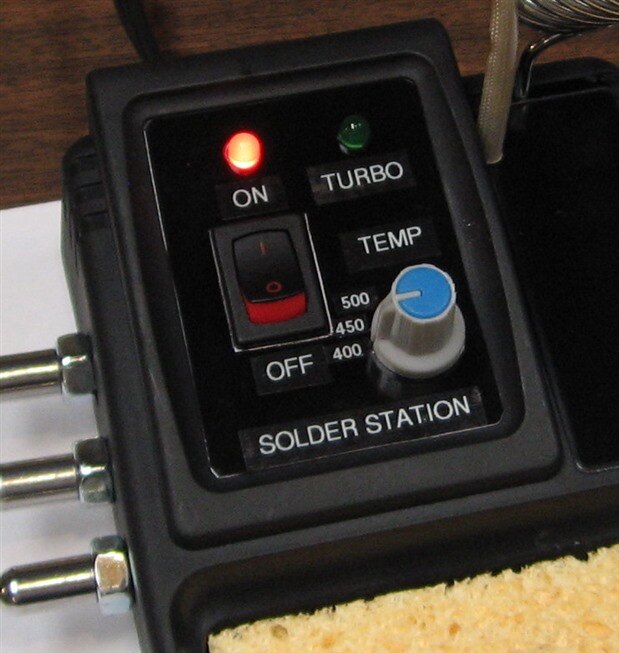
(3) A triac controlled dimmer circuit will be added to allow the selection of power to the tip of Zero to Forty watts.
(4) Test points will be provided on the outside of the station to calibrate the voltage to the Iron.
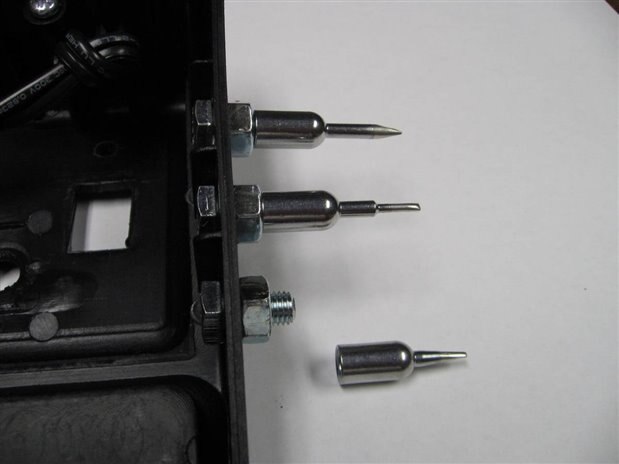
(5) A rack to hold the extra tips will be added to the side of the station.
(6) A sensor circuit will be incorporated so that full power is used during warm up and if the solder iron is off the stand for more than a minute.
After a number of tests, breadboarding, and circuit prototypes this is the schematic of the circuit that will be incorporated in the unit.

The voltage control to the solder iron is a simple Triac controlled dimmer circuit similar to those used in home light dimming applications. The choice of the Q4015L5 Triac is mearly because I had one from salvage and while it is massive over kill for control of just 40 watts it won't hurt anything either. The sensor part of the circuit was more of a challenge as there is very limited space inside the base of the solder iron. I wanted to sense the temperature of a thermistor mounted on the iron holder so that I could determine if the iron was hot and if it was in the holder. This way full voltage can be applied to the iron until it reaches operational temperature. The full voltage is also restored from the level of control voltage applied when the solder iron is out of the holder and in use for more than a minute. This will give the iron a heat boost when under heavy use. The thermistor voltage divider controls a transistor which in turn controls a relay. The relay turns on the Turbo LED to indicate the iron is under full 120 VAC and it shorts the voltage control potentiometer so as to produce the application of full 120 VAC to the iron. The tags "A" and "B" in the schematic are the connections that short the potentiometer.
The modification was begun by moving the exit for the handpiece wire from the back of the unit to the front. The 1/4 - 28 spare solder tip storage mounting screws were also installed.
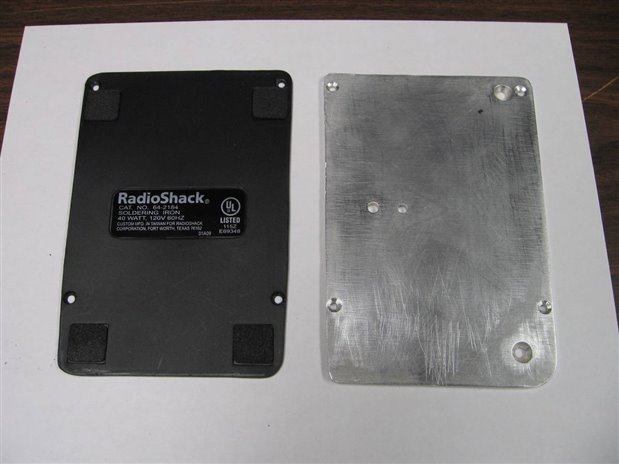
Next a 4mm thick plate of aluminum was cut to match and replace the original plastic base plate of the iron. This aluminum plate will also serve as a heat sink for the Q4015L5 Triac though it will not really be needed.
The control, power switch, and LEDs were mounted into the redesigned front panel of the unit and the circuitry for the dimmer was attached to the base plate. The Q4015L5 is an isolated tab device so it was mounted directly without the need for mica or isolating washers.

Most of my builds and modifications are design centered on salvage equipment and parts that I have in the shop. In the case of this build nearly every part used is recycled from old boards and equipment. The design of the thermistor sensor circuits is no exception. This part of the circuit was going to need a power supply and testing had shown that 9 volts would be sufficient. Even though a 12 volt relay was to be used the 9 volts was still within the pull in range for the relay. I chose the 12 volt relay as it was the only DPDT configured relay in the box that was small enough for this application. The 9 volt power supply was extracted from a wall wart originally designed to power an Arduino board. For the fun of it I am going to show my construction mess in the next photo. This is to quash the suspicion that I never make a mess.

Here is a picture of the inside of the base of the solder iron after the circuits and components have been situated.
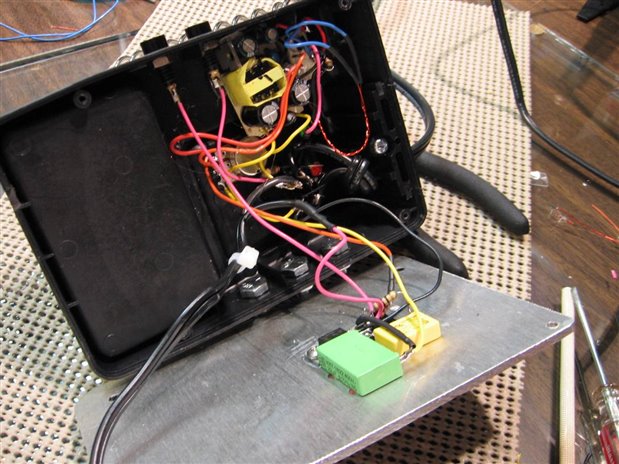
Notice the two jacks at the top of the case. These are pin jacks that will allow me to attach a voltmeter and monitor the voltage across the solder iron's heating element. By monitoring the voltage and the temperature of the tip I will have a rough idea of the temperature that is produce in the iron for a given voltage. The front panel picture (previous displayed) shows the results of this calibration reflected in labels showing approximate degrees Fahrenheit for different control positions.
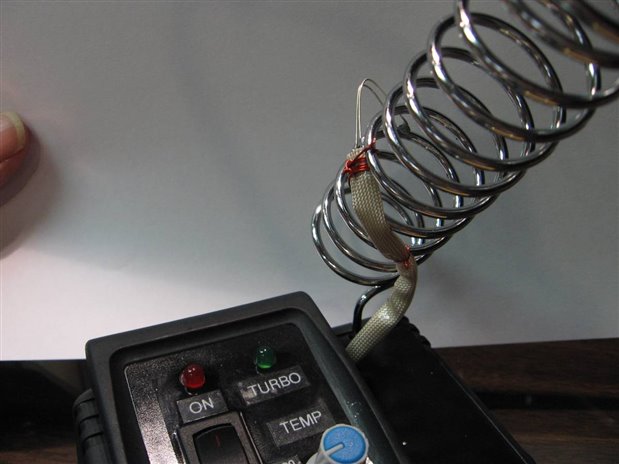
The most difficult part of the design for me was the construction and mounting of the Thermistor sensor on the wire solder iron holder. I had selected a 100K thermistor whose characteristics suited my needs. I used 24 GA enameled wire as the leads from the thermistor. I did not want to have trouble with melting insulation and there was no Teflon wire available in the shop in a small enough gauge. I covered the wiring with a piece of high temperature spaghetti that I had salvaged from a dental sterilizer. The assembly was finally lashed to the solder iron holder with more of the enameled 24 gauge wire. In the following pictures you can see how this assembly was mounted.

I wish I could say that it was as easy as buttoning it up at this point and testing it but as with most of my projects there were many disasters that had to be overcome. Almost all my disasters are self inflicted but occasionally fate gets me too. For example my first choice for a relay for this project had 8 pins. It was housed in an opaque case so I could not look at the contact configuration. All my experienced said that I had a DPDT relay and so that is the way I wired it. Only after destroying one 9 volt power supply board did I discover that it was really a SPDT relay with the pins to the contacts brought out twice to increase the current capacity of the relay. I actually destroyed a second power supply board when my circuit board extraction technique exceed the mounting specs for a couple components. Finally however all the bugs all fled back into the crevasses of a builders nightmare and I was able to do my final tests.

From a cold state the iron would quickly heat up under the full 120 VAC of the Turbo Mode. Once the thermistor sensed a hot iron the Triac dimmer circuit kicked in and voltage dropped to my input setting. First choice was 90 VAC or about half way between the original 20 watt and 40 watt capabilities of the Radio Shack Solder iron. You can see the meter probes monitoring the voltage to the heating element of the solder iron. If the iron is removed from the holder and used to solder something the thermistor begins to cool and as soon as the tipping point is reached, approximately 40 seconds, the Turbo kicks in and a full 120 VAC is applied to the heating element. If the iron is put back into the holder the Turbo turns off within ten seconds and the voltage drops back to Triac control level.
I really enjoy projects that are directed toward improving the operation of the shop. This project was no exception. The verdict is still out on whether I have totally answered my goals. It is likely there will be some side effects of the change that I will have to deal with. Thank you for taking the time to check out this project. If you have any questions on any aspect of the project let me know. If you are new to the world of electronics and want to do something similar to this be aware that the voltages used for solder irons are at mains level and can be dangerous to your health and life if not handled properly.
John
Top Comments