element14 Community
element14 Community
    Register Log In
  • Site
  • Search
  • Log In Register
  • Community Hub
    Community Hub
    • What's New on element14
    • Feedback and Support
    • Benefits of Membership
    • Personal Blogs
    • Members Area
    • Achievement Levels
  • Learn
    Learn
    • Ask an Expert
    • eBooks
    • element14 presents
    • Learning Center
    • Tech Spotlight
    • STEM Academy
    • Webinars, Training and Events
    • Learning Groups
  • Technologies
    Technologies
    • 3D Printing
    • FPGA
    • Industrial Automation
    • Internet of Things
    • Power & Energy
    • Sensors
    • Technology Groups
  • Challenges & Projects
    Challenges & Projects
    • Design Challenges
    • element14 presents Projects
    • Project14
    • Arduino Projects
    • Raspberry Pi Projects
    • Project Groups
  • Products
    Products
    • Arduino
    • Avnet Boards Community
    • Dev Tools
    • Manufacturers
    • Multicomp Pro
    • Product Groups
    • Raspberry Pi
    • RoadTests & Reviews
  • Store
    Store
    • Visit Your Store
    • Choose another store...
      • Europe
      •  Austria (German)
      •  Belgium (Dutch, French)
      •  Bulgaria (Bulgarian)
      •  Czech Republic (Czech)
      •  Denmark (Danish)
      •  Estonia (Estonian)
      •  Finland (Finnish)
      •  France (French)
      •  Germany (German)
      •  Hungary (Hungarian)
      •  Ireland
      •  Israel
      •  Italy (Italian)
      •  Latvia (Latvian)
      •  
      •  Lithuania (Lithuanian)
      •  Netherlands (Dutch)
      •  Norway (Norwegian)
      •  Poland (Polish)
      •  Portugal (Portuguese)
      •  Romania (Romanian)
      •  Russia (Russian)
      •  Slovakia (Slovak)
      •  Slovenia (Slovenian)
      •  Spain (Spanish)
      •  Sweden (Swedish)
      •  Switzerland(German, French)
      •  Turkey (Turkish)
      •  United Kingdom
      • Asia Pacific
      •  Australia
      •  China
      •  Hong Kong
      •  India
      •  Korea (Korean)
      •  Malaysia
      •  New Zealand
      •  Philippines
      •  Singapore
      •  Taiwan
      •  Thailand (Thai)
      • Americas
      •  Brazil (Portuguese)
      •  Canada
      •  Mexico (Spanish)
      •  United States
      Can't find the country/region you're looking for? Visit our export site or find a local distributor.
  • Translate
  • Profile
  • Settings
Personal Blogs
  • Community Hub
  • More
Personal Blogs
John Wiltrout's Blog Hacking a Chinese Soldering Iron
  • Blog
  • Documents
  • Mentions
  • Sub-Groups
  • Tags
  • More
  • Cancel
  • New
  • Share
  • More
  • Cancel
Group Actions
  • Group RSS
  • More
  • Cancel
Engagement
  • Author Author: jw0752
  • Date Created: 24 Jun 2017 5:42 AM Date Created
  • Views 4033 views
  • Likes 6 likes
  • Comments 6 comments
  • mustool mt223
Related
Recommended

Hacking a Chinese Soldering Iron

jw0752
jw0752
24 Jun 2017

A couple weeks ago I received a really nice Tenma Soldering iron from a friend.  The other night while I was looking through the Banggood Electronics I came across a very inexpensive solder iron that reminded me of the handpiece of my new iron. The one my friend sent was a bench station and this one was a direct plug in with a small dial on the handle. It also came with 6 tips so I decided to take a chance and ordered one of them.


They were on sale so my total cost including shipping came to a little over $10.00. I figured that at the very minimum the tips could perhaps be used on the higher quality bench station. Here is the link to the Banggood Iron.


https://us.banggood.com/Wholesale-Warehouse-Mustool-MT223-60W-Adjustable-Temperature-Electric-Soldering-Iron-with-5pcs-Solder-Tips-wp-Usa-1077119.html?rmmds=myorder


The iron was advertised as being adjustable from 200 C to 450 C. When mine arrived however my tests showed that the tip temperature would go no lower than 350 C. I thought that perhaps I got a defective unit so I wrote to the company. After posting the complaint I realized that for $10.00 nothing was going to come of my inquiry and with so little to loose I decided to crack it open and see what made it tick.


The unit came apart very easily. The small knob popped out of a trimmer mounted on the board. The front heater housing unscrewed and the heater and circuit board pulled out to the front. It looked like there was no temperature sensing involved but only a triac dimmer circuit powering the heater. I reverse engineered the circuit and made a schematic.


image

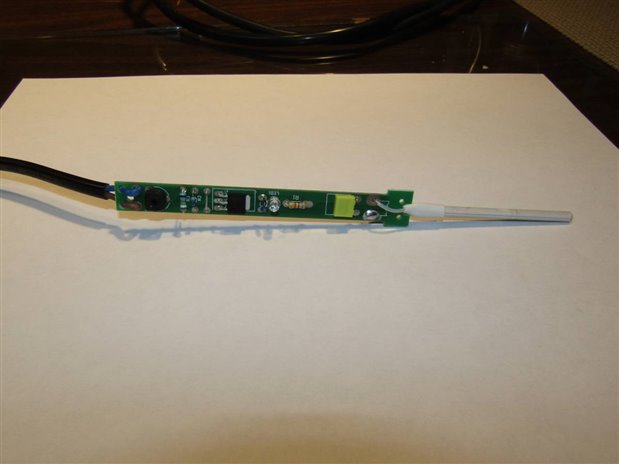
The circuit board and heater.


image


In the original design the output control trimmer had a 200K Ohm resistor (R1) in parallel. This brought the maximum resistance across the trimmer to about 137K Ohms. 137K Ohms would cause the current through the triac to settle around 150 mA which meant about 18 Watts to the heater element. I removed the 200K resistor and began experimenting with the 500K Ohm trimmer alone. By setting a resistance greater than 137K Ohms and then measuring the stabilized temperature of the tip I was able to determine that what I needed was a minimum resistance across the 500K trimmer of 175K Ohms. This produced a current of 50 mA and about 6 Watts of power to the heater. After an extended warm up period the temperature of the tip would stabilize around 200 C. The formula for parallel resistors said that I would need approximately 300K Ohms for R1. Reality forced me to use a 294K Ohm instead as that is as close I could get with supplies on hand. After reassembly of the iron I again tested it and found that I could now control the temperature from 200 C and up. Caution is needed if the trimmer is turned all the way up. At 60 Watts the little iron quickly streaks past 500 C and the nice iron clad tip turns into a piece of junk. Here is a closeup of the iron reassembled and the control knob which will probably need to be protected with a cover to keep it from being moved by normal handling.


image


image


If you don't mind a little fun modifying it this is a fun project. However, if you want to use it out of the box the high minimum temperatures from the factory will make it short lived and difficult to use. The heater element is a 110 Volt unit as opposed to a 28 Volt one in my bench unit. The spare tips that came with it are compatible with the Tenma Bench unit.


John

  • Sign in to reply

Top Comments

  • jw0752
    jw0752 over 8 years ago in reply to mcb1 +3
    Following mcb1 's suggestion I went back for some more experimenting with a focus on using R-2 to limit the High End Temperature. Experimentation showed that with a total of 100 K resistance the soldering…
  • dougw
    dougw over 8 years ago +2
    I have a similar iron - not exactly the same, but the price was similar. It seemed to be working fine until I noticed part of the handle was melting and the whole cartridge becoming unstable. Everything…
  • DAB
    DAB over 8 years ago +2
    Great post John. A good lesson on how to turn junk into a better device. I agree with mark, you could add something like an LM317 to set up a maximum current limit to help with the top end. DAB
  • jw0752
    jw0752 over 8 years ago in reply to mcb1

    Following mcb1  's suggestion I went back for some more experimenting with a focus on using R-2 to limit the High End Temperature. Experimentation showed that with a total of 100 K resistance the soldering iron topped out at 475 C. Therefore I replaced the 4.7K R-2 that came from the factory with a 100K. As we all know there are always compromises and side effects. Experimentation had also revealed that anything over 170K of resistance and the dimmer would not start. If I left R1 out of the circuit the trimmer would not work until its resistance fell below 70K Ohms. I put a 100K resistor in the R1 position parallel with the trimmer and tested the unit out. If the trimmer was at its high resistance the dimmer circuit still would not start but if I left the trimmer at mid position the dimmer would start and the temperature would stabilize in the vicinity of 275 C. Once the circuit starts I can back it off to lower temps if need. The little LED pilot light lets me know if the dimmer is working and providing power to the heater element. Here is a schematic of the revised resistor network in the dimmer control circuit. The knob that fits into the trimmer can be re-positioned at 90 degree points so I shifted it to the position that most accurately reflected the new temperature spread. The result is a tool that will be workable for me but is perhaps too confusing for someone who hasn't had experience with it.


    image


    This soldering iron is advertised as a 60 watt iron. This is obviously just an advertising ploy geared to attracting the inexperienced who feel that higher wattage is better. It takes approximately 12 Watts to maintain the tip temperature at 275 C and 24 Watts will take the tip to 475 C. The truth is that as originally configured the soldering iron will in fact draw 60 watts if it is turned all the way up. Unfortunately when I first tried the iron I turned it up and watched the nice steel clad tip turn a sickly matte gray that told me it was probably permanently damaged. I did not measure the temperature as I wanted to back off the temp as soon as possible to see if I could salvage the tip. The one nice thing about Chinese stuff is that the price is usually low enough that it is hard to really lose. I now have a workable soldering iron and I had a lot of fun experimenting with it.


    John

    • Cancel
    • Vote Up +3 Vote Down
    • Sign in to reply
    • More
    • Cancel
  • DAB
    DAB over 8 years ago

    Great post John.


    A good lesson on how to turn junk into a better device.


    I agree with mark, you could add something like an LM317 to set up a maximum current limit to help with the top end.


    DAB

    • Cancel
    • Vote Up +2 Vote Down
    • Sign in to reply
    • More
    • Cancel
  • dougw
    dougw over 8 years ago

    I have a similar iron - not exactly the same, but the price was similar. It seemed to be working fine until I noticed part of the handle was melting and the whole cartridge becoming unstable. image Everything except one plastic ferule was fine. In my case the price was too good to be true. Lesson learned....(maybe) image

    Removing the offending plastic is very tough - that stuff is like concrete when cold and very sticky when hot. And of course I can't simply 3D print a replacement image

    • Cancel
    • Vote Up +2 Vote Down
    • Sign in to reply
    • More
    • Cancel
  • jw0752
    jw0752 over 8 years ago in reply to mcb1

    "Hacking a Chinese Soldering Iron Volume II"


    Coming soon to a website near you.


    John


    If I had increased R2 just the right amount I should have been able to slide the scale over and perhaps produce better results. See I always learn something .

    • Cancel
    • Vote Up +1 Vote Down
    • Sign in to reply
    • More
    • Cancel
  • balearicdynamics
    balearicdynamics over 8 years ago in reply to mcb1

    Little hack but efficient hack.


    Enrico

    • Cancel
    • Vote Up +1 Vote Down
    • Sign in to reply
    • More
    • Cancel
>
element14 Community

element14 is the first online community specifically for engineers. Connect with your peers and get expert answers to your questions.

  • Members
  • Learn
  • Technologies
  • Challenges & Projects
  • Products
  • Store
  • About Us
  • Feedback & Support
  • FAQs
  • Terms of Use
  • Privacy Policy
  • Legal and Copyright Notices
  • Sitemap
  • Cookies

An Avnet Company © 2025 Premier Farnell Limited. All Rights Reserved.

Premier Farnell Ltd, registered in England and Wales (no 00876412), registered office: Farnell House, Forge Lane, Leeds LS12 2NE.

ICP 备案号 10220084.

Follow element14

  • X
  • Facebook
  • linkedin
  • YouTube