element14 Community
element14 Community
    Register Log In
  • Site
  • Search
  • Log In Register
  • Community Hub
    Community Hub
    • What's New on element14
    • Feedback and Support
    • Benefits of Membership
    • Personal Blogs
    • Members Area
    • Achievement Levels
  • Learn
    Learn
    • Ask an Expert
    • eBooks
    • element14 presents
    • Learning Center
    • Tech Spotlight
    • STEM Academy
    • Webinars, Training and Events
    • Learning Groups
  • Technologies
    Technologies
    • 3D Printing
    • FPGA
    • Industrial Automation
    • Internet of Things
    • Power & Energy
    • Sensors
    • Technology Groups
  • Challenges & Projects
    Challenges & Projects
    • Design Challenges
    • element14 presents Projects
    • Project14
    • Arduino Projects
    • Raspberry Pi Projects
    • Project Groups
  • Products
    Products
    • Arduino
    • Avnet Boards Community
    • Dev Tools
    • Manufacturers
    • Multicomp Pro
    • Product Groups
    • Raspberry Pi
    • RoadTests & Reviews
  • Store
    Store
    • Visit Your Store
    • Choose another store...
      • Europe
      •  Austria (German)
      •  Belgium (Dutch, French)
      •  Bulgaria (Bulgarian)
      •  Czech Republic (Czech)
      •  Denmark (Danish)
      •  Estonia (Estonian)
      •  Finland (Finnish)
      •  France (French)
      •  Germany (German)
      •  Hungary (Hungarian)
      •  Ireland
      •  Israel
      •  Italy (Italian)
      •  Latvia (Latvian)
      •  
      •  Lithuania (Lithuanian)
      •  Netherlands (Dutch)
      •  Norway (Norwegian)
      •  Poland (Polish)
      •  Portugal (Portuguese)
      •  Romania (Romanian)
      •  Russia (Russian)
      •  Slovakia (Slovak)
      •  Slovenia (Slovenian)
      •  Spain (Spanish)
      •  Sweden (Swedish)
      •  Switzerland(German, French)
      •  Turkey (Turkish)
      •  United Kingdom
      • Asia Pacific
      •  Australia
      •  China
      •  Hong Kong
      •  India
      •  Korea (Korean)
      •  Malaysia
      •  New Zealand
      •  Philippines
      •  Singapore
      •  Taiwan
      •  Thailand (Thai)
      • Americas
      •  Brazil (Portuguese)
      •  Canada
      •  Mexico (Spanish)
      •  United States
      Can't find the country/region you're looking for? Visit our export site or find a local distributor.
  • Translate
  • Profile
  • Settings
Personal Blogs
  • Community Hub
  • More
Personal Blogs
John Wiltrout's Blog Repurposing Salvaged Circuit Board
  • Blog
  • Documents
  • Mentions
  • Sub-Groups
  • Tags
  • More
  • Cancel
  • New
  • Share
  • More
  • Cancel
Group Actions
  • Group RSS
  • More
  • Cancel
Engagement
  • Author Author: jw0752
  • Date Created: 5 Aug 2019 5:28 AM Date Created
  • Views 1672 views
  • Likes 12 likes
  • Comments 15 comments
  • bench power supply
Related
Recommended

Repurposing Salvaged Circuit Board

jw0752
jw0752
5 Aug 2019

I recently bought a power control module from a Chinese source. All I needed to do was provide the input power, up to 75 volts at 12 Amps and the module would allow me to output a digitally controlled voltage or current up to 60 Volts and 12 Amps. I will not go into the assembly of the unit as I have perhaps done one too many power supply builds in my blog already.


I had on the shelf a perfect candidate for an enclosure for this unit. It was really heavy duty with an already available fused and switched AC input. It had a 12 volt thermally controlled fan and it looked very nice. The only stumbling block (and there is always one) was the front panel of the enclosure was special purpose for the original application and it was contoured.


image


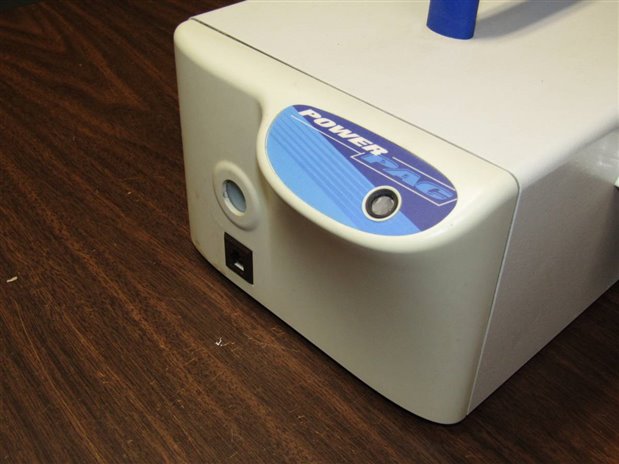
With the way that the front panel fit on the unit it was not going to be practical to abandon it altogether. This project has been on the shelf for a couple weeks while I mulled over what my approach was going to be to make this sculpted panel suitable for me to adapt one of my traditional flat control panels to the front of the unit.


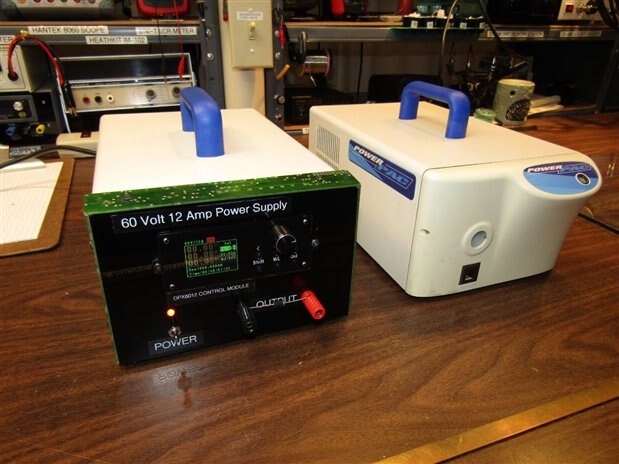
Finally I decided to launch into it and with the unit in a vise I took a carpenters hand saw and sawed the contours of the front panel as flat as I could while still retaining the basic structure of the mount. My new front panel did mount to the flattened original panel and the unit worked well. Unfortunately I could not get past the cosmetics of the appearance where the new flat  front did  not integrate totally with the contours that were left on the original panel. Perhaps you can see a little of the problem in this picture:


image


The next step I took was to try to fill in and bridge the gaps and mismatch with a white silicone sealer. While this worked to fill in the holes and gaps it did nothing to improve the cosmetics. The silicone is very hard to work with if one is looking for any kind of a professional appearance. When it was done it looked like crap and I knew there had to be at least one more step to make it look finished. I thought that maybe I would make a bezel out of copper or brass. When I did not have sufficient pieces of either of these in the shop the box of scrap circuit boards caught my eye. You may have guessed that when I salvage all the components from a circuit board I seldom throw the board itself away. The circuit board material makes very good structural material for building other things.


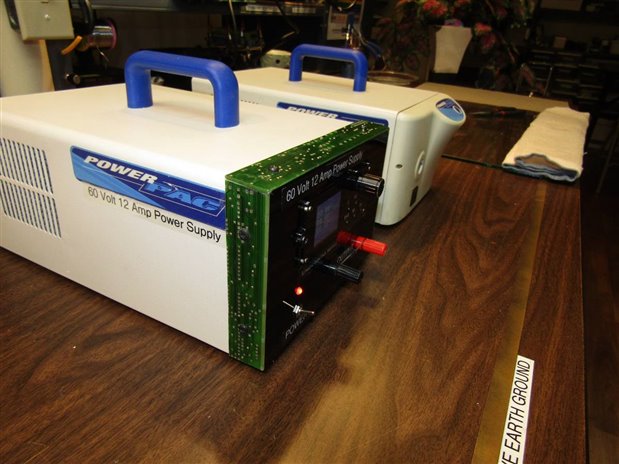
I decided that it would be a unique solution to build the decorative bezel for the power supply from strips of salvage circuit board.


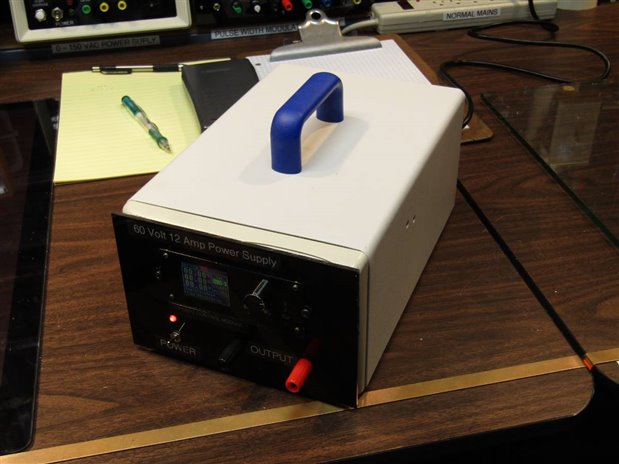
Here is the finished power supply with a circuit board decorative bezel.


   imageimage


I haven't quite gotten used to its appearance yet but it fits well with my collection of other unusual pieces of test equipment.


Incidentally the 60 Volt 12 Amp marking is a lie. The Chinese module has this for a rating and I have no way to test if it is true or not. I was only able to come up with a power transformer than can deliver 180 Watts of power to the control module. Therefore when I have the unit powered and loaded to the max I can get about 45 Volts at 4 Amps. Until I can find a higher VA transformer that will still fit in the enclosure the current one will have to do. The fact is that I seldom have an application for the higher voltage and current that this unit can provide anyway. The main purpose of the build was to experiment with the Chinese Digital power supply control module.


John

  • Sign in to reply

Top Comments

  • shabaz
    shabaz over 5 years ago in reply to Andrew J +7
    Hi Andrew! This one might be more interesting actually, it's the same price, but with colour pellets too (although, it's all in a bag, whereas the other one is in a more convenient pot): https://www.amazon…
  • shabaz
    shabaz over 5 years ago +6
    Hi John, Very nice looking PSU : ) Although you didn't need it here, I found a material recently, that may interest you. It's possibly well-known, but it was new to me. It's called ' polydoh mouldable…
  • shabaz
    shabaz over 5 years ago in reply to jw0752 +4
    Hi John, The Polydoh came in handy today. The washing machine debris catcher has a plastic knob which is near-impossible to open by hand, since it has very little to grip on, and is very stiff due to rubber…
  • jw0752
    jw0752 over 5 years ago in reply to shabaz

    Hi Shabaz,


    That looks a lot like what we used to call a bung wrench. It was used to open the caps on 55 gallon barrels of oil or other products that the place I worked at sold to auto service stations. I love the way you never let a problem beat you or inconvenience you. Thanks for sharing. The cool part is if you ever get a new dryer you can throw the wrench into the hot water and turn it into a tooth brush if you want.


    John

    • Cancel
    • Vote Up +2 Vote Down
    • Sign in to reply
    • More
    • Cancel
  • shabaz
    shabaz over 5 years ago in reply to jw0752

    Hi John,


    The Polydoh came in handy today. The washing machine debris catcher has a plastic knob which is near-impossible to open by hand, since it has very little to grip on, and is very stiff due to rubber around it. Plus it is right by the floor of course, so it is difficult to get a comfortable grip. The machine wasn't working today, so I wanted to check for blockages, but from experience this knob can break easily if (say) adjustable pliers are used to try to grip the protrusion and twist the knob free.

    I'm sure it is a scam to force owners to get their machines professionally serviced.

    image


    So, I put some 'vaseline' (petroleum jelly) onto the knob to act as a release agent, and then molded a massive lump of the Polydoh around it, and shoved a metal rod into it too. This size of lump takes ages to cool, so to accelerate it I used an air dust spray can upside-down as a kind of freezer spray. Then pulled it off and put the lump in the freezer for 10 minutes.

    Anyway, it worked really well! It helped unscrew the knob with ease, to clear the blockage (a hairpin).

    image

    • Cancel
    • Vote Up +4 Vote Down
    • Sign in to reply
    • More
    • Cancel
  • jw0752
    jw0752 over 5 years ago in reply to shabaz

    Hi Shabaz,


    I got in some of the Playdoh oops I mean Polydoh and I had a lot of fun with it. I am not sure how I will use it but something this cool will certainly find me something to do with it. Thanks again for mentioning it.


    John

    • Cancel
    • Vote Up +1 Vote Down
    • Sign in to reply
    • More
    • Cancel
  • clem57
    clem57 over 5 years ago

    Your skill always has amazed me. Good work again jw0752

    Clem

    • Cancel
    • Vote Up +3 Vote Down
    • Sign in to reply
    • More
    • Cancel
  • shabaz
    shabaz over 5 years ago in reply to Andrew J

    Hi Andrew!


    This one might be more interesting actually, it's the same price, but with colour pellets too (although, it's all in a bag, whereas the other one is in a more convenient pot):

    https://www.amazon.co.uk/gp/product/B01MZE4LYK/ref=ppx_yo_dt_b_asin_title_o03_s00?ie=UTF8&psc=1


    It doesn't seem to stick to stuff, I heat it in a jam jar by pouring in a bit of boiling water slowly (not cracked it so far, but probably a plastic bottle could be safer!) and then throwing in some of the balls.

    They turn transparent really quickly (15-30 seconds) and cling to each other but not to anything else, and then I lift it out with (say) a wood barbequeue skewer, or anything else.

    I used it to make a mic mount, by first wrapping cellophane-like sheet around the mic, and then putting it around it. It didn't stick to the sheet (so possibly the sheet was not needed around the object).

    Working time is maybe a minute before it starts to solidify, and then it's hard after another minute or so (or put it under a cold tap for instant results).

    If you have any left over, if you squeeze it into a flat piece (for large surface area) before it solidifies, then it can be reused by putting it in the hot water again, so nothing gets wasted.

    If it's not flat it just takes ages for the centre of it to soften since it is a bit of a heat insulator too.

    Also apparently it's non-toxic, so kids may like to use it too!

    • Cancel
    • Vote Up +7 Vote Down
    • Sign in to reply
    • More
    • Cancel
>
element14 Community

element14 is the first online community specifically for engineers. Connect with your peers and get expert answers to your questions.

  • Members
  • Learn
  • Technologies
  • Challenges & Projects
  • Products
  • Store
  • About Us
  • Feedback & Support
  • FAQs
  • Terms of Use
  • Privacy Policy
  • Legal and Copyright Notices
  • Sitemap
  • Cookies

An Avnet Company © 2025 Premier Farnell Limited. All Rights Reserved.

Premier Farnell Ltd, registered in England and Wales (no 00876412), registered office: Farnell House, Forge Lane, Leeds LS12 2NE.

ICP 备案号 10220084.

Follow element14

  • X
  • Facebook
  • linkedin
  • YouTube