element14 Community
element14 Community
    Register Log In
  • Site
  • Search
  • Log In Register
  • Community Hub
    Community Hub
    • What's New on element14
    • Feedback and Support
    • Benefits of Membership
    • Personal Blogs
    • Members Area
    • Achievement Levels
  • Learn
    Learn
    • Ask an Expert
    • eBooks
    • element14 presents
    • Learning Center
    • Tech Spotlight
    • STEM Academy
    • Webinars, Training and Events
    • Learning Groups
  • Technologies
    Technologies
    • 3D Printing
    • FPGA
    • Industrial Automation
    • Internet of Things
    • Power & Energy
    • Sensors
    • Technology Groups
  • Challenges & Projects
    Challenges & Projects
    • Design Challenges
    • element14 presents Projects
    • Project14
    • Arduino Projects
    • Raspberry Pi Projects
    • Project Groups
  • Products
    Products
    • Arduino
    • Avnet Boards Community
    • Dev Tools
    • Manufacturers
    • Multicomp Pro
    • Product Groups
    • Raspberry Pi
    • RoadTests & Reviews
  • Store
    Store
    • Visit Your Store
    • Choose another store...
      • Europe
      •  Austria (German)
      •  Belgium (Dutch, French)
      •  Bulgaria (Bulgarian)
      •  Czech Republic (Czech)
      •  Denmark (Danish)
      •  Estonia (Estonian)
      •  Finland (Finnish)
      •  France (French)
      •  Germany (German)
      •  Hungary (Hungarian)
      •  Ireland
      •  Israel
      •  Italy (Italian)
      •  Latvia (Latvian)
      •  
      •  Lithuania (Lithuanian)
      •  Netherlands (Dutch)
      •  Norway (Norwegian)
      •  Poland (Polish)
      •  Portugal (Portuguese)
      •  Romania (Romanian)
      •  Russia (Russian)
      •  Slovakia (Slovak)
      •  Slovenia (Slovenian)
      •  Spain (Spanish)
      •  Sweden (Swedish)
      •  Switzerland(German, French)
      •  Turkey (Turkish)
      •  United Kingdom
      • Asia Pacific
      •  Australia
      •  China
      •  Hong Kong
      •  India
      •  Korea (Korean)
      •  Malaysia
      •  New Zealand
      •  Philippines
      •  Singapore
      •  Taiwan
      •  Thailand (Thai)
      • Americas
      •  Brazil (Portuguese)
      •  Canada
      •  Mexico (Spanish)
      •  United States
      Can't find the country/region you're looking for? Visit our export site or find a local distributor.
  • Translate
  • Profile
  • Settings
Personal Blogs
  • Community Hub
  • More
Personal Blogs
John Wiltrout's Blog TSL-230  Light to Frequency Converter
  • Blog
  • Documents
  • Mentions
  • Sub-Groups
  • Tags
  • More
  • Cancel
  • New
  • Share
  • More
  • Cancel
Group Actions
  • Group RSS
  • More
  • Cancel
Engagement
  • Author Author: jw0752
  • Date Created: 25 Jun 2016 4:42 AM Date Created
  • Views 1792 views
  • Likes 8 likes
  • Comments 4 comments
  • tsl230
  • light-curing
Related
Recommended

TSL-230  Light to Frequency Converter

jw0752
jw0752
25 Jun 2016

Back Ground Information:


One of the important tools in the modern dental clinic is a fairly strong and concentrated light source which is used to cure (harden) light-activated resins. After placing the malleable plastic resin where it is needed the dentist puts the tip of the light gun near the resin and turns it on for an appropriate period of time. It is important that the correct level of light be applied and for the correct period of time. If the level of light is too low the resin will not harden properly. If the light is too intense or applied too quickly the resin may shrink or change shape and not make the proper seal with the tooth surface. As a way of monitoring the intensity of the light output of the gun most of the more expensive light cure units incorporate a light sensor that is used before each use to check that the light intensity is correct.


If you would like more information on the light-activated resin curing procedure here is a link:

https://en.wikipedia.org/wiki/Light-activated_resin


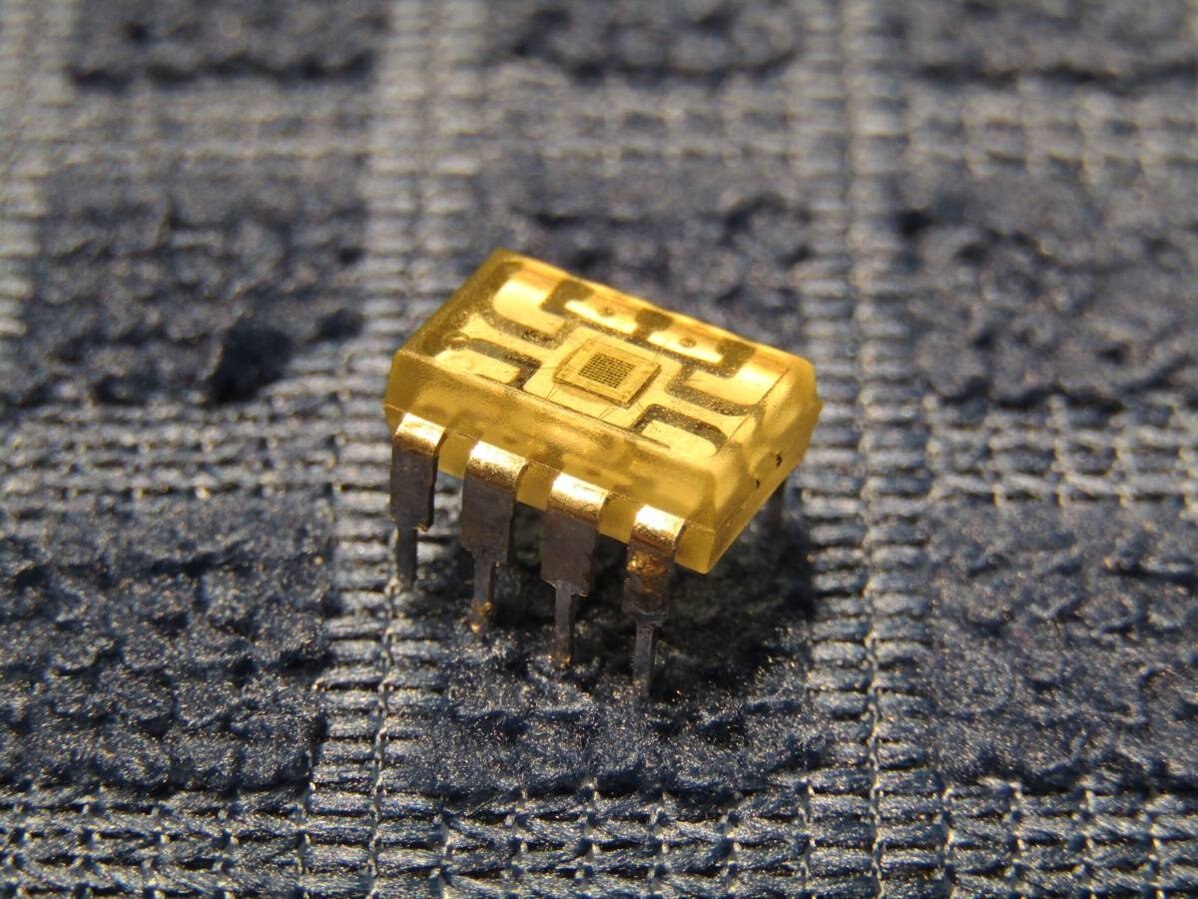
Here is where I come into the picture. As I was salvaging a circuit board for one of these cure lights I came across the TSL230 sensor IC being used as the light quality sensor.


image


Here is a data sheet for the TSL230 Light to Frequency converter:

http://www.ti.com/lit/ds/symlink/tsl230a.pdf


When something interesting like this TSL230 comes from a salvaged board I like to hook it up on a bread board and run a few experiments to get a physical feel for how the circuit works. The data sheet tells us that the TSL230 takes a light level on its photo diode and converts it to a pulsed output. Further the frequency of the pulsed output is dependent on the intensity of the light. The greater the intensity of the light level the higher the frequency of the output. The TSL230 also has programming options that allow the sensitivity of the input to be chosen between OFF, 1X, 10X, and 100X. The output is similarly programmable with the frequency output scaled with dividing by 1, 2, 10, and 100. It is noted in the data sheet that the unity selection produces an output that are pulses. The divide by 2, 10, and 100 selections are output as 50% duty cycle square waves.


For my experiment I have selected the 10X sensitivity level and a divide by 10 level for the frequency output. My light source will be a 6 volt miniature incandescent bulb. By controlling the voltage to the bulb we will be able to control the light level falling on the sensor. It will be important to shield the sensor from ambient light of the shop lights. I have found a black boot that will cover the TSL230 and adapt to the 6 volt bulb so that practically the only light getting to the sensor will come from the 6 volt bulb.


image


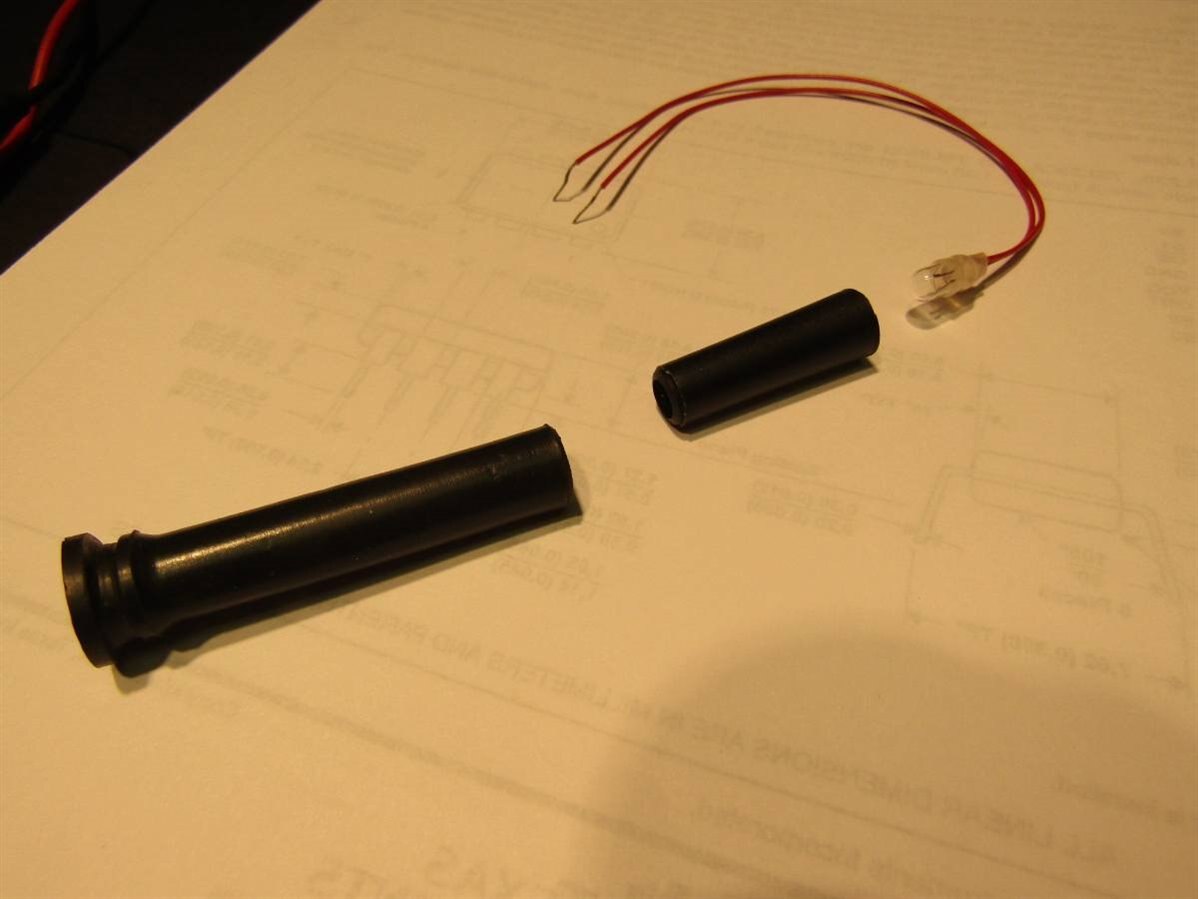
Here is a picture the bread board wired up and also a picture with the boot and bulb in place over the sensor


imageimage


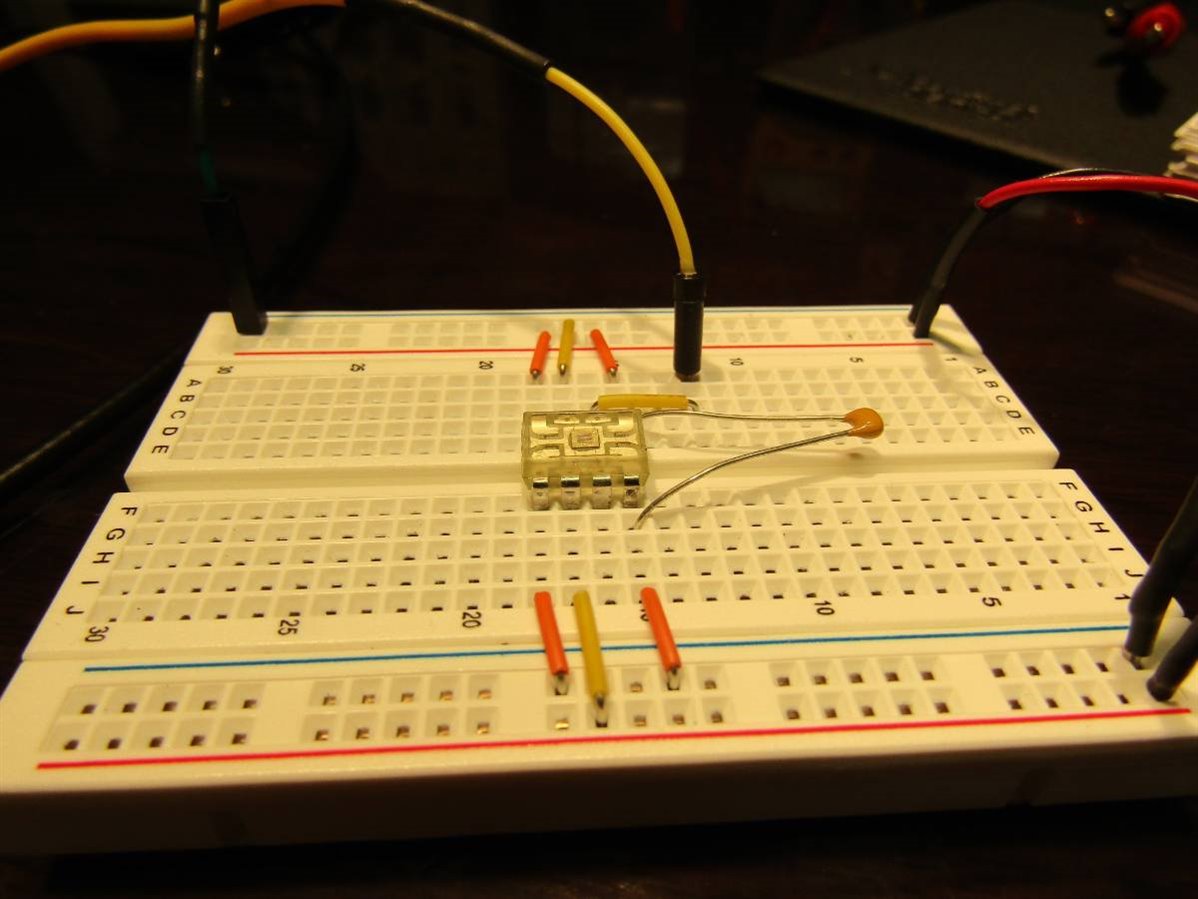
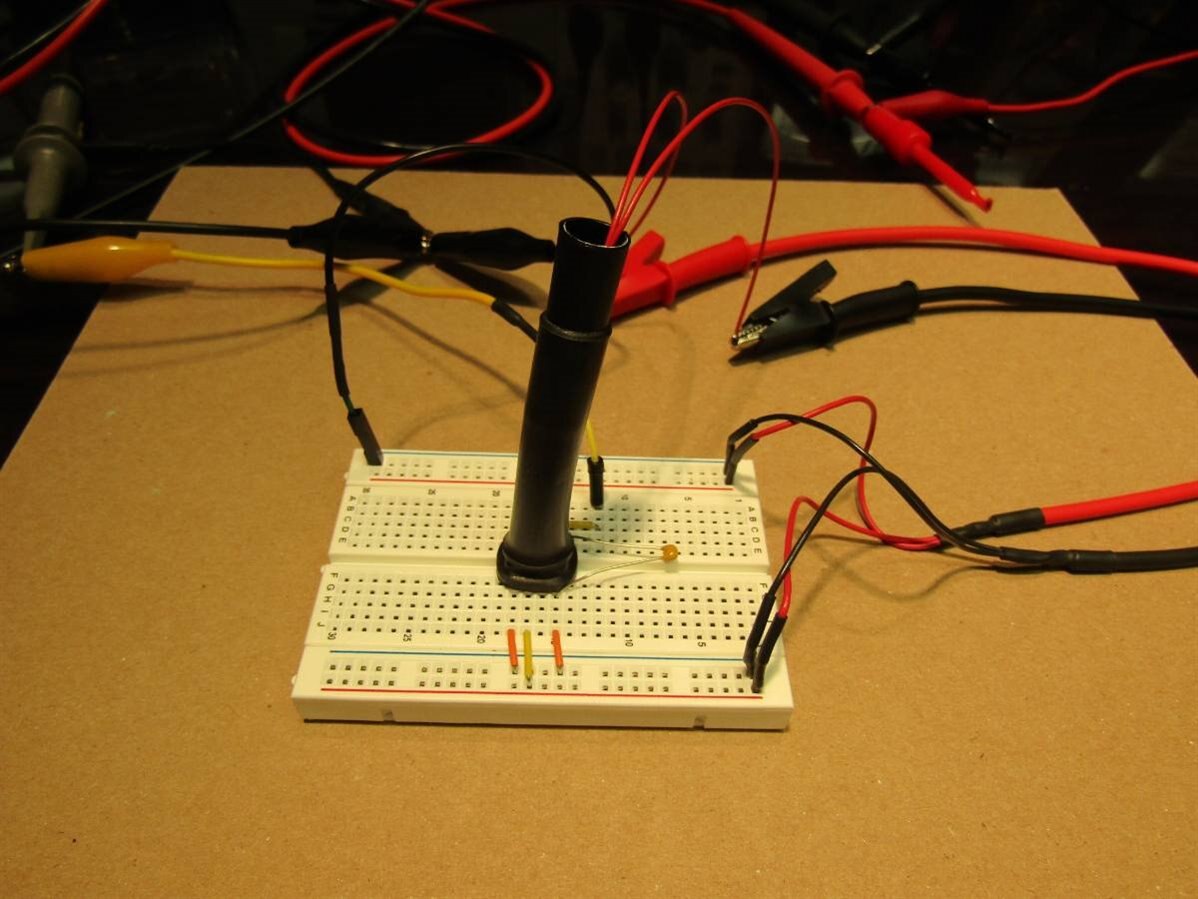
The circuit will be powered with the recommended 5 volts. We will adjust the voltage to the bulb with a variable power supply and the voltage will be monitored with a Fluke Multimeter. The output of the TSL230, itself, will be measured with an oscilloscope and a small frequency counter. You will probably recognize the frequency counter from one of my previous blogs.


image


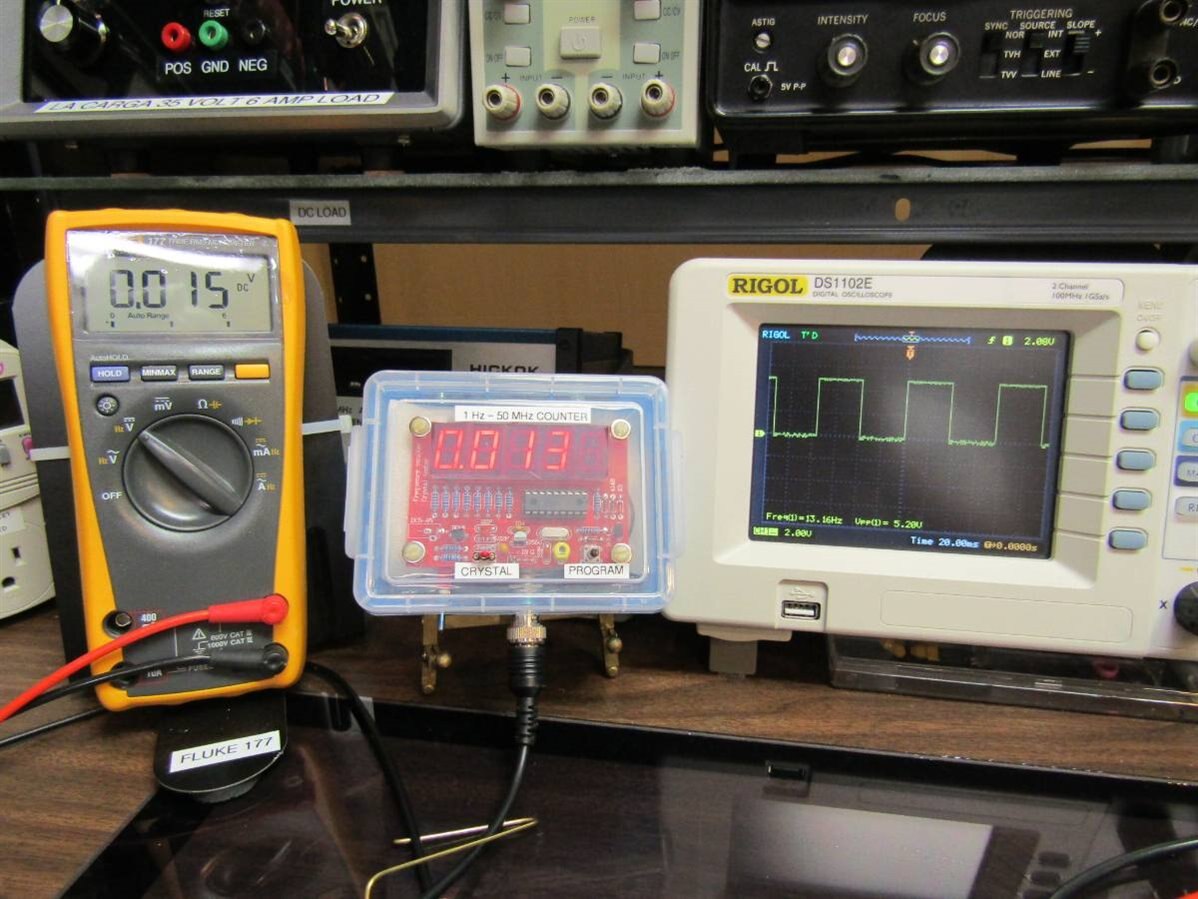
This is the baseline with only 15 mV on the bulb and the output showing 13 Hz.


To properly illustrate here is a short video of the output of the experiment displayed on the oscilloscope and the frequency counter as the voltage, displayed on the Fluke, is increased to the 6 volt bulb. The Oscilloscope will initially show no movement as we are out of range on the low frequency end and, eventually, as we approach full brightness, the resolution will again be lost on the high frequency end. This is because I lack the hands necessary to change the horizontal time on the scope as needed. I have chosen a middle of the road setting for the time base. The frequency counter will better reflect the entire range.


You don't have permission to edit metadata of this video.
Edit media
x
image
Upload Preview
image


This has been a very simple experiment but it gives a good illustration of the capabilities of the TSL230 chip. Further experimentation will allow us to explore the other sensitivity settings and the other output frequencies. In a separate experiment using the 100X input sensitivity it was noted that even with 6 layers of hand towel over the sensor it could still detect the presence or absence of my hand above the sensor shading the stacked up towels.


John

  • Sign in to reply

Top Comments

  • DAB
    DAB over 9 years ago +2
    Great job John, I was not familiar with this device, but now I can see a number of very interesting applications for a couple of these little chips. I may have to pick some up and play with them. DAB
  • Jan Cumps
    Jan Cumps over 9 years ago +1
    Well that's cool. I've had the light wand in my mouth several times without knowing the ins and outs. A while ago I have blogged on how to measure the frequency of such events: 1958 Turntable from the…
  • jw0752
    jw0752 over 9 years ago in reply to Jan Cumps +1
    Hi Jan, Thank you for the good lead on how to interface the IC using the Arduino. While most of my little explorations determine the function of the components I rarely carry this knowledge onto the application…
  • volly
    volly over 8 years ago

    jw0752. As Always....impressive!!!

    • Cancel
    • Vote Up +1 Vote Down
    • Sign in to reply
    • More
    • Cancel
  • DAB
    DAB over 9 years ago

    Great job John,


    I was not familiar with this device, but now I can see a number of very interesting applications for a couple of these little chips.


    I may have to pick some up and play with them.


    DAB

    • Cancel
    • Vote Up +2 Vote Down
    • Sign in to reply
    • More
    • Cancel
  • jw0752
    jw0752 over 9 years ago in reply to Jan Cumps

    Hi Jan,

    Thank you for the good lead on how to interface the IC using the Arduino. While most of my little explorations determine the function of the components I rarely carry this knowledge onto the application phase.

    John

    • Cancel
    • Vote Up +1 Vote Down
    • Sign in to reply
    • More
    • Cancel
  • Jan Cumps
    Jan Cumps over 9 years ago

    Well that's cool. I've had the light wand in my mouth several times without knowing the ins and outs.


    A while ago I have blogged on how to measure the frequency of such events:

    1958 Turntable from the Black Forest - 5: Turntable speed sample testbed with Arduino UNO


    If you have an Arduino, you can make it throw an interrupt on the flank of your pulse. A hardware timer can tell you the time between the flanks.

    I also have the similar code for a TI automotive microcontroller.

    edit: here it is: Vintage Turntable repair: Can I fix a Perpetuum Ebner from 1958 - part 8 - Sample the Motor Speed with Microcontroller

    • Cancel
    • Vote Up +1 Vote Down
    • Sign in to reply
    • More
    • Cancel
element14 Community

element14 is the first online community specifically for engineers. Connect with your peers and get expert answers to your questions.

  • Members
  • Learn
  • Technologies
  • Challenges & Projects
  • Products
  • Store
  • About Us
  • Feedback & Support
  • FAQs
  • Terms of Use
  • Privacy Policy
  • Legal and Copyright Notices
  • Sitemap
  • Cookies

An Avnet Company © 2025 Premier Farnell Limited. All Rights Reserved.

Premier Farnell Ltd, registered in England and Wales (no 00876412), registered office: Farnell House, Forge Lane, Leeds LS12 2NE.

ICP 备案号 10220084.

Follow element14

  • X
  • Facebook
  • linkedin
  • YouTube