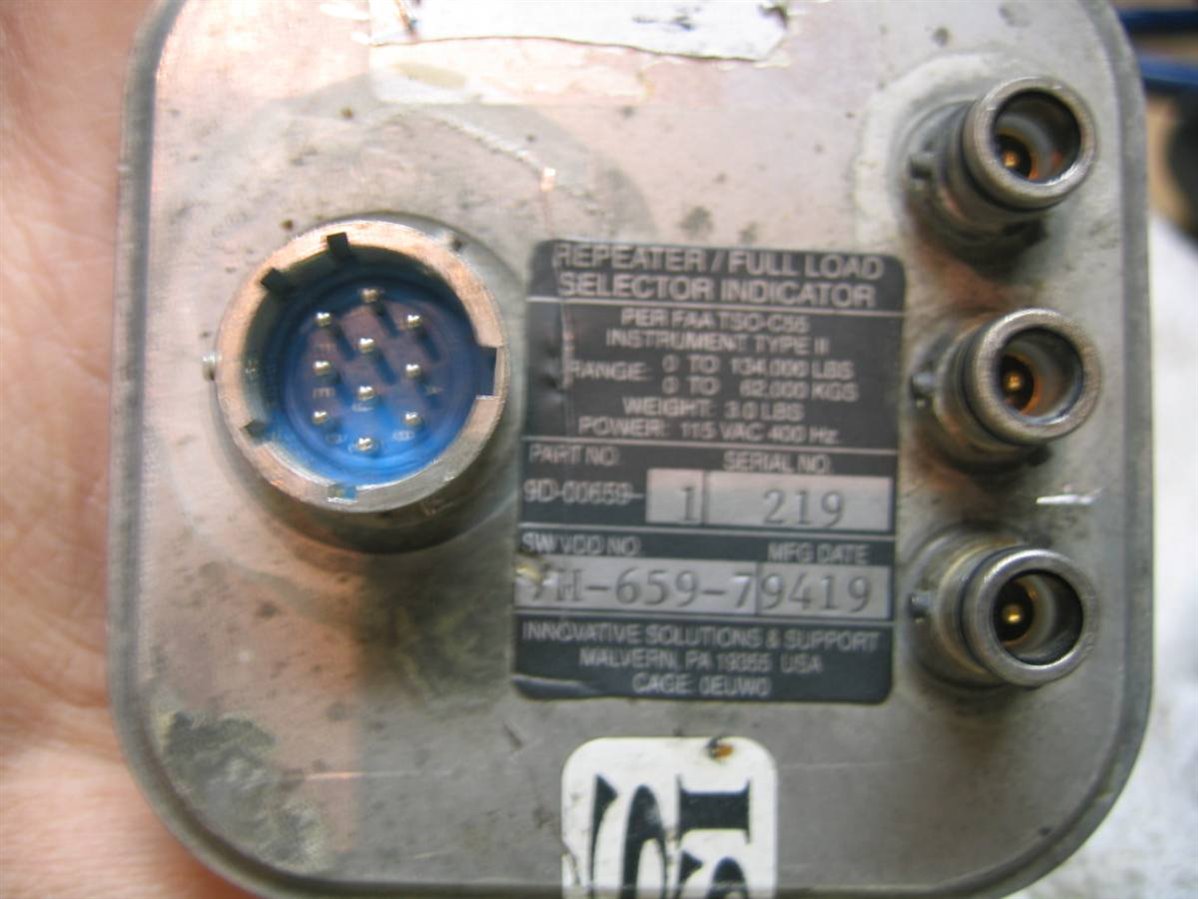
element14 Community
element14 Community
    Register Log In
  • Site
  • Search
  • Log In Register
  • Community Hub
    Community Hub
    • What's New on element14
    • Feedback and Support
    • Benefits of Membership
    • Personal Blogs
    • Members Area
    • Achievement Levels
  • Learn
    Learn
    • Ask an Expert
    • eBooks
    • element14 presents
    • Learning Center
    • Tech Spotlight
    • STEM Academy
    • Webinars, Training and Events
    • Learning Groups
  • Technologies
    Technologies
    • 3D Printing
    • FPGA
    • Industrial Automation
    • Internet of Things
    • Power & Energy
    • Sensors
    • Technology Groups
  • Challenges & Projects
    Challenges & Projects
    • Design Challenges
    • element14 presents Projects
    • Project14
    • Arduino Projects
    • Raspberry Pi Projects
    • Project Groups
  • Products
    Products
    • Arduino
    • Avnet & Tria Boards Community
    • Dev Tools
    • Manufacturers
    • Multicomp Pro
    • Product Groups
    • Raspberry Pi
    • RoadTests & Reviews
  • About Us
  • Store
    Store
    • Visit Your Store
    • Choose another store...
      • Europe
      •  Austria (German)
      •  Belgium (Dutch, French)
      •  Bulgaria (Bulgarian)
      •  Czech Republic (Czech)
      •  Denmark (Danish)
      •  Estonia (Estonian)
      •  Finland (Finnish)
      •  France (French)
      •  Germany (German)
      •  Hungary (Hungarian)
      •  Ireland
      •  Israel
      •  Italy (Italian)
      •  Latvia (Latvian)
      •  
      •  Lithuania (Lithuanian)
      •  Netherlands (Dutch)
      •  Norway (Norwegian)
      •  Poland (Polish)
      •  Portugal (Portuguese)
      •  Romania (Romanian)
      •  Russia (Russian)
      •  Slovakia (Slovak)
      •  Slovenia (Slovenian)
      •  Spain (Spanish)
      •  Sweden (Swedish)
      •  Switzerland(German, French)
      •  Turkey (Turkish)
      •  United Kingdom
      • Asia Pacific
      •  Australia
      •  China
      •  Hong Kong
      •  India
      • Japan
      •  Korea (Korean)
      •  Malaysia
      •  New Zealand
      •  Philippines
      •  Singapore
      •  Taiwan
      •  Thailand (Thai)
      • Vietnam
      • Americas
      •  Brazil (Portuguese)
      •  Canada
      •  Mexico (Spanish)
      •  United States
      Can't find the country/region you're looking for? Visit our export site or find a local distributor.
  • Translate
  • Profile
  • Settings
Personal Blogs
  • Community Hub
  • More
Personal Blogs
NexGen Flight Simuator NexGen: Hacking the Fuel Load Indicator.
  • Blog
  • Documents
  • Mentions
  • Sub-Groups
  • Tags
  • More
  • Cancel
  • New
  • Share
  • More
  • Cancel
Group Actions
  • Group RSS
  • More
  • Cancel
Engagement
  • Author Author: phoenixcomm
  • Date Created: 2 Oct 2014 12:01 PM Date Created
  • Views 1584 views
  • Likes 2 likes
  • Comments 10 comments
  • 9d-00659-1
  • diy cockpit
  • hardware
  • mc68hc711
  • flight simulation
  • 219-100-001
  • nexgen flight simulator
  • hacking
  • hdsp-2131txv
Related
Recommended

NexGen: Hacking the Fuel Load Indicator.

phoenixcomm
phoenixcomm
2 Oct 2014
Manufacture Part Number Miss
Parker Hannifin 219-100-001
Innovative Solutions 9D-00659-1 SW 7H-659-79419
Manufacture & Part Numbers
Table 1

image
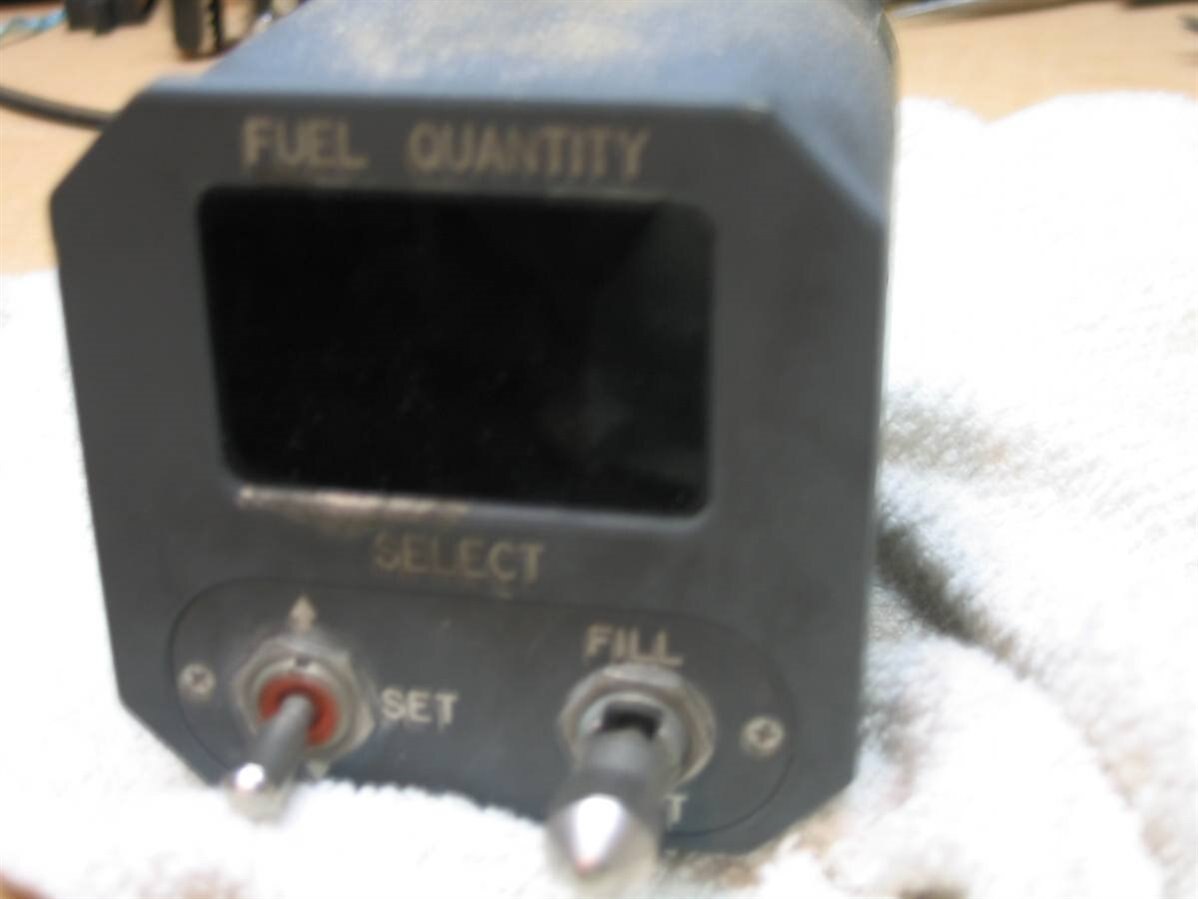
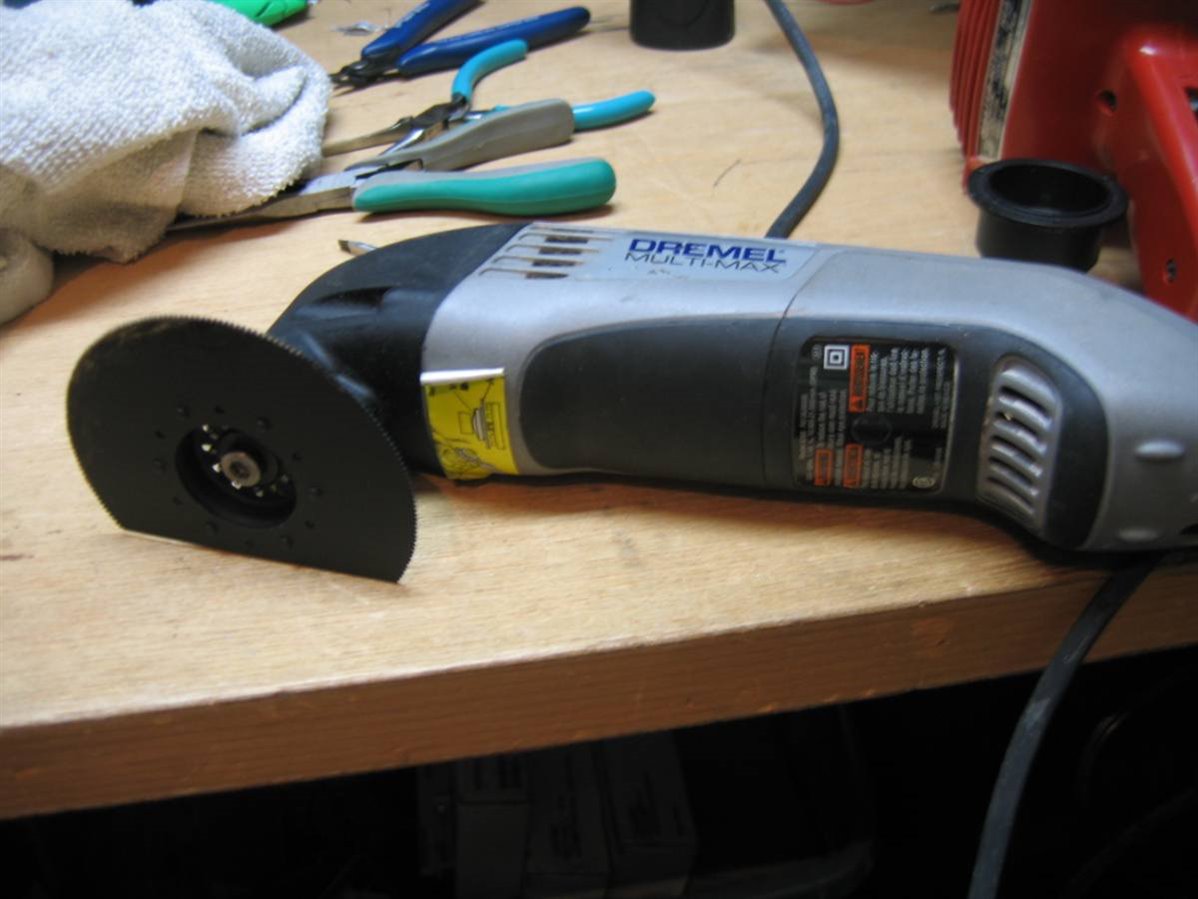
I have had this Fuel Quantity Indicator  (Figure 1) for about 6 months or so. I have been stonewalled by ISI from getting any info. During Cockpit-Fest it was suggested that I cut the unit apart. Well, this unit is solder sealed and I don't have a fire ring.. So out came my Multi-Max (Figure 8) and put a metal blade on it.. well it took about an hour to get it apart and it's not pretty, but the job is done.

Well first by the numbers (see Table 1): Parker Hannifin made the unit. for Innovative Solutions got it and well good luck. In the bottom there is a PGA85 (Pin Grid Array) and I took off the label, and the part is a  5M-00497-1 which is a private label, and a date code of 9416.  More Work!


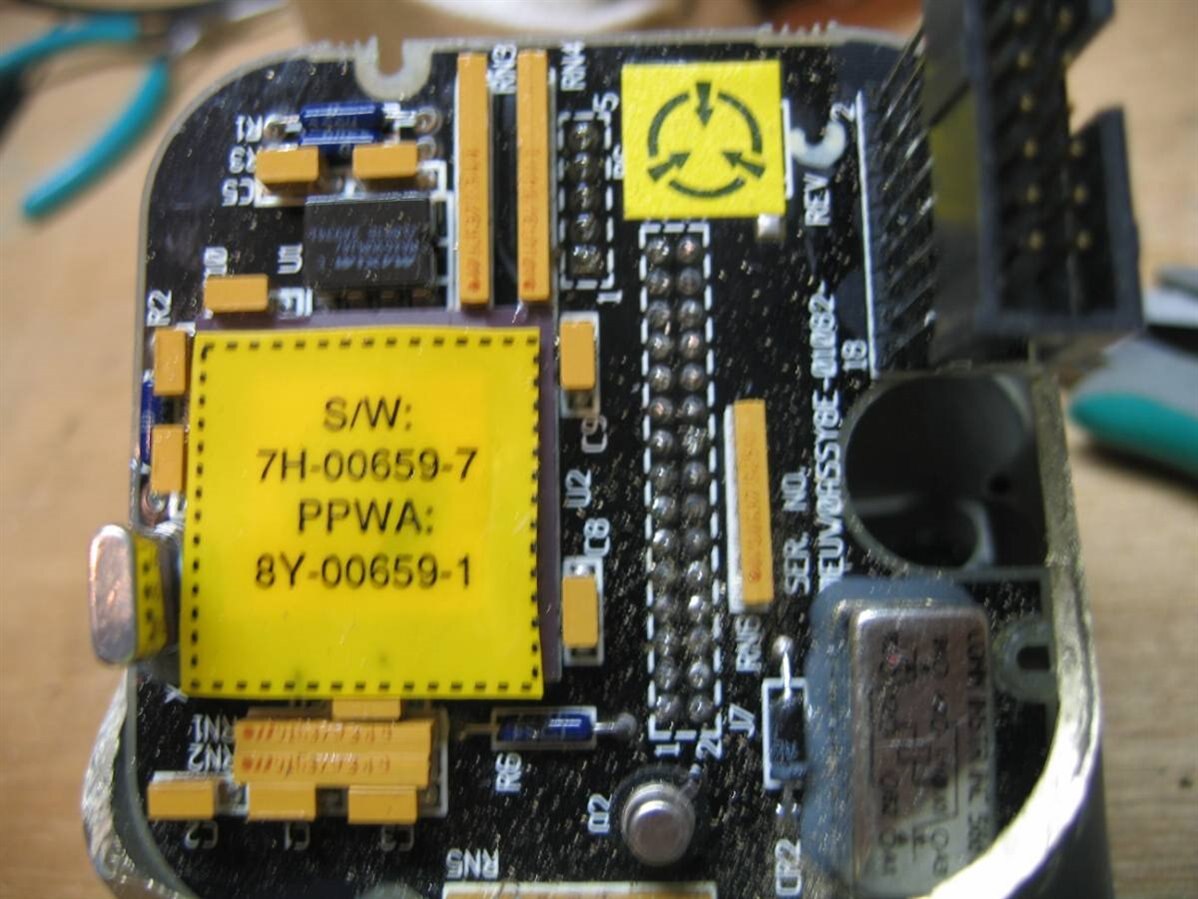
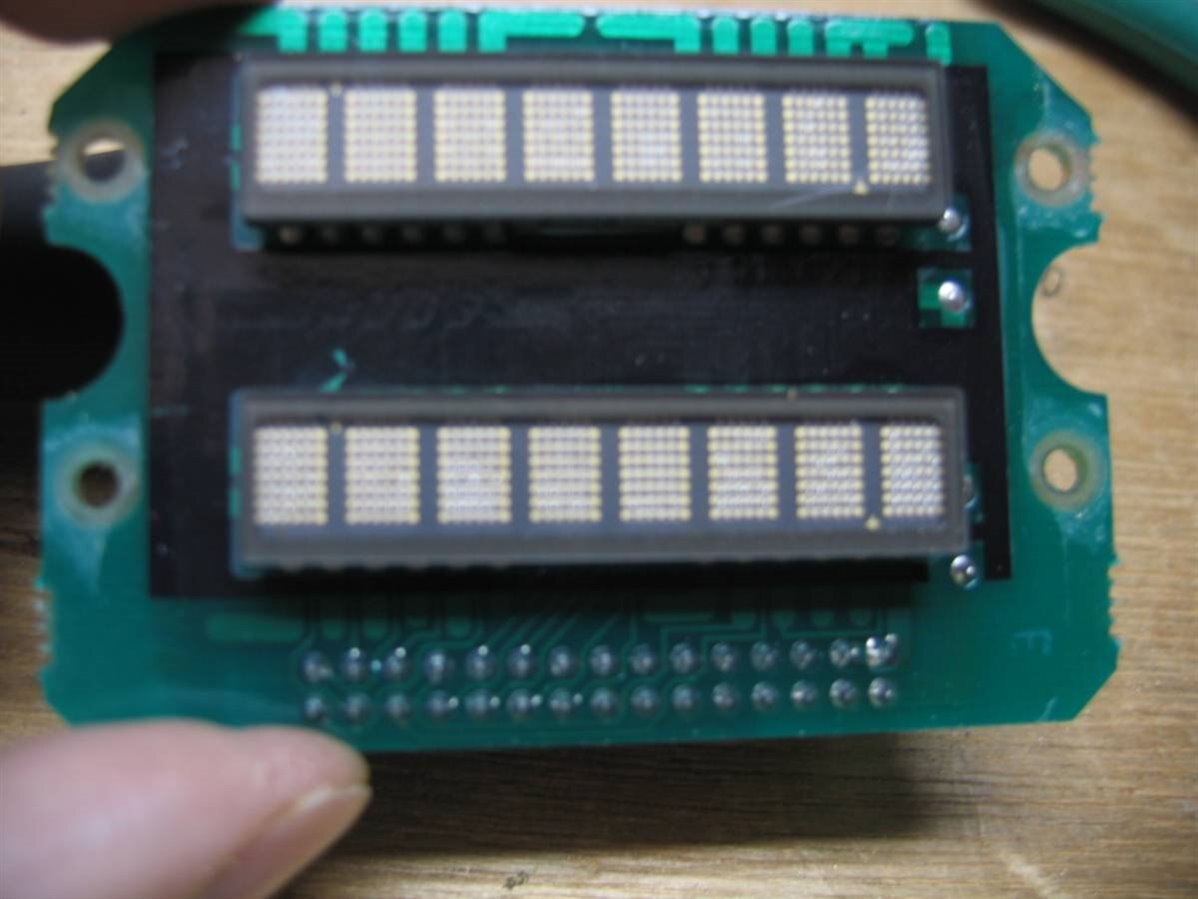
THE ANALYSIS: The unit consists of three (3) boards:

Part Numbers Description
8E-01117 Power Supply Board
8E-01082-18 Logic Board
8E-01081 Display Board
Part Numbers & Descriptions
Table 2
  • The back ie Power Supply (Figure 4): Has an LM-109 5vdc regulator + a bridge and some caps.
  • The middle ie Logic Board (Figure 5): Has a large EE??? part and a MAX690MJA microprocessor supervisor
  • The front ie the Display Board (Figure 6): Has two (2) HDSP-2131TXV  each display has 8 chars 5mm high of 5 x 7 chars each and has a 30 pin head connector.

If I can get the power supply board out of the housing I can tag in 5vdc from an external power supply to power up this unit... image


Keep Tuned In More To Come!! image

~~Cris H.


UPDATE:  shabaz  informed me that IC manufactures sometimes put the part number in the silicon.... and he was right..

Our Mystery part is a Motorola MC68HC711  which is a MC68HC11 with a security feature..


image image
Fuel Repeater  / Indicator
Figure 1
Fuel Repeater  / Indicator
Figure 2
image image
Front Half after the cut
Figure 3
Rear Half after the cut
Figure 4
image image
Logic Card
Figure 5
HP Smart Display Card
Figure 6
image image
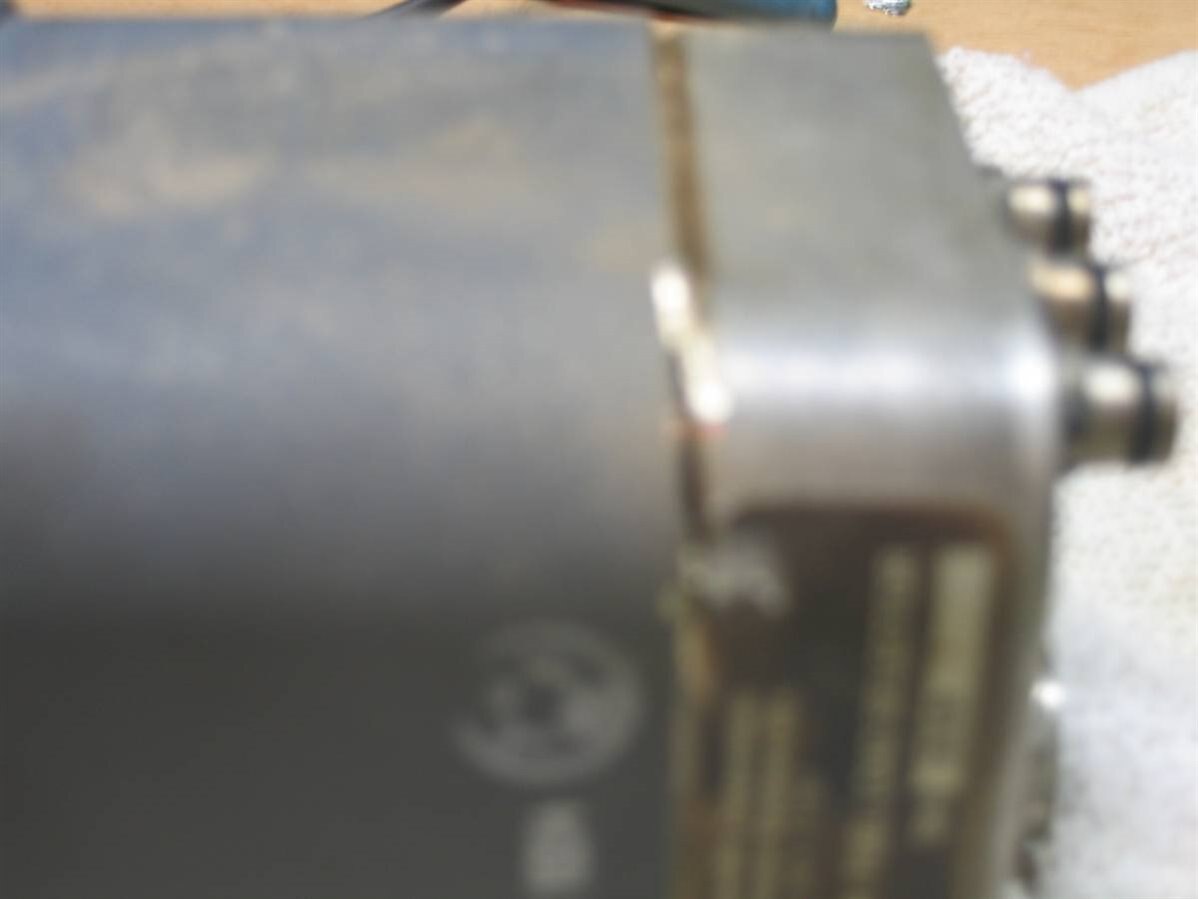
Just Cut on the Line
Figure 7
Dremel Multi-Max with Steel Blade
Figure 8
  • Sign in to reply

Top Comments

  • shabaz
    shabaz over 11 years ago in reply to DAB +1
    Sadly quite a few companies have a hard time sharing information, they probably don't have mechanisms in place to get high-level (non-sensitive) engineering data to others : ( It is maybe harder the older…
Parents
  • shabaz
    shabaz over 11 years ago

    Hi Cris,


    I can't recall any microcontrollers in PGA format, probably because I guess it is an expensive package and in aviation maybe this is an extremely reliable package.

    Is there a PROM window on it, underneath the label? If so, a magnifying glass or microscope may reveal some information, since the manufacturer's name may be written on the silicon.

    Also I wonder what the yellow label (circle with three arrows pointing inward) means, it is in a couple of places in your photographs.

    • Cancel
    • Vote Up 0 Vote Down
    • Sign in to reply
    • More
    • Cancel
  • phoenixcomm
    phoenixcomm over 11 years ago in reply to shabaz

    You where right!! MC68HC711 which is a MC68HC11

    • Cancel
    • Vote Up 0 Vote Down
    • Sign in to reply
    • More
    • Cancel
  • shabaz
    shabaz over 11 years ago in reply to phoenixcomm

    Oh, awesome : )

    That's a nice microcontroller, it was among the first that didn't need any expensive programming tools, if you sent it

    a special character on start-up to it's uart, then it would accept a bootloader of your choice. Then the bootloader could be

    used to pull in the code to be programmed into the in-built memory. And the HC11 has a nice architecture and instruction set.

    • Cancel
    • Vote Up 0 Vote Down
    • Sign in to reply
    • More
    • Cancel
  • phoenixcomm
    phoenixcomm over 11 years ago in reply to shabaz

    Shabaz the 687HC711 is the same design as the HC11 but with one difference! It has a security feature that when turned on:

    NOTE

    If the part is placed in bootstrap or expanded, the code in EEPROM and

    RAM will be erased and the microcontroller cannot be reused. The security

    software will constantly read the NOSEC bit and lock the part.


    so how can I dump the part any Ideas??

    • Cancel
    • Vote Up 0 Vote Down
    • Sign in to reply
    • More
    • Cancel
Comment
  • phoenixcomm
    phoenixcomm over 11 years ago in reply to shabaz

    Shabaz the 687HC711 is the same design as the HC11 but with one difference! It has a security feature that when turned on:

    NOTE

    If the part is placed in bootstrap or expanded, the code in EEPROM and

    RAM will be erased and the microcontroller cannot be reused. The security

    software will constantly read the NOSEC bit and lock the part.


    so how can I dump the part any Ideas??

    • Cancel
    • Vote Up 0 Vote Down
    • Sign in to reply
    • More
    • Cancel
Children
  • shabaz
    shabaz over 11 years ago in reply to phoenixcomm

    Hi Cris,


    As far as I recall, the '7' signified a device with the main memory being EPROM (and an '8' would signify the main memory being EEPROM) but

    the '7' series also contained a small chunk of EEPROM too (for things like (say) config settings for the desired application).

    In some cases small programs could fit entirely in the EEPROM, whereas larger programs did need to fit in the EPROM on the 7 series.


    In this PDF datasheet doc page 55, it suggests that the security feature would only erase the EEPROM portion of the 7 series.

    So, you might be lucky and maybe nothing non-critical is stored in the EEPROM. On the other hand they may have stored some portion of the code

    in the EEPROM, and in that case you'd lose that.


    The above is only true if they have enabled the security feature when they programmed the device, i.e. they might not have since it is

    optional. Hard to know, but there is a reasonable possibility that they didn't lock it.


    If you're willing to risk losing the EEPROM contents, then the remainder EPROM can be read out, it entails writing a bootloader that will

    read the EPROM and pass the output over the UART so that you can log it.


    The bootloader could be custom, but it would entail studying HC11 machine instructions to create it. However, it happens that Motorola

    had a nice debug tool called PCBug11 (PDF user guide), which came with a bootloader, and the PC software would push it to the board

    over a serial port, and then use it to (say) display the EPROM contents. So, this could be a solution. However the software is

    ancient and probably needs MSDOS to run, and a PC with a built-in serial port possibly.

    However if you can obtain the PCBUG11 software (I'm sure there are copies on the Internet, it is likely in the public domain), then you could

    just use the bootloader portion possibly (this is guesswork however), and use some serial port software (maybe PuTTY) to push it to your board, and

    then press the keys that command the bootloader to dump out the EPROM contents (these commands will be documented in Motorola's user guide

    for PCBUG11, they were exceptional at documenting everything).

    • Cancel
    • Vote Up 0 Vote Down
    • Sign in to reply
    • More
    • Cancel
element14 Community

element14 is the first online community specifically for engineers. Connect with your peers and get expert answers to your questions.

  • Members
  • Learn
  • Technologies
  • Challenges & Projects
  • Products
  • Store
  • About Us
  • Feedback & Support
  • FAQs
  • Terms of Use
  • Privacy Policy
  • Legal and Copyright Notices
  • Sitemap
  • Cookies

An Avnet Company © 2025 Premier Farnell Limited. All Rights Reserved.

Premier Farnell Ltd, registered in England and Wales (no 00876412), registered office: Farnell House, Forge Lane, Leeds LS12 2NE.

ICP 备案号 10220084.

Follow element14

  • X
  • Facebook
  • linkedin
  • YouTube