


THE PLAN (Step 2): Well the first thing we need is a piece of Vector Board, about 4" x 4" or about 10 x 10 cm ( Do not buy any cheap crap off of ebay.. It must be FR-4, glass-epoxy ).
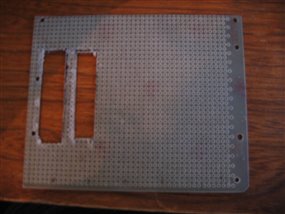 |
| Vector Board before for clean up Figure 1 |
I need cut 2 holes in the board about 2" x .5" (Figure 1), or you can use a DB25 punch if you are lucky enough to own one, $$$$. I cut the two holes with my Dremel multi-tool, but it is very hard to control, I now have to clean it up, anyway, with my Dremel. If I had the right blade for the rotary tool it would have been easier. Then I need to mount the adapter plate(s)(Figure 2) to the Vector Board and the DB25(s) to them as well.
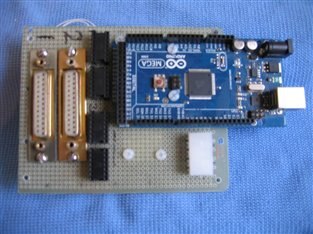
The next thing is to mount the three 16 pin IC sockets, a little dab of hot glue, or crazy glue and that should do it. But remember to leave room for the 4 pin Molex connector that is common on disk drives, and fans, Molex Part Number  15-24-4441, Molex Specification Sheet, and a relay that control the panel lamps. 15-24-4441, Molex Specification Sheet, and a relay that control the panel lamps. |
I really like this relay module I found on eBay (Figure 3) and the cool part is I don't have to build it. There is all so a 2 channel module as well. BTW they are cheaper than I can build them..lol
Now the only this to do is break out the Wire Wrap stuff and wire it up (Figure 4).
BTW Long to finish got sick anyway just finished now on to the next part. |

| I am having the adapter plates made for me. Let me know if you think you can use them. I might get a small run of 100 made. My guess is they will be about 5 to 8 bucks each. |
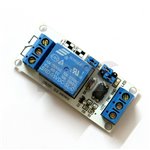 |
1 Channel Isolated 5V Relay ModuleFigure 3 |
 | 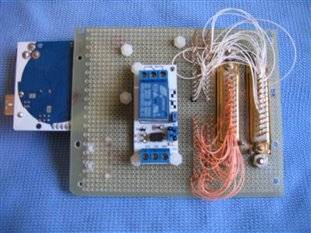 |
| Interface board finished * * The power connector, nor is the relay wired in yet.. Figure 4 | |
One more note: I have found some food containers used in the food business NR2402P-BLK my interface bolts right in. Oh yes the white dots in the photos in figure 4 are nylon 4-40 screws and nuts. 
Top Comments