element14 Community
element14 Community
    Register Log In
  • Site
  • Search
  • Log In Register
  • About Us
  • Community Hub
    Community Hub
    • What's New on element14
    • Feedback and Support
    • Benefits of Membership
    • Personal Blogs
    • Members Area
    • Achievement Levels
  • Learn
    Learn
    • Ask an Expert
    • eBooks
    • element14 presents
    • Learning Center
    • Tech Spotlight
    • STEM Academy
    • Webinars, Training and Events
    • Learning Groups
  • Technologies
    Technologies
    • 3D Printing
    • FPGA
    • Industrial Automation
    • Internet of Things
    • Power & Energy
    • Sensors
    • Technology Groups
  • Challenges & Projects
    Challenges & Projects
    • Design Challenges
    • element14 presents Projects
    • Project14
    • Arduino Projects
    • Raspberry Pi Projects
    • Project Groups
  • Products
    Products
    • Arduino
    • Avnet Boards Community
    • Dev Tools
    • Manufacturers
    • Multicomp Pro
    • Product Groups
    • Raspberry Pi
    • RoadTests & Reviews
  • Store
    Store
    • Visit Your Store
    • Choose another store...
      • Europe
      •  Austria (German)
      •  Belgium (Dutch, French)
      •  Bulgaria (Bulgarian)
      •  Czech Republic (Czech)
      •  Denmark (Danish)
      •  Estonia (Estonian)
      •  Finland (Finnish)
      •  France (French)
      •  Germany (German)
      •  Hungary (Hungarian)
      •  Ireland
      •  Israel
      •  Italy (Italian)
      •  Latvia (Latvian)
      •  
      •  Lithuania (Lithuanian)
      •  Netherlands (Dutch)
      •  Norway (Norwegian)
      •  Poland (Polish)
      •  Portugal (Portuguese)
      •  Romania (Romanian)
      •  Russia (Russian)
      •  Slovakia (Slovak)
      •  Slovenia (Slovenian)
      •  Spain (Spanish)
      •  Sweden (Swedish)
      •  Switzerland(German, French)
      •  Turkey (Turkish)
      •  United Kingdom
      • Asia Pacific
      •  Australia
      •  China
      •  Hong Kong
      •  India
      •  Korea (Korean)
      •  Malaysia
      •  New Zealand
      •  Philippines
      •  Singapore
      •  Taiwan
      •  Thailand (Thai)
      • Americas
      •  Brazil (Portuguese)
      •  Canada
      •  Mexico (Spanish)
      •  United States
      Can't find the country/region you're looking for? Visit our export site or find a local distributor.
  • Translate
  • Profile
  • Settings
Personal Blogs
  • Community Hub
  • More
Personal Blogs
Rachael's Blog Lab Equipment Projects - Vacuum Pick and Place Assistant Part 1 - Overview
  • Blog
  • Documents
  • Mentions
  • Sub-Groups
  • Tags
  • More
  • Cancel
  • New
  • Share
  • More
  • Cancel
Group Actions
  • Group RSS
  • More
  • Cancel
Engagement
  • Author Author: rachaelp
  • Date Created: 20 Dec 2016 6:35 PM Date Created
  • Views 3817 views
  • Likes 11 likes
  • Comments 23 comments
  • project outline
  • lab_equipment
Related
Recommended

Lab Equipment Projects - Vacuum Pick and Place Assistant Part 1 - Overview

rachaelp
rachaelp
20 Dec 2016

There's been a lot of talk on shabaz's blog for his pick and place buddy recently and this gave me the motivation to get on with the very similar project I have been planning. There are some great ideas in that project and the subsequent discussions which will definitely enhance what I was planning and as a result of the inspiration from there have come up with a bunch of additional ideas for things I would like to add to my own. This will be the first blog of several as I go through the design and get it working. I have to fit this in around my main work so it may take a little while before it is complete.


The basic requirements for this project are as follows:


  1. Provide effective and controllable vacuum pickup for SMD components ranging from small surface mount passives to larger IC's.
  2. Give guidance to the user about which parts to place in which locations.
  3. Be reliable and easy to maintain.
  4. Be self contained (i.e. no need for external vacuum or compressed air source).
  5. Be relatively quiet in operation.
  6. Be integrated with my existing systems to ease use.


So today the chassis I ordered to complete the bulk of the kit needed for this project arrived. Whilst there are still things I need to add to the kit as I work through how it's all actually going to work, most of what I will need to get the initial prototype up and running are there. So here is a picture of the bulk of the items:


image


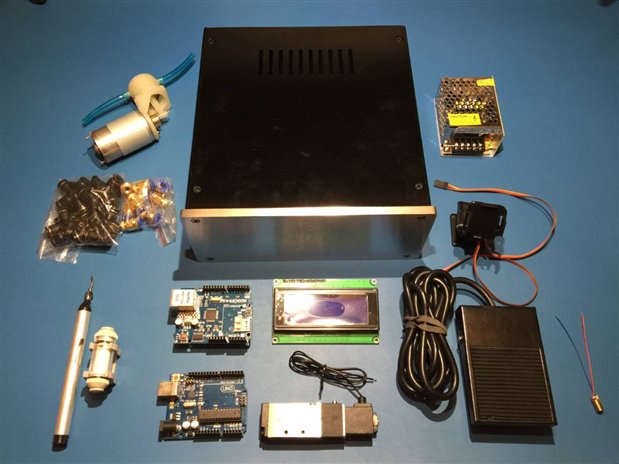
You can see I have gone for a substantial aluminium chassis. This is personal preference, I like equipment that has a really sturdy and well built feel to it so I went with a premium case. The down side is it makes sorting the mechanical parts of the project more challenging as cutting out holes in that thick brushed aluminium front panel is a lot more difficult than if it were a thin aluminium or plastic panel.


For the initial prototype I have got a cheap PSU from Amazon and I am using an Arduino for the simplicity of getting the thing working. Once it's all working I will probably spin a lot of the electronics into a custom PCB just so I can make it all neater and add in any customisations to the circuit that I want. I'll do a blog covering that process which will lead into some blogs I am considering covering EAGLE and how I set things up etc.


In the above you can see several pieces of the kit, some you'll know what they are for with regards a project of this type, others may be more of a mystery. I'm going to leave you guessing in the comments for a little while on that one just for a little fun image


This was just a brief overview, thanks for reading and let me know your thoughts in the comments!

  • Sign in to reply

Top Comments

  • Jan Cumps
    Jan Cumps over 8 years ago +3
    I'll guess the pneumatics: Left top: pump left middle: several types of push-in connectors left bottom: handpiece and filter mid bottom: valve right-bottom: wah-wah.
  • mcb1
    mcb1 over 8 years ago in reply to Jan Cumps +3
    I've done better than that and guessed everything ..... its "stuff" The object on the right looks like some form of axis control. I'm picking its for moving the selfie camera so you can capture the tongue…
  • Jan Cumps
    Jan Cumps over 8 years ago in reply to rachaelp +3
    I too find it easier with vacuum than with tweezers. - as Rachael says, you can pick the components straight out of the strips. - it's possible to give the component an extra nudge down into the paste…
  • philparker
    philparker over 2 years ago

    Shabaz’s blog was a good one, but I loved how you explained things. I have never tried this, but I am gonna give it a try. Wish me luck!

    • Cancel
    • Vote Up 0 Vote Down
    • Sign in to reply
    • More
    • Cancel
  • michaelkellett
    michaelkellett over 8 years ago in reply to shabaz

    The ones we had were made by Blundell.


    They still exist but don't sell them any more.


    Here's a link to one  a bit more modern than ours:


    MASCOT Laser Guided PCB Assembly Station


    MK

    • Cancel
    • Vote Up +1 Vote Down
    • Sign in to reply
    • More
    • Cancel
  • shabaz
    shabaz over 8 years ago in reply to michaelkellett

    Hi Michael,


    Do you remember the name of that machine? I was trying to recall it..

    The one I saw generated three green spots or something..

    • Cancel
    • Vote Up 0 Vote Down
    • Sign in to reply
    • More
    • Cancel
  • rachaelp
    rachaelp over 8 years ago in reply to michaelkellett

    Michael Kellett wrote:


    I liked machines we used to have years and years ago which shone a light spot at the place to put the next component. You could drive that with the CAD system output.

    Yes you could image

    • Cancel
    • Vote Up +1 Vote Down
    • Sign in to reply
    • More
    • Cancel
  • shabaz
    shabaz over 8 years ago in reply to rachaelp

    Nice video! Lots of useful tips and ideas..

    I agree, having a vacuum pen opens up possibilities, even if it augments tweezers or even blue-tack as the video shows image

    I'm helping some people with a prototype lab, here we were at the weekend trying to figure out oven temperatures..

    actually we didn't realize our photo was being taken, we were too busy looking at the numbers.


    image

    • Cancel
    • Vote Up +3 Vote Down
    • Sign in to reply
    • More
    • Cancel
>
element14 Community

element14 is the first online community specifically for engineers. Connect with your peers and get expert answers to your questions.

  • Members
  • Learn
  • Technologies
  • Challenges & Projects
  • Products
  • Store
  • About Us
  • Feedback & Support
  • FAQs
  • Terms of Use
  • Privacy Policy
  • Legal and Copyright Notices
  • Sitemap
  • Cookies

An Avnet Company © 2025 Premier Farnell Limited. All Rights Reserved.

Premier Farnell Ltd, registered in England and Wales (no 00876412), registered office: Farnell House, Forge Lane, Leeds LS12 2NE.

ICP 备案号 10220084.

Follow element14

  • X
  • Facebook
  • linkedin
  • YouTube