element14 Community
element14 Community
    Register Log In
  • Site
  • Search
  • Log In Register
  • About Us
  • Community Hub
    Community Hub
    • What's New on element14
    • Feedback and Support
    • Benefits of Membership
    • Personal Blogs
    • Members Area
    • Achievement Levels
  • Learn
    Learn
    • Ask an Expert
    • eBooks
    • element14 presents
    • Learning Center
    • Tech Spotlight
    • STEM Academy
    • Webinars, Training and Events
    • Learning Groups
  • Technologies
    Technologies
    • 3D Printing
    • FPGA
    • Industrial Automation
    • Internet of Things
    • Power & Energy
    • Sensors
    • Technology Groups
  • Challenges & Projects
    Challenges & Projects
    • Design Challenges
    • element14 presents Projects
    • Project14
    • Arduino Projects
    • Raspberry Pi Projects
    • Project Groups
  • Products
    Products
    • Arduino
    • Avnet Boards Community
    • Dev Tools
    • Manufacturers
    • Multicomp Pro
    • Product Groups
    • Raspberry Pi
    • RoadTests & Reviews
  • Store
    Store
    • Visit Your Store
    • Choose another store...
      • Europe
      •  Austria (German)
      •  Belgium (Dutch, French)
      •  Bulgaria (Bulgarian)
      •  Czech Republic (Czech)
      •  Denmark (Danish)
      •  Estonia (Estonian)
      •  Finland (Finnish)
      •  France (French)
      •  Germany (German)
      •  Hungary (Hungarian)
      •  Ireland
      •  Israel
      •  Italy (Italian)
      •  Latvia (Latvian)
      •  
      •  Lithuania (Lithuanian)
      •  Netherlands (Dutch)
      •  Norway (Norwegian)
      •  Poland (Polish)
      •  Portugal (Portuguese)
      •  Romania (Romanian)
      •  Russia (Russian)
      •  Slovakia (Slovak)
      •  Slovenia (Slovenian)
      •  Spain (Spanish)
      •  Sweden (Swedish)
      •  Switzerland(German, French)
      •  Turkey (Turkish)
      •  United Kingdom
      • Asia Pacific
      •  Australia
      •  China
      •  Hong Kong
      •  India
      •  Korea (Korean)
      •  Malaysia
      •  New Zealand
      •  Philippines
      •  Singapore
      •  Taiwan
      •  Thailand (Thai)
      • Americas
      •  Brazil (Portuguese)
      •  Canada
      •  Mexico (Spanish)
      •  United States
      Can't find the country/region you're looking for? Visit our export site or find a local distributor.
  • Translate
  • Profile
  • Settings
Personal Blogs
  • Community Hub
  • More
Personal Blogs
Ralph Yamamoto's Blog CNC - First Try at Engraving
  • Blog
  • Documents
  • Mentions
  • Sub-Groups
  • Tags
  • More
  • Cancel
  • New
  • Share
  • More
  • Cancel
Group Actions
  • Group RSS
  • More
  • Cancel
Engagement
  • Author Author: ralphjy
  • Date Created: 29 Aug 2019 4:19 AM Date Created
  • Views 3576 views
  • Likes 9 likes
  • Comments 23 comments
  • genmitsu_3018_pro
  • cnc engraving
  • f-engrave
Related
Recommended

CNC - First Try at Engraving

ralphjy
ralphjy
29 Aug 2019

I'm starting to get some experience with my CNC router and quickly learning that there are so many variables due to material, cutting tools, and individual machine capability that there will be quite a lot of trial and error.   As with most tools,  the only real way to get more proficient with them is to use the tool for an actual project.


I'm still looking for a tool flow that will work well for me.  I recently got an RPi4 and I 'm going to try to use that as my workshop computer.  I currently use a mishmash of different computers to support my 3D printer, the CNC router, and my development boards and digital oscilloscope.  I use a Mac Mini with my 3D printer, a Win10 box with the CNC and another Win10 box for application development and the oscilloscope.  An RPi4 with dual monitors seems like just the ticket to consolidating all this stuff.


As for a fabrication workflow, almost everything that I currently use or am considering has a Linux version.  The one notable exception is Fusion 360.  I haven't invested time learning Fusion 360 yet, so I'm going to postpone that until later.  I'll see how well I can do with FreeCad.  I'm sure I'll get back to Fusion 360 when my designs get more complex.  But even FreeCad has quite a learning curve and for a beginner it would be nice to separate hardware issues from software issues.  So, I've decided to start with some simpler programs to get a feel for different cutting tools and material with different machining operations.


I thought I'd start with some simple engraving to get a feel for spindle speed and feed rate for different tools and materials.  I found a program called F-Engrave by Scorchworks https://www.scorchworks.com/Fengrave/fengrave.html .   It's a pretty basic tool.  It does text engraving and v-carving with text and images.  I bought 1/4" birch veneer plywood slats from a local crafts store to practice.  For simple text I find that I like the look of solid line stick fonts rather than the two line silhouette fonts.  I downloaded a set of CAMBam stick fonts to use (the program uses true type fonts).  For engraving you need to manage the character spacing and depth based on the tool (cutting bit) that you are using, the program doesn't do any auto-adjusting but it does preview the effect of the settings.


This was a simple exercise but it surfaced a few issues.  The most significant one is the surface flatness of what I was engraving.  Part of it is the dimensional variation of the plywood, some of it is the flatness of my extruded bed, and a lot of it is due to the warp from clamping soft wood.  Secondly, I really don't have any feel for these cutting bits (also that I don't have a great selection to choose from).  You can see from the program setup that I'm using a very slow feed rate of 127 mm/min.  I'm using a 20 degree v-bit that came with the kit.  The 775 spindle motor that I have is rated at 3000-9000 RPM (12V-36V).   I'm running it at around 7000 rpm.


Here is my setup in F-Engrave (the spindle speed is set manually in the G-Code header).

image


Rather than watching the CNC router cutting, I found it more interesting to watch the controller executing the toolpath.  For engraving the solid stick font the cutter makes precisely two passes for each segment.  The sequencing of the toolpath is pretty neat.  The F-Engrave program is written in Python.  It would be interesting to look at how it is implemented.


Here is the G-Code running in Candle (GRBL controller):

You don't have permission to edit metadata of this video.
Edit media
x
image
Upload Preview
image


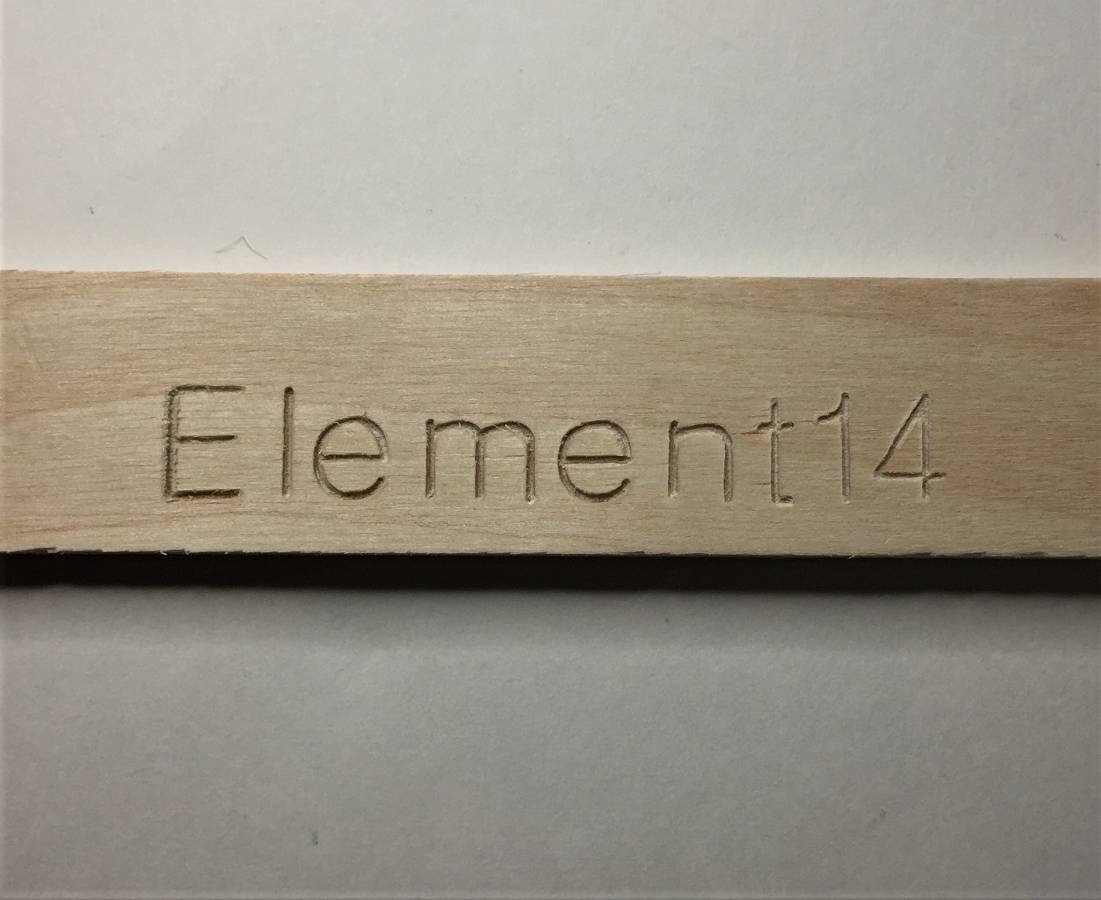
And the finished output.  The cut is rough around the edges.  Next try will be to use an endmill instead of the v-bit.

image


I can see that it is going to take me a few months and a lot of scrap to get somewhat proficient at this.

  • Sign in to reply

Top Comments

  • 14rhb
    14rhb over 6 years ago +7
    That is really impressive work Ralph, well done. I'd be keen to make a similar setup. I've used wood routers before (the 1/4" and 1/2" chuck versions) but never any CNC of wood. The cut is rough around…
  • Fred27
    Fred27 over 6 years ago +6
    That looks good for a first attempt. As you've probably guessed, using an endmill prevents the cut width varying with depth. One thing to be careful of is that endmills do not cut well going straight down…
  • shabaz
    shabaz over 6 years ago +4
    Hi Ralph, That's a great start, it is already looking nice! Looking forward to seeing the enhancements as you progress. It will take time to be familiar with the capabilities and settings with different…
Parents
  • 14rhb
    14rhb over 6 years ago

    That is really impressive work Ralph, well done. I'd be keen to make a similar setup.

    I've used wood routers before (the 1/4" and 1/2" chuck versions) but never any CNC of wood.


    The cut is rough around the edges.

      7000rpm is a little on the low side IMO for cleanly cutting timber fibres, although I note you can only get to 9000rpm with your motor. Wood routers cut at up to 24,000rpm


    Next try will be to use an endmill instead of the v-bit.

    I think the V is the better choice and the endmill would likely splinter the edges even more. Perhaps taking several successively deeper cuts with a V tool would give cleaner edges?


    It is strange how the vertical cut for the 'E' is so torn whilst very close by the 'l' is not. I do know that some wood types have great variation in grain direction and consistency. Perhaps Birch is one of those awkward types? Manufacturers probably don't put the best wood into ply either. Lastly you mention the bed flatness but perhaps the grain was raised on the torn area: you could try sanding the surface nice and smooth prior to engraving?

    • Cancel
    • Vote Up +7 Vote Down
    • Sign in to reply
    • More
    • Cancel
  • 14rhb
    14rhb over 6 years ago in reply to 14rhb

    Hi ralphjy  - you could also try adding some sticky tape (eg decorators paper tape) to the top surface and engraving directly through it, or varnishing the plywood prior to engraving (might hold the fibres together better ?)

    • Cancel
    • Vote Up +4 Vote Down
    • Sign in to reply
    • More
    • Cancel
  • ralphjy
    ralphjy over 6 years ago in reply to 14rhb

    Didn’t think about trying varnish.  I have some spray on clear coat that I could try.  I’ve been been hesitant about using tape because I’m not sure how well it will cut and whether I’ll get residue on the cutter.  Probably just need to find the right tape to use.  Have not heard of decorators paper tape - I’ll google it.

    • Cancel
    • Vote Up +3 Vote Down
    • Sign in to reply
    • More
    • Cancel
Comment
  • ralphjy
    ralphjy over 6 years ago in reply to 14rhb

    Didn’t think about trying varnish.  I have some spray on clear coat that I could try.  I’ve been been hesitant about using tape because I’m not sure how well it will cut and whether I’ll get residue on the cutter.  Probably just need to find the right tape to use.  Have not heard of decorators paper tape - I’ll google it.

    • Cancel
    • Vote Up +3 Vote Down
    • Sign in to reply
    • More
    • Cancel
Children
  • 14rhb
    14rhb over 6 years ago in reply to ralphjy

    aka "Masking Tape", it is normally paper based with an adhesive back - used for masking off window glass or skirting boards/door mouldings when painting. I recall seeing someone use it when engraving metal as, without it, the swarf occasionally caught and scoured the finished surface (not really applies to your case I guess).

    • Cancel
    • Vote Up +2 Vote Down
    • Sign in to reply
    • More
    • Cancel
element14 Community

element14 is the first online community specifically for engineers. Connect with your peers and get expert answers to your questions.

  • Members
  • Learn
  • Technologies
  • Challenges & Projects
  • Products
  • Store
  • About Us
  • Feedback & Support
  • FAQs
  • Terms of Use
  • Privacy Policy
  • Legal and Copyright Notices
  • Sitemap
  • Cookies

An Avnet Company © 2025 Premier Farnell Limited. All Rights Reserved.

Premier Farnell Ltd, registered in England and Wales (no 00876412), registered office: Farnell House, Forge Lane, Leeds LS12 2NE.

ICP 备案号 10220084.

Follow element14

  • X
  • Facebook
  • linkedin
  • YouTube