


I encountered a few problems trying to run DPU-PYNQ on the UltraZed-EV during my roadtest a couple of months ago. Actually, I've tried to run a few variants of UtraZed-EV hardware configuration with PYNQv2.5 with little success. The UltraZed-EV is not one of the boards currently supported by PYNQ or DPU-PYNQ. But there is a reasonably well documented process to port PYNQv2.5 to unsupported or custom boards and the ZCU104 board which uses the same ZU7EV MPSoC+ is supported, so it seemed like getting it to work should have been straightforward. As always, the "devil is in the details" and little things caused me to fail.
Here are the configurations that I tried:
Port OOB BSP to PYNQv2.5 - this was successful Avnet UltraZed-EV Starter Kit Road Test - Port PYNQv2.5
Port VCU TRD BSP to PYNQv2.5 - this was a failure Avnet UltraZed-EV Starter Kit Road Test - Port PYNQv2.5 continued
Port OOB BSP to DPU-PYNQ - this was initially a failure but I now have this working and that's the subject of this post
The configuration that is my end goal:
Port VCU TRD BSP to DPU-PYNQ - this basically gets the VCU, DPU, Vitis-AI (DNNDK and VART) and PYNQ working together
My main issues have been a lack of understanding of how PYNQ and Vitis-AI are configured. I've been fairly successful with PYNQ and DPU-PYNQ on the Ultra96v2 because that's a supported board and the examples have been vetted by Xilinx and Avnet folk. Recently Avnet released Vitis Platforms for the UltraZed-EG and UltraZed-EV and Mario Bergeron did some great tutorials on Hackster on Vitis-AI that I tried during the roadtest: Avnet UltraZed-EV Starter Kit Road Test - Vitis AI . So, it seemed like a good time to go back and see if I could work through the issues that I had earlier.
The quick porting process that I've been using utilizes a board agnostic pre-built image of the PYNQv2.5. It turns out that this process has a problem with the hardware configuration of the Avnet UltraZed-EG and UltraZed-EV boards. These boards assign /dev/mmcblk1 to the SD card while the default is /dev/mmcblk0. I discovered this initially because I needed to modify the pynq_bootargs.dtsi file in meta-pynq in order to be able to boot successfully. What I didn't realize is that the pre-built image also has /dev/mmcblk0 in the resizefs.sh script so that the partition for the rootfs was not getting resized properly. I also ran into an issue trying to upgrade PYNQv2.5 to PYNQv2.5.1 because the Xilinx Runtime (xrt) is also not included in the pre-built image. These problems can be fixed by building a custom image using STAGE4 packages. I just needed to add the xrt package and the resizefs package (with a modified resizefs.sh). I rebuilt a port to PYNQv2.5 using the OOB BSP and was able to successfully complete the DPU-PYNQ installation.
Process to install DPU-PYNQ
1. Upgrade the PYNQv2.5 installation to make it DPU ready (assumes a working PYNQ setup with Internet access)
From the PYNQ home window start a new terminal which opens as root in the /home/xilinx directory (superuser privileges are required)
Clone the DPU-PYNQ repository: git clone --recursive --shallow-submodules https://github.com/Xilinx/DPU-PYNQ.git
Change directory and run make: cd DPU-PYNQ/upgrade
make
The upgrade process took about 40 minutes to complete.
By default, the Makefile will install / update the following packages:
- pynq: Install pynq 2.5.1 from source distribution.
- xrt: Xilinx Run Time (XRT) will be upgraded to tag 2019.2_RC2.
- ubuntu_pkg: Install a couple of packages from Ubuntu repository; remove the old opencv package.
- opencv: Install opencv 3.4.3.
- protobuf: Install protobuf 3.6.1.
- jsonc: Install json-c 0.13.1.
- dpu_clk: Install a small Python script to control DPU clocks.
- glog: Install glog 0.4.0.
2. Install example Jupyter Notebooks: pip3 install pynq-dpu
cd $PYNQ_JUPYTER_NOTEBOOKS
pynq get-notebooks --ignore_overlays pynq-dpu -p . (ignore_overlays because the UltraZed-EV is not a supported board, so there are no overlays in the repo)
3. Build dpu hardware overlay. I'm not going to elaborate this process but you can find the instructions here: https://github.com/Xilinx/DPU-PYNQ/blob/master/boards/README.md
The process is run on your host machine (I'm running a VM with 2019.2 tools)
The make process will generate 3 files:
- dpu.bit
- dpu.hwh
- dpu.xclbin
These files need to be copied to the overlays directory on the UltraZed-EV. I was initially confused because the overlays are not installed where I normally would put them, i.e. /home/xilinx/pynq/overlays.
Then I realized that /home/xilinx/pynq is really a link to /usr/local/lib/python3.6/dist-packages/pynq. The overlays directory for pynq_dpu is /usr/local/lib/python3.6/dist-packages/pynq_dpu/overlays.
4. Build or copy models for example notebooks. Since the UltraZed-EV uses the same MPSoC+ device as the ZCU104, I got the sample models from here: https://github.com/Xilinx/Vitis-AI/tree/v1.1/mpsoc/vitis_ai_dnndk_samples
- dpu_inception_v1_0.elf
- dpu_mnist_classifier_0.elf
- dpu_resnet50_0.elf
- dpu_tf_inceptionv1_0.elf
- dpu_tf_yolov3.elf
Copy the models to the Jupyter Notebooks directory on the UltraZed-EV
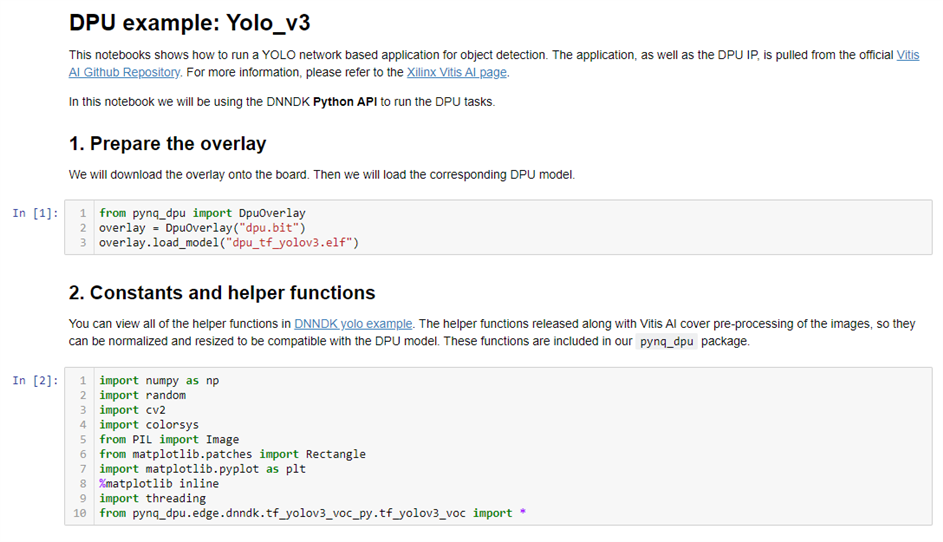
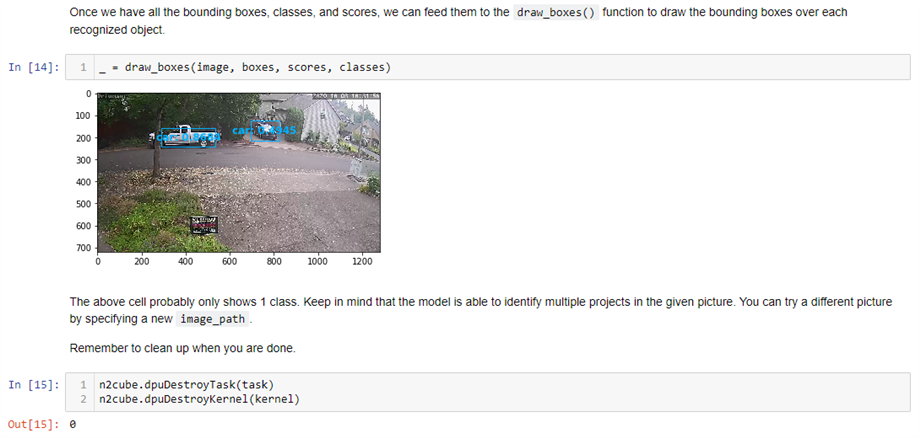
Run yolov3 example
I modified the yolov3 example notebook to use a frame capture from the rtsp stream from my driveway IP camera. It classifies the two vehicles in the image as cars but it is more confident with the side view than the front view.


Now I need to get this working with the VCU TRD. I also haven't tried running IP camera video in Jupyter Notebooks. Maybe I'll try that first.