

Last time, we talked about the structural design (getting the poles to stand up) of The Grid, an art/engineering installation at Electromagnetic Field (EMF) 2014. This week, we're onto the electrical side of things: power supply and distribution!
How much power?
How much power do we need for this thing? We have 49 poles, each with 5m of LED strip. The strip was specified as using 7.4W/m, which would mean our maximum power consumption is just over 1.8kW, or 151A at 12V. Wow, that's quite a bit! It turns out the strips actually only use about half of this power, which made life a lot easier: about 900W, or 75A at 12V.
Supplying the power
As we mentioned last time, we're on a student budget. And 50A is quite a lot of amps. Often, the cheapest way to get get a lot of low voltage DC power is cheap desktop computer power supplies. In theory, they can give you many hundreds of watts for under £20. Unfortunately, this power is spread over a variety of voltages and integrating PC power supplies into things that aren't PCs can be decidedly bodgetastic. Happily, there exist a wide range of dedicated high current 12V DC power supplies designed for CCTV systems and LED lighting. Attempting to preserve the student budget, we ordered several of the cheapest 12V 30A supplies I could find online. As so often happens, this was a false economy – we spent rather a lot of hours repairing various parts of the power supplies such as dry solder joints, wobbly inductors, and heatsinking issues. Check out this dodgy inductor, for example:
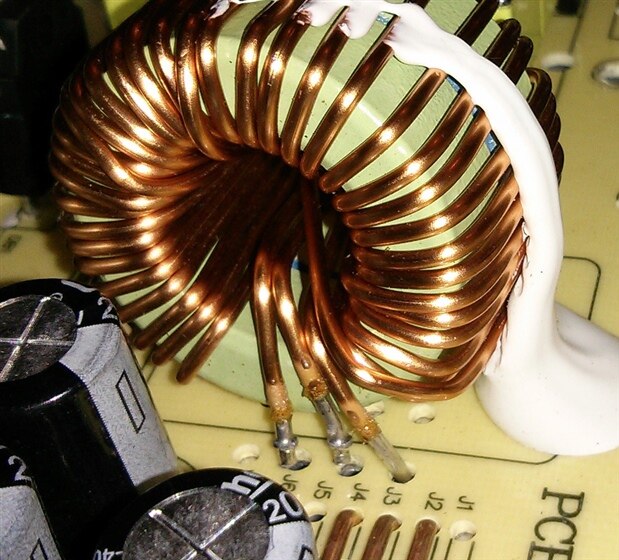
Here we can see two of the three leads through the core (meant to carry 10A each) were not connected, while the final lead is mostly held on with wishful thinking. The inductor mass itself looks like it might be glued to the PCB, but this white gunk has fractured and provides no support. Turning this PSU on would have been an unhappy experience! We fixed these and other issues on all the PSUs.
Finally, after rather a lot of rework, we had rather a lot of amps at 12V. We put them all into a flight case:

Distributing the power
We have lots of power, and we have lots of things that need power – now we need some wires!
The more current you want to send down a wire, the thicker it needs to be. Firstly, the voltage drop across a length of wire with constant resistance is directly proportional to the current flowing, and inversely proportional to the wire's cross sectional area. Too much current, and your voltage will be too low at the destination. Secondly, this voltage drop corresponds to resistive power dissipation (Joule heating) in the wire. If you put too much current through a thin wire it'll get hot, possibly to the point of melting insulation or starting a fire. In our case, the voltage drop was much more limiting than Joule heating, so we shall ignore the latter from here on.
We expected it to be much cheaper to one relatively thick power bus which connected to every pole then switch the LED strip using a pole-mounted relay and a thin signalling wire to each pole. This would minimize the length of thick power wire required. It turns out that the very high current flowing through some parts of the power bus would necessitate it being extremely thick to limit the voltage drop, making this design impractical. A power bus would also complicate setup as the bus would need connecting to each pole once they are setup in the field – connectors are pretty expensive, and who wants to solder in a field!?
We chose the alternative design of running dedicated power wires to each pole. This also meant switching could all be done on centralised PCBs instead of on each pole, so each pole is just two wires connected to LED strip. The power cable was connected to each LED strip in advance, so setup consists just of attaching LED strip to the poles and unrolling the power cable.

The longest power cable between power supplies and LED strip is the far corner of the grid, which is about 20m. This gives a total round trip distance of 40m (voltage is dropped on both the outbound and return trips!). We have a current of 1.5A per pole and can accept a voltage drop of 1.5V or so (we discovered the LED strips would work quite happily on 10-11V instead of the rated 12V). Ohm's law tells us the resistance over 40m must be around 1Ω. The resistance of a conductor is:
resistance = length * resistivity / cross sectional area
Using the resistivity of copper at room temperature, we can calculate that we need a cross sectional area of about 0.68mm². For a cylindrical cable the cross sectional area is equal to pi * radius^2, but they tend to be sold by their cross sectional area anyway. Happily, 0.75mm² is a very common standard conductor cross sectional area, so we bought 600m of the cheapest 2-core 0.75mm² cable we could get our hands on. And then spent hours cutting it into 49 pieces of just the right length to hook up The Grid. We even wrote a short optimisation program to solve the bin packing problem of which cuts to take from which reels!

Connecting the power
Once we've soldered wires onto the LED ends of each cable, we still need to connect them to the control PCBs. Soldering these in advance was a non-starter as it would make packing and setup a complete nightmare. We looked for the cheapest connectors that could handle the current and found these (wire) and these (board). 9A each, very cheap, easy to mount to our PCBs and our cables, perfect! Many hours of crimping (pins here) later and we had 49 connectorised LED strips.

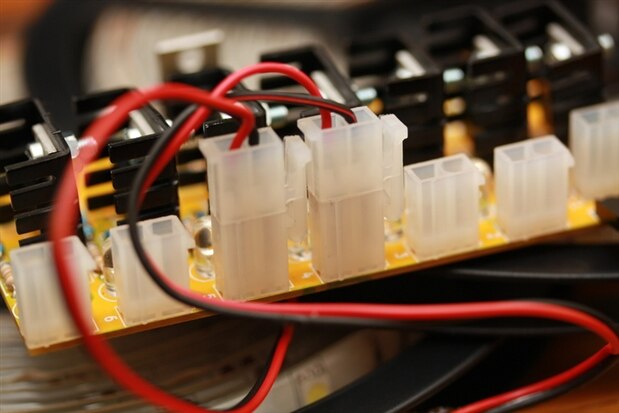

Here they are all plugged in to the flight case:

Watch out for the next post for details on the control electronics and PCBs!
-

gadget.iom
-
Cancel
-
Vote Up
0
Vote Down
-
-
Sign in to reply
-
More
-
Cancel
Comment-

gadget.iom
-
Cancel
-
Vote Up
0
Vote Down
-
-
Sign in to reply
-
More
-
Cancel
Children