element14 Community
element14 Community
    Register Log In
  • Site
  • Search
  • Log In Register
  • Community Hub
    Community Hub
    • What's New on element14
    • Feedback and Support
    • Benefits of Membership
    • Personal Blogs
    • Members Area
    • Achievement Levels
  • Learn
    Learn
    • Ask an Expert
    • eBooks
    • element14 presents
    • Learning Center
    • Tech Spotlight
    • STEM Academy
    • Webinars, Training and Events
    • Learning Groups
  • Technologies
    Technologies
    • 3D Printing
    • FPGA
    • Industrial Automation
    • Internet of Things
    • Power & Energy
    • Sensors
    • Technology Groups
  • Challenges & Projects
    Challenges & Projects
    • Design Challenges
    • element14 presents Projects
    • Project14
    • Arduino Projects
    • Raspberry Pi Projects
    • Project Groups
  • Products
    Products
    • Arduino
    • Avnet & Tria Boards Community
    • Dev Tools
    • Manufacturers
    • Multicomp Pro
    • Product Groups
    • Raspberry Pi
    • RoadTests & Reviews
  • About Us
  • Store
    Store
    • Visit Your Store
    • Choose another store...
      • Europe
      •  Austria (German)
      •  Belgium (Dutch, French)
      •  Bulgaria (Bulgarian)
      •  Czech Republic (Czech)
      •  Denmark (Danish)
      •  Estonia (Estonian)
      •  Finland (Finnish)
      •  France (French)
      •  Germany (German)
      •  Hungary (Hungarian)
      •  Ireland
      •  Israel
      •  Italy (Italian)
      •  Latvia (Latvian)
      •  
      •  Lithuania (Lithuanian)
      •  Netherlands (Dutch)
      •  Norway (Norwegian)
      •  Poland (Polish)
      •  Portugal (Portuguese)
      •  Romania (Romanian)
      •  Russia (Russian)
      •  Slovakia (Slovak)
      •  Slovenia (Slovenian)
      •  Spain (Spanish)
      •  Sweden (Swedish)
      •  Switzerland(German, French)
      •  Turkey (Turkish)
      •  United Kingdom
      • Asia Pacific
      •  Australia
      •  China
      •  Hong Kong
      •  India
      • Japan
      •  Korea (Korean)
      •  Malaysia
      •  New Zealand
      •  Philippines
      •  Singapore
      •  Taiwan
      •  Thailand (Thai)
      • Vietnam
      • Americas
      •  Brazil (Portuguese)
      •  Canada
      •  Mexico (Spanish)
      •  United States
      Can't find the country/region you're looking for? Visit our export site or find a local distributor.
  • Translate
  • Profile
  • Settings
Arduino Projects
  • Products
  • Arduino
  • Arduino Projects
  • More
  • Cancel
Arduino Projects
Blog Arduino-based DIY Safe
  • Blog
  • Documents
  • Events
  • Polls
  • Files
  • Members
  • Mentions
  • Sub-Groups
  • Tags
  • More
  • Cancel
  • New
Join Arduino Projects to participate - click to join for free!
  • Share
  • More
  • Cancel
Group Actions
  • Group RSS
  • More
  • Cancel
Engagement
  • Author Author: madhugovindarajan
  • Date Created: 18 Jul 2018 5:24 PM Date Created
  • Views 2519 views
  • Likes 10 likes
  • Comments 4 comments
  • arduino_projects
  • ardexpert
  • matlab
  • simulink
Related
Recommended

Arduino-based DIY Safe

madhugovindarajan
madhugovindarajan
18 Jul 2018

image

Story

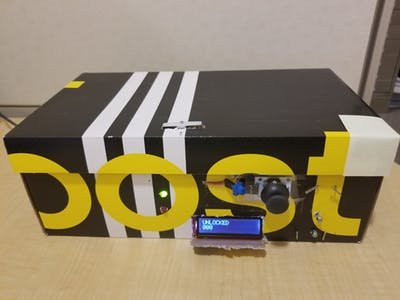
Keeping valuables safe and locked away is important to everyone. While you can have a manual safe, why not build your own safe box and add some smarts to it? Using an Arduino, a servo, joystick and an LCD screen, you can make the electronics for a combination lock safe.

An overview of the safe system:

image

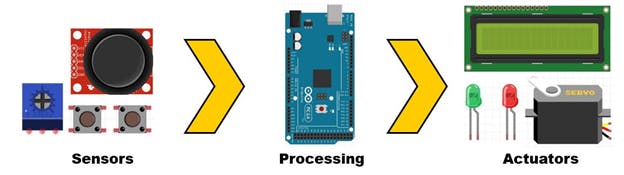
This diagram shows the flow of data for the safe.

Sensors

a. A joystick that controls the digits displayed on LCD screen.

b. Two push buttons that are used to enter and set a new password.

c. A potentiometer that controls the LCD screen’s brightness.

Processing

a. Simulink and Stateflow algorithm that processes the data coming into the Arduino MEGA and sends appropriate outputs to the Actuators.

Actuators

a. An LCD that displays the mode and current combination

b. LEDs that display if the attempted password is correct (green) or incorrect (red)

c. The servo motor unlocks the safe when the password is right.
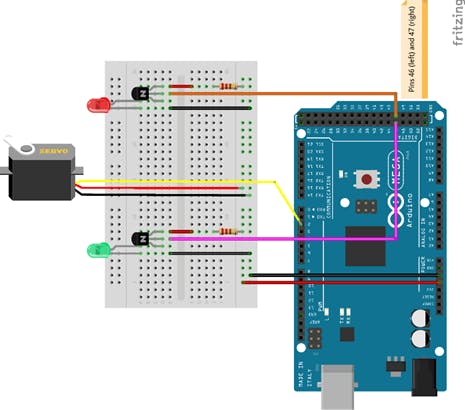
Sensor circuit


image


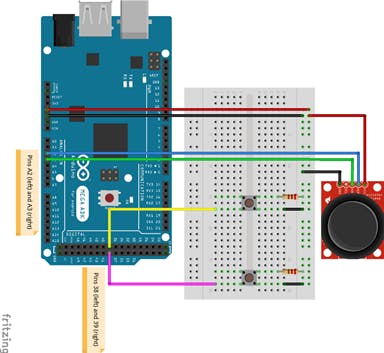
Joystick: This one requires 5V and two pins that relay the XY axis information. The joystick consists of two perpendicular potentiometers that vary the voltage as the stick is pushed up/down/right/left. Since the output of the joystick is an analog value of voltage, read in at pins A2 and A3. We need to threshold this signal to change this to a digital value for the direction. More on that later.

Pushbuttons: The pushbuttons need 3.3V power and their status are read at pins 38 and 39 respectively.

Actuator circuit


image


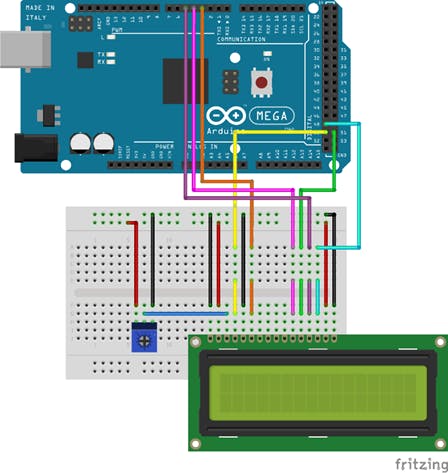
LCD:The LCD screen is a 16 x 2-character, 16 pin, backlit screen. I used six DIGITAL pins to run the screen and the connections are shown above.

LED and servo: I am using a transistor (BJT) to control the power to the LED. I did not want to wire the LED directly to the Arduino because the voltage is not always exact. The servo is controlled with 5V and a PWM pin.

image


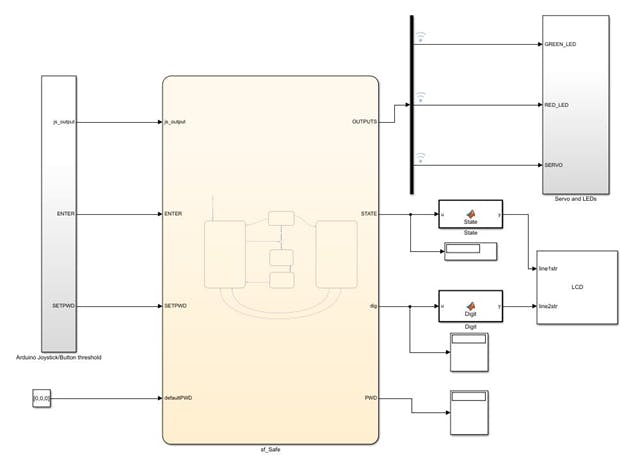
Software: Simulink is a block diagram environment to design dynamic systems and develop complex models and algorithms. This proved very useful as I could focus more on the parameters, rather than worrying about code syntax. It also provides a visual framework for modeling physical systems which I really enjoyed using. I also used Simulink to deploy the code to an Arduino and have it run standalone. Here is the top layer of the model:

image

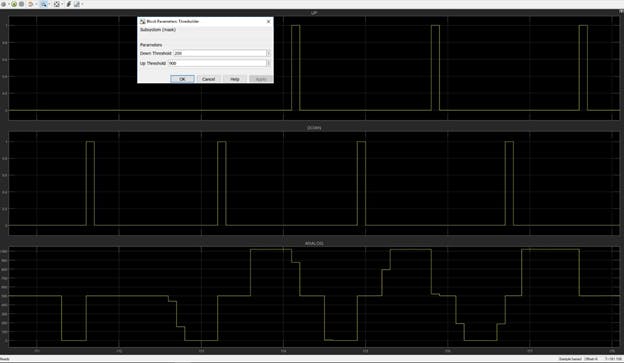
Simulink’s External Mode allowed me to plot the input data from the Joystick. It also helped me tune the minimum and maximum threshold on that signal. Using this analog to digital conversion, the algorithm can now understand if the Joystick moved up, down, left or right. A sample of this is shown below: the first image shows what happened when I set the threshold too high; no movements were recognized, as opposed to the second image with lower thresholds.

image


image


Displays and dashboard blocks were useful for debugging the model without the hardware, or when some hardware was not working properly.
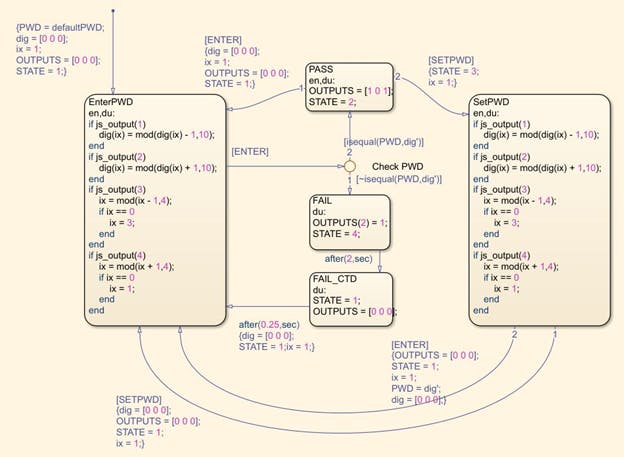
Stateflow

Stateflow is a useful tool for creating state machines. Each state has actions and exit conditions associated with it. A major benefit to using Stateflow is that the algorithm logic is isolated from inputs and outputs, so if I wanted to deploy this model on another board, but the inputs were different, I could still save the bulk of the model because the state logic is reusable. The same is true for all non-Input/Output blocks. In external mode, you can view which state you are in in the Stateflow diagram, allowing you to trace your state logic easily. Here is the state logic for the safe. The Arduino inputs are used to change the state.

image


DeviceDriver Blocks:

The LCD block is not part of the Arduino Simulink support package, but I wrote a simple custom device driver block for it using existing Arduino libraries. This LCD block takes in uint8 ASCII values of the strings that I wish to print, and displays them. All the files for this LCD library are here. Here is a useful video link if you want to create your own MATLAB system block.

  • Sign in to reply

Top Comments

  • DAB
    DAB over 7 years ago +3
    Nice post. Well explained. DAB
  • three-phase
    three-phase over 7 years ago +3
    Clever project with a well written blog. Thanks for posting. Kind regards
  • jw0752
    jw0752 over 7 years ago +3
    Hi Madhu, This is a great project. Thanks for sharing it with us. John
  • madhugovindarajan
    madhugovindarajan over 7 years ago

    Glad you all liked it image

    • Cancel
    • Vote Up +1 Vote Down
    • Sign in to reply
    • More
    • Cancel
  • jw0752
    jw0752 over 7 years ago

    Hi Madhu,

    This is a great project. Thanks for sharing it with us.

    John

    • Cancel
    • Vote Up +3 Vote Down
    • Sign in to reply
    • More
    • Cancel
  • three-phase
    three-phase over 7 years ago

    Clever project with a well written blog. Thanks for posting.


    Kind regards

    • Cancel
    • Vote Up +3 Vote Down
    • Sign in to reply
    • More
    • Cancel
  • DAB
    DAB over 7 years ago

    Nice post.


    Well explained.


    DAB

    • Cancel
    • Vote Up +3 Vote Down
    • Sign in to reply
    • More
    • Cancel
element14 Community

element14 is the first online community specifically for engineers. Connect with your peers and get expert answers to your questions.

  • Members
  • Learn
  • Technologies
  • Challenges & Projects
  • Products
  • Store
  • About Us
  • Feedback & Support
  • FAQs
  • Terms of Use
  • Privacy Policy
  • Legal and Copyright Notices
  • Sitemap
  • Cookies

An Avnet Company © 2025 Premier Farnell Limited. All Rights Reserved.

Premier Farnell Ltd, registered in England and Wales (no 00876412), registered office: Farnell House, Forge Lane, Leeds LS12 2NE.

ICP 备案号 10220084.

Follow element14

  • X
  • Facebook
  • linkedin
  • YouTube