


This is a simple project, very easy to make and with few modules, but it is very useful, since it shows the time, temperature and humidity in a room or where the DHT-11 sensor is placed. To show the time it has been chosen to show only the hour and minutes, since in my opinion, the seconds are not relevant. The picture shows a possible distribution of the markers, but it is left to the reader's imagination its possible distribution in a box that could well be made with a 3D printer.

The materials needed for this project are:
Nano V3.0 CH340 chip finished soldered, improved version with USB cable.
MAX7219 8x32 4 in 1 Dot Matrix LED Display Module.
KY-015 DHT 11 Temperature Sensor Module.
DS1302 Serial Real Time Clock RTC Real-Time Clock Clock Module or Real Time Clock RTC or DS3231 I2C real time clock.
MG995 Micro Digital Servo Motor or SG90 Micro Servo Motor or MG90S Micro Servo Motor.
MB 102 breadboard kit - 830 breadboard, power supply adapter 3.3V 5V, 65pc jumpers.
The required software is:
Arduino IDE.
DS1307_setup.ino sketch.
Clock_temperature_humidity.ino sketch.
MD_Parola library.
MD_MAX72xx library.
SPI library.
Wire library.
DS3231 library.
DHT library.
Servo library.
Circuit and description of operation
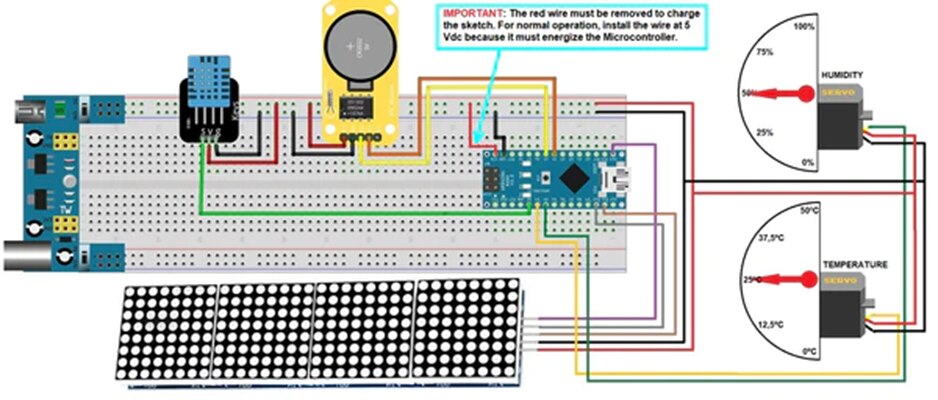
As you can see, the circuit is very simple, we only have the 5 Vdc Voltage Source, the Microcontroller, the RTC module DS1302, DHT-11, the LED Module Array and the 2 Servomotors.
The operation of the circuit is very simple, the RTC module DS1302 is in charge of providing the time to the microcontroller, while the DHT-11 module is the one that takes the temperature and humidity reading and sends the data to the microcontroller. Then, the microcontroller sends the information to display the hour and minutes to the 8x8 LED module array and the temperature and humidity data for the servomotors to move to the degrees that represent this data.
To begin, the first thing we must do is to set the time and date in the DS1302 module, it is very important that we install the corresponding battery, because although this module works properly without it, if we remove the voltage to the circuit, the time that will show when we connect the voltage again will be the one that has factory settings.
To make the adjustment of the current time and date, we have to make the following circuit:
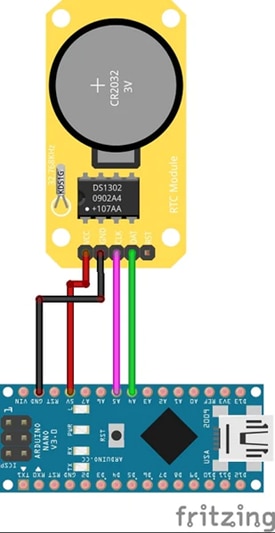
We install the appropriate battery in the module and then we execute the sketch DS1307_setup.ino, we open the Serial Monitor and we can see both the date and the time that has saved the module, these data are those that at the time of executing the sketch are what the operating system has. If we observe the sketch, we can intuit that the code line clock.setDateTime(__DATE__, __TIME__) is the one that loads in the module the two data that the system has. From this moment we already have the module configured with the time and date and thanks to the battery, this data will not be erased from the module when the voltage is removed.
When we have already made the setting of the time and date, we install the DS1302 module in the circuit together with the other modules and run the sketch clock_temperature_humidity.ino and when we finish loading it we should see the exact time on the LED matrix and the two servomotors should move until they are positioned at the value of the temperature and humidity in the environment, let's analyze the code.
The first thing we do is to load the necessary libraries for the execution of the sketch, the first three are necessary to use the LED matrix, the next two are for the use of the DS1307 module, the penultimate one is the library for the DHT-11 module and the last one for the use of the servomotors:
#include <MD_Parola.h>
#include <MD_MAX72xx.h>
#include <SPI.h>

#include <Wire.h>
#include <DS3231.h>

#include <DHT.h>

#include <Servo.h>
After the libraries we must configure the connections of the modules with the pins of the microcontroller, the type of controller and number of LED modules of the matrix (4 in our case), the type of DHT module, we create the instances of each module and the necessary variables to save the data of these:
#define HARDWARE_TYPE MD_MAX72XX::FC16_HW
#define MAX_DEVICES 4
#define CS_PIN 10
MD_Parola reloj = MD_Parola(HARDWARE_TYPE, CS_PIN, MAX_DEVICES);

DS3231 clock;
RTCDateTime dt;

#define DHTPIN 2
#define DHTTYPE DHT11
DHT dht(DHTPIN, DHTTYPE);
float t, hu;

Servo servoTemperature;
Servo servoHumidity;
After configuring the module parameters, we initialize the modules in the method setup() method of the sketch:
Serial.begin(9600);
Serial.println("Initialize RTC module");

clock.begin();
clock.setDateTime(__DATE__, __TIME__);
reloj.begin();
reloj.setIntensity(0);
reloj.displayClear();

dht.begin();

servoTemperature.attach(3);
servoHumidity.attach(4);
The loop() method is where the readings and calculations necessary to display them are performed with the display components.
First we are going to analyze the temperature and humidity data. We assign the temperature value to the variable t and the humidity value to the variable hu, if we do not receive data, we communicate it through the serial monitor. The ranges of values with which we are going to work are from 0 to 50 degrees Celsius of temperature and from 0% to 100% of humidity, as we know that the servomotors normally have an angle range of 180 degrees of work, so that the servomotors mark the data correctly, we make a simple mathematical operation, we assign the maximum values of the ranges to the 180 degrees of the angle of the servomotors and with the values that the DHT-11 module sends us we find out the angles that correspond to them by a simple mathematical rule.
t = dht.readTemperature();
hu = dht.readHumidity();
if (isnan(hu) || isnan(t)) {
    Serial.println("DHT sensor reading failure !!!");
}

servoTemperature.write((t*180)/50);
servoHumidity.write((hu*180)/100);
The process for the acquisition and display of the hour and minutes is very simple, just a comment, when the DS1302 module sends the hour and minutes, it sends the minimum digits required, so from 0 to 9 it only sends one digit and if we show only one digit in both hours and minutes, it would give the impression of a malfunction or failure of the LEDS module, so we must always show two digits in both hours and minutes.
With the first line we request the DS1302 module to retrieve the time and date data, then we create two variables (h and m) to store the data in string format of the hour and minutes after the two conditional processes described below. We create the numeric variables hora and minutos to store the values of the data provided by the DS module, we check their values, if these are less than 10, the process we perform is: to the variables h and m of string type we assign a character 0, not a value 0 and then we convert the value read to string format and write it after the 0 with the concat command, in this way we have the value of the hours and minutes with two digits and in character format, now we only have to display this data in the LED matrix. To give the sensation of operation of the clock, what we do is to show two strings of very similar characters, one with the separation between hours and minutes with two points and another without the two points, we visualize them every half second and with this we obtain the sensation of operation.
dt = clock.getDateTime();

String h;
String m;

int hora = (dt.hour);
if (dt.hour<10) {
    h = "0";
    h.concat((String) hora);
} else {
    h = (String) hora;
  }

int minuto = (dt.minute);
if (dt.minute<10) {
    m ="0";
    m.concat((String) minuto);
} else {
    m = (String) minuto;
  }

String r = h + ":" + m;
String q = h + " " + m;

reloj.setTextAlignment(PA_CENTER);
reloj.print(r);
delay(500);
reloj.print(q);
delay(500);
DS130_setup.ino
#include <Wire.h>
#include <DS3231.h>

DS3231 clock;
RTCDateTime dt;

void setup() {
  Serial.begin(9600);

  Serial.println("Initialize RTC module");

  clock.begin();				// Initialize DS3231

  clock.setDateTime(__DATE__, __TIME__);	// Send sketch compiling time to Arduino

  /*
  Tips:This command will be executed every time when Arduino restarts.
       Comment this line out to store the memory of DS3231 module
  */
}

void loop() {

  dt = clock.getDateTime();

  // For leading zero look to DS3231_dateformat example

  Serial.print("Raw data: ");
  Serial.print(dt.year);   Serial.print("-");
  Serial.print(dt.month);  Serial.print("-");
  Serial.print(dt.day);    Serial.print(" ");
  Serial.print(dt.hour);   Serial.print(":");
  Serial.print(dt.minute); Serial.print(":");
  Serial.print(dt.second); Serial.println("");

  delay(1000);
}
clock_temperature_humidity.ino
/**************************************************************************************
 *   Easy Arduino project with clock, temperature and humidity measurement            *
 *                                                                                    *
 *   Last revisión 10-12-2021                            *
 *                                                                                    *
 *   Spain_mtg                                                              *
 *                                                                                    *
 *************************************************************************************/

// Required Arduino libraries
#include <MD_Parola.h>                          // Matrix LED Display Module
#include <MD_MAX72xx.h>                         // MAX7219
#include <SPI.h>                                // SPI Communications

#include <Wire.h>                               // I2C communications protocol
#include <DS3231.h>                             // Real Time Clock Module

#include <DHT.h>                                // Temperature and Humidity module

#include <Servo.h>                              // Servomotors

// Define hardware type, size, and output pins MAX7219 8x32 4 in 1 Dot Matrix LED Display Module
#define HARDWARE_TYPE MD_MAX72XX::FC16_HW
#define MAX_DEVICES 4
#define CS_PIN 10

// Define hardware type andi pins DHT-11
#define DHTPIN 2
#define DHTTYPE DHT11

// Create a new instance of the MD_Parola class with hardware SPI connection:
MD_Parola reloj = MD_Parola(HARDWARE_TYPE, CS_PIN, MAX_DEVICES);

// Create a instance of DHT-11 sensor and variables for temperature and humidity
DHT dht(DHTPIN, DHTTYPE);
float t, hu;

// Instances of the servos for humidity and temperature
Servo servoTemperature;
Servo servoHumidity;

// Instance for the DS3231 clock
DS3231 clock;
RTCDateTime dt;


void setup() {

      // Initialization of Monitor Serial
      Serial.begin(9600);
      Serial.println("Initialize RTC module");

      // Initialization of DS3231 Module
      clock.begin();

      // Initialization MAX7219 LED Matrix Display
      reloj.begin();                // Intialize the object
      reloj.setIntensity(0);        // Set the intensity (brightness) of the display (0-15)
      reloj.displayClear();         // Clear the display

      // Initialization DHT-11 module
      dht.begin();

      // Servo pins connections
      servoTemperature.attach(3);
      servoHumidity.attach(4);

}

void loop() {

      // Temperature and humidity reading
      t = dht.readTemperature();
      hu = dht.readHumidity();
      if (isnan(hu) || isnan(t)) {
              Serial.println("DHT sensor reading failure !!!");
      }

      dt = clock.getDateTime();               // Reading data from the RTC module

      String h;                               // Variable for the hours
      String m;                               // Variable for the minutes

      int hora = (dt.hour);                   // The variable "hora" is used
      if (dt.hour<10) {                       // to set the time to always show two digits
	            h = "0";                        // two digits in the clock hours.
	            h.concat((String) hora);
      } else {
	            h = (String) hora;
      }

      int minuto = (dt.minute);               // The variable "minuto" is used
      if (dt.minute<10) {                     // to set the minutes to always
	            m ="0";                         // two digits en the clock minutes
	            m.concat((String) minuto);
      } else {
	            m = (String) minuto;
      }

      String r = h + ":" + m;                 // Hour and minutes with colon separation
      String q = h + " " + m;                 // Hour and minutes without colon separation

      Serial.print("Hora: ");
      Serial.print(dt.hour);   	Serial.print(":");
      Serial.print(dt.minute); 	Serial.print(":");
      Serial.print(dt.second); 	Serial.println("");
      Serial.print( "T = " );
      Serial.print(t);
      Serial.print(" ºC, H = ");
      Serial.print(hu);
      Serial.print( "%, " );

      reloj.setTextAlignment(PA_CENTER);    // Configuration the text centered
      reloj.print(r);                       // We change the text showing the separation
      delay(500);                           // and without it every half second for the
      reloj.print(q);                       // sensation of movement.
      delay(500);

      // To display the value of temperature and humidity we assign
      // a maximum value (50ºC and 100% of humidity) to the 180 degrees of the servomotor and
      // by means of a rule of three we display the actual values.

      servoTemperature.write((t*180)/50);   // Move the servos to value
      servoHumidity.write((hu*180)/100);

}


