element14 Community
element14 Community
    Register Log In
  • Site
  • Search
  • Log In Register
  • Community Hub
    Community Hub
    • What's New on element14
    • Feedback and Support
    • Benefits of Membership
    • Personal Blogs
    • Members Area
    • Achievement Levels
  • Learn
    Learn
    • Ask an Expert
    • eBooks
    • element14 presents
    • Learning Center
    • Tech Spotlight
    • STEM Academy
    • Webinars, Training and Events
    • Learning Groups
  • Technologies
    Technologies
    • 3D Printing
    • FPGA
    • Industrial Automation
    • Internet of Things
    • Power & Energy
    • Sensors
    • Technology Groups
  • Challenges & Projects
    Challenges & Projects
    • Design Challenges
    • element14 presents Projects
    • Project14
    • Arduino Projects
    • Raspberry Pi Projects
    • Project Groups
  • Products
    Products
    • Arduino
    • Avnet & Tria Boards Community
    • Dev Tools
    • Manufacturers
    • Multicomp Pro
    • Product Groups
    • Raspberry Pi
    • RoadTests & Reviews
  • About Us
  • Store
    Store
    • Visit Your Store
    • Choose another store...
      • Europe
      •  Austria (German)
      •  Belgium (Dutch, French)
      •  Bulgaria (Bulgarian)
      •  Czech Republic (Czech)
      •  Denmark (Danish)
      •  Estonia (Estonian)
      •  Finland (Finnish)
      •  France (French)
      •  Germany (German)
      •  Hungary (Hungarian)
      •  Ireland
      •  Israel
      •  Italy (Italian)
      •  Latvia (Latvian)
      •  
      •  Lithuania (Lithuanian)
      •  Netherlands (Dutch)
      •  Norway (Norwegian)
      •  Poland (Polish)
      •  Portugal (Portuguese)
      •  Romania (Romanian)
      •  Russia (Russian)
      •  Slovakia (Slovak)
      •  Slovenia (Slovenian)
      •  Spain (Spanish)
      •  Sweden (Swedish)
      •  Switzerland(German, French)
      •  Turkey (Turkish)
      •  United Kingdom
      • Asia Pacific
      •  Australia
      •  China
      •  Hong Kong
      •  India
      • Japan
      •  Korea (Korean)
      •  Malaysia
      •  New Zealand
      •  Philippines
      •  Singapore
      •  Taiwan
      •  Thailand (Thai)
      • Vietnam
      • Americas
      •  Brazil (Portuguese)
      •  Canada
      •  Mexico (Spanish)
      •  United States
      Can't find the country/region you're looking for? Visit our export site or find a local distributor.
  • Translate
  • Profile
  • Settings
Arduino Projects
  • Products
  • Arduino
  • Arduino Projects
  • More
  • Cancel
Arduino Projects
Blog Using IoT to Remotely Control a Robotic Arm
  • Blog
  • Documents
  • Events
  • Polls
  • Files
  • Members
  • Mentions
  • Sub-Groups
  • Tags
  • More
  • Cancel
  • New
Join Arduino Projects to participate - click to join for free!
  • Share
  • More
  • Cancel
Group Actions
  • Group RSS
  • More
  • Cancel
Engagement
  • Author Author: madhugovindarajan
  • Date Created: 25 Oct 2018 5:11 PM Date Created
  • Views 3036 views
  • Likes 8 likes
  • Comments 6 comments
Related
Recommended

Using IoT to Remotely Control a Robotic Arm

madhugovindarajan
madhugovindarajan
25 Oct 2018

image

Here is a link to video of project in action - https://www.mathworks.com/videos/how-to-control-a-robotic-arm-from-a-remote-location-using-iot-1538564659095.html .


Introduction 

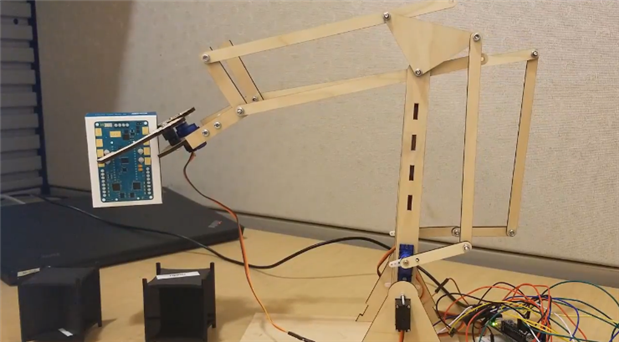
Something I really wanted to try was designing a robotic arm completely from scratch. There are many open-source designs available, but I thought it would be gratifying if I could design, build, and program one from nothing (and it was).


I will talk about both the design and programming phases. But I will focus more on the programming side since it is not just controlling servo angles. I used Simulink to program an Arduino MKR1000 which is the MCU controlling the robotic arm. I then added the ability to control the robot arm from practically anywhere through ThingSpeak, an open IoT platform with MATLAB analytics.


Hardware

Software

15” x 20” 1/8-inch plywood

MATLAB

Arduino MKR1000

Simulink

5x GS9025MG servo

MATLAB Support package for Arduino hardware

  1. 2.1mm breadboard friendly DC barrel jack

Simulink Support package for Arduino hardware

6 V DC barrel jack power supply

MATLAB Support package for ThingSpeak

Jumper Wires


3x 2n2222a Transistors


Design

I wanted to keep the cost of parts low, so I designed this for hobby servos, specifically the GS-9025MG model. The main restrictions that this imposed was the final weight and size. This was because micro servos could not exert much torque, and as a result, cannot lift heavy lever arms.I tried prototyping with 1/4 inch plywood, but it proved to be too heavy for the servos. I reduced the length of the arms and used 1/8 inch plywood, and that fixed the servo control issue. I drew up the design using Fusion 360, and downloaded the design as a .dxf file, which I then laser cut.

Also, supplying continuous DC voltage from a wall outlet proved necessary because the current drawn from battery packs was very high and drained them very quickly.


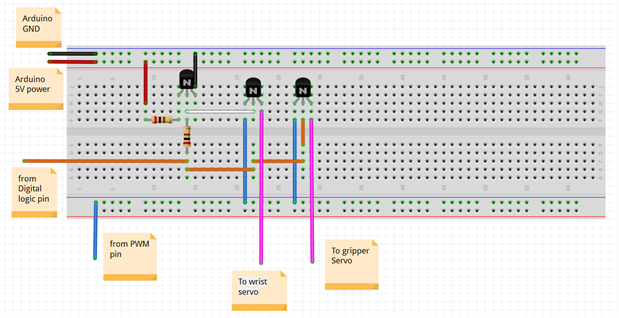
Regarding controlling the motors, the Arduino MKR1000 has 4 PWM pins, but I needed 5 to control the 5 servos, so I used one PWM pin to control 2 servos and a digital pin to toggle between the two servos and control one at a time.


Here is the circuit describing that:

image


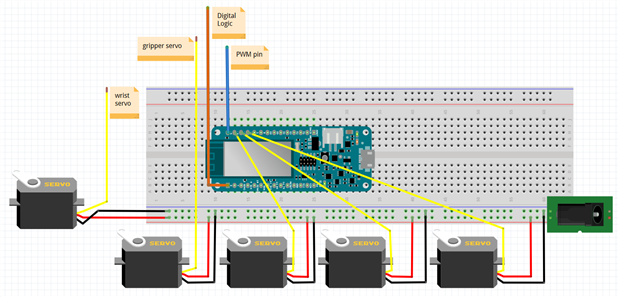
Here is the wiring of the servos to the Arduino:

image


Programming

There were two parts of the programming, the prototyping phase where I assembled it and got the servos to command to a certain location, and the precise control phase where I was able to command a location to the servo using ThingSpeak.


Prototyping

image

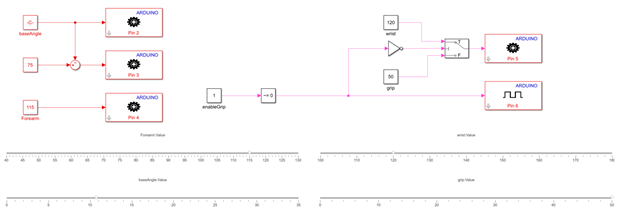
Using sliders and constant blocks I was able to command the servos on the Arduino to move to certain angles. I used this model to find out the biases between the commanded angle and the actual angles of the arm, as well as the range of allowable angles for each servo.

The blocks with the gear on them are the PWM write blocks for commanding the serve to a certain angle between 0 and 180.


I used inverse kinematics for an arm in 2D planar motion to solve for the angles necessary to move the arm to an XY coordinate. I found that this link explains the kinematics rather well: https://appliedgo.net/roboticarm/

Precise Control

image

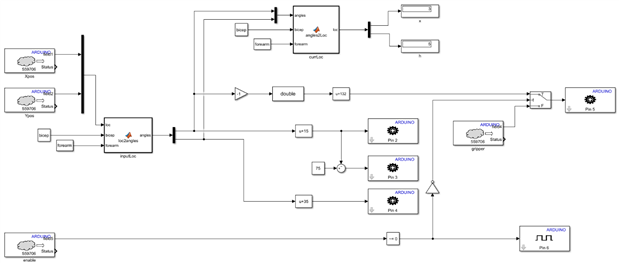
Although this looks more complicated than the other one, the logic is still the same. The output blocks are still the servo write blocks with the gears. The input blocks are now not the slider/constant block inputs but are being read from the ThingSpeak channel. I will elaborate later on using ThingSpeak. The inputs are the X and Y position of the arm, which using the loc2angles matlab function block are converted to commanded angles for the arm. The angles2loc block at the top of the model is just a way of monitoring the system to make sure the servo angles translated to the correct input position using forward kinematics. One of the cool tools from Simulink that I used in this project is External Mode. This allowed me to monitor the system while it was running on the Arduino itself.


The blocks with the gray cloud on them are the ThingSpeak read block built into the Simulink support package for Arduino. I input the channel ID, the data field number I want to retrieve, and the API read key, and it outputs the data from that channel and field. Don’t worry, if you are unfamiliar with any of those terms, I will elaborate soon.


Using ThingSpeak: Creating and using a channel

  • Go to https://thingspeak.com/
  • Click ‘sign in’ in the top right corner, and log in using your MathWorks account.
  • On the dashboard page click ‘New Channel’
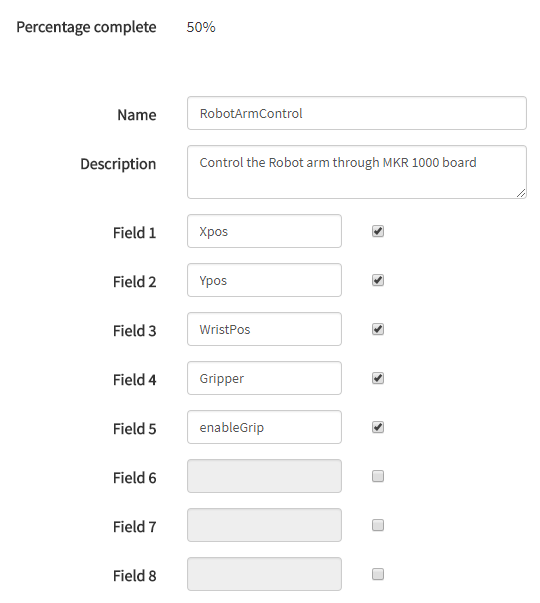
  • Fill in the data like below. The data shown is all you need to fill in.

image

  • Click ‘Save channel’ at the bottom
  • You have now created a ThingSpeak channel
  • In the MATLAB command window or using the MATLAB mobile app, you can enter commands that look like:
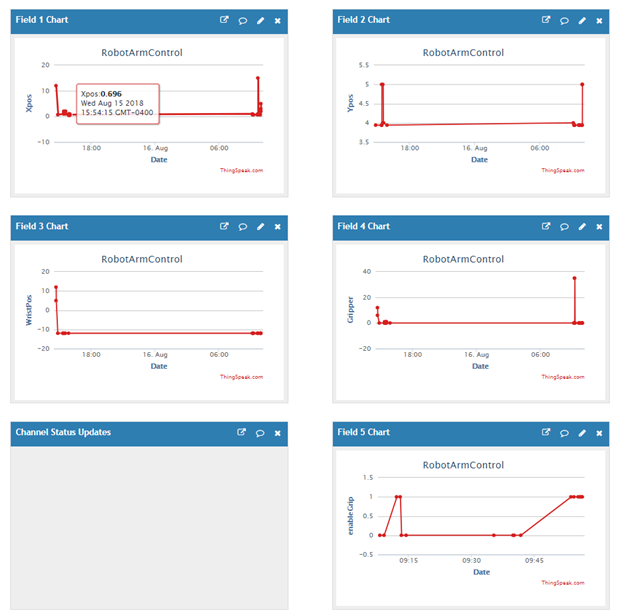
  • thingSpeakWrite(chID,[0.696 3.94 -12 0 0],'WriteKey',APIKEY,'Fields',[1 2 3 4 5]);

This writes new data to the specified fields in the ThingSpeak channel. You can change the values in the second argument of the function call to change the value of the corresponding field. After changing the values, the channel data should look like this:

image

Running the Model

When you finish with setting up the ThingSpeak channel, you can either run the model on the Arduino in external mode, or by deploying to the hardware. In the Simulink model, go to ‘Model Configuration Parameters’ by clicking on the small gear in the top menu panel, select ‘Hardware implementation’ and make sure the ‘Hardware Board’ is the Arduino MKR 1000. Under ‘Target Hardware Resources’ in the same tab, click on wifi properties and enter the wifi credentials to access the network.


Click the green run button to run the model in external mode or the blue deploy button to deploy it to hardware.

image


Once the model is running, you can write new data to the fields in the ThingSpeak channel from MATLAB or MATLAB mobile on your phone and watch how it moves your robot arm!


Code

https://www.mathworks.com/matlabcentral/fileexchange/68880-controlling-a-robotic-arm-from-anywhere-using-iot

  • Sign in to reply

Top Comments

  • aswinth
    aswinth over 6 years ago in reply to clem57 +3
    Yes I did build something similar and it was a easy build. However I was not happy with the UI of blynk. I would like to have a real robotic arm 3D model on my phone, which can be dragged to placed in…
  • genebren
    genebren over 7 years ago +1
    Very nice little project. It is fun to play around with these hobby servos. Gene
  • dubbie
    dubbie over 6 years ago +1
    Neat robot arm and project. Dubbie
  • madhugovindarajan
    madhugovindarajan over 6 years ago in reply to aswinth

    The reason we used thingspeak in this project was: there is a direct way to program Arduino to send data to ThingSpeak using Simulink. Simulink is popular among folks like me who do not know how to write C/C++ code but want to do fun projects like this. Simulink allows me to connect blocks from built-in libraries together and see how they work in a simulated environment, then generate and compile code that gets downloaded to the hardware all with the click of a button. The level of abstraction to writing and compiling code is really good and that is the thing engineers who are not programmers love.


    Even though we love abstraction, we wanted to understand how the mechanisms work and the mechanical engineering side of things and that is why went with the option of building our own robotic arm.

    • Cancel
    • Vote Up +1 Vote Down
    • Sign in to reply
    • More
    • Cancel
  • aswinth
    aswinth over 6 years ago in reply to clem57

    Yes I did build something similar and it was a easy build. However I was not happy with the UI of blynk. I would like to have a real robotic arm 3D model on my phone, which can be dragged to placed in a required position. I am planning to build my own android application for it using processing. Should be fun

    • Cancel
    • Vote Up +3 Vote Down
    • Sign in to reply
    • More
    • Cancel
  • dubbie
    dubbie over 6 years ago

    Neat robot arm and project.


    Dubbie

    • Cancel
    • Vote Up +1 Vote Down
    • Sign in to reply
    • More
    • Cancel
  • clem57
    clem57 over 6 years ago in reply to aswinth

    Maybe you are right and maybe not. Do you plan to try this? Proof is in the pudding!

    • Cancel
    • Vote Up 0 Vote Down
    • Sign in to reply
    • More
    • Cancel
  • aswinth
    aswinth over 6 years ago in reply to genebren

    Fun build, but why thingsspeak? I feel that it makes the project complex. Also using a nodemcu in place of arduino would also reduce the cost and complexity like this simple IoT based Robotic arm

    • Cancel
    • Vote Up 0 Vote Down
    • Sign in to reply
    • More
    • Cancel
>
element14 Community

element14 is the first online community specifically for engineers. Connect with your peers and get expert answers to your questions.

  • Members
  • Learn
  • Technologies
  • Challenges & Projects
  • Products
  • Store
  • About Us
  • Feedback & Support
  • FAQs
  • Terms of Use
  • Privacy Policy
  • Legal and Copyright Notices
  • Sitemap
  • Cookies

An Avnet Company © 2025 Premier Farnell Limited. All Rights Reserved.

Premier Farnell Ltd, registered in England and Wales (no 00876412), registered office: Farnell House, Forge Lane, Leeds LS12 2NE.

ICP 备案号 10220084.

Follow element14

  • X
  • Facebook
  • linkedin
  • YouTube