Created and installed rpi4 based router to access internet. This also has PoE hat on it..

Introduction
Recently, I was having a need for a router or a wifi range extender. Because, the high speed internet in my home router was not connecting to other Flores. For that I could either have to buy a router or create my own.
I thought of creating a router by myself. For that I would like to thank Element14 because they have sent me few Raspberry Pi 4 over time. As far as I remember one was for one meter of pi challenge, other was for asking a good question in one of the webinar from Micron about memory technologies. And one more for some quiz winners announcement.
One more thing is that I am using PoE(Power over Ethernet) to supply to the Raspberry Pi. I have road tested that HaT some years ago.
Raspberry Pi PoE HaT with Raspberry Pi 4 roadtest review
Real Stuff
There are many Linux versions and distros that could run on Raspberry Pi. All or many of them have advantages and are designed for specific use case. Normally they all support basic networking and other raspberry Pi project use case scenarios. But for advance configurations some are specifically designed. For example, Kali Linux is for people who are interested in penetration testing. There are other distros for gaming, automation, automotive applications etc.
For creating a router that works in home or office, I have decided to use Ubuntu server image for Raspberry Pi 4. This is because Ubuntu provides good documentation and networking related software configurations. For creating router it is important that networking related settings are properly configured. For that, Ubuntu has Netplan software that takes care of networking settings. Netplan is configurable through .YAML files and Linux commands.
https://ubuntu.com/download/server/arm
For creating a router it is required to configure Raspberry Pi WiFi interface as Access point(AP) rather than a station device.
Also, raspberry pi Ethernet interface such as ETH0 is configured as access point. Which means it gets a WAN connection and shares it will other interface. Normally, with Netplan there was no need to explicitly specify a Bridge connection between these two device interfaces(ETH0 and WLAN0).
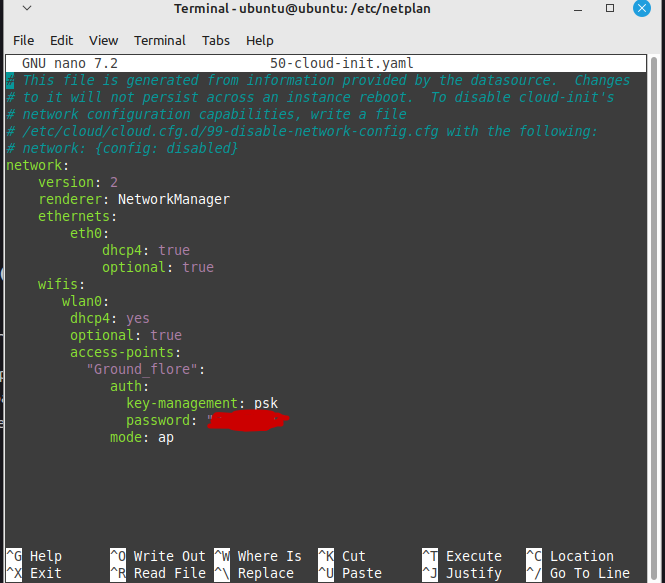
Now let's have a look at how does the .YAML files for Netplan looks like. Netplan is stored in /etc/netplan/50-cloud-init.yaml file.
After coping the contents of netplan into a Netplan file, restart the netplan with
$ sudo netplan apply
The above command will apply the netplan settings as described in the below file. Hence, you will have a working Router.
You can try to connect the network using a mobile phone with SSID and password mentioned in the netplan file and be able to connect to the internet. The condition here is that there should be working internet on Ethernet interface.

Conclusion and future plans
It was quite interesting to work on this project in my free time. Nevertheless, there are improvements and other features that one might want to add. For me adding a official camera module to this device will be interesting. Because then it will have a Router plus a camera in one device and it will be quite awesome. I have tested that the camera is indeed working on this 64-bit version of Ubuntu. I would also love to make a video tutorial and post it online, how I have created this device. Also, I would love to hear some feedback from the community members about this project. Specially, thanks to DAB for motivating me to post this tiny blog and share my work so that others can follow.
