element14 Community
element14 Community
    Register Log In
  • Site
  • Search
  • Log In Register
  • Members
    Members
    • Benefits of Membership
    • Achievement Levels
    • Members Area
    • Personal Blogs
    • Feedback and Support
    • What's New on element14
  • Learn
    Learn
    • Learning Center
    • eBooks
    • STEM Academy
    • Webinars, Training and Events
    • Learning Groups
  • Technologies
    Technologies
    • 3D Printing
    • FPGA
    • Industrial Automation
    • Internet of Things
    • Power & Energy
    • Sensors
    • Technology Groups
  • Challenges & Projects
    Challenges & Projects
    • Design Challenges
    • element14 presents
    • Project14
    • Arduino Projects
    • Raspberry Pi Projects
    • Project Groups
  • Products
    Products
    • Arduino
    • Dev Tools
    • Manufacturers
    • Raspberry Pi
    • RoadTests & Reviews
    • Avnet Boards Community
    • Product Groups
  • Store
    Store
    • Visit Your Store
    • Choose Another Store
      • Europe
      •  Austria (German)
      •  Belgium (Dutch, French)
      •  Bulgaria (Bulgarian)
      •  Czech Republic (Czech)
      •  Denmark (Danish)
      •  Estonia (Estonian)
      •  Finland (Finnish)
      •  France (French)
      •  Germany (German)
      •  Hungary (Hungarian)
      •  Ireland
      •  Israel
      •  Italy (Italian)
      •  Latvia (Latvian)
      •  
      •  Lithuania (Lithuanian)
      •  Netherlands (Dutch)
      •  Norway (Norwegian)
      •  Poland (Polish)
      •  Portugal (Portuguese)
      •  Romania (Romanian)
      •  Russia (Russian)
      •  Slovakia (Slovak)
      •  Slovenia (Slovenian)
      •  Spain (Spanish)
      •  Sweden (Swedish)
      •  Switzerland(German, French)
      •  Turkey (Turkish)
      •  United Kingdom
      • Asia Pacific
      •  Australia
      •  China
      •  Hong Kong
      •  India
      •  Korea (Korean)
      •  Malaysia
      •  New Zealand
      •  Philippines
      •  Singapore
      •  Taiwan
      •  Thailand (Thai)
      • Americas
      •  Brazil (Portuguese)
      •  Canada
      •  Mexico (Spanish)
      •  United States
      Can't find the country/region you're looking for? Visit our export site or find a local distributor.
  • Translate
  • Profile
Arduino
  • Products
  • More
Arduino
Blog Adding Analog RC Control to an Arduino
  • Blog
  • Forum
  • Documents
  • Events
  • Members
  • Mentions
  • Sub-Groups
  • Tags
  • More
  • Cancel
  • New
Arduino requires membership for participation - click to join
Blog Post Actions
  • Subscribe by email
  • More
  • Cancel
  • Share
  • Subscribe by email
  • More
  • Cancel
Group Actions
  • Group RSS
  • More
  • Cancel
Engagement
  • Author Author: fmilburn
  • Date Created: 7 Nov 2021 3:58 AM Date Created
  • Views 2544 views
  • Likes 2 likes
  • Comments 4 comments
  • rc
  • animatronics
  • pwm
  • receiver
  • transmitter
  • radio control
  • arduino
Related
Recommended

Adding Analog RC Control to an Arduino

fmilburn
fmilburn
7 Nov 2021

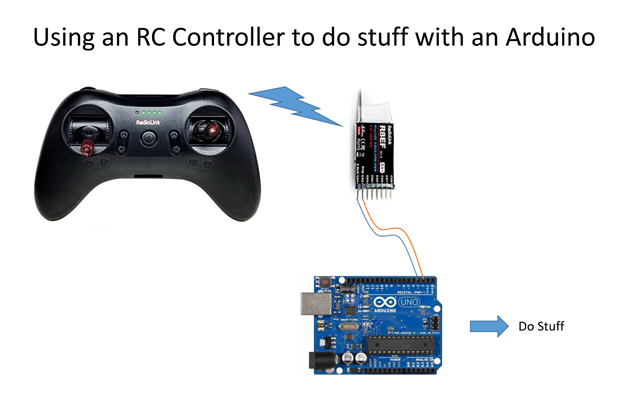
I want to use analog RC control to do stuff wirelessly with an Arduino

image

My method up until now for controlling penguins that flap their wings and tell jokes, rude Bender robots, and the Tin Man has been to use WiFi.  This works but I thought I would try something different.  I'm not breaking new ground here but thought I'd document what I'm doing anyway.


Why RC Control?

One of my complaints with the animatronics I've made has been the wonky eye movement.  The main issues are mechanical and I had a look at how RC model control is done as it requires some degree of precision.  That is a separate issue but it got me interested in RC transmitters and receivers.  They are relatively inexpensive (the T8S-BT  I'm using cost ~$50), have long range, and are simple to set up.  But they aren't digital and the inexpensive models are one-directional.


RadioLink T8S(BT) Transmitter

image


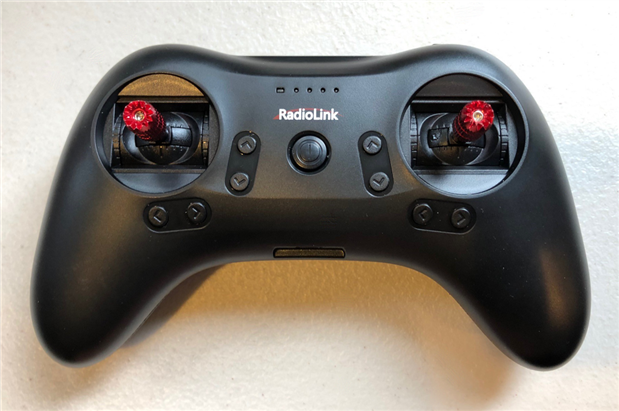
This is an 8-channel transmitter in the shape of a gamepad with left and right 2-axis joysticks.  There are also two 3-way switches, a button switch, and a continuously variable wheel.  The eight buttons on top with arrowheads (< and >) are used to trim servos attached to the joystick channels. It has an internal LiPo battery and charger for power.


The primary radio operates at 2.4GHz on the ISM band with GFSK modulation but only works with RadioLink receivers.  The advertising says it works up to 2000 meters line of sight.  There is also a BLE radio that can connect to a phone, tablet, or PC and be used to refine settings and save them for future use.  The BLE App is available for iOS, Android, and PCs.


It occurred to me that it might be possible to modify the transmitter to transmit digital information so I took it apart.  The case comes apart easily with 6 self-tappers into the plastic case holding it together.

image

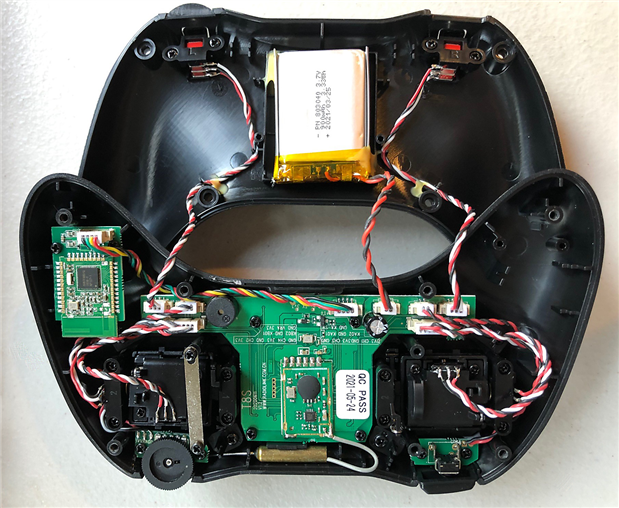
There isn't much inside.  The joysticks, switches, and knobs are all connected neatly to the main PCB along with the battery.  The BLE radio and antenna are on a separate PCB to the left in the photograph.  The transmitter blob has its PCB attached to the main PCB center-middle with an antenna hanging off below it.  It is nice and tidy with a fair amount of room inside of the right handle.  As will be seen shortly though I don't think adding digital logic on the transmitter side is a good idea.


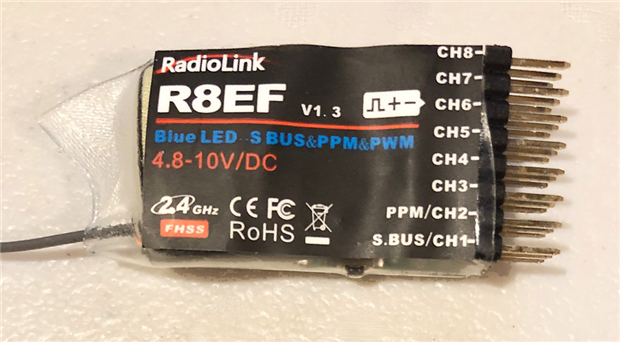
RadioLink R8EF Receiver

The receiver has eight channels and came packaged with the transmitter.  The operating voltage is 4.8V to 10V DC.  In addition to PWM operation, it is capable of SBUS and PPM protocols which allow servos to be with a single wire.  I'm only interested in PWM which is brought out on 8 sets of pins with the standard signal, positive, and negative arrangement for a servo.

image


As a first step, the output from the receiver was looked at with an oscilloscope.  We expect pulses around 50Hz with a duration between 1 and 2 milliseconds with 1.5 milliseconds being centered for the joysticks.

You don't have permission to edit metadata of this video.
Edit media
x
image
Upload Preview
image

We get pulses at 55Hz with close to the expected duration.  The video starts with one axis of the joystick displayed on the oscilloscope and then the second added.  By playing with it a bit I found that it was possible to manually control the output and get perhaps 7-bit resolution.  The output is not linear and has offset.


Of interest, even though the receiver is being powered with 5V, the output is 3V3 which means it is safe with 3V3 microcontrollers.  This might not be the case will all receivers and should be checked.  In any event, a 5V Arduino Uno will be used in the next experiment.


Why isn't transmitting digital with this radio a good idea?

One of my original thoughts was to modulate output on one of the channels of the transmitter with a microcontroller by pulsing one of the buttons.  While possible, it isn't practically useful because the pulses are only occurring at 55 Hz.  It is possible to get faster although perhaps not a practically higher resolution by reading the analog signal as it comes out of the receiver.


Inserting an Arduino in the loop

It might not be immediately obvious why an Arduino might be inserted.  Why not just send the receiver output to the servo?  Reasons might include "massaging" the output remove or adding an offset, removing or adding non-linearity, adding a filter to the output, and so on.  For animatronics, vocals might be attached to the buttons or even to the joystick.


It is easy enough to intercept the pulses and read their duration with a microcontroller.  It turns out of course that there is an Arduino library (ServoInput) for that.  I'll be using one of the examples and examining the output with the Serial monitor on my computer.

You don't have permission to edit metadata of this video.
Edit media
x
image
Upload Preview
image


It would be easy to interpret the input from a spare joystick and get 9 digital readings - top left, top center, top right, middle left, and so on.  The library works with interrupts and isn't blocking so at 50 Hz the microcontroller has plenty of time to do other stuff.  The buttons and switches are also available to an Arduino.


Conclusion

I'm not sure I'll be using this with my animatronics but it is worth trying if not too many vocalizations are required.  Thanks for reading.  Comments and suggestions are always welcome.

  • Sign in to reply
  • fmilburn
    fmilburn over 1 year ago in reply to genebren

    Thanks Gene,


    It is the first time I’ve looked into RC controllers in any detail and investigated how they can be used for these type things.  The controller has a good feel to it and is comparatively inexpensive.


    Frank

    • Cancel
    • Vote Up 0 Vote Down
    • Sign in to reply
    • More
    • Cancel
  • genebren
    genebren over 1 year ago

    Cool blog Frank!


    I have taken a similar approach on a few projects (Walky II and Mr. Machine), where I used a micro to read the outputs from the R/C receiver to where I processed the signals to control the motors.  In both of these projects I qualified commands from the R/C receiver with sensor data to determine how to act, if at all, to the commands.


    It is very handy to use a R/C transmitter/receiver as opposed to having design/build your own controller.


    Gene

    • Cancel
    • Vote Up 0 Vote Down
    • Sign in to reply
    • More
    • Cancel
  • fmilburn
    fmilburn over 1 year ago in reply to carmelito

    Thanks, and those are good points. The map function is quite useful for this type application.  I remember your blog now that you have linked to it. If I don’t use my controller for animatronics it may come in handy for other robots as it is quick and simple.

    • Cancel
    • Vote Up 0 Vote Down
    • Sign in to reply
    • More
    • Cancel
  • carmelito
    carmelito over 1 year ago

    I had done something similar, with a FLYSKY radio controller , I used the map function in the Arduino sketch, not sure how useful it will be in your case. Ideally, I could have made the servo's move by directly connecting the servo's to the receiver , like how we do in RC planes.. Here is the blog post - Arduino Nano -- controlling things using a RC controllers - Servos

    Good Luck - Carmelito

    • Cancel
    • Vote Up 0 Vote Down
    • Sign in to reply
    • More
    • Cancel
element14 Community

element14 is the first online community specifically for engineers. Connect with your peers and get expert answers to your questions.

  • Members
  • Learn
  • Technologies
  • Challenges & Projects
  • Products
  • Store
  • About Us
  • Feedback & Support
  • FAQs
  • Terms of Use
  • Privacy Policy
  • Legal and Copyright Notices
  • Sitemap
  • Cookies

An Avnet Company © 2023 Premier Farnell Limited. All Rights Reserved.

Premier Farnell Ltd, registered in England and Wales (no 00876412), registered office: Farnell House, Forge Lane, Leeds LS12 2NE.

ICP 备案号 10220084.

Follow element14

  • Facebook
  • Twitter
  • linkedin
  • YouTube