element14 Community
element14 Community
    Register Log In
  • Site
  • Search
  • Log In Register
  • Community Hub
    Community Hub
    • What's New on element14
    • Feedback and Support
    • Benefits of Membership
    • Personal Blogs
    • Members Area
    • Achievement Levels
  • Learn
    Learn
    • Ask an Expert
    • eBooks
    • element14 presents
    • Learning Center
    • Tech Spotlight
    • STEM Academy
    • Webinars, Training and Events
    • Learning Groups
  • Technologies
    Technologies
    • 3D Printing
    • FPGA
    • Industrial Automation
    • Internet of Things
    • Power & Energy
    • Sensors
    • Technology Groups
  • Challenges & Projects
    Challenges & Projects
    • Design Challenges
    • element14 presents Projects
    • Project14
    • Arduino Projects
    • Raspberry Pi Projects
    • Project Groups
  • Products
    Products
    • Arduino
    • Avnet & Tria Boards Community
    • Dev Tools
    • Manufacturers
    • Multicomp Pro
    • Product Groups
    • Raspberry Pi
    • RoadTests & Reviews
  • About Us
    About the element14 Community
  • Store
    Store
    • Visit Your Store
    • Choose another store...
      • Europe
      •  Austria (German)
      •  Belgium (Dutch, French)
      •  Bulgaria (Bulgarian)
      •  Czech Republic (Czech)
      •  Denmark (Danish)
      •  Estonia (Estonian)
      •  Finland (Finnish)
      •  France (French)
      •  Germany (German)
      •  Hungary (Hungarian)
      •  Ireland
      •  Israel
      •  Italy (Italian)
      •  Latvia (Latvian)
      •  
      •  Lithuania (Lithuanian)
      •  Netherlands (Dutch)
      •  Norway (Norwegian)
      •  Poland (Polish)
      •  Portugal (Portuguese)
      •  Romania (Romanian)
      •  Russia (Russian)
      •  Slovakia (Slovak)
      •  Slovenia (Slovenian)
      •  Spain (Spanish)
      •  Sweden (Swedish)
      •  Switzerland(German, French)
      •  Turkey (Turkish)
      •  United Kingdom
      • Asia Pacific
      •  Australia
      •  China
      •  Hong Kong
      •  India
      •  Japan
      •  Korea (Korean)
      •  Malaysia
      •  New Zealand
      •  Philippines
      •  Singapore
      •  Taiwan
      •  Thailand (Thai)
      •  Vietnam
      • Americas
      •  Brazil (Portuguese)
      •  Canada
      •  Mexico (Spanish)
      •  United States
      Can't find the country/region you're looking for? Visit our export site or find a local distributor.
  • Translate
  • Profile
  • Settings
Arduino
  • Products
  • More
Arduino
Arduino Forum Laser Harp issue please help
  • Blog
  • Forum
  • Documents
  • Quiz
  • Events
  • Polls
  • Files
  • Members
  • Mentions
  • Sub-Groups
  • Tags
  • More
  • Cancel
  • New
Join Arduino to participate - click to join for free!
Actions
  • Share
  • More
  • Cancel
Forum Thread Details
  • Replies 14 replies
  • Subscribers 418 subscribers
  • Views 1666 views
  • Users 0 members are here
Related

Laser Harp issue please help

e14 Contributor
e14 Contributor over 13 years ago

Good Evening,


I was hoping you could help I am attempting to build a laser buzzer type harp with my Arduino I have followed a tutorial I found online however when it came to the programming I am experiencing an issue Error compiling


C:\Users\Scott\Documents\Arduino\libraries\Tone\Tone.cpp: In member function 'void Tone::begin(uint8_t)':

C:\Users\Scott\Documents\Arduino\libraries\Tone\Tone.cpp:121: error: 'bitWrite' was not declared in this scope

C:\Users\Scott\Documents\Arduino\libraries\Tone\Tone.cpp:123: error: 'digitalPinToPort' was not declared in this scope

C:\Users\Scott\Documents\Arduino\libraries\Tone\Tone.cpp:123: error: 'portOutputRegister' was not declared in this scope

C:\Users\Scott\Documents\Arduino\libraries\Tone\Tone.cpp:124: error: 'digitalPinToBitMask' was not declared in this scope

C:\Users\Scott\Documents\Arduino\libraries\Tone\Tone.cpp: In member function 'void Tone::play(uint16_t, uint32_t)':

C:\Users\Scott\Documents\Arduino\libraries\Tone\Tone.cpp:198: error: 'OUTPUT' was not declared in this scope

C:\Users\Scott\Documents\Arduino\libraries\Tone\Tone.cpp:198: error: 'pinMode' was not declared in this scope

C:\Users\Scott\Documents\Arduino\libraries\Tone\Tone.cpp:294: error: 'bitWrite' was not declared in this scope

C:\Users\Scott\Documents\Arduino\libraries\Tone\Tone.cpp: In member function 'void Tone::stop()':

C:\Users\Scott\Documents\Arduino\libraries\Tone\Tone.cpp:361: error: 'digitalWrite' was not declared in this scope


here is the tutorial I have followed: http://www.radioshack.com/graphics/uc/rsk/Support/ProductManuals/Laser_Harp_Online_Instructions.pdf


Here is the code:


#include <Tone.h>


const boolean DEBUG = false;


const int CALIBRATION_PIN = A5;

const int SPEAKER_PIN = 8;

const int SENSOR_COUNT = 3;


typedef struct

{

  int pin;

  int note;

} sensor_type;


sensor_type sensor[SENSOR_COUNT];


Tone notePlayer;


void setup(void)

{

  if (DEBUG) {

    Serial.begin(9600);

  }

  sensor[0].pin = A0; // analog input 0, etc...

  sensor[0].note = NOTE_G3;

  sensor[1].pin = A1;

  sensor[1].note = NOTE_D4;

  sensor[2].pin = A2;

  sensor[2].note = NOTE_A4;


  notePlayer.begin(SPEAKER_PIN);

}


void loop(void)

{

  int calibration = analogRead(CALIBRATION_PIN);

  if (DEBUG) {

    Serial.print("cal: ");

    Serial.print(calibration);

  }

  int activeSensor = -1;

  for (int p = 0 ; p < SENSOR_COUNT ; p++) {

    int sensor_value = analogRead(sensor[p].pin);

    if (DEBUG) {

      Serial.print("\tsensor ");

      Serial.print(p);

      Serial.print(": ");

      Serial.print(sensor_value);

    }

    if ( sensor_value < calibration ) {

      activeSensor = p;

      if (DEBUG) Serial.print("!"); // "!" indicates note being played

    }

  }

  if (DEBUG) Serial.println();

  if (activeSensor == -1) {

    notePlayer.stop();

  } else {

    notePlayer.play(sensor[activeSensor].note);

  }

  if (DEBUG) delay(1000);

}


I look forward to your reply thanks in advance!


Scott

  • Sign in to reply
  • Cancel
  • billabott
    billabott over 13 years ago

    A quick look suggests that this may be the issue:

    http://playground.arduino.cc/Code/Library#WProgram

    • Cancel
    • Vote Up 0 Vote Down
    • Sign in to reply
    • Cancel
  • e14 Contributor
    e14 Contributor over 13 years ago in reply to billabott

    I am sorry I am not great with programming just a beginner. I found there is an issue with the tone folder wiring.h needs to be changed to Arduino.h however still receiving compiling errors.

    • Cancel
    • Vote Up 0 Vote Down
    • Sign in to reply
    • Cancel
  • e14 Contributor
    e14 Contributor over 13 years ago in reply to billabott

    I'm sorry still rather new to programming, I came accross a tutorial to change the wiring.h to Arduino.h within the Tone folder however still not compiling? can you assist please?

    • Cancel
    • Vote Up 0 Vote Down
    • Sign in to reply
    • Cancel
  • billabott
    billabott over 13 years ago in reply to e14 Contributor

    Maybe tomorrow.  I am calling it a Day and going to bed.  Don't give up!

    • Cancel
    • Vote Up 0 Vote Down
    • Sign in to reply
    • Cancel
  • billabott
    billabott over 13 years ago

    Dude!


    There is nothing wrong with the example program or the Tone library.

    The problem is the Arduino IDE.  It can be a little uncooperative when adding a new library.


    Make sure you have the Tone folder where it is supposed to be.  Delete the #include <Tone>; line from the sketch.  Save the sketch.  Close down all Arduino IDE windows.  (Maybe even reboot your computer)  Open the sketch in the IDE.  Use the menu tab to Import the library.  Compile the sketch.


    Can I assume that this is you first go around with a library?  Allow me to share the "Facts of Arduino Life" with you about 3rd party Contributed Libraries.

    On 11/30/2011 10:08 PM, David Cuartielles wrote:


    When it comes to the software, it is not Arduino's responsibility to

    fix the libraries developed by third parties. It is like in any other

    systems, the responsibility of those third parties to fix what stops

    working at each update.

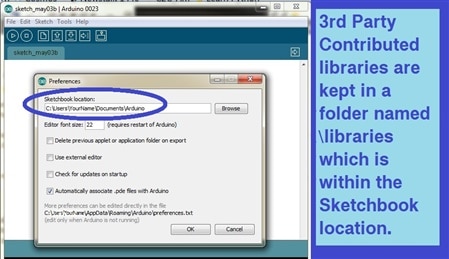
    These contributed libraries live in a folder called: C:\...\Arduino\libraries\  whereas the officially supported libraries live in a folder called: C:\...\Arduino\arduino-0023\arduino-0023\libraries.  If the contributed libraries folder does not exist then you must create it.


    image

    Please note: A professional quality library will come with one or more example sketches.  Do not ignore them; they are valuable resources.


    Just like the Radio Shack document said:

    Install the Tone Library

    For this project, you’ll need to install the “Tone” library, which can be downloaded here:   http://code.google.com/p/rogue-code/wiki/ToneLibraryDocumentation


    When you unzip the downloaded file, it will create a “Tone” folder. This folder should be moved to the “Libraries” folder, which is in your Arduino sketchbook folder. If you’re not sure of your sketchbook folder location, it can be found in your Arduino preferences. If the “libraries” folder doesn’t exist, create it, then copy the “Tone” folder to that location. Restart your Arduino application. You should now see “Tone” when you select from the menu bar:    


    Sketch > Import Library... (look under “Contributed”)


    • Cancel
    • Vote Up 0 Vote Down
    • Sign in to reply
    • Cancel
  • mcb1
    mcb1 over 13 years ago in reply to billabott

    Billabot


    To save that pain, I simply install them in the same libraries folder as the official ones.


    Yes you need to restart the IDE again to pick them up, but they are there.


    This method means if you have different libraries for the different versions (not so bad now) you can keep them apart.


    Cheers

    Mark

    • Cancel
    • Vote Up 0 Vote Down
    • Sign in to reply
    • Cancel
  • billabott
    billabott over 13 years ago

    Trusting that a few of you out there may be experimenting with this sketch using Arduino 1.0, further research seemed to be in order.


    Doing so, just for fun, earned an inglorious reward: a bucket full of error messages from the IDE and a very unsuccessful compile.  The first "red line" warning told the whole story:  "C:\Users\microwattbott\Documents\Arduino\libraries\Tone\Tone.cpp:26:20: warning: wiring.h: No such file or directory"


    Due diligence brought me to: http://blog.makezine.com/2011/12/01/arduino-1-0-is-out-heres-what-you-need-to-know/

    Where something unexpected was learned about migrating libraries into the new and improved Arduino 1.0 IDE.

    If your sketch includes any libraries that have not been designed for 1.0

    then you will need to change the library if it uses any of the old header files

    that have been replaced with the new Arduino.h file. If you include any

    of these libraries, change:

         #include "wiring.h"

         #include "WProgram.h"

         #include "WConstants.h"

         #include "pins_arduino.h"

    To

         #include "Arduino.h"


    The fix was made by opening the library, Tone.cpp, for editing and the reference to wiring.h was replaced with the suggested Arduino.h.  Saving and recompiling the sketch was done with ease and success (queue marching bands and cheering crowds). 

    • Cancel
    • Vote Up 0 Vote Down
    • Sign in to reply
    • Cancel
  • e14 Contributor
    e14 Contributor over 13 years ago in reply to billabott

    thanks for your help I resolved the issue, then received another issue something to do with the drivers but its all fixed now. I have one more issue when I shine a laser over the sensors it beeps instead of it making the noises once the laser beam was broken can anyone be kind enough to help me with the code?

    • Cancel
    • Vote Up 0 Vote Down
    • Sign in to reply
    • Cancel
  • billabott
    billabott over 13 years ago in reply to e14 Contributor

    http://www.youtube.com/results?search_query=arduino+laser+harp&oq=arduino+laser+harp


    Redo the the Calibration steps.

    Troubleshooting

    If it’s not working...

    • Check all connections. Make sure all components and jumper wires are

    in the appropriate rows in the solderless breadboard. Make sure you’ve

    connected to the correct pins on the Arduino. 

    • Use a multimeter to test your circuit. Hook it up in voltage testing mode

    to test the voltage coming from each photoresistor (In the illustration and

    photo above, you would test the blue, green and yellow wires coming from

    each sensor. Unplug each wire in turn from the Arduino and test the voltage

    across the wire and ground. The voltage should vary as you block and

    unblock the sensor).

    • Use a multimeter to test the resistance of the photoresistors. A fully blocked

    photoresistor should be in the same ballpark as the fixed (non-photo) resistor

    in the voltage divider circuit. If the resistance is significantly different (e.g., 10K

    vs. 100K), try to find a photoresistor in the correct range. Otherwise,

    replace the fixed resistor with one of a similar value as the blocked photoresistor.


    If you want to see what’s going on in the Arduino program, turn on debug input in

    the sketch by changing this line:

    const boolean DEBUG = false;


    To this:

    const boolean DEBUG = true;


    Turn on the Serial Monitor in Arduino while the program is running, keeping the

    USB cable connected.  This will print some interesting information to the screen

    as you play your harp, but it will negatively affect its performance; there will be

    a lag as you block and unblock the beams.


    • Cancel
    • Vote Up 0 Vote Down
    • Sign in to reply
    • Cancel
  • mcb1
    mcb1 over 13 years ago in reply to billabott

    Billabot

    I note that most of the new/revised libraries detect the version of Arduino IDe and make the adjustment.

    Pity someone hasn't updated this one for the novices.


    mark

    • Cancel
    • Vote Up 0 Vote Down
    • Sign in to reply
    • Cancel
>
element14 Community

element14 is the first online community specifically for engineers. Connect with your peers and get expert answers to your questions.

  • Members
  • Learn
  • Technologies
  • Challenges & Projects
  • Products
  • Store
  • About Us
  • Feedback & Support
  • FAQs
  • Terms of Use
  • Privacy Policy
  • Legal and Copyright Notices
  • Sitemap
  • Cookies

An Avnet Company © 2026 Premier Farnell Limited. All Rights Reserved.

Premier Farnell Ltd, registered in England and Wales (no 00876412), registered office: Farnell House, Forge Lane, Leeds LS12 2NE.

Follow element14

  • X
  • Facebook
  • linkedin
  • YouTube