element14 Community
element14 Community
    Register Log In
  • Site
  • Search
  • Log In Register
  • About Us
  • Community Hub
    Community Hub
    • What's New on element14
    • Feedback and Support
    • Benefits of Membership
    • Personal Blogs
    • Members Area
    • Achievement Levels
  • Learn
    Learn
    • Ask an Expert
    • eBooks
    • element14 presents
    • Learning Center
    • Tech Spotlight
    • STEM Academy
    • Webinars, Training and Events
    • Learning Groups
  • Technologies
    Technologies
    • 3D Printing
    • FPGA
    • Industrial Automation
    • Internet of Things
    • Power & Energy
    • Sensors
    • Technology Groups
  • Challenges & Projects
    Challenges & Projects
    • Design Challenges
    • element14 presents Projects
    • Project14
    • Arduino Projects
    • Raspberry Pi Projects
    • Project Groups
  • Products
    Products
    • Arduino
    • Avnet Boards Community
    • Dev Tools
    • Manufacturers
    • Multicomp Pro
    • Product Groups
    • Raspberry Pi
    • RoadTests & Reviews
  • Store
    Store
    • Visit Your Store
    • Choose another store...
      • Europe
      •  Austria (German)
      •  Belgium (Dutch, French)
      •  Bulgaria (Bulgarian)
      •  Czech Republic (Czech)
      •  Denmark (Danish)
      •  Estonia (Estonian)
      •  Finland (Finnish)
      •  France (French)
      •  Germany (German)
      •  Hungary (Hungarian)
      •  Ireland
      •  Israel
      •  Italy (Italian)
      •  Latvia (Latvian)
      •  
      •  Lithuania (Lithuanian)
      •  Netherlands (Dutch)
      •  Norway (Norwegian)
      •  Poland (Polish)
      •  Portugal (Portuguese)
      •  Romania (Romanian)
      •  Russia (Russian)
      •  Slovakia (Slovak)
      •  Slovenia (Slovenian)
      •  Spain (Spanish)
      •  Sweden (Swedish)
      •  Switzerland(German, French)
      •  Turkey (Turkish)
      •  United Kingdom
      • Asia Pacific
      •  Australia
      •  China
      •  Hong Kong
      •  India
      •  Korea (Korean)
      •  Malaysia
      •  New Zealand
      •  Philippines
      •  Singapore
      •  Taiwan
      •  Thailand (Thai)
      • Americas
      •  Brazil (Portuguese)
      •  Canada
      •  Mexico (Spanish)
      •  United States
      Can't find the country/region you're looking for? Visit our export site or find a local distributor.
  • Translate
  • Profile
  • Settings
Arduino
  • Products
  • More
Arduino
Arduino Forum Arduino + object avoidance robot.
  • Blog
  • Forum
  • Documents
  • Quiz
  • Events
  • Polls
  • Files
  • Members
  • Mentions
  • Sub-Groups
  • Tags
  • More
  • Cancel
  • New
Join Arduino to participate - click to join for free!
Actions
  • Share
  • More
  • Cancel
Forum Thread Details
  • Replies 14 replies
  • Subscribers 392 subscribers
  • Views 1412 views
  • Users 0 members are here
  • robotics
  • arduino
Related

Arduino + object avoidance robot.

dtsartsanis
dtsartsanis over 10 years ago

Hi everybody.


Few days now i started building a small robot (my first one) using an arduino as a controller.

This post is a small presentation of this project


The kit of the robot is from Actobitty and it is a simple 2 motor with an aluminum chassis.

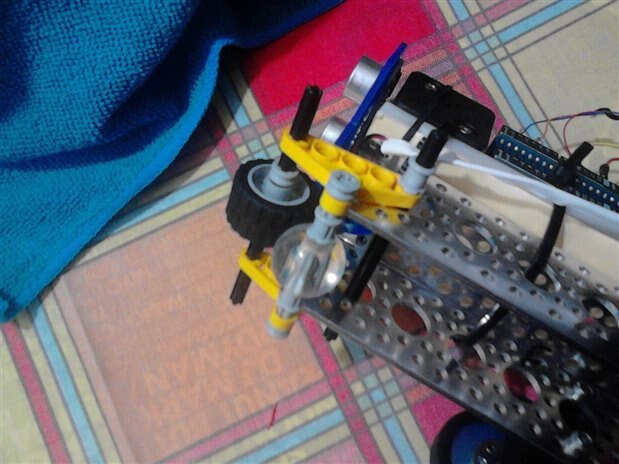
The front "wheel" was a simple plastic one and i noticed that it was difficult to overcame small objects and also difficult in turning. So i took pieces from an old Lego Technic and i made a front fork.


this was the front wheel and these are the holders of the battery below the chassis. I also removed them and manage to transfer the battery up.

image


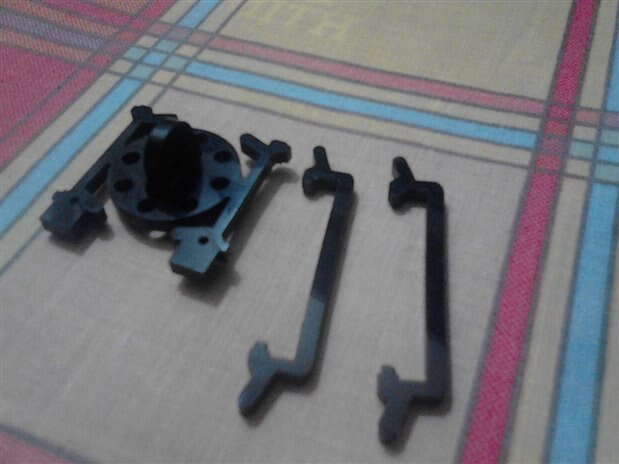
this is the Lego fork

image


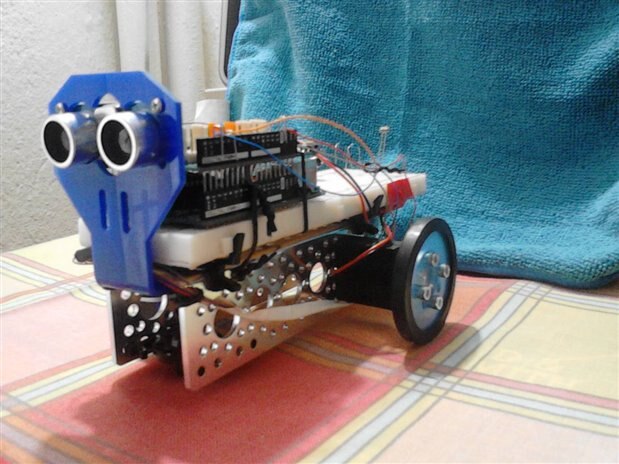
this is how the robot looked when i assembled it.

image


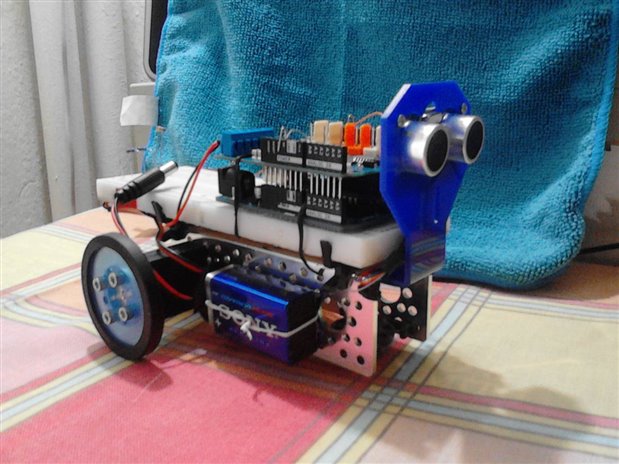
and this is how it looks now.

image


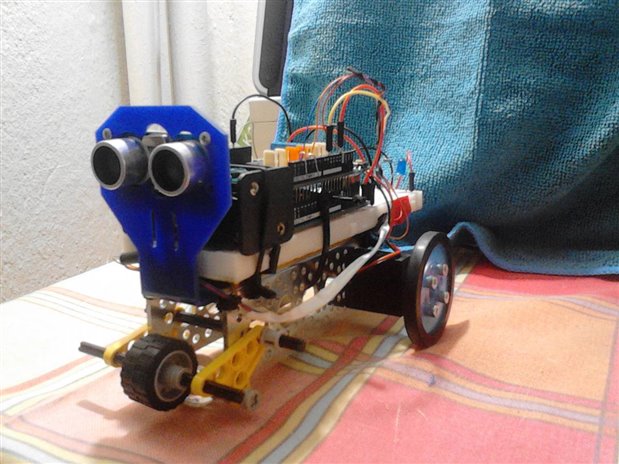
The original kit includes two holders for your Arduino or Raspberry. I manage to put the breadboard with the holders.

Also the battery pack moved in front of the micro controllers.Now there is a small space at the end of the breadboard for connecting leds etc.


Now the robot uses the following parts:

1.Actobitty 2 wheels robot aluminum chassis

2.2x Micro Gearmotor - 90 RPM

3.Arduino Uno

4.Arduino Motor shield rev.3

5.Ultrasonic sensor HC-SR04 with bracket

6.Breadboard for prototyping and additional sensors.

7.Additional 9V battery.

8.Cell AA Battery Pack with 4 rechargeable batteries


This is a the how u can attach the second battery.

image


At the present the robot can avoid objects and i found a very good tutorial here James Robot Tutorial - Duino-Robotics .

The code from the tutorial is for a robot with a servo ultrasonic sensor and servo motors. I use an Arduino motor shield so i had to make modifications.


In the next days ill try to load a video with the robot in action.


*the attachment code is working for me but still needs improvement

Attachments:
sample_code_for_robot.ino.zip
  • Sign in to reply
  • Cancel

Top Replies

  • neilk
    neilk over 10 years ago +3
    dtsartsanis Hi Dimitrios - a very nice piece of work! Well done. The code looks very useful for my own Cybot project. Are you going to include a way of sending commands to your robot? I am working on using…
  • mcb1
    mcb1 over 10 years ago +3
    Dimitrios Nice project. The ping sensor may not be seeing the echo from the door, and as I understand not all ping sensors are equal. To overcome the front wheel issues, I've tended to build tail draggers…
  • dtsartsanis
    dtsartsanis over 10 years ago +2
    A small modification to the 9V battery. It stays at the back of the chassis with tie zips. The good about the Actobity chassis is that it has a lot of holes and you can attach either sensors or whatever…
  • dtsartsanis
    dtsartsanis over 10 years ago

    Just finished a detailed step-by-step guide for the robot .You can see it at the instructables site Actobitty 2 wheel object avoidance robot image

    • Cancel
    • Vote Up +2 Vote Down
    • Sign in to reply
    • Cancel
  • neilk
    neilk over 10 years ago in reply to dtsartsanis

    Dimitrios very nice write up, Dimitrios. Congratulations on an excellent project.


    Neil

    • Cancel
    • Vote Up +1 Vote Down
    • Sign in to reply
    • Cancel
  • mcb1
    mcb1 over 10 years ago

    Dimitrios

    Nice project.


    The ping sensor may not be seeing the echo from the door, and as I understand not all ping sensors are equal.


    To overcome the front wheel issues, I've tended to build tail draggers (ie the third wheel is at the rear).

    It tends to stop doing wheelstands, if it gets slightly stuck, and helps with turning.


    I haven't tried the ping type avoidance but have used a solid bumper with microswitches on one.

    imageimage

    This used a tamiya ball castor for the third wheel, and is picaxe18 based using the high power control board (pre my Arduino days image )


    imageimage

    This 300g bot used a rounded off plastic screw, and uses a Wireless Nintendo Wii Nunchuk remote control.


    The Tamiya sports wheel used in both these are 55mm diameter.


    Mark

    • Cancel
    • Vote Up +3 Vote Down
    • Sign in to reply
    • Cancel
  • dtsartsanis
    dtsartsanis over 10 years ago in reply to mcb1

    Mark thank u for your pics and thoughts image

    • Cancel
    • Vote Up 0 Vote Down
    • Sign in to reply
    • Cancel
<
element14 Community

element14 is the first online community specifically for engineers. Connect with your peers and get expert answers to your questions.

  • Members
  • Learn
  • Technologies
  • Challenges & Projects
  • Products
  • Store
  • About Us
  • Feedback & Support
  • FAQs
  • Terms of Use
  • Privacy Policy
  • Legal and Copyright Notices
  • Sitemap
  • Cookies

An Avnet Company © 2025 Premier Farnell Limited. All Rights Reserved.

Premier Farnell Ltd, registered in England and Wales (no 00876412), registered office: Farnell House, Forge Lane, Leeds LS12 2NE.

ICP 备案号 10220084.

Follow element14

  • X
  • Facebook
  • linkedin
  • YouTube