element14 Community
element14 Community
    Register Log In
  • Site
  • Search
  • Log In Register
  • About Us
  • Community Hub
    Community Hub
    • What's New on element14
    • Feedback and Support
    • Benefits of Membership
    • Personal Blogs
    • Members Area
    • Achievement Levels
  • Learn
    Learn
    • Ask an Expert
    • eBooks
    • element14 presents
    • Learning Center
    • Tech Spotlight
    • STEM Academy
    • Webinars, Training and Events
    • Learning Groups
  • Technologies
    Technologies
    • 3D Printing
    • FPGA
    • Industrial Automation
    • Internet of Things
    • Power & Energy
    • Sensors
    • Technology Groups
  • Challenges & Projects
    Challenges & Projects
    • Design Challenges
    • element14 presents Projects
    • Project14
    • Arduino Projects
    • Raspberry Pi Projects
    • Project Groups
  • Products
    Products
    • Arduino
    • Avnet Boards Community
    • Dev Tools
    • Manufacturers
    • Multicomp Pro
    • Product Groups
    • Raspberry Pi
    • RoadTests & Reviews
  • Store
    Store
    • Visit Your Store
    • Choose another store...
      • Europe
      •  Austria (German)
      •  Belgium (Dutch, French)
      •  Bulgaria (Bulgarian)
      •  Czech Republic (Czech)
      •  Denmark (Danish)
      •  Estonia (Estonian)
      •  Finland (Finnish)
      •  France (French)
      •  Germany (German)
      •  Hungary (Hungarian)
      •  Ireland
      •  Israel
      •  Italy (Italian)
      •  Latvia (Latvian)
      •  
      •  Lithuania (Lithuanian)
      •  Netherlands (Dutch)
      •  Norway (Norwegian)
      •  Poland (Polish)
      •  Portugal (Portuguese)
      •  Romania (Romanian)
      •  Russia (Russian)
      •  Slovakia (Slovak)
      •  Slovenia (Slovenian)
      •  Spain (Spanish)
      •  Sweden (Swedish)
      •  Switzerland(German, French)
      •  Turkey (Turkish)
      •  United Kingdom
      • Asia Pacific
      •  Australia
      •  China
      •  Hong Kong
      •  India
      •  Korea (Korean)
      •  Malaysia
      •  New Zealand
      •  Philippines
      •  Singapore
      •  Taiwan
      •  Thailand (Thai)
      • Americas
      •  Brazil (Portuguese)
      •  Canada
      •  Mexico (Spanish)
      •  United States
      Can't find the country/region you're looking for? Visit our export site or find a local distributor.
  • Translate
  • Profile
  • Settings
Arduino
  • Products
  • More
Arduino
Arduino Forum Please I need help Writing code
  • Blog
  • Forum
  • Documents
  • Quiz
  • Events
  • Polls
  • Files
  • Members
  • Mentions
  • Sub-Groups
  • Tags
  • More
  • Cancel
  • New
Join Arduino to participate - click to join for free!
Actions
  • Share
  • More
  • Cancel
Forum Thread Details
  • State Verified Answer
  • Replies 51 replies
  • Answers 9 answers
  • Subscribers 396 subscribers
  • Views 4019 views
  • Users 0 members are here
  • need help coding
  • need code written
Related

Please I need help Writing code

theshay
theshay over 7 years ago

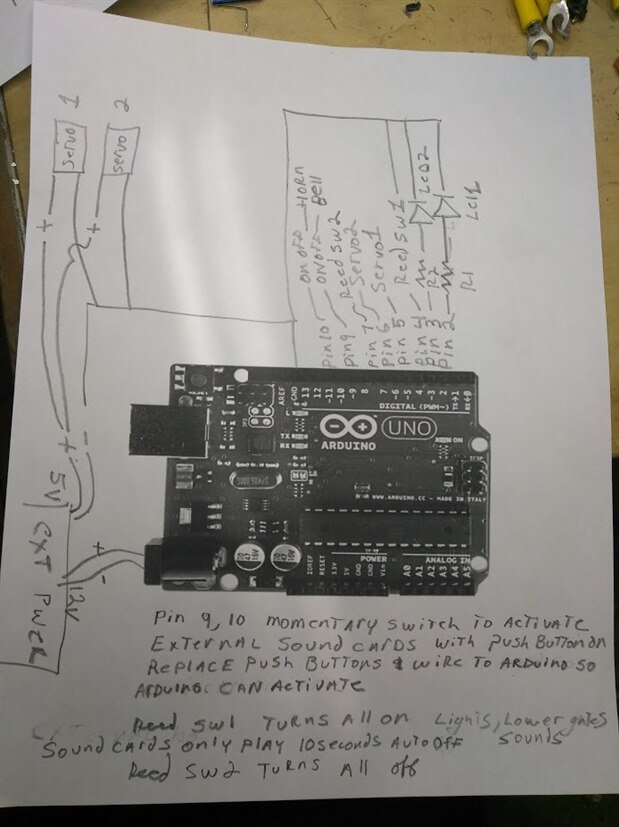
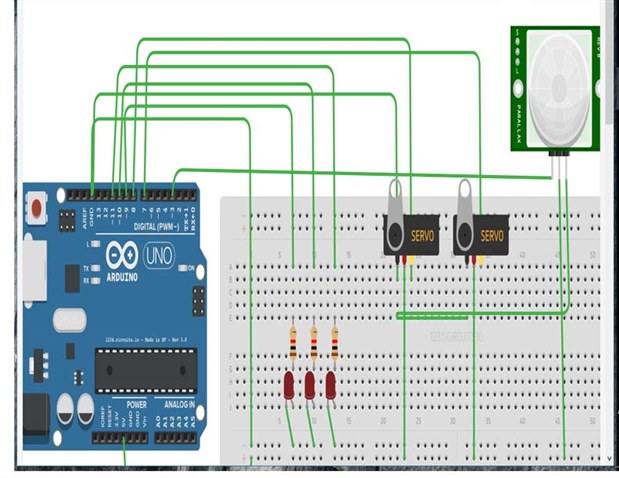
I am trying to write code for an automatic railroad crossing gates for my grandsons train table i built. I have no clue what i am doing. What i can say is im using 2 servos with external power 4 red leds that need to flash and a speaker for bell ding which i was hoping to use a sound file to play back my wire config is 2,3 for leds  2 servos 5,6 I also have a 10 second record-able device for train horn which uses push button for playback. i wanted to cut off the push button and use the arduino r3 to act as the push button pin 8. Also i will have 2 reed switches one to activate gates and lights and one to deactivate pins 4,7 this is what i have so far I get the lights to flash but im lost from there can some one help me write this code?


@@@@

int rd1LEDPin=2; //Declares rd1LED as int and set to 2

int rd2LEDPin=3; //declairs rd2LED as int and set to 3


int rd1onTime=250; //light 1 on time

int rd1offTime=250;  // light 1 off time

int rd2onTime=250; //light 2 on time

int rd2offTime=250;  // light 2 off time


const int REED_PIN = 4; // Pin connected to reed switch

const int REED_PIN = 7; // Pin connected to reed switch

const int LED_PIN = 13; // LED pin - active-high


void setup() {

  pinMode(rd1LEDPin, OUTPUT);// sets the second pin for output

   pinMode(rd2LEDPin, OUTPUT);// sets the third pin for output


  Serial.begin(9600);

  // Since the other end of the reed switch is connected to ground, we need

  // to pull-up the reed switch pin internally.

  pinMode(REED_PIN, INPUT_PULLUP);

  pinMode(LED_PIN, OUTPUT);

}


void loop() {

  digitalWrite(rd1LEDPin,HIGH); //turns led 1 on

  digitalWrite(rd2LEDPin,LOW); // turns led 2 off

  delay (rd1onTime); //wait

  delay(rd2offTime); //wait


  digitalWrite(rd1LEDPin,LOW); //turns led 1 off

  digitalWrite(rd2LEDPin,HIGH);//turns led 2 on

  delay (rd1offTime);//  wait

  delay(rd2onTime);  //wait


  int proximity = digitalRead(REED_PIN); // Read the state of the switch

  if (proximity == LOW) // If the pin reads low, the switch is closed.

  {

    Serial.println("Switch closed");

    digitalWrite(LED_PIN, HIGH); // Turn the LED on

  }

  else

  {

    digitalWrite(LED_PIN, LOW); // Turn the LED off


}

  • Sign in to reply
  • Cancel

Top Replies

  • theshay
    theshay over 7 years ago in reply to andywest +4 suggested
    ok i changed it. please for give me im an old man trying to do something for my autistic grandson he loves trains. so i build him a table for his birthday. only thing left to do is make the crossing gates…
  • jomoenginer
    jomoenginer over 7 years ago in reply to theshay +3 suggested
    Considering your lack of code development background, gabbing code examples might be causing more of an issue for you than it may solve. My suggestion for you is to write out what you want the code to…
  • theshay
    theshay over 7 years ago in reply to balearicdynamics +3
    Thank you so very much Enrico You are truly an honor and a scholar. May the guiding light be with you! I cant thank you enough for helping me. you really got me out of a jam. :-))) Not sure if you travel…
Parents
  • balearicdynamics
    0 balearicdynamics over 7 years ago

    Hello Edward,


    I am sorry to miss your question, thanks to tariq.ahmad  now I am on the piece image Don't worry we can easily solve your problem; BTW, maybe many users say that the problems are easy. I always found easy the problems I already know the solution image


    I ask you a favor, please. Take a look in the editor features and add the code with Syntax Highlighting so I can easily copy and past it in one Arduino board here to make some test and solve it faster. It was my browser rendering wrond your sources, now I can see them correctly. So, go ahead.


    As far as I see lights may flash with your code but this approach IMHO may create difficulties implementing the other part, better if we use a couple of separate functions. Let me know as I am almost available to follow you these days.


    Wait for your code to try it together. image What is the Birthday deadline?


    Enrico

    • Cancel
    • Vote Up +1 Vote Down
    • Sign in to reply
    • Verify Answer
    • Cancel
  • balearicdynamics
    0 balearicdynamics over 7 years ago in reply to balearicdynamics

    As waiting for your code I mean your last update after the mcb1 suggestions eventually applied.


    Enrico

    • Cancel
    • Vote Up +1 Vote Down
    • Sign in to reply
    • Verify Answer
    • Cancel
  • theshay
    0 theshay over 7 years ago in reply to balearicdynamics

    [code]
    /*
    Railroad crossing controller
    */
    #include 
    
    // Constants
    const int CYCLE_PERIOD_MS = 10;
    
    const int SENSOR_DELTA_THRESHOLD = 20;
    
    const int BELL_RING_PERIOD = 400;
    const int BELL_RING_CYCLES = BELL_RING_PERIOD / CYCLE_PERIOD_MS;
    const int BELL_TONE_FREQUENCY = 300;
    const int BELL_DURATION = 180;
    
    const int LIGHT_BLINK_PERIOD = 1000;
    const int LIGHT_BLINK_CYCLES = LIGHT_BLINK_PERIOD / CYCLE_PERIOD_MS;
    const int LIGHT_BLINK_HALF_CYCLES = LIGHT_BLINK_CYCLES / 2;
    
    const float CROSSING_POSITION_RAISED = 110.0;
    const float CROSSING_POSITION_LOWERED = 15.0;
    const float CROSSING_DEGREES_PER_CYCLE = 0.1;
    
    const int TRAIN_SPEED_MS_PER_SECTION = 1000;
    const int TRAIN_SECTIONS_TO_CROSSING = 13;
    
    const int TIME_GATE_WARNING_BEFORE_TRAIN_MS = 7000;
    const int TIME_GATE_DOWN_BEFORE_TRAIN_MS = 5000;
    const int TIME_GATE_DOWN_AFTER_TRAIN_MS = 2000;
    const int TIME_GATE_DOWN_BEFORE_TRAIN_CYCLES = TIME_GATE_DOWN_BEFORE_TRAIN_MS / CYCLE_PERIOD_MS;
    const int TIME_GATE_DOWN_AFTER_TRAIN_CYCLES = TIME_GATE_DOWN_AFTER_TRAIN_MS / CYCLE_PERIOD_MS;
    
    const int PIN_SENSOR = 0;
    const int PIN_LEFT_LIGHT = 2;
    const int PIN_RIGHT_LIGHT = 3;
    const int PIN_STATUS_LIGHT_ARRIVAL = 4;
    const int PIN_STATUS_LIGHT_DEPARTURE = 5;
    const int PIN_BUZZER = 6;
    const int PIN_SERVO = 7;
    
    // Enums and globals
    enum sensorState {
      out, entering, in, exiting
    }
    sensorState = out;
    
    enum crossingState {
      up, warning, lowering, down, raising
    }
    crossingState = up;
    
    Servo gateServo;
    int sensorThreshold = 0;
    long trainArrivalCountDownMS = 0;
    long trainDepartureCountDownMS = 0;
    int bellCycleCounter = 0;
    int leftLightCycleCounter = 0;
    int rightLightCycleCounter = LIGHT_BLINK_HALF_CYCLES;
    float crossingPosition = CROSSING_POSITION_RAISED;
    
    
    /*
    One time initializations
    */
    void setup()
    {
      pinMode(PIN_LEFT_LIGHT, OUTPUT);
      pinMode(PIN_RIGHT_LIGHT, OUTPUT);
      pinMode(PIN_STATUS_LIGHT_ARRIVAL, OUTPUT);
      pinMode(PIN_STATUS_LIGHT_DEPARTURE, OUTPUT);
      pinMode(PIN_BUZZER, OUTPUT);
     
      // we assume that a train is not in the sensor at startup
      sensorThreshold = analogRead(PIN_SENSOR) + SENSOR_DELTA_THRESHOLD;
    
      gateServo.attach(PIN_SERVO);
      gateServo.write(CROSSING_POSITION_RAISED);
    
      Serial.begin(9600);
    }
    
    /*
    Main control loop.
    Check the sensor, update outputs, and then wait the cycle period.
    */
    void loop()
    {
      checkSensor();
      updateTimers();
      updateStatusLights();
      updateCrossingState();
      updateBells();
      updateLights();
      updateGatePosition();
      delay(CYCLE_PERIOD_MS);
    }
    
    
    /*
     Check sensor and update transitions or states
     */
    void checkSensor()
    {
      if (isTrainPresentAtSensor()) {
        switch (sensorState) {
          case in:
            // still in...
            break;
          case entering:
            Serial.println("\nsensor -> in");
            sensorState = in;
            break;
          case out:
          case exiting:
            Serial.println("\nsensor -> entering");
            sensorState = entering;
            break;
        }
      } else {
        switch (sensorState) {
          case in:
          case entering:
            Serial.println("\nsensor -> exiting");
            sensorState = exiting;
            break;
          case out:
            break;
          case exiting:
            Serial.println("\nsensor -> out");
            sensorState = out;
            break;
        }  
      }
    }
    
    /*
     Set the timers when a train arrives,
     increment the departure timer if a train is still in the sensor,
     decrement the timers if a train is on its way
     */
    void updateTimers() {
      switch (sensorState) {
        case in:
          trainDepartureCountDownMS += CYCLE_PERIOD_MS;
          break;
        case entering:
          // is this a new train or an additional train?
          if (trainDepartureCountDownMS > 0) {
            // it is an additional train...
            // leave the arrival time as-is, add the time it takes for the new train to arrive on the departure timer
            Serial.println("\nAdditional train detected...");
            trainDepartureCountDownMS = calculateTrainArrivalTimeMS() + CYCLE_PERIOD_MS + TIME_GATE_DOWN_AFTER_TRAIN_MS;  
            // Serial.print("Arrival: ");
            // Serial.print(trainArrivalCountDownMS);
            // Serial.print("Departure: ");
            // Serial.println(trainDepartureCountDownMS);  
          } else {
            // it is a new train...
            Serial.println("\nNew train detected...");
            trainArrivalCountDownMS = calculateTrainArrivalTimeMS();
            trainDepartureCountDownMS = trainArrivalCountDownMS + CYCLE_PERIOD_MS + TIME_GATE_DOWN_AFTER_TRAIN_MS;
            // Serial.print("Arrival: ");
            // Serial.print(trainArrivalCountDownMS);
            // Serial.print("Departure: ");
            // Serial.println(trainDepartureCountDownMS);  
          }
          break;
        case out:    
        case exiting:
         // do nothing additional
         break;
      }
     
      if (trainArrivalCountDownMS > 0) {
        trainArrivalCountDownMS -= CYCLE_PERIOD_MS;
      }
     
      if (trainDepartureCountDownMS > 0) {
        trainDepartureCountDownMS -= CYCLE_PERIOD_MS;
      }
    }
     
    
    /*
     Manage crossing state transitions
     */
    void updateCrossingState() {
      switch (crossingState) {
        case up:
          if ((trainDepartureCountDownMS > 0) && (trainArrivalCountDownMS < TIME_GATE_WARNING_BEFORE_TRAIN_MS)) {
            Serial.println("\ngate up -> warning");
            crossingState = warning;
          }
          break;
        case warning:
          if (trainArrivalCountDownMS < TIME_GATE_DOWN_BEFORE_TRAIN_MS) {
            Serial.println("\ngate warning -> lowering");
            crossingState = lowering;
          }
          break;
        case lowering:
          if (crossingPosition <= CROSSING_POSITION_LOWERED) {
            Serial.println("\ngate lowering -> down");
            crossingState = down;      
          } else {
            crossingPosition -= CROSSING_DEGREES_PER_CYCLE;
          }
          break;
        case down:
          if (trainDepartureCountDownMS <= 0) {
            Serial.println("\n(expected train departure from gate)");
            Serial.println("\ngate down -> raising");
            crossingState = raising;
          }
          break;
        case raising:
          if (crossingPosition >= CROSSING_POSITION_RAISED) {
            Serial.println("\ngate raising -> up");
            crossingState = up;      
          } else {
            crossingPosition += CROSSING_DEGREES_PER_CYCLE;
          }
          break;
      }
    }


    /*
    We have one light to show the arrival countdown timer > 0 and
    another light to show the departure countdown timer > 0
     */
    void updateStatusLights() {
      if (trainArrivalCountDownMS > 0) {
        digitalWrite(PIN_STATUS_LIGHT_ARRIVAL, HIGH);
      } else {
        digitalWrite(PIN_STATUS_LIGHT_ARRIVAL, LOW);
      }
      
      if (trainDepartureCountDownMS > 0) {
        digitalWrite(PIN_STATUS_LIGHT_DEPARTURE, HIGH);
      } else {
        digitalWrite(PIN_STATUS_LIGHT_DEPARTURE, LOW);
      }
    }
    
    
    /*
    Helper to determine if the train is in the sensor
    */
    boolean isTrainPresentAtSensor() {
      int sensorValue = analogRead(PIN_SENSOR);
      // Serial.println(sensorValue);
      if (analogRead(PIN_SENSOR) > sensorThreshold) {
        Serial.print("S");
        return true;
      } else {
        return false;
      }
    }
    
    /*
    We do a very simplistic calculation with the assumption that all
    trains move at the same speed.  If we had a better sensor we could
    figure out how fast an individual train was going
    */
    int calculateTrainArrivalTimeMS() {
      return TRAIN_SPEED_MS_PER_SECTION * TRAIN_SECTIONS_TO_CROSSING;
    }
    
    
    /*
    Bells only ring during the initial warning and
    when the gate is lowering
    */
    void updateBells()
    {
      switch (crossingState) {
        case warning:
        case lowering:
          if (bellCycleCounter == 0) {
            Serial.print("(B!)");
            tone(PIN_BUZZER, BELL_TONE_FREQUENCY, BELL_DURATION);
            bellCycleCounter = BELL_RING_CYCLES;
          } else {
            bellCycleCounter--;
          }
          break;
      }
    }
    
    
    /*
    Lights flash continuously when the gate is not up
    */
    void updateLights()
    {
      switch (crossingState) {
        case up:
          digitalWrite(PIN_LEFT_LIGHT, LOW);
          digitalWrite(PIN_RIGHT_LIGHT, LOW);
          break;
        case warning:
        case lowering:
        case down:
        case raising:
          if (leftLightCycleCounter == 0) {
            Serial.print("(LL)");
            digitalWrite(PIN_LEFT_LIGHT, HIGH);
            digitalWrite(PIN_RIGHT_LIGHT, LOW);
            leftLightCycleCounter = LIGHT_BLINK_CYCLES;
            rightLightCycleCounter--;
          } else if (rightLightCycleCounter == 0) {
            Serial.print("(RL)");
            digitalWrite(PIN_LEFT_LIGHT, LOW);
            digitalWrite(PIN_RIGHT_LIGHT, HIGH);
              rightLightCycleCounter = LIGHT_BLINK_CYCLES;
            leftLightCycleCounter--;
          } else {
            leftLightCycleCounter--;
            rightLightCycleCounter--;
          }
          break;
      }
    }
    
    /*
    Manage incremental changes to the servo position
    */
    void updateGatePosition()
    {
      switch (crossingState) {
         case lowering:
           if (crossingPosition > CROSSING_POSITION_LOWERED) {
             crossingPosition -= CROSSING_DEGREES_PER_CYCLE;
             gateServo.write(crossingPosition);  // Move to next position
           }
           break;
         case raising:
           if (crossingPosition < CROSSING_POSITION_RAISED) {
             crossingPosition += CROSSING_DEGREES_PER_CYCLE;
             gateServo.write(crossingPosition);  // Move to next position
           }
           break;
      }
    }
    [/code]

    this is the code i found that i would like to altar to my needs but unsure how to do it i have no coding experience I can tell you where i have things plugged but not sure how to altar to my needs

    pin 2,3 are the leds pins 5.6 are servo pin 9 to act as switch to activate external sound card pins 4,7 will be the reed switches servos have external powersource

    • Cancel
    • Vote Up +2 Vote Down
    • Sign in to reply
    • Verify Answer
    • Cancel
  • theshay
    0 theshay over 7 years ago in reply to theshay

    oh and the birthday is may second.Thats why im freaking out to get this finished i have been building the table for 3 months its down to the finishing touches, applying trees and detail and getting these crossing gates to work. I tried going through a few tutorials an how to code but i cant learn fast enough. Its tough to teach an old dog new tricks. LOL

    • Cancel
    • Vote Up +2 Vote Down
    • Sign in to reply
    • Verify Answer
    • Cancel
  • balearicdynamics
    0 balearicdynamics over 7 years ago in reply to theshay

    Ok, I should finish something before then this evening I will try to put your code on Arduino and see what it does.


    Enrico

    • Cancel
    • Vote Up +2 Vote Down
    • Sign in to reply
    • Verify Answer
    • Cancel
  • theshay
    0 theshay over 7 years ago in reply to balearicdynamics

    image

    • Cancel
    • Vote Up +2 Vote Down
    • Sign in to reply
    • Verify Answer
    • Cancel
  • balearicdynamics
    0 balearicdynamics over 7 years ago in reply to theshay

    Great! This helps me a lot image


    Enrico

    • Cancel
    • Vote Up +1 Vote Down
    • Sign in to reply
    • Verify Answer
    • Cancel
  • theshay
    0 theshay over 7 years ago in reply to balearicdynamics

    I found a different set up real close to what i want. I dont know how to add the reed switches and eliminate the yellow light

    • Cancel
    • Vote Up +1 Vote Down
    • Sign in to reply
    • Verify Answer
    • Cancel
  • theshay
    0 theshay over 7 years ago in reply to balearicdynamics

    [code]
    //Level_crossing
    
    #include <Servo.h>
     Servo myservo1; // create servo object to control a servo
     Servo myservo2;
     // a maximum of eight servo objects can be created
     int pos = 0; // variable to store the servo position
     int led1 = 11 ;// define RED2 LED Interface
     int led2 = 10 ;// define RED1 LED Interface
     int led3 = 9 ;// define Yellow LED Interface
     int buttonpin = 3; // define the obstacle avoidance sensor interface
     int val ;// define numeric variables val
     void setup ()
     {
     pinMode (led1, OUTPUT) ;// define LED as output interface
     pinMode (led2, OUTPUT) ;// define LED as output interface
     pinMode (led3, OUTPUT) ;// define LED as output interface
     pinMode (buttonpin, INPUT) ;// define the obstacle avoidance sensor output interface
     myservo1.attach(8); // attaches the servo on pin 9 to the servo object
     myservo2.attach(7); // attaches the servo on pin 8 to the servo object
     }
     void loop ()
     {
     val = digitalRead (buttonpin) ;// digital interface will be assigned a value of 3 to read val
     if (val == LOW) // When the obstacle avoidance sensor detects a signal, LED flashes
     {
     myservo1.write(90); // tell servo to go to position in variable 'pos'
     myservo2.write(90);
     flashLights();
    
     }
     else
       
     {
     myservo1.write(0); // tell servo to go to position in variable 'pos'
     myservo2.write(0);
     digitalWrite (led1, LOW);
     digitalWrite (led2, LOW);
     digitalWrite (led3, LOW);
     }
    }
    void flashLights() {
     digitalWrite(led3, HIGH); // turn the LED on (HIGH is the voltage level)
     delay(2000); // wait for a second
     digitalWrite(led3, LOW); // turn the LED off by making the voltage LOW
    
     digitalWrite(led1, HIGH); // turn the LED on (HIGH is the voltage level)
     delay(200); // wait for a second
     digitalWrite(led1, LOW); // turn the LED off by making the voltage LOW
    
     digitalWrite(led2, HIGH); // turn the LED on (HIGH is the voltage level)
     delay(200); // wait for a second
     digitalWrite(led2, LOW); // turn the LED off by making the voltage LOW
      
      digitalWrite(led1, HIGH); // turn the LED on (HIGH is the voltage level)
     delay(200); // wait for a second
     digitalWrite(led1, LOW); // turn the LED off by making the voltage LOW
    
     digitalWrite(led2, HIGH); // turn the LED on (HIGH is the voltage level)
     delay(200); // wait for a second
     digitalWrite(led2, LOW); // turn the LED off by making the voltage LOW
    
     digitalWrite(led1, HIGH); // turn the LED on (HIGH is the voltage level)
     delay(200); // wait for a second
     digitalWrite(led1, LOW); // turn the LED off by making the voltage LOW
    
     digitalWrite(led2, HIGH); // turn the LED on (HIGH is the voltage level)
     delay(200); // wait for a second
     digitalWrite(led2, LOW); // turn the LED off by making the voltage LOW
    
     digitalWrite(led3, HIGH); // turn the LED on (HIGH is the voltage level)
     delay(1000); // wait for a second
     digitalWrite(led3, LOW); // turn the LED off by making the voltage LOW
    }
    [/code]

    • Cancel
    • Vote Up +1 Vote Down
    • Sign in to reply
    • Verify Answer
    • Cancel
  • theshay
    0 theshay over 7 years ago in reply to balearicdynamics

    image

    • Cancel
    • Vote Up +1 Vote Down
    • Sign in to reply
    • Verify Answer
    • Cancel
  • theshay
    0 theshay over 7 years ago in reply to balearicdynamics

    image

    • Cancel
    • Vote Up +2 Vote Down
    • Sign in to reply
    • Verify Answer
    • Cancel
  • theshay
    0 theshay over 7 years ago in reply to balearicdynamics

    I appreciate you taking the time to help me with this your awesome!!

    • Cancel
    • Vote Up 0 Vote Down
    • Sign in to reply
    • Verify Answer
    • Cancel
Reply
  • theshay
    0 theshay over 7 years ago in reply to balearicdynamics

    I appreciate you taking the time to help me with this your awesome!!

    • Cancel
    • Vote Up 0 Vote Down
    • Sign in to reply
    • Verify Answer
    • Cancel
Children
No Data
element14 Community

element14 is the first online community specifically for engineers. Connect with your peers and get expert answers to your questions.

  • Members
  • Learn
  • Technologies
  • Challenges & Projects
  • Products
  • Store
  • About Us
  • Feedback & Support
  • FAQs
  • Terms of Use
  • Privacy Policy
  • Legal and Copyright Notices
  • Sitemap
  • Cookies

An Avnet Company © 2025 Premier Farnell Limited. All Rights Reserved.

Premier Farnell Ltd, registered in England and Wales (no 00876412), registered office: Farnell House, Forge Lane, Leeds LS12 2NE.

ICP 备案号 10220084.

Follow element14

  • X
  • Facebook
  • linkedin
  • YouTube