element14 Community
element14 Community
    Register Log In
  • Site
  • Search
  • Log In Register
  • About Us
  • Community Hub
    Community Hub
    • What's New on element14
    • Feedback and Support
    • Benefits of Membership
    • Personal Blogs
    • Members Area
    • Achievement Levels
  • Learn
    Learn
    • Ask an Expert
    • eBooks
    • element14 presents
    • Learning Center
    • Tech Spotlight
    • STEM Academy
    • Webinars, Training and Events
    • Learning Groups
  • Technologies
    Technologies
    • 3D Printing
    • FPGA
    • Industrial Automation
    • Internet of Things
    • Power & Energy
    • Sensors
    • Technology Groups
  • Challenges & Projects
    Challenges & Projects
    • Design Challenges
    • element14 presents Projects
    • Project14
    • Arduino Projects
    • Raspberry Pi Projects
    • Project Groups
  • Products
    Products
    • Arduino
    • Avnet Boards Community
    • Dev Tools
    • Manufacturers
    • Multicomp Pro
    • Product Groups
    • Raspberry Pi
    • RoadTests & Reviews
  • Store
    Store
    • Visit Your Store
    • Choose another store...
      • Europe
      •  Austria (German)
      •  Belgium (Dutch, French)
      •  Bulgaria (Bulgarian)
      •  Czech Republic (Czech)
      •  Denmark (Danish)
      •  Estonia (Estonian)
      •  Finland (Finnish)
      •  France (French)
      •  Germany (German)
      •  Hungary (Hungarian)
      •  Ireland
      •  Israel
      •  Italy (Italian)
      •  Latvia (Latvian)
      •  
      •  Lithuania (Lithuanian)
      •  Netherlands (Dutch)
      •  Norway (Norwegian)
      •  Poland (Polish)
      •  Portugal (Portuguese)
      •  Romania (Romanian)
      •  Russia (Russian)
      •  Slovakia (Slovak)
      •  Slovenia (Slovenian)
      •  Spain (Spanish)
      •  Sweden (Swedish)
      •  Switzerland(German, French)
      •  Turkey (Turkish)
      •  United Kingdom
      • Asia Pacific
      •  Australia
      •  China
      •  Hong Kong
      •  India
      •  Korea (Korean)
      •  Malaysia
      •  New Zealand
      •  Philippines
      •  Singapore
      •  Taiwan
      •  Thailand (Thai)
      • Americas
      •  Brazil (Portuguese)
      •  Canada
      •  Mexico (Spanish)
      •  United States
      Can't find the country/region you're looking for? Visit our export site or find a local distributor.
  • Translate
  • Profile
  • Settings
Arduino
  • Products
  • More
Arduino
Arduino Forum i m having difficulty in this project somebody will help me....only pro programmers can do it
  • Blog
  • Forum
  • Documents
  • Quiz
  • Events
  • Polls
  • Files
  • Members
  • Mentions
  • Sub-Groups
  • Tags
  • More
  • Cancel
  • New
Join Arduino to participate - click to join for free!
Actions
  • Share
  • More
  • Cancel
Forum Thread Details
  • Replies 8 replies
  • Subscribers 392 subscribers
  • Views 1040 views
  • Users 0 members are here
Related

i m having difficulty in this project somebody will help me....only pro programmers can do it

Former Member
Former Member over 9 years ago

PROJECT

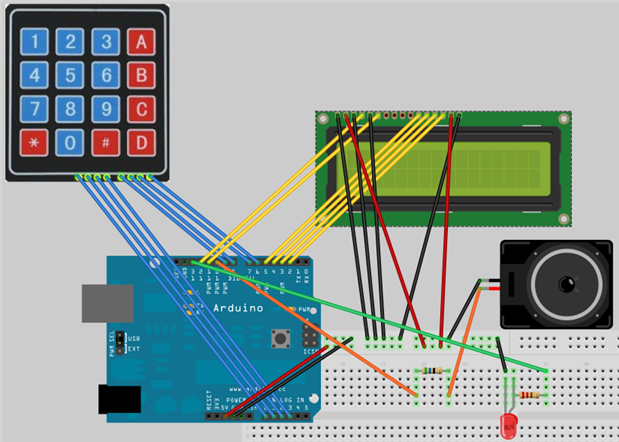
When your system is in the idle mode, RGB module’s color in your system stays in Red. This

represents the default state of your system.

As the next step, use the key board array (4 x 4 pushbuttons) in the kit to get the one of

your group member’s e-id. The e-id and student name must be displayed on the LCD panel.

If it is the right e-id, your system is enabled, otherwise there is no way you can enable the

system. Here, your system should sound differently depending on the e-id, for example, if

correct, sounds something good, if not, sound something weird.

 Once you have the system enabled correctly, change the color of RGB module into Green.

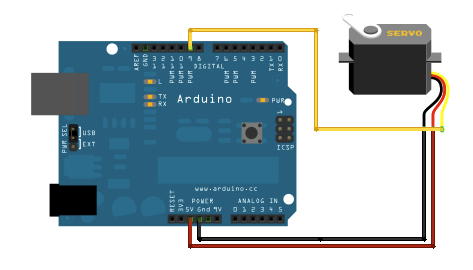
 Your system also has a push button to start a stepper (or a servo) motor. It is your choice

whether you want to use stepper or servo motor.

 When you keep the button pressed, the motor keeps rotating. (Note that 5 turns may

simulate a complete part machining cycle)

 When the motor rotates 5 full turns, turn your RGB module into Blue. After 5 seconds,

change the color of your RGB into Green.

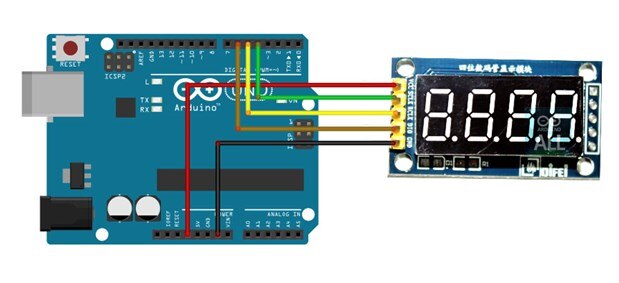
 Each time your motor makes 5 full turns, you need to count up the number of machined

parts by “1” and display total number of machined parts on a “4 digital tube” included in the

kit.

 There is another push button with which you can finish the whole process and get out of

the process. If you push this button, you cannot continue. The only way you start over is to

input the right e-id number of your own group again. In other words, this button makes the

state of your system back to idle.


I have done till here so far

#include <LiquidCrystal.h>

#include <Wire.h>

#include <Keypad.h>


const byte rows = 4;

const byte cols = 4;

char* ourCode = "1234";

int currentPosition = 0;


char keys[rows][cols] = {

{'1','2','3','A'},

{'4','5','6','B'},

{'7','8','9','C'},

  {'*','0','#','D'}

};

byte rowPins[ROWS] = {A3, A2, A1, A0};

byte colPins[COLS] = {10, 9, 8, 7};


Keypad keypad = Keypad(makeKeymap(keys), rowPins, colPins, rows, cols);


// initialize the library with the numbers of the interface pins

LiquidCrystal lcd(12, 11, 5, 4, 3, 2);

int greenLED = 6;

int redLED = 13;

int blueLED = 1;

void setup() {

  // set up the LCD's number of columns and rows:

  lcd.begin(16,2);

   pinMode(redLED, OUTPUT);

  pinMode(greenLED, OUTPUT);

pinMode(blueLED, OUTPUT);

digitalWrite(redLED, LOW);

digitalWrite(greenLED, LOW);

digitalWrite(blueLED, LOW);


}


void loop() {


    char key = keypad.getKey();


  if (key == ‘0’|| key!='ourCode') {

lcd.setCursor(0,0);


  1. lcd.print("Invalid input");

  // Print a message to the LCD.

digitalWrite(redLED, HIGH);

  if (key==’ourCode’) {

digitalWrite(greenLED, High);

digitalWrite(redLED,LOW);

  lcd.setCursor(2, 0);

lcd.print("Name:james!");

  // print the number of seconds since reset:

    lcd.setCursor(2, 1);

lcd.print("YOUR ID:1234");


}

}

  • Sign in to reply
  • Cancel

Top Replies

  • michaelkellett
    michaelkellett over 9 years ago in reply to gadget.iom +6
    'Coz no one would take this on except for money MK
  • balearicdynamics
    balearicdynamics over 9 years ago in reply to Former Member +3
    Hello, first of all, it seems that you mention a series of components but the correspondence with the design is just partial. Then I see three Arduino board with the different connections while it seems…
  • gadget.iom
    gadget.iom over 9 years ago +2
    Why can only "pro programmers" do it?
  • balearicdynamics
    balearicdynamics over 9 years ago

    Hello, if this is the entire sketch please paste it as code so I can copy and paste to test it. Follow the image below to see how to do this after selecting the code.


    image


    Thank you. Enrco

    • Cancel
    • Vote Up 0 Vote Down
    • Sign in to reply
    • Cancel
  • Former Member
    Former Member over 9 years ago in reply to balearicdynamics

    Dear this is not the entire code this is just till bullet#2

    • Cancel
    • Vote Up 0 Vote Down
    • Sign in to reply
    • Cancel
  • balearicdynamics
    balearicdynamics over 9 years ago in reply to Former Member

    Just what I was writing,


    please provide the code in a more readable form, explain what hardware are you using and possibly provide some images, components information etc. Then we can give you useful suggestions.

    • Cancel
    • Vote Up +1 Vote Down
    • Sign in to reply
    • Cancel
  • Former Member
    Former Member over 9 years ago in reply to Former Member

    #include <LiquidCrystal.h>

    #include <Wire.h>

    #include <Keypad.h>

    const byte rows = 4;

    const byte cols = 4;

    char* ourCode = "1234";

    int currentPosition = 0;


    char keys[rows][cols] = {

    {'1','2','3','A'},

    {'4','5','6','B'},

    {'7','8','9','C'},

      {'*','0','#','D'}

    };

    byte rowPins[ROWS] = {A3, A2, A1, A0};

    byte colPins[COLS] = {10, 9, 8, 7};


    Keypad keypad = Keypad(makeKeymap(keys), rowPins, colPins, rows, cols);


    // initialize the library with the numbers of the interface pins

    LiquidCrystal lcd(12, 11, 5, 4, 3, 2);

    int greenLED = 6;

    int redLED = 13;

    int blueLED = 1;

    void setup() {

      // set up the LCD's number of columns and rows:

      lcd.begin(16,2);

       pinMode(redLED, OUTPUT);

      pinMode(greenLED, OUTPUT);

    pinMode(blueLED, OUTPUT);

    digitalWrite(redLED, LOW);

    digitalWrite(greenLED, LOW);

    digitalWrite(blueLED, LOW);


    }


    void loop() {


        char key = keypad.getKey();


      if (key == ‘0’|| key!='ourCode') {

    lcd.setCursor(0,0);


    1. lcd.print("Invalid input");

      // Print a message to the LCD.digitalWrite(redLED, HIGH);

      if (key==’ourCode’) {digitalWrite(greenLED, High);

    digitalWrite(redLED,LOW);  lcd.setCursor(2, 0);

    lcd.print("Name:james!");  // print the number of seconds since reset:

        lcd.setCursor(2, 1);lcd.print("YOUR ID:1234");


    }}

    • 12 Views
    • Tags (edit):
    • Cancel
    • Vote Up 0 Vote Down
    • Sign in to reply
    • Cancel
  • Former Member
    Former Member over 9 years ago
    • I m using arduino uno r3, lcd 16x2 with iic , keypad4x4 , 4digitaltube,three leds and buzzerimageimageimageimage
    • Cancel
    • Vote Up 0 Vote Down
    • Sign in to reply
    • Cancel
  • balearicdynamics
    balearicdynamics over 9 years ago in reply to Former Member

    Hello,


    first of all, it seems that you mention a series of components but the correspondence with the design is just partial. Then I see three Arduino board with the different connections while it seems that you are using only one. There is a serial RFID sensor that has no sense to the there, according with your code and there is only one red led instead of the three you mention. So please, be serious, place what you need and a decent schematic. And consider to have suggestions, helpful hints and more but to be hones you can't hope or pretend that someone makes the project for you.


    Just a note: if you don't select the code (you can see it by yourself) the code is outside of the syntax highlight.

    • Cancel
    • Vote Up +3 Vote Down
    • Sign in to reply
    • Cancel
  • gadget.iom
    gadget.iom over 9 years ago

    Why can only "pro programmers" do it?

    • Cancel
    • Vote Up +2 Vote Down
    • Sign in to reply
    • Cancel
  • michaelkellett
    michaelkellett over 9 years ago in reply to gadget.iom

    'Coz no one would take this on except for money image


    MK

    • Cancel
    • Vote Up +6 Vote Down
    • Sign in to reply
    • Cancel
element14 Community

element14 is the first online community specifically for engineers. Connect with your peers and get expert answers to your questions.

  • Members
  • Learn
  • Technologies
  • Challenges & Projects
  • Products
  • Store
  • About Us
  • Feedback & Support
  • FAQs
  • Terms of Use
  • Privacy Policy
  • Legal and Copyright Notices
  • Sitemap
  • Cookies

An Avnet Company © 2025 Premier Farnell Limited. All Rights Reserved.

Premier Farnell Ltd, registered in England and Wales (no 00876412), registered office: Farnell House, Forge Lane, Leeds LS12 2NE.

ICP 备案号 10220084.

Follow element14

  • X
  • Facebook
  • linkedin
  • YouTube