element14 Community
element14 Community
    Register Log In
  • Site
  • Search
  • Log In Register
  • Community Hub
    Community Hub
    • What's New on element14
    • Feedback and Support
    • Benefits of Membership
    • Personal Blogs
    • Members Area
    • Achievement Levels
  • Learn
    Learn
    • Ask an Expert
    • eBooks
    • element14 presents
    • Learning Center
    • Tech Spotlight
    • STEM Academy
    • Webinars, Training and Events
    • Learning Groups
  • Technologies
    Technologies
    • 3D Printing
    • FPGA
    • Industrial Automation
    • Internet of Things
    • Power & Energy
    • Sensors
    • Technology Groups
  • Challenges & Projects
    Challenges & Projects
    • Design Challenges
    • element14 presents Projects
    • Project14
    • Arduino Projects
    • Raspberry Pi Projects
    • Project Groups
  • Products
    Products
    • Arduino
    • Avnet & Tria Boards Community
    • Dev Tools
    • Manufacturers
    • Multicomp Pro
    • Product Groups
    • Raspberry Pi
    • RoadTests & Reviews
  • About Us
  • Store
    Store
    • Visit Your Store
    • Choose another store...
      • Europe
      •  Austria (German)
      •  Belgium (Dutch, French)
      •  Bulgaria (Bulgarian)
      •  Czech Republic (Czech)
      •  Denmark (Danish)
      •  Estonia (Estonian)
      •  Finland (Finnish)
      •  France (French)
      •  Germany (German)
      •  Hungary (Hungarian)
      •  Ireland
      •  Israel
      •  Italy (Italian)
      •  Latvia (Latvian)
      •  
      •  Lithuania (Lithuanian)
      •  Netherlands (Dutch)
      •  Norway (Norwegian)
      •  Poland (Polish)
      •  Portugal (Portuguese)
      •  Romania (Romanian)
      •  Russia (Russian)
      •  Slovakia (Slovak)
      •  Slovenia (Slovenian)
      •  Spain (Spanish)
      •  Sweden (Swedish)
      •  Switzerland(German, French)
      •  Turkey (Turkish)
      •  United Kingdom
      • Asia Pacific
      •  Australia
      •  China
      •  Hong Kong
      •  India
      •  Korea (Korean)
      •  Malaysia
      •  New Zealand
      •  Philippines
      •  Singapore
      •  Taiwan
      •  Thailand (Thai)
      • Americas
      •  Brazil (Portuguese)
      •  Canada
      •  Mexico (Spanish)
      •  United States
      Can't find the country/region you're looking for? Visit our export site or find a local distributor.
  • Translate
  • Profile
  • Settings
Azure Sphere Starter Kit
  • Products
  • Dev Tools
  • Avnet & Tria Boards Community
  • Azure Sphere Starter Kit
  • More
  • Cancel
Azure Sphere Starter Kit
Blog Azure Sphere - Li-ion charger from blocks
  • Blog
  • Forum
  • Documents
  • Events
  • Polls
  • Files
  • Members
  • Mentions
  • Sub-Groups
  • Tags
  • More
  • Cancel
  • New
Join Azure Sphere Starter Kit to participate - click to join for free!
  • Share
  • More
  • Cancel
Group Actions
  • Group RSS
  • More
  • Cancel
Engagement
  • Author Author: xpiotrekx
  • Date Created: 30 Nov 2019 10:40 PM Date Created
  • Views 315 views
  • Likes 2 likes
  • Comments 0 comments
  • battery charger
  • azure iot
  • sensing the world project
  • li-ion;
  • charger
Related
Recommended

Azure Sphere - Li-ion charger from blocks

xpiotrekx
xpiotrekx
30 Nov 2019

1. Introduction


The project was born from the need to have a universal charger that is able to charge both 1 cell and a battery pack for child car or scooter .

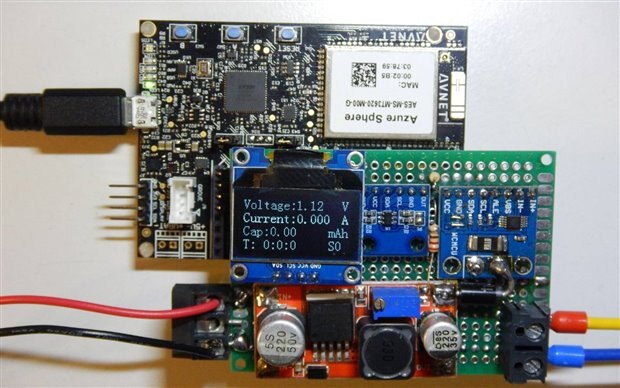
The main concept to make Li-ion charger was using the block for fast prototyping.

I chose as hardware for this role 5 modules:

1. MT3620

2. LM2596

3. INA226

4. MCP4725

5. OLED Display

image

2. Description of concept


On the diagram bellow are present the connection between all additional boards.

image


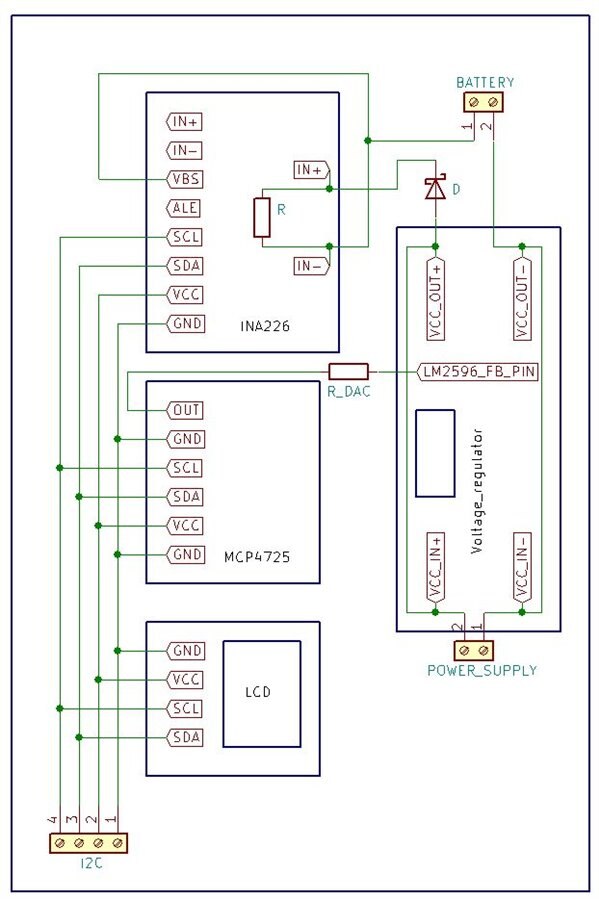
The main processor, in this role MT3620, is responsible for collecting information about actual voltage and current provided to charged battery and correct them if they are out of scope.

The main module responsible for controlling the voltage is based on LM2596 and is controlled via 12-bit DAC - MCP4725. To collecting all necessary information I use wide range input ADC - INA226.

Additionally few information about charging process like:
- charging voltage
- charging current
- capacity
- passed time form the begin of charging

- actual charging mode
are presented on OLED  display.


All this three modules are connected to ISU2 and controlled via I2C bus.

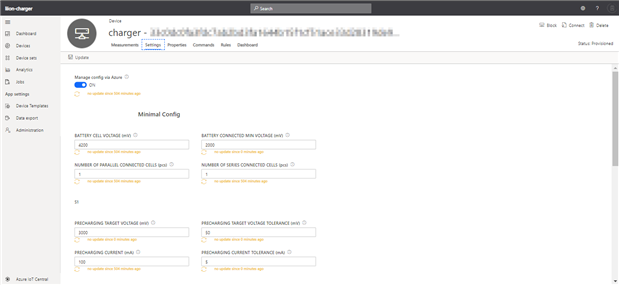
Furthermore Azure module is also responsible for communicating with Azure IoT Central where all information of charging process are presented.

In Azure IoT Central is also possible to change parameters for charging process.


3. The Software


After power on the charger, the first what is done, is initialization the I2C by calling InitPeripherals() function.

In this function are set the speed all parameters of I2C bus and then, the external peripherals like ADC, DAC, display and GPIO are initialized.

In the next step is checked state of Buttons A and B from main board. Depending of it’s combination, charger is running in preferred mode:


Button A

Button B

Mode

Release

Release

Standalone mode

Pressed

Release

Configured via Azure

Release

Pressed

Test mode

Pressed

Pressed

Configure via Azure and send data


In “Standalone mode” all parameters for charging process are predefined in file liion_charger_algorithm.h


In “Configured via Azure” mode the parameters are taken from Azure. In this case program is waiting for connecting to Azure and after receiving all parameters, sets them by calling function SetDefaultChargingParameters(&azureChargingParameters).


In “Test mode” user has possibility to check all peripheries. Program read state of button A and B and increase / decrease value of DAC register. The result of this is changing voltage on output. By holding the button for time longer than one second, DAC value is changing in step +/- 20. When button is pressed and released in time shorter than one second, DAC value is changing in step of +/- 1. 

Information about Voltage on output and actual current are show in display.


In “Configure via Azure and send data” mode, program in first step do this same like in “Configured via Azure” mode, but during charging process, is sending information about actual voltage and current.


4. Charging algorithm


Whole charging algorithm is contained in  liion_charger_algorithm.c file.

The function named LiionChargerProces() is called periodically from main() function.

In first step, (called S0) program is checking if battery is connected. This is realized by measuring voltage on output during the voltage on regulator is setting to lowest value.

If battery was connected program compare voltage of battery with set values and makes a choice which charging mode should be start.

Charging process is divided on five steps:

Step 1 (S1) – precharging. This step is ran when battery voltage is < 3 V

Step 2 (S2) – Constant Currenc (CC)

Step 3 (S3) – Constant Voltage (CV)

Step 4 (S4) – End of charging. When battery voltage has 4,2 V and charging current drop under 0,1 C


The LiionChargerProces() is also responsible for calculating capacity and charging time.


Appendix A.

To calculate the R_DAC please visit: https://www.fischl.de/dcdccontrol/


Appendix B.

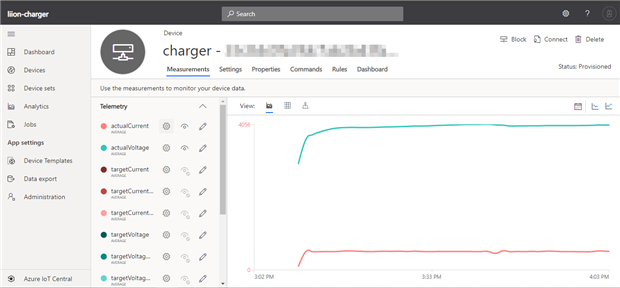
Graph of charging battery from Azure

image

Setting form on Azure portal

image

Attachments:
AzureLiIonCharger.zip
  • Sign in to reply
element14 Community

element14 is the first online community specifically for engineers. Connect with your peers and get expert answers to your questions.

  • Members
  • Learn
  • Technologies
  • Challenges & Projects
  • Products
  • Store
  • About Us
  • Feedback & Support
  • FAQs
  • Terms of Use
  • Privacy Policy
  • Legal and Copyright Notices
  • Sitemap
  • Cookies

An Avnet Company © 2025 Premier Farnell Limited. All Rights Reserved.

Premier Farnell Ltd, registered in England and Wales (no 00876412), registered office: Farnell House, Forge Lane, Leeds LS12 2NE.

ICP 备案号 10220084.

Follow element14

  • X
  • Facebook
  • linkedin
  • YouTube