


Story
Introduction
This project is supposed to make my basement smarter and secured - because somebody stole my stuff in the past. So main feature will be when somebody will intrude my basement, I recieve a notification. Also I need to arm alarm (if I forget to do it during leaving the basement) and disarm remotely (to prevent false-alarm notifications when I enter the basement).
Idea how this security-alarm should work it's pretty simple - on device are a lot of sensors capable to detect somebody's presence: ambient light (when thief use flashlight or turn on the light), microphone (nobody is so silent to be not-detected). And when I mount the device on door, it can also detect movement of doors (thanks to angular rate+acceleration sensor on board).
So if at least one sensor detects important change (higher than some threshold), device starts alarm - it sends notification to my phone via Telegram Bot.

<html><head><title>Jive SBS</title></head>
<body><font face="arial,helvetica,sans-serif">
<b>Error</b><br><font size="-1">
An general error occurred while processing your request.
</font></font></body></html>

Solution Design
Architecture
Sphere SDK provides simple APIs to Microsoft Azure services. Device communicates with IoT Hub (which cares about device management) and message routing (bi-directional - cloud-to-device & device-to-cloud).
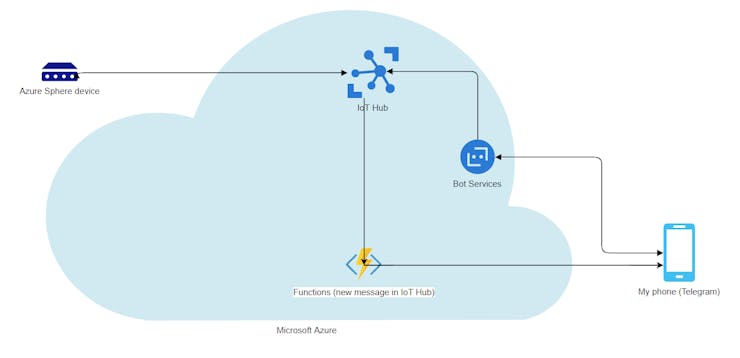
SmartBasement project architecture
Azure Bot Services is kind of WebApp - which provides all needed integrations and webhooks needed by Telegram's API. This part allows to communicate from phone to device (via IoT Hub), but not the other way.
That's why I have in solution also Azure Function service, which provides native IoTHubTrigger (when is new message in IoT Hub detected, it will call your code) - this will cover also a scenario "send notification when breach".
Important advantage of this solution (with my current needs) is cost - it costs $0 per month, because all used services run on Free tier.
BoM
- Avnet Azure Sphere MT3620 Starter Kit
- Mikroe Mic Click (link)
- 300KΩ resistor
- 3D printer (for case)
SW:
- Azure IoT Hub
- Azure Functions
- Azure Bot Services
- Telegram API
My Start With Azure Sphere MT3620
I usually work with high-level programming languages, so I had little cold start, with this project - and for rest of developers like me, I would like to mention really important fact, there are more variants of this board. If you will search for help or read some documentation, make sure, than you have same board as author - because there is a big difference between Development Kit and Starter Kit (totally different adresses of GPIOs,...) - thats why I included also the folder device-app/Hardware with boards definitions in source code of this project.
My whole project is prepared for Starter Kit, but with few changes you can launch it also on Development Kit.
Peripherals (Sensors, Button, LED)
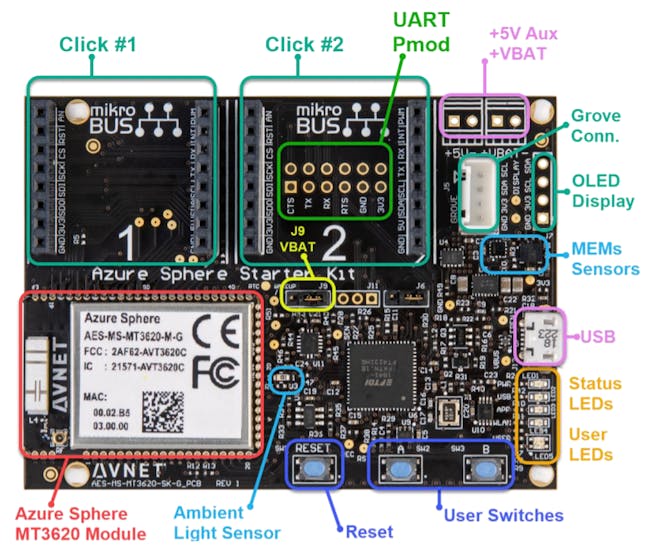
Azure Sphere MT3620 Starter Kit board
On-board Ambient light sensor - is connected via ADC, and on Starter Kit is directly connected to ADC0 (diagram).
Microphone - I used MikroE's Mic Click module for MikroBUS. MikroBUS allows you to connect module without wiring anything, you just click module into socket on board. Starter Kit has two sockets, Click #1 (socket #1) is connected to ADC1, Click #2 to ADC2. To protect your board, you have to do small wiring - because of Mic Click module has reference output voltage up to 3.3V, board is designed for maximum input voltage only 2.5V. You need to add 300KΩ resistor between module and board.
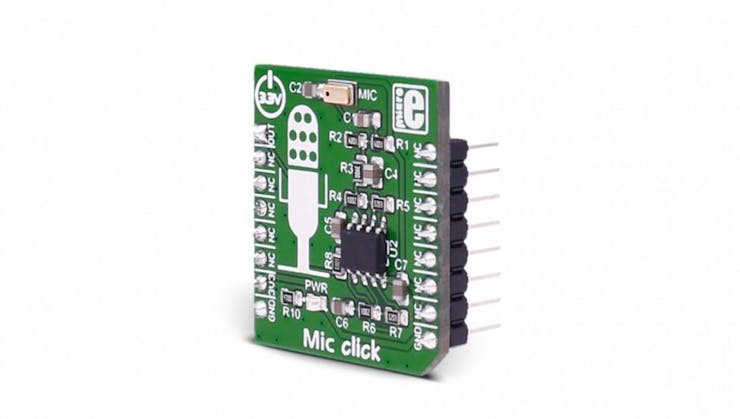
Mic click (MikroBUS socket)
On-board accelerometer+ gyroscope sensors - are connected via digital I2C interface, on ISU2 port.
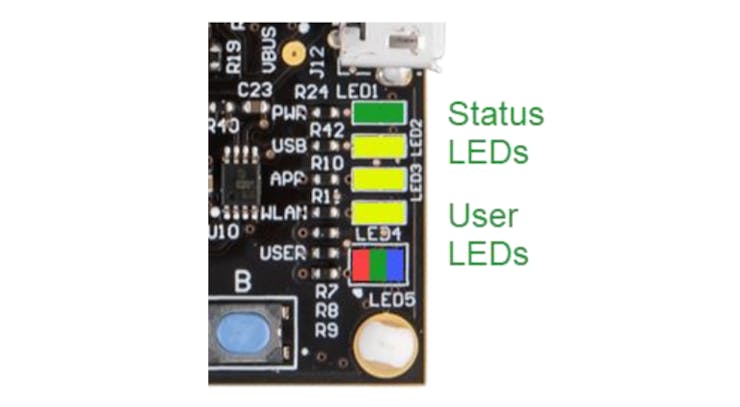
UserLED - is connected via GPIO ports. For every color (RGB) there is GPIO port - ports GPIO8, GPIO9 and GPIO10, so you can mix them.
In this project I am using user LED for indicate device status:
- permanent blue=armed- blinking blue=waiting 10 seconds to arm- permanent red=something went wrong
In the code you can easily control user LED via method:
void setNewLEDStateRGB(bool isRedOn, bool isGreenOn, bool isBlueOn);
Button A - is also connected via GPIO port, on port GPIO12. In this project is used for arming alarm manually (when you click this button, device will wait 10 seconds and arm alarm - to give you time to leave the basement).
Source Code
All project source codes (+3D model for case) are available on my GitHub.
Please read README file in repository root folder, it will guide you step by step, how to deploy whole project.
In repository are two main folders:
device-app - application for Sphere device (Visual Studio solution)cloud-backend - two separated Visual Studio solutions (Azure Functions app + Bot Service Web App)
Device app description
The app needs to be deployed into device. For debugging and deployment you need to have installed Azure Sphere SDK (I recommend at least version 19.09, because older doesn't fully support ADC controller).
As first you need to set up app_manifest.json, which defines application settings&permissions:
{
"SchemaVersion": 1,
"Name": "AzureSphereSecuredBasement",
"ComponentId": "685f13af-25a5-40b2-8dd8-8cbc253ecbd8",
"EntryPoint": "/bin/app",
"CmdArgs": [ "--SCOPE-ID--" ],
"Capabilities": {
    "Adc": [ "$AVNET_MT3620_SK_ADC_CONTROLLER0" ],
    "AllowedConnections": [
       "--YOUR-IOT-HUB-URL--",
       "global.azure-devices-provisioning.net"
    ],
    "DeviceAuthentication": "--DEVICE-AUTHENTICATION--",
    "Gpio": [ "$AVNET_MT3620_SK_USER_LED_RED", "$AVNET_MT3620_SK_USER_LED_GREEN", "$AVNET_MT3620_SK_USER_LED_BLUE", "$AVNET_MT3620_SK_USER_BUTTON_A", "$AVNET_MT3620_SK_GPIO34" ],
    "I2cMaster": [ "$AVNET_MT3620_SK_ISU2_I2C" ],
    "SpiMaster": [],
    "WifiConfig": true
    }
}
In project is located file app_manifest.json.template, which you can rename to app_manifest.json and fill missing variables only.
For every peripheral type is in project separated helper file f.ex. i2c_helper.c,button_helper.c,adc_helper.c etc. and main.c file, which contains functions init peripherals, infinity loop and the core function GetAndProcessDataFromSensors, which reads and evaluate data from sensors.
Synchronization between IoT Hub and device is solved by Azure IoT Hub SDK - so you have to initializate the SDK, register you callback functions and give command to IoT Hub SDK to start sync by:
// register callback function - call function ReceiveMessageCallback, when is a new message for this device (in IoT Hub) detected
IoTHubDeviceClient_LL_SetMessageCallback(iothubClientHandle, ReceiveMessageCallback, NULL);

// start IoT Hub to sync
IoTHubDeviceClient_LL_DoWork(iothubClientHandle);
Breach detect algorithm is simple - it stores previous values (in variable g_previous_state), and if difference between previous value and new value is greater than defined threshold (in build_options.h), breach is detected.
For combined-value calculation from multiple axis (X, Y, Z) from accelerometer and gyroscope, is there used Pythagorean theorem.
Cloud backend
This part of project is really easy and straightforward - liitle bit complicated is only to set up resources in Azure (IoT Hub with DPS), but Microsoft has nice manual for that to follow step-by-step.
Please keep in mind, that threshold values are defined on side of device, but also in Azure Function ReactToMessageInIoTHub. So if you want to change them, please do it in both files.
Mounting To Doors (3D Printed Case)
I prepared mount case to be printed on 3D printer - it has space for microUSB connector + powerbank can be put on the top. Because the doors are moving, I also added top piece to secure device from falling-down from case (there is space from top, because we don't want cover the microphone chip).

Instruction for assembly - glue middle component with right one (biggest one) together - on the middle component use the stronger edge and on the right component use back top edge (hole for USB should be on right bottom). After inserting the board inside, glue with smallest part on the top (be sure you not cover sensors on MikroE board).
Testing
I mounted device on doors with powerbank (powerbank is secured against falling down by 3M sticker).
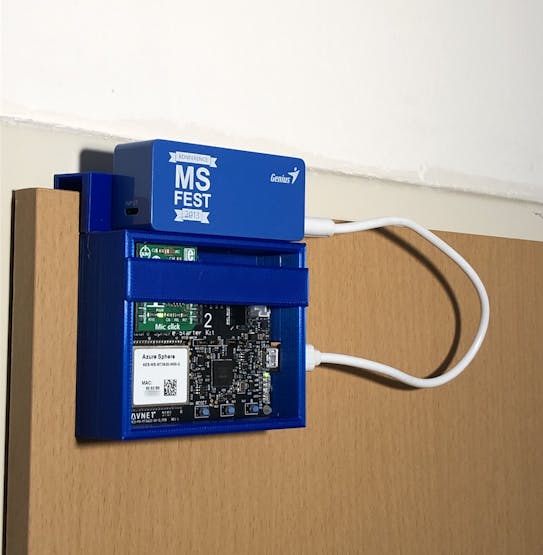
Smart Basement deployed with powerbank (secured by 3M)
Demo (Video)
demo - alarm is armed (permanent blue LED) and door opening is detected and notification sent
Conclusion
Thanks to this project, you can secure your basement for no monthly fee, just thanks to basic Start Kit board + one Mic Click module.
For future, I would like to extend project by other important thing in house basement: humidity. I am planning to use other click slot for humidity sensor and report humidity status in basement to IoT Hub periodically and notify, if there is needed air exchange in basement.
Top Comments