


Introduction
Lets face it, despite all of the technology in our lives, when it comes down to it, we are still humans with human functions. We poop. A lot. Expect some amount of humor in this blog post and project, but also some serious design and fabrication.
One of the most frustrating scenarios I face, is when after a marathon of programming and designing, I need to take care of human functions. I live in a house with others who also poop. The others who also poop, sometimes don't replace the paper roll when they are done. The end result, is a failure on my part to check the paper we use to wipe our rears and in a hurry, get to business. The end result is and being stuck on the toilet. There are simple solutions to this problem, for example using a bidet. But still, toilet paper (may be referred to as TP from here on) has an important place in American culture and daily life. Every day, thousands of people are likely stuck on a toilet with a soiled rear, and no toilet paper in sight. What do we do about this problem? We text, we shout, or worse we waddle to the nearest storage location. Hopefully someone comes to our rescue and delivers the much needed TP. A problem that can easily be solved by checking before starting business, but it does slip by. More importantly, even if you keep your rolls closely stocked within reach, a dreaded pandemic can have unexpected impact on toilet paper supply.
As we have recently seen, a pandemic can impact the supply and demand of a simple household item.. toilet paper... Some hoard and over stock ahead of time, buying much more than needed and others buy too little, and end up running short while stores are closing down. If only we could know for sure how much paper our household uses, we could project our consumption for the duration of the pandemic and buy a proper amount of toilet paper for our household. This would reduce excessive hoarding, as well as balance under purchasing to help project usage through a pandemic or shutdown so we do not run short.
Most of us have been there at some point or another.
Lets fix this.
Introducing the Smart Toilet Paper Roll
A toilet paper roll that sends consumption data to the cloud!
Why cloud connected? This project sounds like a joke, and, it started off kind of as one, but after I thought about it, seemed to really have some serious benefits and motivations. Because it opens up many options. notifications, apps, tracking, etc. Imagine running a large hotel or convention center and knowing exactly which stalls and restrooms need more toilet paper. Imagine finding out that you use more than the average person, and cutting back to save money and reduce landfill waste. Imagine realizing your running low on toilet paper when a new case arrives at your door, ordered automatically from Amazon. Maybe these are already on the market, but I have not seen them in stores or anywhere I shop, and even if they are out there, why not make it yourself and have your data remain your property. Welcome to the future!
Objectives
- Alert potential poopers to the current toilet paper situation. Flash red if the remaining paper is less than the average required for use.
- Track usage within a household. Send poop session data to the cloud!
- Calibrate tracking to match a type of roll. Not all toilet paper is created equal (length, thickness, overall quantity).
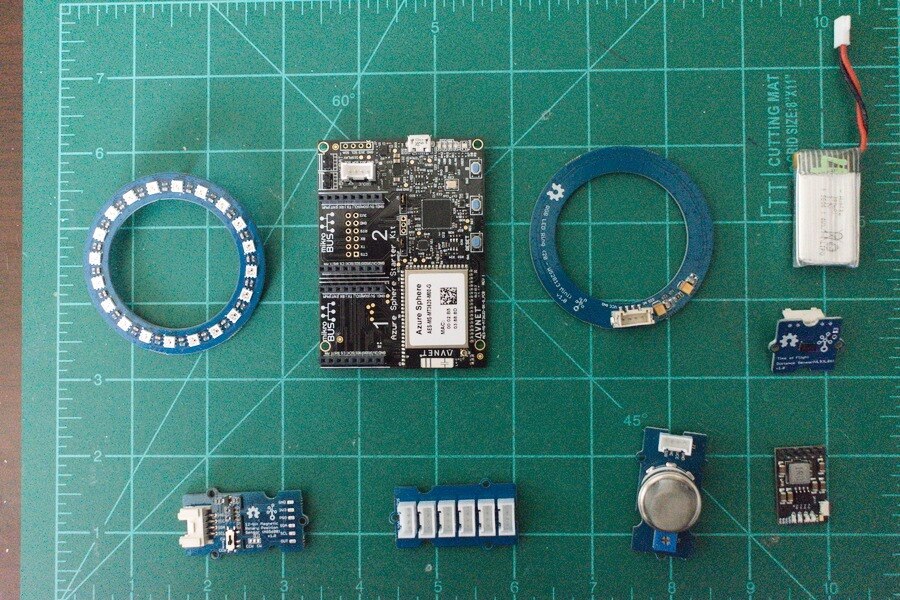
Parts
- Bearings x2 (Outer diameter 1.125 in and Inner Diameter .038 in)
- Spring
- Custom end caps
- Aluminum rod 0.36in diameter
- Cap screws (M4)
- Tap for M4 screws
- USB Breakout board
- Battery Charge Module
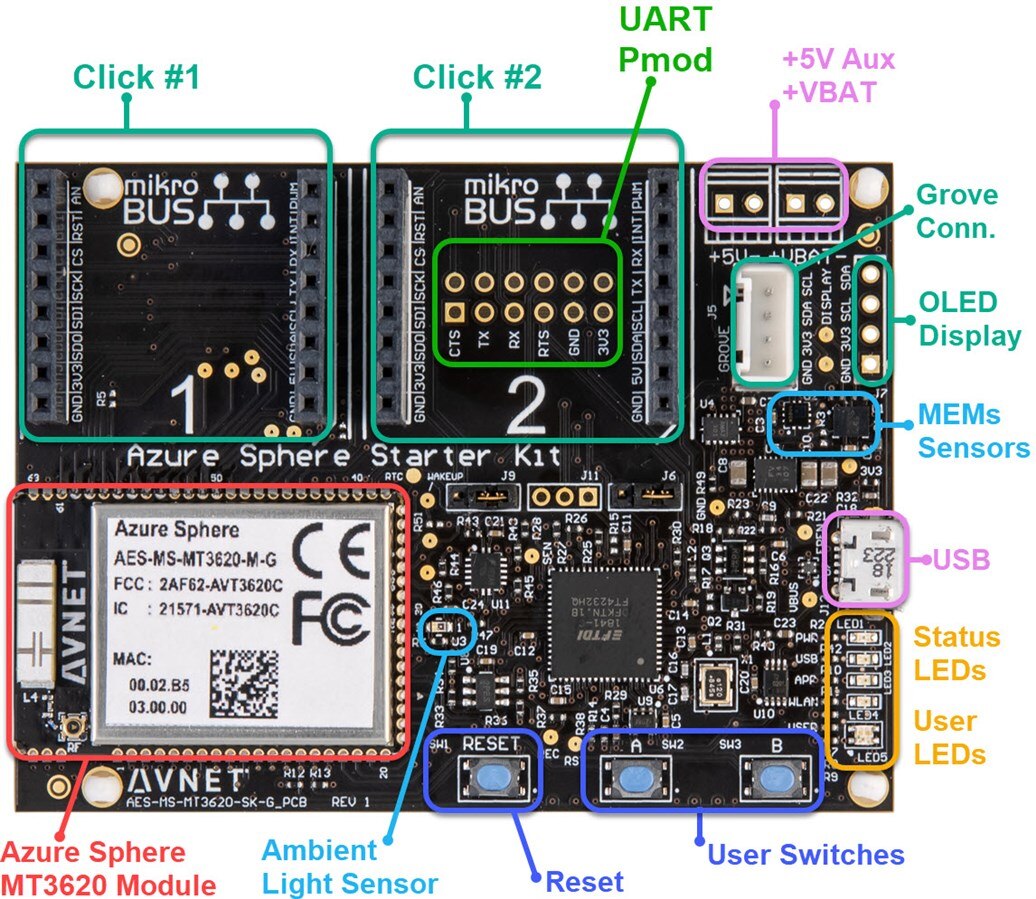
- Avnet Azure Sphere MT3620
- 2 Neopixel Rings
- Grove Rotary encoder
- Grove Lidar range sensor
- A good soldering iron
- Heat shrink tube
- Extra wire (salvaged wire is ok)
- Lithium battery salvaged form something else (or go buy one if you feel the need)
- 3D printer (yay!)
- JB Weld or some decent glue
- Thermoplastic just in case. As a maker, its a great tool to have on hand
- Arduino Nano (for now)
- An Azure subscription (can be free etc)
Inspiration
No matter who we are or what we do, we all need to poo. Some of use use toilet paper, some use a bidet. Toilet paper has a very significant impact on not only hygiene but also day to day life. Its such a simple thing we look past on a daily basis.. Until we sit down to do our business and well, notice when it is too late, that we are out of that precious paper. Obtaining that precious paper after the fact is no easy feat. Instead of asking someone to spare a square, maybe we should get smart.
One morning while umm.. doing my morning business, I was thinking of the many things I could make for my next project. I thought about many things that could make the world a better place, things in my home even, big, grand, ideas. I decided to get back to my desk and do some research, and went to grab for that paper, and it was then that I realized, I was out. Now running out of paper can be a problem, but it can be a much worse problem when there is an ongoing pandemic and the city is in lockdown. Not only would I not be able to cleanse my rear, but may also need to break quarantine to restock. How much of this do I need to last three months anyways? Then it hit me. Sometimes the things that change our life for the better, are the small things we interact with each day. Something basic, that goes unnoticed, until its a problem. I decided to make the Smart Toilet Paper roll. A roll to help me track my usage, and well, might look cool too.
Design and Concept
The first thing I did when I resolved my tissue issue, was to sit down and sketch. I drew a few designs, some were needlessly complicated, but I settled for something simple. Something I could print and design in a short time. Using Inventor, I designed the base and spindle that would house the electronics. I knew I would need to sense on dispense, so I settled for a Lidar range sensor and magnetic rotary encoder. Both should be simple. I also decided to have the option for status lights, so decided to design spots for two NeoPixel rings. This is what I came up with:


In theory, the range sensor would go in the square hole in the base, and the right side spindle would be pushed inward to hold the TP roll by a simple spring. A handle on the opposite side would be pulled to release and replace a roll of toilet paper. This helps accommodate variances in roll with and size. Both ends have panels that are screwed on with M2 screws that I have on hand, which i would later replace with M4 screws.
The model is included in the Git repo. At the time of writing, this is the prototype version where the next revision will include openings for USB (debug/programming and charging) and an additional channel for the pixel ring on the left side. For power and other electronics, i figured there was enough space and I would figure it out later. I wish I had thought to add a power switch -_-
Printing
Now its time to get to the fun part...
The Print Layout
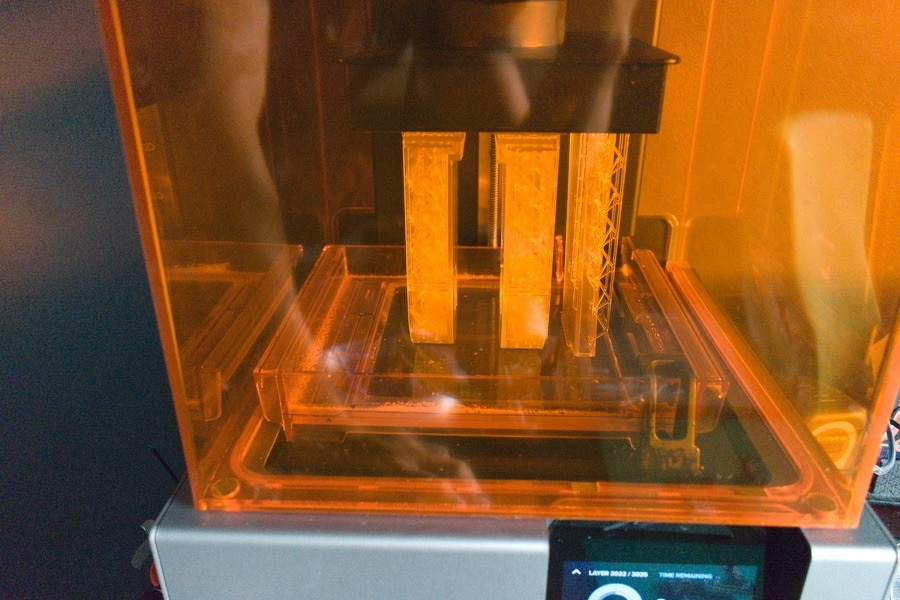
The printing took a full 24 hours. The model was also split into three pieces to fit in a Formlabs SLA printer. I used the standard clear resin because it is cheap and has many finishing options. After the first revision, assuming I could afford the materials and setup, I realized i should have used a blend of Durable and Tough resins.
The prints were laid out as seen below:


The print files will be included in the github repository
Print Day
After a full 25 hours of printing, the larger parts were completed! How exciting! I couldn't wait to get them out of the tank, but had to wait until later in the day (after work!).
Cleaning parts
With resin prints, cleaning and finishing is a critical process. It is important to get any excess resin out of the small holes and detailed areas. A good scrub down in Isopropyl Alcohol does the trick. Wear gloves and work in a ventilated space.


As you can see the process is quite messy. No matter what printing process you use, you will need to clean the support structures and any residue. Now we have some parts!
Next was to decide on a finish for the parts and the end product. Since it is a prototype, I thought keeping it clear would be a nice touch. It would better show the insides! I sprayed the parts with clear coat after maskign off parts where glue will be needed.
Assembly
Once parts are printed and cleaned, it is time to clear the table and cleanup a bit. That was messy and we don't want the mess to carry over. Work clean and the end result will be clean as well!
The first stage of assembly was pretty simple. The parts snapped right into place, but some improvising was needed to address a few oversights.
Simply assemble the parts into the case as shown. If you want to expose the USB on the Avnet MT3620, you will need to rotate it. I plan to update the 3d model to match.If you chose this configuration, some good glue will be needed to hold the board in place since the screws may not line up perfectly after rotating.
Be sure to put the NeoPixel rings in first, then the controller board, and last the rotary encoder and lidar sensor.


The Lidar should fit in the base, held in place with two small screws.
Cut the Rod
Using a hack saw, cut the rod into two pieces. Be sure to remove any sharp edges with sand paper.
- cut a piece at 1.125 inches long
- cut a piece at 3 inches long
The three inch aluminum dowel will need holes drilled in the center of both ends, and will need those holes tapped. Use the same M4 drill and tap used in other steps.
For the smaller aluminum dowel, only drill and tap one side.
Press in bearings
Next, select grab your bearings and push them into the two counter-bores located on the fronts of the left and right housings. It should be a snug tight fit as they slide in. It is important to not push too hard, it may be going in sideways and you do not want to crack your printed parts.


Tapping holes
Speaking of screws.. Once you identify the screw holes, drill the holes gently (by hand even) with a drill, and then tap the holes. A tap is a special tool similar to a drill that adds the threads to a hole for a screw to go into. Be careful when doing this, you will need to gently screw the tap in a half rotation, and back a quarter rotation, then forward another half rotation etc. This ensures that any plastic debris created when cutting the threads is evacuated, preventing the part from breaking. If you break a hole or stud, heat up some thermoplastic, and put it in its place. Push a screw in to form the threads before it cools, and you wil have fixed your threads if you broke something.
Here is a drill and tap chart for reference
Glue!
Things can get a little complicated here. The objective is to fuse the three parts together to make a solid base. Generally you can use some resin to fuse the parts, but since I generally use sunlight, and due to a tropical storm, wouldn't be getting any sunlight any time soon, I decided to rely on the tried and true J-B weld. I also used some thermoplastic after the J-B weld had cured to ensure a strong bond.
Make sure to sand the contact surfaces gently, then remove any dust or oil. Mix up a small batch of epoxy, you only need about a pea size from each tube to make enough. Don't rush, you have some time before it dries. It might also be nice to have a clamp to hold the parts together for about 4 hours before disturbing them.
Once the glue has set, I used a heat gun to liquefy some of the thermoplastic, and on the inside lined the seam. The thermoplastic sticks easily and fuses to the printed plastic, creating a nice strong bond! This step is optional, but the result is pretty good and I highly recommend.
The Spindle and Encoder
This step is a little tricky, and relies on some creative crafting. for a magnet, I went to my refrigerator, and found a strong but soft magnet, and cut a strip, off, then cut a cube from the strip. You want the north and south poles facing horizontal.
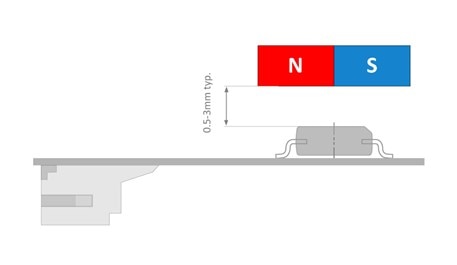
Mix up some more JB weld and glue the magnet to the end of the SHORT aluminum dowel opposite to the tapped end. Pile up some glue and stick that magnet on. Here is a very crude image of how the magnet should be glued:

Now that we have that complete, you need to secure the dowel to the bearing that goes into the housing. I recommend removing the electronics for now to be safe. Keep the rotary encoder close for sizing up a spacer.
The easiest way to do this, is use a small bit of tape on the inside of the housing with a scrap piece of plastic as a spacer. The spacer should push the magnet away from where the sensor will go by at least the height of the ship plus an additional 1.5mm. Push the dowel with the magnet going into the hole in the left housing (that holds the sensor). Get a feel for how this goes together, and then mix up some more JB weld. Add the glue to the inside diameter of the bearing and push the magnet end through, Try not to get glue on the magnet. Now make sure the tape is in place and the shaft is stuck in the bearing. Let it sit propped up and undisturbed for at least 4 hours. When done, you should be able to remove the tape and spin the shaft without any interference. Good job!
Now the electronics can go back into place.
Things are glued up, and looking good!
Final Assembly
Next its time to finish up. Put the two large round printed spindle parts onto the shafts and screw them in. Be sure to screw in the electronics. Some glue can be used for the neoPixel rings.
On the side of the base with the moving shaft where there is no controller or electronics, mount your USB port, the battery controller, neo Pixel ring, and battery. I used double sided tape to stick my battery to the cover.


Wiring
Get some wires and wire up the USB Power and Ground to the battery controller
- Connect Vin and GND to the USB Breakout board
- Connect the Bat and GND pins to the battery. DONT cross the wires!
- Wire the OUT 5V and GND to a long wire running under the base past the LiDAR sensor
- Connect the long wire from the 5v OUT to the Avnet MT3620 board on the 5V AUX and ground pins and NOT the battery header. That is not what you think it is


For reference:
For the sensors, you can splice together three Grove connectors. Use a soldering iron and heat shrink tubing for good results. The objective is to jsut solder together the matching colors so you have a cable with a grove connector on one end, and two on the other. This is a 'branch' as they call it, but really its just a janky cable. Plug the side with one connector to the Avnet control board, and the other sides to the liDAR sensor and the rotary encoder.
The LED rings are a bit of a problem, because they are not I2C and not really compatible on a branch like Seeed would like you to think. Really I regret using Grove components, because they are just basic sensors with basic over priced cables attached. Either way, IO have them so might as well use them. Things get a little complicated here, since this gets into the programming of the device.
As it turns out, the LED rings wont be compatible on the same bus as the sensors. Also there is no suitable driver, and time is running out. I decided to drop in an Arduino nano to get things going for now. The problem is the NeoPixels have strict timing requirements, which makes troubleshooting very difficult if you don't have the right tools. For one, an o-scope would be helpful in this case. Lacking the proper tools, I decided to settle for a less elegant solution to get this thing finished. The LED rings can be attached to the Arduino by wiring the 5v pin to a splitter with three wires. Two wires going to the pixel rings, and one wire going to the 5v output of the battery controller. Connect the ground wire in the same way. Next wire both yellow signal wires to pin D6 of the Arduino nano. I then programmed the Arduino with the boiler plate exmaple from Adafruit. And off we go!
Tuck the nano into the compartment with the battery for now. Later I will write a driver for the pixel ring so it can be controlled directly from the Avnet MT3620.
After that, screw on the panels and make sure all of the rollers are in place. Put the spring on the moving dowel between the roller and base for some added tension to hold the roll. And that is it, plug it in, charge it up, and off you go!
Programming
The next step is the device programming. For this, I used VSCode and the standard libraries. You will need to install the Azuire Sphere SDK and toolchain. Follow the directions located here
On Windows, Install the Azure Sphere SDK for Windows.
You may also need to install platform.io for VSCode and the azure-platform located here. Follow the instructions in the github repo and install the URL as an extension. This will add the Arduino libraries.
Once you are setup, pull the code from the repository located at the bottom of the post and build.
You may notice that I had to include Wire.C and H for Arduino compatibility. I could not use the entire Arduino platform because of some compatibility issues, but I did get to borrow some code and ideas from Georgi Angelov's big brain (the author of the plugin to add Arduino compatibility to the MT3620).
The code is a little messy around the rotary encoder driver because of time constraints, but it will be improved in time. The original code for the rotary encoder came from here but was modified to suit our needs and included in the project repo below.
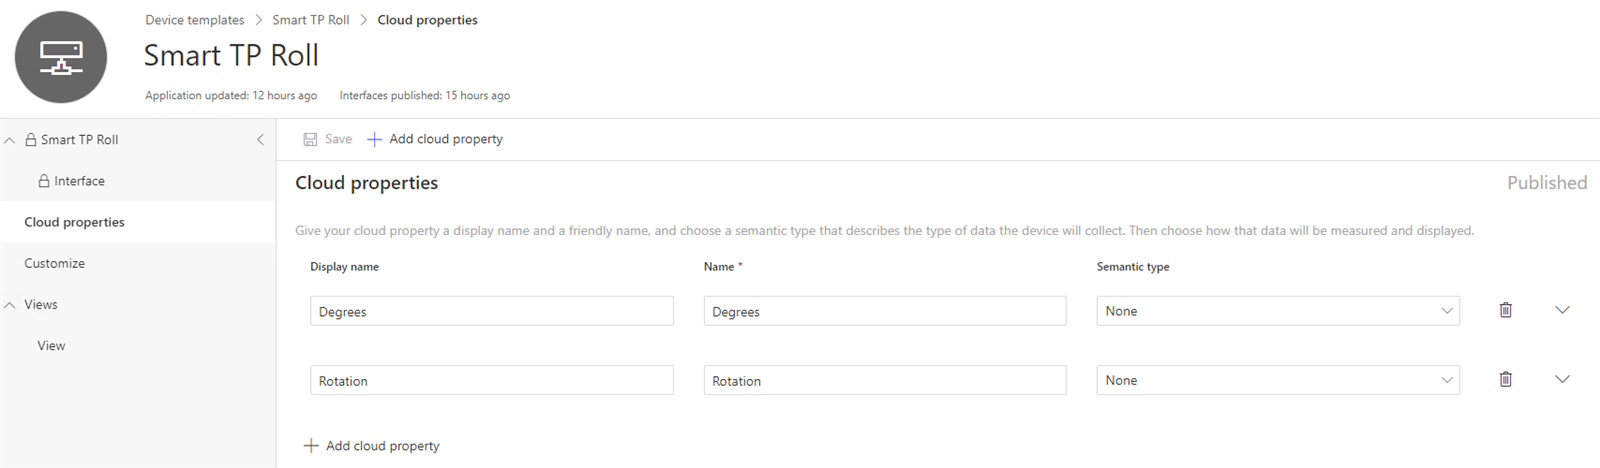
Once you have the code, you will also need to setup an IoT central application. The directions are a bit lengthy and I followed the steps provided HERE. Be sure to follow these steps carefully and make sure to pull the certificate from your IoT tenant and verify it. When creating the device template, be sure to add "Rotation" and "Degrees" as shown below:
Now its time to upload your code.
You can click the gear icon on the bottom of VSCode

And if all goes well, you should see no errors. Make sure your SmartTp roll is plugged into the USB port attached to the Mt3620 board. Next press F5 to start debugging. The program should upload and the device should be running!
Now plug in the Arduino Nano if you have not already. Make sure to install the Arduino Library located HERE. Then open the sketch located in the repo "SmartTp\Arduino\PixelRing\Lights.ino" and then build/upload. As soon as the program uploads, the lights will startup.
That is all for now on programming!
Cloud Stuff!
Next up is the cloud stuff. You should already have creatd your IoT central in Azure, and have a device showing up on the portal. You will need to approve the device and apply the template you created earlier. Once that is complete, you will start to see data flow!
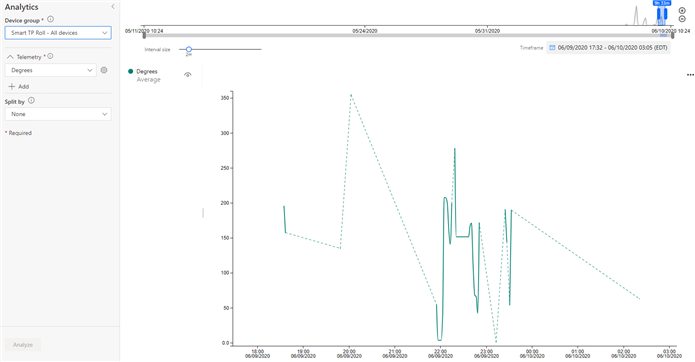
This image shows the sensor data from our rotary encoder. It will pulse up and down as degrees moves from 360 to 0. Each falling edge represents a new rotation on the roll. Rotation is currently not saved when the device powers off, but that is a planned feature. For now data will be sent and can be analyzed in the cloud!
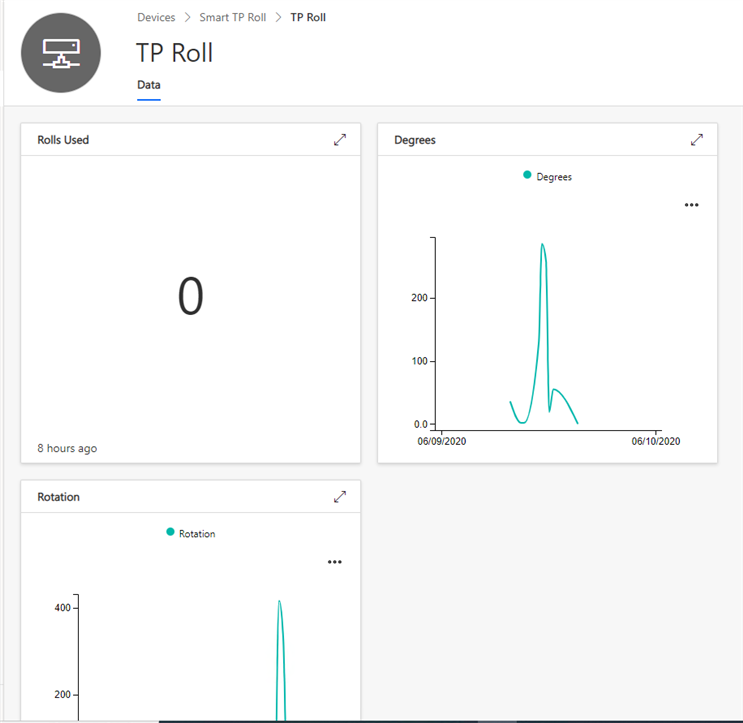
You can also create a nice dashboard to show the data. As I test more with the device, additional data will show up on the dashboard.
Conclusion
From here, there is a lot of potential. Much to be done. For one, I will need to write a LiDAR driver to detect roll changes.
Lets be honest, there is still much left to do:
- LiDAR driver
- Additional Data collection and analysis on consumption
- Driver for NeoPixel Rings
- Alerts (text or flashing lights) to let users know of TP Depletion
- Would like to have an 'inventory' tracking setup that automatically orders TP from amazon before i run out.
- Code cleanup
- Model changes to allow for USB access
- A power switch to turn it off
- Integrate a methane sensor
- Direction change detection
- Lengthen the base to support slightly wider rolls of TP
I will be continuing this project, for fun. Most likely i will also spray paint it a nice bathroom friendly color before its final installation, and will likely need to make a 2nd revision.
Below is the github repository with everything needed to build and program the device!
Happy hacking!
- Robert Lisiecki
- Feedback is appreciated!
GitHub Repository:
The files for printing can be found in the STL folder.
UPDATES:
6/26/2020 - Lidar Update
I have updated the source repo to include some new code to get the LiDAR sensor working. It works pretty good so far, but still needs a little work for reliability and application specific tweaking. Also the data will need to be sent with telemetry in the next update. I ported over C++ Arduino code to do the job and refactored some of the project layout. Overlal its pretty good, but I wouldn't use the code to land airplanes, dock space ships, or teleport through space and time, since there are most likely reliability issues that need to get worked out  . I will likely create a new post on the LiDar topic.
Top Comments